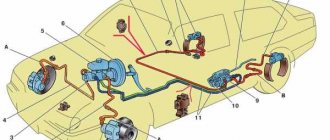
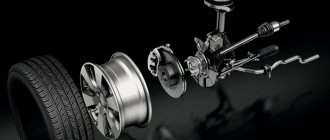
VAZ 2114 brake system diagram
The design of the VAZ 2114 brake system is very simple and understandable. The system is dual-circuit, equipped with a hydraulic drive. When you press the pedal, pressure is generated which activates the cylinders. Dual-circuit structure - this means that when you press the pedal, the force is transmitted to each pair of wheels along its own contour. Its distribution occurs diagonally. In this case, the right rear wheel works together with the left front, and the left rear - with the right front. This principle ensures effective braking of the machine, even if one of the circuits fails. The diagram of the brake system on the VAZ 2114 looks like this:
- Main brake cylinder VAZ 2114 (GTC).
- Metal pipes of the 1st circuit.
- Flexible hose for front mechanisms.
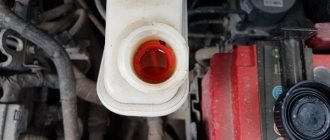
- Liquid reservoir.
- Vacuum brake booster.
- Metal pipes of the 2nd circuit.
- Rear wheel cylinders.
- Brake pressure regulator drive lever.
- Flexible hose for rear mechanisms.
- Pressure regulator.
- Pressure regulator bracket.
- Pedal.
The GTZ is responsible for creating pressure in the entire system. It is distributed along the contours and transmitted through them to the wheel brake mechanisms of the car.
Useful : TOP 7 reasons why the steering wheel on a VAZ 2114 shakes
The vacuum booster makes braking simple and effective. Thanks to its operation, less effort is required from the driver to brake in a timely manner when danger arises. The pressure regulator provides the necessary braking force, taking into account the load on the rear of the machine. This gives the car greater stability and prevents the rear wheels from slowing down too early or late.
HOW TO ADJUST HYDRAULICS PRESSURE
As you know, hydraulic drives use fluids and pressure in the system instead of conventional mechanics, where any force is applied either directly or through transmission mechanisms. The key to clear hydraulic responsiveness is the presence of the required amount of brake fluid in the system and, of course, correctly adjusted pressure.
To properly adjust the pressure in the drive, you need to find an assistant. Doing this work alone is extremely inconvenient, and for the final test you will need an outside perspective.
The VAZ 2114 brake pressure regulator allows you to adjust the operation of the brakes to the required level. To do this you just need to do certain things:
- First you need to drive the car into the pit and rock its rear end. This will bring the suspension to the middle position, and this is exactly what needs to be achieved;
- Then slightly unscrew the front bolt on the VAZ brake pressure regulator mount;
- Using a screwdriver, make a small gap (2 mm) between the lever and the spring. For convenience, insert wire or whatever is at hand. A special protrusion on the lever allows you to move it to achieve the desired clearance;
- Tighten the previously loose bolt.
Now you need to check whether everything was done correctly. Accelerate to 35-40 km/h and brake. If the car does not drive away, then everything is done perfectly. In addition, you need to check the wheel locking sequence. Here you need a second person who will see how smoothly the brakes of the VAZ 2114 work. The whole point is that when working correctly, the front wheels should lock a little earlier than the rear ones. If this happens, then the system is set up with a bang.
If the front wheels lock later, the clearance must be increased. It is also possible that the rear wheels will be very late, in this case we reduce the gap. After completing all the work, securely tighten the regulator mount.
It is important to consider that all tests should not be carried out with flat tires. The result depends on this, and accordingly the brake system can be adjusted incorrectly. The tire pressure of the VAZ 2114 must meet the requirements specified in the vehicle documentation.
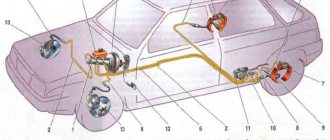
Operation diagram of the VAZ 2114 brake system
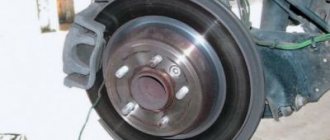
Front brake device for VAZ 2114
The front brakes of the “four” consist of the following parts and mechanisms:
- Brake disk. It is connected to the wheel hub and rotates with the car wheel.
- The pad guide is a holder for the pads and a base for the guide pins.
- Caliper. Responsible for uniform transmission of force from the pads to the disc.
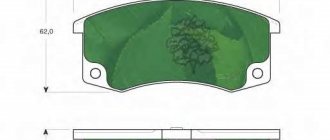
- Brake pads. When you press the pedal, the disc is compressed on both sides. This results in slower movement.
- Cylinder. A sealed cavity in which the piston moves.
- Piston. Hydraulic fluid pressure presses the pads against the disc during braking.
- Seal ring. Serves to seal the system.
- Cover to protect the guide pin from dirt.
- Guide finger. Ensures uniform movement and adhesion of the pads to the disc with the entire plane.
- Protective cover. Protects the disc from contamination.
The front brakes of the VAZ 2114 are disc. They provide automatic adjustment of the gap between the pads and the disc.
Symptoms of a problem
With a calm driving style and regular maintenance of the brake system, the GTZ will serve without interruption for many years. Cylinder output increases with frequent vehicle use in city traffic.
Frequent and prolonged stops accelerate the wear process of the turbocharger, which is reflected in the manifestation of the following symptoms:
- When you press the brake pedal, the car stops slowly, although the fluid level and the condition of the discs and pads are normal;
- To effectively brake, you have to press the pedal with serious force;
- Short brake pedal travel is another sign of a worn cylinder;
- Sudden failure of the pedal and “grabbing” of the brake at the end of pressing;
- Incomplete disengagement of the calipers, which leads to friction of the pads on the discs.
The listed symptoms of a faulty master cylinder manifest themselves in different ways, but always mean there are problems with the braking system. The braking system in your car requires regular maintenance. Despite the simplicity of the design and reliability, diagnostics of the design should be carried out every maintenance. Regular replacement of pads, installation of new brake discs, replacement of fluid, elimination of leaks from pipes - all this ensures the smooth operation of the system as a whole. The GTZ plays a crucial role in this design, because Braking efficiency directly depends on the correct operation of the cylinder. In addition to the GTZ located under the hood of the car, there are other elements in the system that are responsible for stopping the car. Often, in addition to the main brake cylinder, it is necessary to replace the front brake cylinder on a VAZ 2114. It is located on each caliper and is responsible for actuating the pads.
A faulty front brake cylinder on a VAZ 2114 leads to a wedge in the mechanism and friction of structural parts. If the front TC fails, the car begins to move to the side when braking, and extraneous noise comes from the wheel.
Rear brake device for VAZ 2114
The design of the rear brake system of the VAZ 2114 is as follows:
- Hub nut
- Hub flange. The brake drum is attached to it
- Lower tension spring
- Left pad
- Thrust spring
- Cylinder
- Upper tension spring
- Guide bar
- Eccentric
- Right pad
- Pad cover
The car has drum brakes at the rear. This design has been time-tested and is considered very effective. In addition to the above elements, it also includes a parking brake. It ensures reliable fixation of the car even on an inclined surface while stopping or parking. The handbrake on the VAZ 2114 has the following structure:
The braking system of cars of this model is quite reliable and durable. But it also needs regular maintenance. To ensure effective braking, it is necessary to change pads and discs, as well as drums and other elements in a timely manner. System parts require regular inspection to identify external damage and defects. When they are identified, broken elements are replaced, even if their scheduled replacement period has not yet arrived. Particular attention should be paid to the serviceability of the handbrake; you need to monitor the condition of the cable. If the handbrake does not provide reliable fixation of the car on an inclined surface, then the cable needs to be tightened or replaced. It is wrong to leave a car in a parking lot in gear. The parking brake is used for this. Driving with a faulty brake system is illegal and very dangerous. Sudden brake failure can cause a serious accident with unpredictable consequences. Therefore, the system requires regular inspection, maintenance and repair when faults are identified. You can usually check and repair your brakes yourself. Contacting a car service is required in difficult cases and when the owner is unsure of his own abilities.
DEVICE OF BRAKE MECHANISMS
Many people wonder what is the difference between the brake mechanisms of the front wheels and the rear ones. The fact is that when braking, they are subject to different loads, and they do not operate synchronously. But this is not the main reason for the differences.
The front mechanisms consist of:
- Brake disc of classic design;
- Direction pads;
- Calipers;
- Directly the pads themselves;
- Cylinder;
- Piston;
- Seal rings;
- Protection casing;
- Direction finger;
- And its cover, which performs a protective function.
The design of the front brakes is a little simpler than the rear, however, this does not mean that they play a lesser role in braking. After all, these are the mechanisms that work first.
- Nuts that secure the hub;
- Actually, the hub itself;
- Tension springs (lower and upper);
- Brake pads;
- Directional springs;
- Wheel cylinder;
- Expansion bar;
- Handbrake lever finger;
- Handbrake lever;
- Mechanism casing.
As we can see, this difference in design is caused by the presence of parking brake elements in the rear mechanism. Therefore, the part itself looks much more massive. The operating principle of the hydraulic part is the same as in the front. The only difference between the rear brakes is this.
A simple diagram of the VAZ 2114 brake system allows you to easily carry out any repairs yourself. Spare parts for domestic cars are inexpensive and quite common, which greatly simplifies operation and repair work. This is why VAZ cars are in such demand and provide good competition to foreign cars.
How to tighten the handbrake correctly
The handbrake, or in common parlance “handbrake”, is a “permanent brake” and is used when parking a car, parking on a slope, and is also used by masters to perform complex tricks.
The parking brake blocks any spontaneous movement of the vehicle. The handbrake is activated using the handbrake lever, which is mounted on the dashboard along with the gearbox. The handbrake is an important and irreplaceable thing, but still not all drivers use it. The fact is that the car can be put in gear, and then it will not roll away anywhere. But if the slope is very steep, then the gearbox is no longer able to help, and in general, many novice drivers cannot imagine normal driving without a handbrake.
Aluminum brake drums
Now they are the most advanced. Why? Yes, they simply weigh little, and manufacturers are trying their best to lighten the weight of the car and, in particular, reduce the load on the axle.
Therefore, this material is now being used more and more often, what other advantages are there:
- As I already wrote, this is weight. Aluminum can weigh up to 50% less than the same cast iron version.
- Price. Not to say that they were cheaper just like that, after all, they are non-ferrous metal. But due to the mass, the difference in price is quite significant. About 30% cheaper.
- Cooling. This is really a big plus, we all know that during prolonged braking, say in the city, the discs and drums literally get hot. Aluminum conducts heat well, meaning it heats up quickly and cools down quickly. Therefore, drums made from it perfectly remove heat and cool quickly enough. Also, you can often see ribs on them, for even greater heat dissipation. It is worth noting that the more the drum heats up, the more effective the brakes decrease, and the pads simply begin to “float”. Cooling saves the situation and efficiency is maintained.
- Corrosion and aesthetic appearance. Yes, it should be noted that aluminum practically does not show any signs of rust or other decay. Thus, the outer and inner surfaces always remain clean. It is practical, and also aesthetically pleasing; there is no need to tint or maintain it. This is definitely a plus.
But this system also has disadvantages and they are also significant, let’s take it in order.
- The very first disadvantage is greater wear on the disc. Aluminum is a soft metal and therefore wears out quickly. You will change much more often than your opponent.
- They get very attached. This material sticks very strongly to the place of attachment, and it is not at all easy to remove them.
- Fragility. If you plan to remove them, then you must have special pullers, otherwise there is a high probability of breaking the drum, it is very fragile.
- With strong heating, after falling into a puddle, the geometry can change. What will affect the quality of braking?
To be honest, aluminum drums are not as durable a product as, say, cast iron. They really break very easily. Let’s say your rear wheel is stuck, the brake lining is torn off due to high wear, you won’t be able to just remove it and look inside, and if you hit it with a hammer, you’ll simply break the drum. In this regard, the opponent looks much more profitable.
Features associated with replacing a brake drum
Some of them (relating to annual prevention and the use of proper lubrication) have already been mentioned. Another important point is that if one of the drums wears out and is replaced, the second drum must be replaced (even if it has less wear). This rule is strictly mandatory and has no exceptions.
Brake drum installation
In addition, in case of almost all damage - cracks, chips, grooves, and others - the drum should be replaced; it cannot be repaired. The only case when the situation can be corrected is if there are small bevels (in this case, you can turn the part on a lathe until you get an even round shape). True, after this operation you should check its diameter - if after grooving it exceeds 201.5 mm, then such a drum can no longer be used.
Lada 2114 2012 - self-repair
Comments 7
Participate in the discussion can only registered users.
Like brake fluid, tell me =) There is a difference between taking a cheap one and yet one that is more expensive.
This is a very abstract question. You can't feel the difference with your feet. I only took it because of the brand. And her color is not the same as everyone else's. Definitely not a fake.
This is why I asked Mish, the front brake hoses were changed and at that moment we bought the fluid from the common people (turtle-antifreeze synthesis), the fluid was replaced not so long ago, but became dark. It was bought in a hurry without any problems, the main thing is that Dot4, but The manufacturer makes no difference. Now I’m thinking of changing the hoses in a circle and filling in something more solid.
This one doesn't seem to get dark. Most likely your new one is mixed with the old one. Buy Castrol. Bleed the entire system and everything will be ok
Features of operation
By paying attention to the following signs, you can determine that the brake system needs adjustment or repair:
- If the pedal does not have the usual tension, then air has entered the system. It can be removed by completely disassembling and sealing the system.
- Vibration or excessive disk runout occurs. This defect is caused due to damaged disks. The problem is solved by grinding, but if the thickness of the discs becomes less than 11 millimeters, then replacement is required.
- If grease appears in the parking space, it means the sealing rings are worn out.
Source
Necessary tools and spare parts
Repairing your car yourself allows you to save money and gain experience in car maintenance. Having a minimum set of tools allows you to repair most components and parts of the “four”. To replace the GTZ you will need the following tools:
- Keys at 10, 13, 17;
- Pliers;
- Rags and brush to remove dirt;
- Device for unscrewing fittings;
- Brake fluid and syringe for pumping it out;
- New GTZ.
If there are problems with this element, it is recommended to change the assembly mechanism, because Repair kits when installed in an old cylinder body will not give the desired result, because development inside it will not allow the new part to return to efficiency.
Working principle of the parking brake
To keep the VAZ 2114 car stationary when parked, it has a manual mechanism (parking brake). This unit is especially important when the car is parked on an inclined surface. The handbrake and rear brakes are interconnected.
The “drums” are connected to the parking brake lever using a metal cable. When the lever is lowered, the pads are pressed against the discs, thereby blocking the involuntary movement of the wheels of the VAZ 2114. This unit is rarely used, but the vehicle’s operation and maintenance manual states that the parking brake also needs to be adjusted.
Step by step procedure for replacing pads
When replacing pads, you first need to take care of your safety. To do this, place the machine on a level surface. Place wheel chocks, wedges or, in extreme cases, stones under the rear wheels. It is better under both wheels or diagonally from the lifted front one. And set the car to the parking brake. The further procedure will be as follows:
Start on the right side, so turn the steering wheel all the way to the right. Open the hood and brake fluid reservoir cap. If the level is close to the maximum, pump out the liquid to the minimum level. Loosen the wheel bolts, but do not unscrew them completely. Raise the car with a jack. Unscrew the bolts and remove the wheel. Clean the caliper from dirt with a brush and remove dust with a rag. Try to push the brake piston into the cylinder. To do this, rest your thumbs on the caliper, and with the rest, pull the bracket with the brake cylinder towards you
If that doesn’t work, then carefully, so as not to damage the rubber seal, insert a slotted screwdriver between the block and the piston and try to press it into the cylinder. Use a 17 key to hold the nut, and use a 14 key to unscrew the lower and upper guide bolts of the caliper. Remove the caliper bracket and tie it to the spring. Remove the brake pads. Check the condition of the rubber protective seals and replace them with new ones if necessary. Unscrew, lubricate and reinstall the guide bolts. Insert new pads. The block with a wear indicator is installed on the inner side. Check whether the brake piston is completely recessed into the cylinder
If not, you'll have to press it in. To do this, press the piston with adjustable pliers or sliding pliers. Be careful not to damage the rubber cuff! The lack of pliers or pliers is not a problem. Use another method. Attach an old block, or better yet two, to the piston, with the entire plane, insert a wheel wrench into the window of the bracket and press the piston. It is not recommended to do this with a bracket screwed to the caliper. In this case, you will hit the brake disc with the key and may damage it. Reinstall and screw the bracket. Also holding the nut with a 17mm wrench. Install the wheel and tighten the bolts. Lower the car and be sure to finally tighten the bolts. Remove the jack, turn the wheels the other way and move on to the next wheel.
Replacement of drums
So, you will need the following tool and material:
- The wheel wrench is set to “19” or “17” (depending on what bolts are on the wheels).
- Jack.
- Keys for “7”, “10” or “12” - depending on the size of the guide pin.
- Hammer.
- Wooden spacer.
- Penetrating lubricant WD-40.
Having this entire arsenal, you can start replacing. First of all, loosen the wheel bolts and lift the side to be repaired. Of course, the car must be secured - place stops under the front wheels. Next, remove the wheel and unscrew the guides. With their help, the drum is held on the hub.
The next step is to remove the VAZ 2114 drum with your own hands. This can be difficult to do as the metal may have become stuck to the hub. Try treating all contacting surfaces with penetrating lubricant, tapping them with a hammer, and then, applying even blows to the back of the drum, carefully remove it from the hub. It is advisable to install a new one only after the entire surface has been cleaned. There should be no problems with installation. It is advisable to screw in new guides as well - old ones may have defects. Reinstall the wheel and use a similar scheme to replace the VAZ 2114 brake drum on the second side. This completes the repair.
Which brake cylinder should I choose?
Before starting work to replace a worn part, you should decide on the choice of replacement. In addition to the original GTZ, there are other analogue parts.
Most often, 2114 owners prefer to buy factory spare parts, so first let’s look at the advantages of parts from LADA:
- Reasonable price – about 1700 rubles;
- Good quality. The factory version of the GTZ runs for 70-100 thousand kilometers.
The disadvantage is the large number of fakes. We recommend purchasing parts in packaging.
When choosing which brake cylinder to choose for the VAZ 2114, you should consider the option from HOFER. The German analogue differs from the factory version in the quality of the material and lower price. The part number is HF 244102. The price of the spare part is about 1200-1400 rubles. Reviews from owners of cars with an installed HOFER GTZ do not highlight the disadvantages of the spare part, so the option can be safely considered for purchase. Replacing a part is easy, so any of the GTZ options can always be replaced with a factory one. The abundance of analogue spare parts for VAZ allows you to choose parts in different price segments. For stock fans, we recommend taking the factory version from LADA.
Source
Brake drums cast iron or aluminum
Some drivers wonder which brake drums are better, cast iron or aluminum. And this is not surprising, because the material is different, it has its pros and cons. All this needs to be understood in order to answer the question posed. Of course, when choosing, each driver relies on his own knowledge and reviews. It is worth remembering that not only your safety, but also the comfort of movement depends on the quality of brake drums.
It is worth focusing your attention on this matter and carefully examining the presented models. There are currently two types of brake drums:
- Cast iron;
- Aluminum.
Which brake drums are better, cast iron or aluminum - this is a question that arises among many drivers. The safety of not only the driver, but also the passengers depends on this.
It is very important that the system works like a clock, without failures or jams. Of course, at the first malfunction they can be easily changed
But this is extra money and time. There are times when the brake drum simply sticks to the base and is not very easy to remove.
You have to resort to physical force, spend extra effort and money. To prevent this from happening, it is necessary to regularly check the brakes and lubricate them. It is not very easy to answer this question, since cast iron and aluminum have their own characteristics, pros and cons. We will talk about them further.
Many can say that this material is very popular and lightweight. It can compete with cast iron drums, which is not surprising. The main advantages include:
Price category. This part can be purchased much cheaper than cast iron. The fact is that during production it does not require a lot of time and money;
Weight. The aluminum drum weighs almost nothing, which is great. Due to this, the driver will not have problems with servicing the system, removing the drums;
Corrosion. This material is absolutely not susceptible to corrosion.
This is very important for any driver, since you will not have to spend additional money to prevent the process;
Cooling. The material cools down very quickly, which is important.
As for the disadvantages, they include:
- Low wear resistance.
That is, the material will not last very long; the drums will have to be changed regularly. And this means additional money and time; - Complete intolerance to temperature changes.
During this process, the material cracks and bursts; - The geometry doesn't hold up well.
That is, with a strong impact, deformation occurs; - Sticks very quickly at high and low temperatures.
You have to resort to physical force and a sledgehammer to somehow remove them. And this is extra effort, money and time. In addition, an incorrect impact can damage not only the drum, but also the brake mechanism itself.
In addition to all this, defects occur during production, and quite often. Because of this, manufacturers do not make aluminum drums as often.
Cast iron brake drums
Needless to say, this metal is much stronger, but also many times heavier than its opponent. Some manufacturers sacrifice suspension lightweighting and still install cast iron on their cars.
There are a number of reasons for this, but as you probably guessed, they stem from the competitor’s disadvantages, let’s list:
- Durable. A very durable option in terms of wear and tear.
- The sticking is not so strong; in extreme cases, you can beat them off with a hammer; here you are unlikely to damage them.
- Do not deform from temperature loads.
That's all! Of course there are more disadvantages.
- It is much more difficult to cool down, because of this, braking efficiency decreases.
- Heavy. Create a large load on the vehicle axle.
- Prone to rust. You have to paint the outside, they don't look aesthetically pleasing.
By the way, here is a short video after painting such a drum.
Differences in the operation of rear and front mechanisms
The rear brakes in Lada Samara models have a drum operating principle. The system is equipped with special pads that differ from the front mechanism in their semicircular shape. Due to their static location, they move apart to the sides, thereby slowing down the wheel. In simple words, the elements are pressed against the disk and cause the VAZ 2114 to slow down when the corresponding pedal is pressed. The rear brakes are equipped with a ventilated mechanism, but its operation cannot be called effective. At high speeds, you can even visually notice how the rear wheel disks heat up.
The front wheels of the VAZ 2114 are equipped with disc mechanisms, which include calipers and pads. Their operating principle is the same as that of disk ones, but in these mechanisms the calipers also take on the load. The wheels are slowed down by increasing the pressure of the working fluid. Ventilation is also provided here. A disk system works an order of magnitude more efficiently than a drum system. In order to save money, the rear wheels are equipped with primitive mechanisms.
Removing the rear brake drum
Now let's look at the most important thing - how to remove the rear drum on a VAZ 2114, what tools are needed for this and how to then install a new one instead of the old drum.
To begin with, it’s worth saying that it is strongly recommended to remove the rear drums at least once a year (and if more often, even better), even if there is no indirect suspicion of their wear. This is due to the fact that brake drums, which have been standing in place for many years, become very sticky, and they can only be removed by pouring them heavily with VeDeshka and using enormous force (which can result in harm to both the motorist and the car).
That is why, preventive annual dismantling of the drums, their inspection and installation in place is a guarantee that in the future there will be no problems with such an operation.
Treating the drum with WD-40
And so, let's move directly to removing the brake drum.
First, let's collect a set of necessary tools:
- jack;
- wheel wrench (17 or 19 - depends on the installed wheel bolts);
- wrenches 7, 10 or 12 - depending on the size of the guide pin;
- hammer;
- a wooden plank (as a spacer when working with a hammer - so as not to damage the metal parts);
- lubricant like WD-40 or similar in properties.
Regarding the last point, you should immediately make a clarification - you need to use exactly the specified lubricant or as close as possible to it. The use of any other liquids - solvents, kerosene, gasoline and the like - is strictly not recommended. Now let's look at how to remove the rear brake drum on a VAZ 2114.
This should be done according to the following scheme:
- securely stop the car (put the handbrake on and place a shoe under the wheels);
- raise the rear of the car using a jack (roll or bottle);
- remove the wheel;
- thoroughly and generously treat all joints with VeDe-40 type lubricant;
- wait about 5 minutes (so that the lubricant has time to act) and remove all dirt with a rag;
- unscrew the mounting pins;
- carefully apply a series of blows to the edges of the drum (through a spacer or using a rubber/wooden mallet) until it begins to move by hand;
- remove the brake drum.
Removing the brake drum using a hammer
Installing the new drum in its place is done in exactly the same way, but in the reverse order. Also, there is another, often faster and at the same time safer, way to dismantle the old drum (you can also try it in a situation where prolonged hammering did not lead to success and the part did not move from its place).
This should be done as follows:
- fix the car in place and hang it up (all as in the previous method);
- remove the wheel;
- unscrew the two installation bolts from their sockets;
- screw the same bolts into the other mounting sockets of the drum (there are four of them on the drum - two have bolts screwed in, the other two are empty);
- begin to gradually tighten one bolt, then the other, so that their heads always remain parallel to each other (in order to achieve this, you can turn each bolt half a turn in turn).
Removing the brake drum using bolts
Thus, passing through the drum and resting on the reverse side, these bolts, when tightened, will pull it out of place, as a result of which the entire dismantling process will be as safe as possible and will not cause any damage to the car parts.