The VAZ 2108 is the first-born of the front-wheel drive “eight” family of cars from Tolyatti. This is a debut model that did not have an Italian prototype, and was completely developed by domestic designers. The family, in addition to the three-door hatchback VAZ 2108, included the five-door hatchback VAZ 2109 and the sedan VAZ 21099. Their brakes are designed exactly the same.
Brake device VAZ 2108,09,10-15
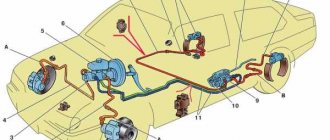
The brake drive of the VAZ-2109 car has a classic version, based on a dual-circuit hydraulic (liquid) operating principle.
The drive circuit includes:
- brake pedal;
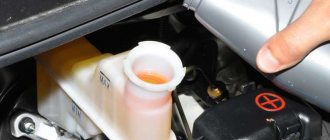
- expansion tank (with liquid level sensor);
- vacuum brake booster;
- master cylinder;
- hoses and pipelines;
- wheel cylinders;
- pressure regulator.
Compared to rear-wheel drive models, the VAZ-2109 brake system has some improvements in components and assemblies - master and working cylinders, vacuum booster, pressure regulator, mechanical parts, etc.
However, these changes are of a highly specialized nature and are understandable only to professionals who provide car service and repair.
Such a scheme for the functioning of independent circuits significantly increases the safety of braking and minimizes the possibility of a general failure in the operation of the braking system. It allows you to compensate for faults in one circuit by redistributing functions to another circuit.
The parking brake system of the VAZ-2109 (in driver's parlance - “handbrake”) is based on the mechanical cable principle of extending the rear shoes and blocking the brake drums. It has some improved technical solutions (compared to the “classics”), which greatly facilitates its repair.
General structure of the vehicle
Speaking about the braking system of the VAZ-2109 car, it should be recognized that it would be more correct to use the term “VAZ-2108 braking system”. It was on the G8 that the scheme of the specified vehicle was implemented. The components, parts and assemblies of the new product have been refined and optimized. But the new braking system was not fundamentally different from the braking system of Russian rear-wheel drive cars.
The “nine” vehicle is represented by a working and a parking vehicle.
The structure of the working vehicle includes:
- a brake mechanism, the functions of which include direct braking;
- a brake actuator that serves to convert and deliver the driver’s command to brake and the effort he exerts for this.
The operation scheme of the VAZ-2109 brake mechanism is based on the operation of friction mechanisms that implement the principle of friction of parts.
The brake mechanisms themselves are located in the wheels and are made up of a rotating part (disc or drum) and a stationary part (special pads). Domestic cars of the VAZ family use a disc principle on the front wheels and a drum principle on the rear. The latest VAZ-2109 models began to be equipped with an electronic system for monitoring the wear of the front pads.
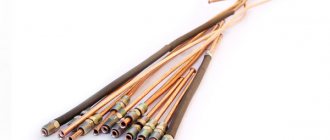
Brake fluid leak
You can find out where the brake fluid goes only by visually inspecting the brake valves, front calipers, and rear cylinders. The presence of drips will indicate a leak. If the fluid leaves, but no traces of it are visually visible, most likely the master brake cylinder is to blame, which allows fluid to pass into the vacuum brake booster chamber. This problem also does not arise instantly and before reaching a critical point, when the pedal goes to the floor and the brakes do not work, it will lose elasticity for some time until air enters the system.
There can be quite a few reasons, but the main ones can be outlined as follows:
- wear of the cuffs of the main or working brake cylinders;
- wear of the mirror surface of the working or master cylinder;
- violation of the tightness of the brake hoses on the front struts of the VAZ 2109;
- fluid leakage due to wear of brake pads due to a critical increase in operating
- stroke of the working cylinders.
In short, the easiest way to deal with a brake fluid leak, especially an obvious one, is to simply eliminate the cause of the leak and bleed the brakes.
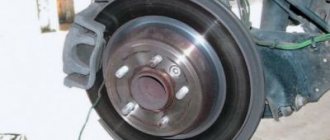
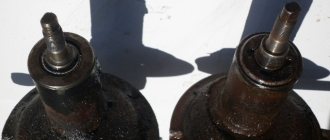
HOW TO REPLACE REAR BRAKE CYLINDERS
Smudges on the brake flap or the inside of the wheels most often indicate poor condition of the seals, less often the failure of the piston - the formation of scratches on it, which caused a seal failure. Repairing the brake cylinder is possible, but most often it needs to be replaced.
Work order
So:
- The VAZ 2109 is placed in first gear and the wheel is removed.
- The drum and brake pads are removed, which can only be disconnected, and the upper spring tie is removed.
- Using a metal brush, remove dirt from the bolts that secure the cylinder to the brake flap and the brake pipe. The bolts are loosened.
- The brake pipe is plugged with a rubber cap or a piece of wood.
- The tube unscrews completely.
- The bolts securing the brake cylinder are unscrewed, while holding it with your hand from the reverse side. The part is removed.
- The new cylinder is installed in the reverse order.
- After completing the work, it is necessary to bleed the rear brake circuit.
Bleeding the brakes
If during the repair process the components of the brake system were removed or disassembled: the vacuum booster, brake cylinders or lines, air may enter the system. When replacing elements in one circuit, you can bleed only in this circuit; in other cases: when removing the master cylinder or replacing brake pipes, the entire system requires bleeding. When performing work, you need the help of another person, brake fluid, rubber and vinyl tubes, and a plastic bottle. Leveling sequence:
- Right rear and left front wheel; left rear and right front:
- The caps are removed from all fittings. Their tightening is weakened.
- New fluid is poured into the reservoir.
- An assistant should press the brake pedal seven to nine times to
Increase system pressure:
- Continuing to press the pedal to the floor, a rubber hose is put on the fitting, its tightening is loosened, and air is released from the system along with the brake fluid. It is clearly visible by the air bubbles escaping into the plastic bottle. One end of the hose is lowered into the liquid, as shown in the photo.
Bleeding brakes VAZ 2109
- The fitting is screwed in and the pressure is built up again.
- This operation is carried out until the entire system is pumped until all the air comes out of it. During pumping, the liquid level in the tank is periodically checked.
- All fittings are pulled through and rubber caps are put on to protect against contamination.
- Brake fluid changes when its lubricating properties deteriorate. This subsequently leads to increased wear on the caliper cylinders in the brake system, which push the brake pads out and press them against the rotor. The instructions recommend replacing the brake fluid after two or three years.
Replacing brake fluid
Tip: When working with liquid you need to be very careful. The toxic composition must be washed off immediately with soap and warm water. When adding to the tank, make sure that the solution does not get on the plastic.
So:
- When pumping the brakes, air is displaced from the system; when replacing old fluid with new fluid, pumping continues until clean fluid comes out of the fittings.
- You need to drain the old one from all wheels, crosswise. During operation, it is necessary to periodically add brake fluid.
Ineffective brake operation
It is much more difficult when the system works, but is inefficient or unstable. There may be a lot of surprises here. For example, if the right and left brake cylinders operate unevenly, you most likely need to pay attention to the pressure regulator. It either does not work at all or requires adjustment and improvement. It may also turn out that even after the system has been completely restored, lubricant has got onto the working surface of the brake pads of one of the wheels, as a result of which the braking will be uneven, one pair of pads is oily, and the second is working normally.
Less often, but such a problem as incomplete disinhibition also occurs. If this applies to all wheels at once, then in this case it is enough to adjust the free play of the brake pedal. In this case, you need to check the play on the vacuum booster rod. Its value should be within 1.5-2 mm for a VAZ 2109. If one of the wheels does not release the brakes, in this case, again, either the pressure regulator or one of the brake cylinders must be blamed. The fact is that the piston could get stuck in a certain position and prevent the brake pad from fully releasing the wheel.
The vacuum brake booster of the Nine rarely fails, and its habits are well known to all owners - if the pedal suddenly becomes wooden and stiff, then the booster requires repair or adjustment. Most likely, the problem is in the hose that connects the booster reservoir and the engine intake tract.
Of course, these are not all the surprises of the Nine’s braking system, but other troubles are derivatives of the main problems. The main thing you need to remember is to change the brake fluid on time, prevent it from getting dirty, change the pads according to the regulations, or even earlier, and occasionally check the brake system for leaks. Then the system will last a long time and will not create problems on the road. Reliable brakes to everyone!
Bleeding brakes on a VAZ 2022, preparation and sequence of actions
Bleeding the VAZ 2109 brakes is carried out in a sequence strictly determined by the design features, namely:
- Rear right wheel (farthest wheel in the system);
- Front left (connected by the system to the already pumped rear right wheel);
- Rear left;
- Front right.
The sequence is this way because of the diagonal placement of the contours. All steps must be completed when pumping along the full circuit. You can only upgrade one at a time.
To work you will need:
Dishes for draining brake fluid;
A set of keys (need 8 and 10), screwdrivers;
Jack or pit;
Aerator, compressor (when working without an assistant).
Note. Brake fluid is quite aggressive, do not allow it to come into contact with the skin, wash it off immediately
It is also undesirable for it to come into contact with plastic parts, wires, or in the eyes; TJ vapors are poisonous.
Preparing to bleed the brakes
To properly bleed the brakes on a VAZ 2109, as necessary, you will need competent preparation according to the following scheme:
- Be sure to check the system for leaks and inspect all pipelines and parts. The machine is installed on a pit or raised with a jack. Tubes, connections, hoses must be carefully cleaned with a rag, then press the brake several times and secure. When inspecting, connections and hoses must not be wet. Detected leaks are eliminated by tightening the fasteners or replacing problematic parts.
- Make sure that the fluid level in the tank is maximum; if not, top up. The level will have to be checked after bleeding each mechanism, otherwise air will enter the system again.
- Pour a little liquid into the draining container so that the bubbles escaping from the system are visible.
- The fittings must be loosened before starting work.
- You also need to remember that the VAZ 2109 has a rear wheel drive pressure regulator. When pumping, it is necessary to create high pressure in the system. To prevent the regulator from blocking the flow of fluid to the rear wheels, when working without a pit, on a jack, you need to open its valve and keep it in this form until the end of work. To do this, it is enough to install, for example, a flat screwdriver between the plate and the regulator rod, pushing the rod all the way. The screwdriver is removed upon completion of work.
It is more convenient to pump the brakes on a VAZ 2109 with two people; if you work independently, the cost of brake fluid, time, and effort will increase, but it is possible to cope with the task.
How to bleed the brakes on a VAZ 2109, working together
If you have a partner (no qualifications are required from him), the action plan is as follows:
- The driving partner creates the required pressure in the system by depressing the brake pedal (5-9 presses are needed), then holds the pedal in the lower position until the bleeding is completed.
- The one under the car puts a hose on the fitting of the right rear cylinder and completely releases the fitting so that the liquid flows. The end of the hose must first be lowered into a container for draining. By the bubbles in the liquid you can judge the state of the system and notice when all the air has been removed.
- After complete cleaning, the fitting is tightened and the pedal is released, you can move to the next wheel, the diagram is the same, the front left wheel.
- The level of brake fluid in the reservoir will decrease as pumping progresses and will need to be restored to the maximum level.
- After bleeding along a full (or one, as necessary) circuit, the fittings must be finally tightened and the protective caps must be put on.
If you have to work independently, the scheme and sequence of actions are almost the same. You can press the pedal yourself, or you can use an aerator (price up to 150 rubles).
- The aerator adapter is connected to the pump, possibly with an inflated tire;
- The required wheel is removed from the jacked up car;
- Instead of its own lid, the aerator lid is screwed onto the tank;
- After loosening the fitting, pumping is performed according to the general scheme.
When pumping in this way, the wheel spool is used instead of a compressor, and in extreme cases, the brake is squeezed out and pressed down with a stone until the pumping is complete.
Upon completion of the work, a check is made, first of all, of the brake pedal travel; it should not be too soft, and the pedal should not fail. The parking (hand) brake must also be checked and adjusted once every 15,000 km.
How to bleed the brake system alone
If at the moment you cannot afford an assistant and you work alone, then without any problems you can bleed the brake system of the VAZ 2109 alone, see how to do this in the picture below, and also watch the video.
Payment via PayPal
After selecting payment via PayPal, the PayPal payment system will launch, where you need to select the payment method: bank card or PayPal account.
If you already have a PayPal account, then you need to log into it and make a payment.
If you do not have a PayPal account and you want to pay using a bank card via PayPal, you need to click on the “Create an Account” button - shown with an arrow in the picture.
PayPal will then prompt you to select your country and provide your credit card information.
After specifying the information required to make the payment, you must click on the “Pay Now” button.
Basic malfunctions of the brake system
In fact, the brakes don't just go away. So that the problem does not take you by surprise on the road, it is necessary to at least check the system every time before leaving the garage by simply pressing the pedal. A bright lamp will already indicate an insufficient level of brake fluid, but not a single display will indicate about its leakage or malfunctions of the vacuum booster.
A brake fluid leak in an old car can come from anywhere. First of all, you need to listen to the behavior of the car when you press the brake pedal. If the pedal gradually fails, it is quite possible that one of the circuits has depressurized. In the nine, the brake circuits are organized diagonally, that is, if there are problems with the right rear brake cylinder, the right front brake caliper and the rear left cylinder will work automatically.
Bleeding the system - (methods of execution: two people)
We prepare a clean glass vessel, a plastic or rubber tube corresponding to the volume of the outlet nipple, and a key for the nipple.
Remove the protective cap from the first nipple according to the order of work. We put the tube and key on the nipple, place the other end of the tube in a glass jug and fill it with brake fluid so that it closes the end of the tube. We check that the level in the reservoir with hydromechanical fluid is kept slightly above the MIN degree estimate in the operation of the entire process.
The assistant must depress the brake pedal all the way to the stop a number of times in order to generate pressure, then leave it in this state.
Unscrew the nipple (approximately one turn) and allow the liquid to drain into the jug. At the same time, the assistant must press the pedal all the way to maintain pressure and release it. if necessary. When all the liquid has drained. tighten the outlet nipple and tell the assistant to slowly release the pedal, then check the fluid level in the reservoir.
Repeat these steps until there are no air bubbles in the liquid coming out of the nipple.
What does the VAZ 2114 brake system consist of?
The brakes of the VAZ 2114 are a vital system of the car. These are not loud words and every driver will agree with this. Also, every driver knows that timely, high-quality repair of the VAZ 2114 brake system is the key to its trouble-free operation.
The brake system on the VAZ 2114 consists of two main parts:
- Wheel mechanisms - directly affect the elements rotating with the wheel and slow down its rotation.
- Drive – a system for transmitting force from the pressed pedal to the wheel mechanisms.
The “fourteenth” has a dual-circuit system with a hydraulic drive. This means that the force created by pressing the pedal creates fluid pressure (hydraulics) throughout the system. This same pressure forces the wheel cylinders to work. The concept of “dual-circuit” means that the pedal force is transmitted along two lines (circuits) independent of each other to pairs of wheels. The contours have a diagonal distribution: the rear right wheel works together with the front left one, and the rear left one works with the front right wheel. If one of the circuits fails, this solution allows you to maintain vehicle stability when braking, especially on slippery roads and when turning.
Important: the main condition for the system to work is its tightness. Therefore, it is extremely dangerous to operate a car with fluid leakage.
It is also extremely dangerous for air to enter the system. According to its physical properties, air, when compressed, decreases in volume many times over, unlike liquid, which, when compressed, practically does not change its volume. When braking a car with a leaky system, the pedal may “fail” and the brakes of the VAZ 2114 will not work.
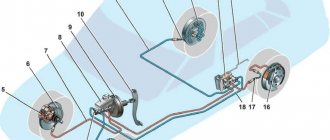
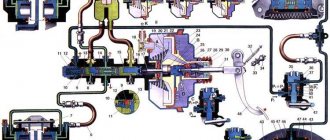
VAZ 2114 brake system diagram
The brake system diagram of the VAZ 2114 has a classic layout, similar to both VAZ models and cars of many world brands.
- Master brake cylinder.
- Metal pipes of the 1st circuit.
- Flexible hose for front mechanisms.
- Liquid reservoir.
- Vacuum brake booster.
- Metal pipes of the 2nd circuit.
- Rear wheel cylinders.
- Brake pressure regulator drive lever.
- Flexible hose for rear mechanisms.
- Pressure regulator.
- Pressure regulator bracket.
- Pedal.
Main brake cylinder VAZ 2114
General view of the brake master cylinder (MBC) under the hood of a car with a fluid reservoir and a vacuum booster.
The master brake cylinder creates pressure in the system, distributes it along the circuits and transmits it to the wheel cylinders. It consists of a two-section housing, inside which a piston moves, driven by a pedal. The fluid pressure created in the hydraulic structure is transmitted through circuits to the wheel mechanisms.
The vacuum booster reduces the force applied to the pedal. This makes the system more efficient. The operation of the vacuum valve directly depends on the operation of the engine. The vacuum booster is connected to the engine intake manifold by a flexible rubber hose. The vacuum (vacuum) in the amplifier is created by creating low pressure in the intake manifold from the movement of the engine pistons during the intake stroke.
The rear brake pressure regulator changes the force applied to the brakes depending on the load on the rear of the vehicle. It protects the car from early or late deceleration of the rear wheels and increases its stability.
Replacing the pressure regulator
The breakdown of the rear brake pressure regulator of the VAZ 2108 is most clearly evidenced by the car’s tendency to skid when braking on a straight, flat, dry road. If the regulator breaks down, it is recommended to replace it as an assembly. Repairing this unit in a private garage is extremely difficult, and the brakes directly affect safety. If you are forced to repair your brakes yourself, but do not have the proper experience and training, replace the entire adjuster. Do not disassemble it to avoid problems with the brakes.
The regulator is replaced in a pit or on an overpass. Work order:
- Use a screwdriver to lift the bracket of the regulator drive lever, remove the lever from the hole and remove the bracket from the lever.
- Unscrew the hydraulic hose fittings from the regulator body and remove the hoses.
- Plug the pipe fittings to prevent liquid from leaking out.
- Unscrew the two screws securing the regulator to the bracket.
- Remove the regulator.
Install the new regulator in the reverse order.
Signs and causes of malfunction of the VAZ 2110 brake disc
Brake discs on the VAZ 2110 are cast iron. The minimum permissible disc thickness during wear is 17.8 mm for ventilated discs and 10.8 mm for non-ventilated discs, the maximum runout along the outer radius is 0.15 mm. Incorrect selection of brake pads leads to damage to the disc; cheap pads with high-resistant linings lead to accelerated wear. Using the pads until they are completely worn out and metal-on-metal friction occurs also reduces the life of the brake discs.
In most cases, discs are thrown away after such “exploitation”, but sometimes they are reanimated on a special machine using a groove. Discs with deep potholes and burrs on the working surfaces, obvious traces of rust, and wave-like wear on the working surfaces are also sent for grinding.
Signs of a brake disc failure may include:
- beating during braking is a symptom of incorrect installation or poor quality disc;
- beating while driving is an indicator of inaccurate manufacturing of the disc or violation of the symmetry of the disc;
- small cracks that form on the disc after braking are an attribute of using a cheap cast iron alloy with low density;
- increased disc wear indicates the use of a low-density alloy and/or low-quality pad;
- the appearance of beating after braking of medium intensity indicates a low-quality cast iron alloy (it lacks the necessary additives).
Use a 17mm wrench to remove the front wheel bolts.
Source m.etlib.ru
We will show you the correct instructions for replacing the front brake discs in a VAZ 2110 2111 2112. The work is performed by an experienced technician, everything is shown from convenient angles, all actions are commented on.
First, unscrew the wheel and place the car on a lift or jack. We turn the steering knuckle outward and clean the stubborn dirt from the brake caliper. Using some handy object, even an ordinary flat screwdriver is suitable for this, we unbend the pads. We remove the brake cylinder, having previously unlocked the lower bolt, this is done using a hammer and screwdriver:
We remove this bolt with a 13mm wrench. We roll the cylinder along the upper guide and take it out, simultaneously removing the brake hose from the bracket. We remove the pads. At the same time, we evaluate the condition of our brake system, look at what the hoses, boots, pads, etc. look like. We clean all seats using a brush with metal bristles.
I think if you are watching this video instruction, then most likely you do not have a special tool that presses the cylinder piston; you can replace it with improvised means:
Up to this point, we have done all the steps from our material on replacing the front brake pads in a VAZ 2110 2111 2112, but now we have to change the brake discs, so we continue.
We unscrew the two 17 bolts holding the bracket, take them out, remove the bracket:
We clean the hubs and brake disc from stubborn dirt. To make it easier for us to remove the brake disc, apply WD to the mounts and wait a few minutes. The screws that hold the disk in place very often become sour; to make them easier to unscrew, tap the disk around them with a hammer through a chisel:
The screws are unscrewed with a socket head 7. Carefully without damaging the hub, tap the brake disc with a hammer. Next we use a special puller, but you can do without it:
Don't forget to apply a coat of copper or graphite grease to the hubs. It is better to degrease the new brake disc before installation. We assemble everything in reverse order.
Video of replacing front brake discs in VAZ 2110 2111 2112:
Source vazhelpgid.ru
Front brake disc of a VAZ 2112 car
Brake discs are an indispensable part of the braking system. They, together with the pads, when slowing down and stopping the car, convert kinetic energy into thermal energy, which arises from friction against the pad discs. The maximum braking effect occurs after the brake pads and discs have been worn in. The period for running in the elements is from five hundred to one thousand kilometers. During this period, you should not brake sharply to allow the working surfaces of the disc and pads to grind in. On a VAZ 2112, the front disc brakes can wear out faster or slower, which is influenced by the driving style of the car. Typically, the metal used to make parts is cast iron, but sometimes ceramics or carbon are used on sports cars. This article describes how to correctly replace the front brake discs of a VAZ 2112.
Which pads are better to put on a VAZ?
Today there are a large number of companies on the market that sell linings for classic or modern VAZ cars. The following are the 10 best companies, according to consumer reviews and sales statistics.
10th place: AvtoVAZ
Typically, pads are used in everyday use where there is no need for increased performance or durability. The products are not suitable for fans of high-speed driving - the standard material does not like overheating, which can cause brake failure.
Users install such brake pads on the VAZ 2107 and other classic-type models.
Advantages:
- full compatibility with car models;
- sufficient reliability;
- moderate cost;
- durable base;
- available in every store.
Minuses:
- do not like overheating;
- may squeak a lot;
- a lot of debris is formed;
- do not withstand aggressive use.
9th place: DAFMI
The controversial reputation of the brand imposes certain restrictions on customer demand. On the one hand, users praise the products, saying that the pads wear out for a long time and hold critical loads well. Others insist on a large number of shortcomings, pointing out strong creaking, lack of effective braking even after prolonged grinding.
I am pleased with the minimum price of the products. If you have a limited budget, you can buy brand pads and play the lottery.
Advantages:
- minimum price;
- wide use;
- wide selection of models.
Flaws:
- questionable quality;
- there is a high probability of buying a defect.
8th place: TRUCKMAN
A competent approach to the arrangement of materials and technical processes during manufacturing eliminates crumbling of the linings due to overheating or shock loads. This provides the necessary durability and practicality of use.
On the other hand, increased rigidity of the composition negatively affects the comfort of use. The pads make a lot of noise and are not effective enough when exposed to water or snow, which forces motorists to be careful when driving in bad weather.
Advantages:
- optimal cost;
- good wear resistance;
- hold heat well;
- take a long time to grind in.
Flaws:
- fasten;
- require careful handling during operation in bad weather.
7th place: QUATRO FRENNI
The company's arsenal includes Vesta and XRay brake pads, as well as for other modern car models. Thanks to a wide range of organic mixtures and pad sizes, there is a choice to suit the individual needs of the user. Cheap modifications are perfect for production cars operated in standard mode without heavy loads. For modernized cars, semi-metallic linings with an increased margin of strength and durability are suitable.
Among the disadvantages, buyers highlight the fakes they come across, which greatly damages the brand’s reputation.
Advantages:
- wide choice of modifications;
- normal quality of budget products;
- low noise level.
Flaws:
a large number of fakes.
6th place: HERZOG
In Russia, the quality of the brand is well known. Brake pads can last 1.5-2 times longer than standard brake pads on Lada Largus or classic modifications. Users like the absence of squeaks, a normal reaction to overheating and minimal formation of chips, which ensures comfortable operation of the car and an adequate response to driver manipulations.
Advantages:
- good product quality;
- no squeaks;
- do not crumble when overheated;
- sufficient durability.
Flaws:
- slightly overpriced;
- there are fakes.
5th place: EZATI
Advantages:
- good braking performance;
- increased service life;
- does not eat discs - well-thought-out composition;
- sufficient distribution.
Flaws:
limited assortment.
Advantages:
decent value for money.
Flaws:
limited assortment.
3rd place: MARCON
Advantages:
- minimum price;
- sufficient efficiency;
- rapid heat removal from the contact zone.
Flaws:
- creaking;
- wipe off quickly.
2nd place: ROSDOT
Separately, we can highlight the company’s assortment. The company produces brake pads not only for VAZ, but also for imported cars.
Advantages:
- good quality;
- reasonable price.
Flaws:
wear out quickly.
1st place: STS
Advantages:
- impressive reliability;
- adequate price tag.
Flaws:
not detected when used correctly.
Air in the brake system is dangerous
A piston is placed inside the brake master cylinder. The brake hoses supply the fluid to the local cylinders on each wheel. Thus, the main braking system consists of:
- master brake cylinder;
- brake hoses;
- wheel brake cylinders.
When the driver presses the pedal, the rod pushes the piston. Brake fluid is sent under pressure to each of the 4 wheel cylinders. At this time, the pistons move apart in them. As a result, the pads are moved apart and pressed against the disc or drum. This creates a friction force, causing the wheel speed to instantly decrease.
If air gets into the system, the VAZ brakes instantly lose effectiveness. This happens because the pressure drops. The pads begin to press against the disc (drum) worse. This can be understood if, when you press the pedal, it fails, and the braking distance increases significantly (the distance from the point at which the pedal was pressed to the point of complete stop). In this case, further operation is not recommended until the brakes are bled.
A more dangerous malfunction is when more air enters the area near one wheel. In this case, the pressure in the wheel cylinders of the left and right wheels will be different. This leads to uneven pressing of the pads to the disc (drum). When you press the pedal, according to the laws of physics, a side skid of the car may occur.
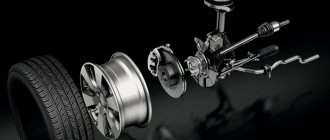
The principle of operation of a brake caliper and why it is needed at all
Welcome! A brake caliper is essentially a very necessary thing, since practically no car can do without it, because the brake caliper does the most basic work during braking, but not all people know how it works and what will happen if it doesn’t installed on the car, that’s what we’ll look at today.
Note! At the end, in addition to this article, there is an interesting video clip that shows the entire principle of operation of the brake system!
What is a caliper for and what is its operating principle?
In short, it is needed so that the car slows down when you press the brake pedal and if it is not there, as was said earlier, the car will not stop at all, since the main work of braking is performed by this particular caliper.
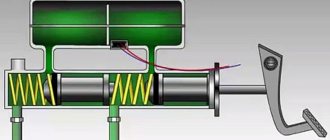
Well, if we talk in more detail and, in addition to all this, delve into the principle of its operation, then this very principle of its operation is as follows: when you press the brake pedal, pressure occurs in the brake system, namely the piston which is located in the master brake cylinder ( This cylinder is indicated by the number 3), moves from the beginning of this cylinder to the end, thereby still collecting a little brake fluid that is in the brake reservoir (indicated by the number 5), squeezing the brake fluid forward, it goes through the hoses and thereby squeezes out the pistons that are in the caliper itself, and these pistons press on the brake pads and the car stops.
Let's look at it in more detail, for this let's first look at what this main brake cylinder is, and it represents a structure inside which there is that same piston as well as a rod that presses on it, so when you have to stop the car, you press accordingly on the brake pedal, after pressing the rod will also mix forward, thereby the piston that sits on this rod will mix, and after mixing, all the brake fluid will be pushed forward, as it were, and it will go all the way to the working cylinders themselves, which we will talk about a little lower.
Note! Let us tell you right away so that you understand one thing, this brake fluid is not compressible, so if something does not press on it, it will also press on other parts of the brake system and at the same time it will not compress!
Now the fluid will press from one end, onto all working cylinders to which hoses are connected (Hoses that are connected to the working cylinders are indicated by numbers 2 and 4 in the photo above, which shows a diagram of the brakes of a VAZ 2110 car), so after the brake fluid is the working cylinder is filled, the piston which is located in this cylinder will be squeezed out and thereby put pressure on the brake pad, and the brake pad at this moment will compress the brake disc and therefore friction will occur which stops the car.
And in conclusion, let’s note why a car needs a brake reservoir, namely, thanks to the brake reservoir, which contains the fluid itself and maintains the normal level of this fluid in the system, to understand more, look at the photo located just below:
Where is the brake caliper located?
On many cars it is different, sometimes this caliper is located in the front part of the car, and sometimes in the front and rear at the same time, and on some cars (Mainly on old ones) there were usually no brake calipers at all, and instead of them ordinary drum brakes were used , and these brakes heat up very quickly and therefore the effectiveness of their braking after constantly pressing the brake pedal (Especially in hot weather) greatly decreased and thus the number of accidents was not small.
Note! On domestically produced cars (VAZ), in most cases, the brake caliper is located only at the front of the car, and the rear wheels are equipped with conventional brake drums! (By the way, if you are interested and want to know how brake pads for disc and drum brakes work, then read an interesting article entitled: “What are brake pads and how not to run into a fake?”, everything is described in detail there)
Links! How to replace the front brake caliper - on a classic? How to replace the caliper on a VAZ 2108-VAZ 21099?
Additional video clip: You can learn more about how the brake system works in an interesting video clip located just below:
https://youtube.com/watch?v=Av-jj8NNrv8
Vaz-Russia.ru
How to replace a brake disc on a VAZ 2108-VAZ 21099?
Removal: 1) To replace the disk, you will first need to remove the wheel from the car and place either wheel chocks or bricks under the rear wheels, or simply put the car on the handbrake so that it does not roll away anywhere. (For information on how to remove a wheel, see the article entitled: “Replacing wheels on a car”)
Note! When the wheel is removed, use a ruler to check the thickness of the disk; if it is below 10.8 mm, then the disk needs to be replaced, but if it is not much higher, for example, 12.0 mm, then in this case it is up to you to change or not change the disk you, but in such a situation it won’t take a very long time to reach the critical point! (Be sure to check the thickness of the disk in at least three places)
2) Now look under the caliper, at the back you will see (Indicated by arrows) two bolts that will attach it to the steering knuckle, so you will need to completely unscrew these bolts and thereby remove the brake caliper from the car, without removing it you can remove it yourself disk from the car.
Note! When the bolts that hold the caliper are unscrewed and the caliper itself is removed, the first thing you will see is that some kind of hose is connected to the caliper and thus you will not be able to completely remove the caliper, so you don’t need to unscrew this hose and completely remove the brake caliper from the car, you just find a rag or some kind of wire in your garage or car and use it to hook the caliper behind the telescopic strut spring, as shown in the small picture above!
3) After this operation, you will need to take WD-40 lubricant or something similar and apply it to the guide pins (Indicated by red arrows), and to the part where the disc itself connects to the hub (The place where the brake disc connects with hub, indicated by four blue arrows).
Note! This lubricant is applied only to unscrew the guide pins and it was much easier to remove the disc itself from the hub, because from time to time rust forms in all places in the car, especially what starts to rust first is what is below and has at least some kind of contact with road dirt, and what has contact (Especially in winter) with road dirt? Of course, this is the bottom of the car and the brake system, so you need to lubricate all these places with lubrication, which are indicated by arrows in the photo above!
4) So, when you lubricate the guide pins with grease, pick up a wrench or an extension with a socket head and completely unscrew both of these pins and then put them aside in some kind of box so that they don’t get lost, or put them in the car.
5) And at the end of the operation, grab the disc with both hands and try to pull it from the car, but essentially this method is pointless, so if you have a rubber hammer or something similar (In principle, a regular hammer will do, only for them you need to hit it more carefully without breaking the disc itself), take it in your hands and twist the brake disc in a circle, hit the hammer on the back side of the disc in different places so that it first comes off the hub a little in one part, then a little in another and so on, this is how you remove the disc from the car.
Note! There is no need to hammer with all your might just one place on the discs, it will be pointless, so be sure to twist it!
Installation: Install the new disk in its place in the reverse order of removal.
Note! If you reinstall the old disk, pay attention to the fact that a bead has formed on its edges; you will need to remove this bead with a file and thereby make the disk even!
Additional video: For more information on how to replace a disk on a car, see the video posted below:
https://lubimauto.ru/kak-snjat-perednij-tormoznoj-disk-na-vaz-21099/https://tuningtaza.ru/%D0%B7%D0%B0%D0%BC%D0%B5%D0 %BD%D0%B0-%D1%82%D0%BE%D1%80%D0%BC%D0%BE%D0%B7%D0%BD%D0%BE%D0%B3%D0%BE-%D0 %B4%D0%B8%D1%81%D0%BA%D0%B0-%D0%BD%D0%B0-%D0%B0%D0%B2%D1%82%D0%BE%D0%BC%D0 %BE%D0%B1%D0%B8%D0%BB%D0%B5-%D0%B2%D0%B0%D0%B7-2108-%D0%B2%D0%B0%D0%B7-2109-% D0%B2%D0%B0%D0%B7-21099.htmlhttps://russia-car-gid.ru/zamena-tormoznyx-diskov-vaz-21099/https://tire1.ru/pomenjat-tormoznye-diski- na-vaz-21099/https://vaz-russia.com/remont-vaz-2108/zamena-tormoznogo-diska-na-vaz-2108-vaz-2109-vaz-21099.html
How to bleed the brakes on a VAZ-2106 alone, step-by-step video instructions
Before you start bleeding the brakes on the VAZ-2106, you should thoroughly clean the brake cylinder fittings. Over time, a huge amount of dirt sticks to these parts. It is also necessary to remove the rubber caps from them. The next sequence of actions is as follows:
- Add brake fluid to the appropriate reservoir if necessary.
- Press the brake pedal several times.
- At this stage we will need a gas stop. For this purpose, for example, a gas stop from a VAZ-2110 is perfect. The brake pedal must be fully depressed. The same gas stop is installed between the floor and the pedal.
- We bleed all existing brake fluid from the cylinder along with air. Thus, the gas stop independently begins to exert pressure on the brake pedal, pushing it all the way to the floor.
- It is necessary to bleed all four wheels of the car until all the air leaves the brake system.
Using a rubber syringe
Many car enthusiasts do not know how to bleed the brakes on a VAZ-2106 using a rubber syringe. Therefore, let us dwell on this issue in more detail.
A hose of suitable diameter must be placed on the syringe spout. It is best if it is completely transparent. But if you don’t have a transparent hose at hand, it doesn’t matter, you can use what you have.
The syringe is compressed as much as possible. The main essence of this task is to make sure that the least amount of air remains in the syringe. Having fixed the device in this position, a fitting is put on the free end of the hose.
The syringe should be hung in such a position that the hose coming from it is in a vertical position.
Now you need to press the brake pedal quite sharply 3-5 times. But you should release the pedal slowly. This will create excess pressure in the car's brake system. Then we unscrew the fitting a little and through the transparent hose we observe how the brake fluid along with air is sucked into the syringe. In order to completely bleed the brake system of your VAZ-2106 yourself, you will need 2-3 similar approaches.
The only thing left to do is to disconnect the device from the fitting and drain the liquid from the syringe into a jar. A similar action should be performed for each individual wheel.
Bleeding the brakes when using a medical syringe
The sequence of actions is as follows:
- Brake fluid is drawn into the most ordinary medical syringe.
- The syringe is connected (hermetically) to the cap of the brake fluid tank. To do this, you can use sealants or mechanical seals if you don’t have time to wait for the sealant to dry.
- Place a bottle under the leakage area and unscrew the fitting.
- We press on the syringe plunger, thereby creating pressure. Thus, pumping brake fluid into the system.
- In turn, a trickle of brake fluid along with air should appear at the exit point.
In order to be completely sure that there is no more air left in the brake system, in this simple way you should push absolutely all the fluid through the system.
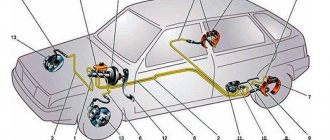
Main elements of the brake system
The brake system of the VAZ 2109 car includes many auxiliary parts, but the main design elements are:
GTZ. Master brake cylinder. The most important part of the system, which creates pressure in the pipes. This element is made of a piston moving along an ideal, flat surface. Rubber rings are used to seal connections between components.
- The brake fluid that is poured into the GTZ is quite aggressive. It contains many additives. But they are the ones who guarantee high-quality engine operation. The disadvantage of such a system is that the components of this liquid quickly evaporate. Therefore, it is better to change the brake fluid at least once a year;
- Vacuum booster. It is located between the passenger compartment and the compartment where the engine is located. It is a large container, cylindrical in shape. The booster is connected to the master cylinder and the booster runs a hose to the fuel injection system (carburetor).
- The function of this element is to make driving easier. And this simplification lies in reducing the effort required to press the brake pedal.
- Brake calipers. The function of these calipers is to press the brake pad against the top of the disc. When repairing a VAZ 2109 model car, calipers are replaced in very rare cases for the reason that their service life is very long. The design consists of a housing made of aluminum, in which there are two holes. A tube is connected to one of the holes using a hose. A fitting is inserted into the other. Inside the device itself there is a piston made of steel that activates the pads;
- Pressure regulator. An element whose purpose is to increase the efficiency of the braking system. The entire braking process is 70-80 percent done by the wheels of the front axle. The remaining percentage of braking is performed by the rear brake system of the VAZ 2109. Of course, this parameter is conditional and depends on many factors such as the load on the car, etc. Therefore, the developers made sure that the brake system of the VAZ 2109 model could, independently of anyone, regulate the forces on the wheel calipers of the front and rear axles.
This simple technology reduces the pressure in the pipe supplying fluid to the rear wheels.
Read all about car tuning here, current news in the world of sedans here.
The feasibility of installing a vacuum brake booster
The vacuum booster dramatically improves the driving comfort of the VAZ 2108. It reduces the pedal effort required to stop the car. All modern cars are equipped with a vacuum booster. Domestic and imported. Nowadays, it is impossible to imagine a car without a vacuum brake booster.
The amplifier is aggregated with the master brake cylinder and is mounted on a shield separating the engine compartment from the interior of the VAZ 2108. It is connected to the engine crankcase with a flexible hose to supply rarefied air necessary for the operation of the amplifier. A malfunction of the amplifier is clearly indicated by a noticeable increase in the force on the brake pedal. Braking acceleration decreases.
Continuing your trip with a broken amplifier is very risky. You can drive to the nearest car service center with caution. A cracked hose can be wrapped with several layers of electrical tape. If replacing the cracked hose and check valve does not produce results, the unit must be replaced.
Work on removing the amplifier is carried out in this order.
- Disconnect the negative battery terminal. De-energize the electrical system.
- Disconnect the wiring block from the hydraulic reservoir cap located on the brake master cylinder body.
- From the passenger compartment, remove the amplifier pusher pin using pliers. Disconnect the pusher.
- Disconnect the hose going to the engine crankcase.
- Unscrew the two nuts securing the brake master cylinder.
- Move the cylinder away from the amplifier housing. Leave it hanging from the metal hydraulic pipes.
- Unscrew the four nuts securing the amplifier bracket to the engine shield and carefully remove the amplifier.
- Unscrew the two nuts securing the amplifier to the bracket. Disconnect the bracket and amplifier.
Install the new VAZ 2108 vacuum booster in the reverse order.
Examination
The operation of the VAZ-2109, 2110 and other AvtoVAZ models is checked on the move, in closed areas. To do this, accelerate the car to a speed of 40 km/h and sharply press the brake. The rear wheels should lock ½ second later than the front wheels.
The wheels are monitored by an assistant located outside the car. If wheel locking occurs noticeably later or does not occur at all, and also if the rear axle is locked simultaneously with the front, the sorcerer adjustment procedure is repeated.
Many drivers have heard about such a detail as a sorcerer, but they do not know where he is and what tasks he is responsible for. In today's article we will look at what the sorcerer 2114 is and how to properly adjust it.
Traffic regulations requirements for the serviceability of a vehicle
Traffic regulations exclude the possibility of driving if the service brake system is malfunctioning (ineffective or leaking). The driver must repair the working vehicle on site or refuse to operate the vehicle altogether, using towing (if permitted by Section 20 of the Rules) or transportation (transportation by tow truck).
The ineffectiveness of the handbrake is determined by specific fixed indicators associated with the stationary state of the vehicle. Thus, a VAZ-2109 car with a full load must remain stationary on a slope of at least 16%, and in equipped condition (ready for movement - with a driver, but without load) - at least 23%.
If the specified requirements are not met (and, consequently, the parking brake system is malfunctioning), the driver is also obliged to refrain from operating the vehicle. However, at the same time, he is allowed to move, subject to precautions, to the place where the car will be parked or repaired.
Thus, the braking system of the VAZ-2109 has proven its effectiveness during operation. That is why it was extended to other front-wheel drive models of the famous domestic brand. Thus, the braking system of the VAZ-2110 and the entire family of “tenths” is an exact copy of the “nine” vehicle.
What else is worth reading
Replacing brake pads VAZ 2114
VAZ 2106 brake system diagram Climate control diagram
Headlight corrector for VAZ 2110