Step-by-step procedure with photo support for replacing brake pipes on a car.
Leakage of brake fluid and depressurization of the entire brake system can be caused by damaged pipes through which brake fluid moves to each brake mechanism (wheel). If this happens, then the car owner will have to work to replace them, which, as a rule, is carried out with the car raised. The car can be raised with a jack and more bricks or other hard objects can be placed so that you can get to the pipes and change them. But usually the car is taken to a car service center where there is a lift, so it will be easier to work. The procedure itself is not complicated, more fuss will be with pumping the brakes, although this should not cause problems even for a novice car owner. The procedure was carried out on a VAZ 2110 car, but this can be done on any other brand.
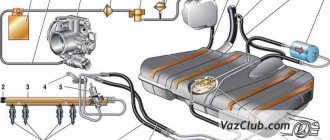
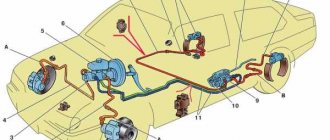
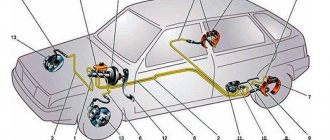
Brake system VAZ 2110 - diagram
For better or worse, all Tolyatti models suffer from the same diseases. The perestroika virus brought them to the plant back in the 80s, along with the VAZ 2108, and since the genetics of the cars did not change, the diseases were the same. The VAZ 2110 is no exception. A nice replacement for the eights and nines appeared on the assembly line about 20 years ago, almost completely repeating the design of the front-wheel drive VAZ first-borns. The same applies to the brake system of the tenth family, which we will wash the bones with today.
The procedure for replacing brake pipes on a VAZ 2110
- Before starting the replacement, you need to disconnect the terminal from the battery for safe work;
- Replacement of brake pipes must be done starting from the main brake cylinder in turn to each wheel cylinder;
- The wheel bolts are loosened and the car is jacked up to a convenient height for work;
- The brake pipe fittings are removed one by one from the brake master cylinder and the holes are closed with plugs;
- The pipeline is carefully released from plastic and metal fasteners towards a specific wheel. The protective plastic box must be removed;
- The brake hose fitting on the wheel is unscrewed, where the tube is replaced and the damaged line is removed;
- The new brake pipe is installed in the opposite direction, “going” from the wheel to the brake master cylinder;
- All tube holders are put back into place; those damaged during dismantling are replaced with new ones;
- The new pipeline is blown through with compressed air and connected.
The rest of the brake pipes are changed in the same way, also starting from the master cylinder to the wheel cylinders. Don't forget to replace the short brake pipes on the brake calipers.
When laying new brake pipes, they must be equipped with plugs at both ends to prevent foreign objects from getting into them (dirt, paint, mastic from the body). It is advisable to coat the tubes with an anti-corrosion compound during their installation, which will extend their service life.
After replacing the brake pipes, new brake fluid is poured in and the brake system is bled.
Also read other reviews
Repair of the main brake cylinder of VAZ 2110
2110 brake design
A dual-circuit hydraulic system with a vacuum brake booster is not uncommon on cars developed in the 80s. Easy to maintain, without unnecessary electronic bells and whistles, like ABS, cheap spare parts and pads. The front brakes are disc, and on models 2112, in the hatchback body, they are also ventilated with a larger diameter. This is because on the twelfth only 16-valve engines were installed and more effective brakes were needed to stop this incredible hundred-horsepower power. And also in order to cope with the Opel engine of 150 horsepower, which was also sometimes used for modification by dozens.
The rear brakes are tens of drum type, and the parking brake is mechanical. Everything is like in the good old classics. The car has a vacuum brake booster and the system is divided into two circuits. If one of them fails, the second one remains operational, so there won’t be a dozen left without brakes. The circuits work in a diagonal pattern - front-rear wheel diagonally. Also, the brake system of the VAZ 2110, the diagram of which is presented above, has a pressure regulator for uniform distribution of braking force, depending on the load of the rear axle. Both brake circuits are connected through the regulator.
Device
The VAZ-2110 brake system consists of a master cylinder with an installed fluid reservoir, from which the lines of two circuits emerge.
The schematic diagram is shown below.
One circuit interacts with the mechanisms of the front right and rear left wheels, the second - vice versa, hence the diagonal system.
Between the pedal and the cylinder there is a non-separable vacuum booster.
The front wheel lines of both circuits, coming out of the main cylinder, go directly to the working cylinders of the calipers.
The lines going to the rear mechanisms are first connected to the pressure regulator, and then from it to the mechanisms themselves.
This regulator is designed to adjust the fluid pressure in the lines at different loads on the rear axle.
Malfunctions of the brake system of the VAZ 2110
The main malfunctions of the brake system of the VAZ 2110 can safely include the following set:
- brake fluid leakage through brake hoses;
- the brake pedal falls off;
- airing of the line due to a violation of the tightness of the connections or a fall
- brake fluid level in the reservoir;
- overheating of the front brakes, as a result of which the brake discs fail;
- malfunction of the vacuum brake booster.
There are not many malfunctions, but they do not bring joy. Most often, all fluid leaks occur due to the fact that the brake hoses of the front calipers are worn out. Whenever possible, they should be monitored from time to time. It is also common for the brake pedal to fail due to a defect or wear of the brake booster diaphragm. It is easy to identify such a breakdown. When the engine is off, the pedal will have normal travel, but it will be stiff. And when you start the engine, the pedal slowly goes to the floor. It should be taken into account that the depressed pedal moves 5-10 mm when starting the engine is a normal phenomenon on all VAZ cars with a vacuum booster. If the pedal fails, then you can safely make a claim against the amplifier’s diaphragm membrane. Most likely it is broken or simply worn out.
Replacing the rear brake hose
- We unscrew the fitting using two keys: 10 and 15;
- Remove the hose from the eyelet securing the rear beam to the body;
- We put a protective cap on the end of the tube;
- Using two wrenches, disconnect the hose and tube. Remove the brake hose. When replacing it, do not forget about the seals;
- We put everything back in reverse order. We perform the same procedure on the other rear wheel. We pump the hydraulic drive (brake).
Thus, you are convinced that replacing brake hoses on VAZ 2109 and 2110 is not such a difficult matter. And with your own hands, if you have certain skills, it’s quite possible!
Brake hoses have to be changed quite often; according to the “garage guys”, this consumable part often does not last even six months. But, if you use the car carefully, it will require replacement in a year, or even two.
To extend their service life, wipe them with special additives, for example, Roil Platinum™ and wrap them with textile tape. At the same time, you need to remember that from time to time you need to check the condition under the electrical tape.
The worst thing is when the hose breaks on the road. The first sign of a breakdown is that the pedal “goes to the floor.” At the same time, it is impossible to brake quickly. In this case, you need to plug the torn end, for example, with a bolt. When one of the circuits does not work, the ABS also stops working, and during sharp braking the car turns around. The following is step-by-step instructions for replacing them with new ones.
Repair of the brake system of VAZ 2110
Most often, repair and maintenance of brakes of the tenth family occurs during planned replacements of consumables - pads, brake discs, cuffs and seals. In this case, it is necessary to evaluate the degree of wear not only of the brake pads themselves, but also of the discs and drums. Often, no attention is paid to their condition until the pads literally begin to whistle. The normal service life of brake pads is up to 60 thousand, depending on the degree of hardness. But if the disc is worn out, the pad wears out much faster. Before changing pads, it is imperative to check the condition of the discs and drums, and, if necessary, sharpen or grind their surface.
Problems and their solutions
There are several common problems associated with brakes on a VAZ 2110 car. The reasons for their occurrence may be different, but the solution is always the same - timely and high-quality repairs.
- The brakes have completely lost their effectiveness, pressing the pedal does not cause any reaction. In such a situation, it is categorically impossible to drive anywhere under your own power, even if we are talking about a trip to a service station? How do you brake? About a wall or pillar? Call a tow truck and start repairs. In some situations, the problem can be solved on the spot, but these are temporary measures.
- During braking, strong vibrations are observed, most often in the steering column. At the same time, when you press the pedal, it is difficult to hold the steering wheel in your hands. There may be several reasons for this: If you have non-ventilated discs installed, similar situations may arise during rain or when braking through a puddle. Such devices do not like moisture, so to get rid of vibrations, replace the disks with ventilated ones;
- Another cause of vibrations is faulty drums. If there are dark spots on the working surface of the drums, the unit wears unevenly. Immediate repair or complete replacement of mechanisms is required;
- Be sure to check for signs of deformation on the front brake discs. They often cause vibrations.
- The vacuum booster air filter may be clogged, causing the brake pedal to feel stiff;
As you can see, the brake system of the VAZ 2110 car is far from perfect in its factory version, but it performs its functions effectively and reliably. All possible malfunctions can easily be fixed independently, but in some situations it is advisable to contact a professional service station.
Bleeding the brake system of a VAZ 2110
Bleeding the car's brake system is necessary to remove air from the line. Air locks can appear not only due to a drop in the level of brake fluid in the reservoir, but even without any apparent reason for the leak. This can happen due to overheating of the brakes, when the brake fluid boils, and air bubbles released from the fluid during boiling accumulate and form an impressive plug that requires removal. Then the brakes need to be bled. This is done according to a certain algorithm:
- Liquid is added to the tank to the top mark, the lid does not close.
- We start pumping from the wheel farthest from the main brake cylinder.
- An assistant pumps the brake pedal to the highest possible position.
- A hose is put on the fitting, the second end of which is lowered into a container with brake fluid.
- The fitting on the wheel cylinder unscrews, the liquid comes out along with the air, the pedal falls and rests on the floor.
- The fitting is tightened, the pedal is inflated again, the operation is repeated for each of the wheels, while you need to add fluid to the tank and make sure that during pumping its level does not fall below the control mark. If necessary, the procedure is repeated.
In this way, the functionality of the brake system of the VAZ 2110 is restored. In order to avoid problems with the dozens of brakes, it is enough to check the level of brake fluid in the reservoir from time to time and monitor the condition of the brake wheel mechanisms. Then the brakes will be reliable, the ride will be safe, and the driving experience will be the most positive. Watch your brakes and good luck on the road!
Source
How to change the brake hose on a VAZ 2109-2115?
1. The first thing to do is disconnect the negative (-) cable from the battery terminal.
2. Next, you need to remove the wheel whose brake hose needs to be replaced.
3. Then remove the wire connecting the block and the wear sensor.
4. With a sharp movement, push the tip of the wire out of the block on the other side.
6. Holding the tip of the tube with a “10” wrench, unscrew the hose from the brake pipe. At the same time, use the “15” key to hold the tip. If the nuts have “soured” in the tube mount, it should be cut in half and the tip removed from the tube.
7. Remove the tip and seal from the bracket on the rack and body. Using a 15mm wrench, unscrew the tip from the wheel cylinder... remove the hose.
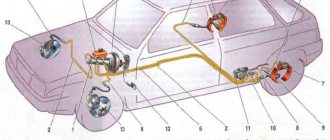
Brake system for VAZ 2110 - design, repair
If the brakes are faulty, driving a car is strictly prohibited, so it is important to monitor the condition of the brake system. The brake system needs to be monitored and repaired in a timely manner, and repairing the brake system on a VAZ 2110 is not lengthy and labor-intensive, but if you lack the skills and tools, it is better to contact specialists.
In order to know for sure whether the technical condition of the most important function of the car is in order, you need to understand how the brake system on the VAZ 2110 is designed. What sore spots do all the well-known “ten” have and how to solve possible or already pressing problems yourself.
The procedure for replacing brake pipes on a VAZ 2110
- Before starting the replacement, you need to disconnect the terminal from the battery for safe work;
- Replacement of brake pipes must be done starting from the main brake cylinder in turn to each wheel cylinder;
- The wheel bolts are loosened and the car is jacked up to a convenient height for work;
- The brake pipe fittings are removed one by one from the brake master cylinder and the holes are closed with plugs;
- The pipeline is carefully released from plastic and metal fasteners towards a specific wheel. The protective plastic box must be removed;
- The brake hose fitting on the wheel is unscrewed, where the tube is replaced and the damaged line is removed;
- The new brake pipe is installed in the opposite direction, “going” from the wheel to the brake master cylinder;
- All tube holders are put back into place; those damaged during dismantling are replaced with new ones;
- The new pipeline is blown through with compressed air and connected.
The rest of the brake pipes are changed in the same way, also starting from the master cylinder to the wheel cylinders. Don't forget to replace the short brake pipes on the brake calipers.
When laying new brake pipes, they must be equipped with plugs at both ends to prevent foreign objects from getting into them (dirt, paint, mastic from the body). It is advisable to coat the tubes with an anti-corrosion compound during their installation, which will extend their service life.
After replacing the brake pipes, new brake fluid is poured in and the brake system is bled.
Also read other reviews
- Repair of the main brake cylinder of VAZ 2110
Principle of operation
The “ten” type of braking system, namely a hydraulic dual-circuit with diagonal distribution, works well and can be considered quite reliable. A simple but successful brake system project, which is not always liked by car owners. Although few people take into account the fact that if one circuit decides to stop fulfilling its direct purpose, then the second will give the opportunity to slow down in a timely manner. Both circuits can fail only if there is a global oversight of the technical condition of the “chervonets”.
Reference. The design of the circuit system looks like this: from front left to rear right and vice versa. A kind of “X” of the brake system from the manufacturer.
This type of brake arrangement helps prevent you from going into a strong roll, skidding, turning 360 degrees around one side, or even turning over when braking with one of the available circuits.
Improvement of the braking system
Many VAZ 2110 owners agree that the factory brake system is far from perfect. Therefore, they decide to modernize and improve the unit using technical tuning.
A popular solution to the issue of brake efficiency is to replace drum mechanisms with disc ones. Of course, in the case of the “ten” we are talking about the rear wheels. When replacing brakes, be sure to take into account the fact that the rear wheels must brake more softly and somewhat later than the front wheels. This way the car won't skid and you won't fly off the road.
Another option is to remove the factory brake master cylinder and vacuum booster. Instead, units from Priora are excellent. Such tuning will eliminate vibrations and also allow you to use the brake pedal effectively and without excessive effort.
Design of a domestic braking system
The brake system on the VAZ 2110 has a main element - a dual-circuit regulator with a mandatory vacuum booster. The regulator is responsible for the pressure in the brakes on the rear axle, and to be more precise, it creates this pressure.
Mandatory brake hoses and basic elements equip the brake drive and divide it into two complete circuits. Thanks to this, braking occurs in both the front and rear wheels, which is optimal and safe.
In general, there is nothing unusual in the technical component.
The location of the brake pedal in the VAZ 2110 is classic - in the middle, like most cars with a manual transmission. It is this pedal that activates the braking system. Some may call it a priori heavy or tight, but most drivers are happy with everything and with any changes in the squeeze they begin to think about whether the brake system on the VAZ 2110 is in danger of being repaired.
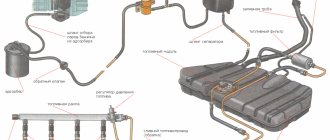
System hydraulic drive elements
- Pressure regulator drive, which transports brake fluid to the rear brake mechanism. The presence of brake fluid is mandatory, as in all cars.
- Main (main) cylinder with pistons and reservoir. It is equipped with a fairly accurate sensor that shows the brake fluid level. You need to pay attention to it, mainly to prevent an emergency level, which can lead not only to a breakdown of the entire system, but also to an accident.
- A vacuum booster that creates pressure that is directed into the master cylinder piston. Which is what creates the inhibition. Problems with the vacuum booster can cause quite a lot of trouble.
- Pressure regulator in the brake system, responsible for the pressure force. It can reduce and increase the indicator, focusing on the load of the rear axle of the “tens”. And in a correct, not broken condition, the loads on the axles should be the same, but without a pressure regulator, using the brake system will be difficult.
- The rear wheel mechanism, in which the brake system is drum by default from the factory, the 2110 does not have modifications with rear disc brakes. There is an opinion that drums are not very reliable, so some owners change the rear brakes to disc ones.
- The front wheel mechanism consists of pads, disc and cylinders. The “Ten” is equipped with a front brake wear sensor. The front brakes can be either ventilated or not.
The role of the pressure regulator in the brake system
People call the regulator quite original - the sorcerer. But all VAZ 2110 owners know or consider it necessary to change the pressure regulator and monitor its technical condition.
Diagram of the brake pressure regulator VAZ 2110: 1 - pressure regulator housing; 2 - piston; 3-protective cap; 4.8- retaining rings; 5 — piston sleeve; 6 — piston spring; 7 — body bushing; 9, 22 — support washers; 10 — sealing rings of the pusher; 11 — support plate; 12 — pusher bushing spring; 13 - sealing ring of the valve seat; 14 — valve seat; 15 - sealing gasket; 16 - plug; 17 - valve spring; 18 - valve; 19 — pusher bushing; 20 — pusher; 21 - piston head seal; 23 - piston rod seal; 24 - plug; A, D - chambers connected to the main cylinder; B, C - chambers connected to the wheel cylinders of the rear brakes; K, M, N - gaps.