The braking system is one of the most important in a car, because it ensures safety while driving and guarantees timely stopping of the vehicle. In today's article we will talk about how the VAZ 2114 brakes are designed, what main components they include and how to set them up correctly.
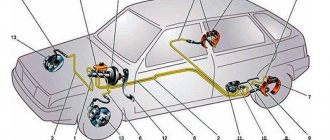
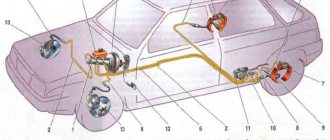
Brake system VAZ 2114
Brake Cylinder Replacement Procedure
Replacing the rear brake cylinder on a VAZ 2114 is no different from the same procedure, say, on 2106 or 21099.
- At the first stage, it is necessary to provide access to all wheels at the same time, because this will make it easier to subsequently pump the entire system. To do this, they placed the car on supports and raised it. It is most convenient to do this on a screw lift, but you can do without it.
- Using a wheel wrench, unscrew the wheel we need.
- Using pliers, unscrew the studs that secure the drum to the hub. And we remove it evenly, while you may have to tap a little with a hammer on its back through the wooden spacer. Be careful when doing this because the drum is made of very fragile material. Additionally, use a metal brush to clean the cylindrical surface of the hub from rust and dirt.
- Then carefully remove all parts of the brake system. But most often it is better to remove everything, because the casing, as a rule, needs to be processed and painted with at least primer.
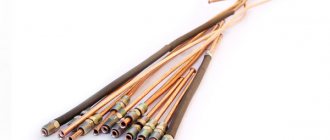
- Next, we proceed to dismantling the cylinder itself. To save yourself the hassle, be sure to thoroughly clean the connection between the cylinder and the brake pipe. However, remember that they can be either steel or copper. In this regard, it is necessary to be careful in all actions so as not to damage them.
We recommend: Replacing the vacuum brake booster on a VAZ 2114
How to unscrew the rear brake cylinder on a VAZ 2114 if the connections are stuck?
- You can try to unscrew the fitting with a 10mm wrench, but most likely this will result in the edges breaking, so generously moisten all connections with WD-40 for a while. In a relatively short period of time it will corrode and dissolve all metal oxide, and due to its microscopic nature it even gets into micro gaps. Usually after such actions the fitting is easily unscrewed. But if this does not help, and there are practically no edges, then there is a special wrench on sale, which is a socket wrench with a slot and a clamping bolt. This simple device allows you to unscrew any stubborn connections without much effort. You need to securely attach it to the nut, tighten it with the bolt and turn it.
- So, having defeated this connection, proceed to unscrew the brake cylinder itself. Here everything is much simpler, because it is bolted with only two M6 bolts, with a 10 key. As a rule, it is easily unscrewed and the cylinder is easily removed from the hole.
- After dismantling the old cylinder, carefully inspect the condition of the newly unscrewed fitting and the installation location. All defects should be removed and burrs cleaned.
- Reassemble the brakes in reverse order. Start checking the cylinder only after assembling the entire wheel brake mechanism. Install the pads, trims, do not forget to hook the handbrake cable back on. This is a common problem in this business. The main thing is to put everything back together exactly as it was.
We figured out how to replace the brake cylinder, now let's start bleeding the system.
- After installing the drum, you can begin bleeding the system. It must be started from the farthest wheel in a clockwise direction. This is due to the fact that the system is quite large and in order to pump air out of it it is necessary to start from distant areas, gradually filling the entire system.
- After bleeding, carefully inspect the new cylinder and its connection to the tube for leaks. In this case, you need to press and hold the brake pedal as hard as possible a couple of times.
- To simplify your task, in the event of a malfunction of the newly purchased cylinder, and not do a bad job. You can check the cylinder without a drum, but here you will need good physical strength and two mats to press and hold the pistons.
- With properly adjusted brakes, the front wheels first grab dead when you press the pedal sharply, because they are closer to the master cylinder, and then both rear wheels grab at the same time. If this is not the case, then the system should be bled again or re-maintained.
We recommend: Replacing brake discs on a VAZ 2114
But sometimes the rear brake cylinder can be repaired; for this purpose, repair kits are sold, which include several o-rings and two boots. But this is only advisable if the condition of its inner surface is excellent.
HOW TO ADJUST HYDRAULICS PRESSURE
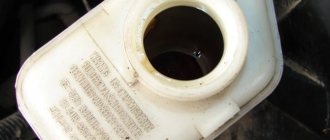
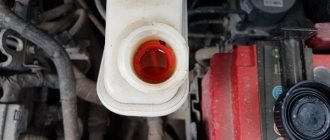
As you know, hydraulic drives use fluids and pressure in the system instead of conventional mechanics, where any force is applied either directly or through transmission mechanisms. The key to clear hydraulic responsiveness is the presence of the required amount of brake fluid in the system and, of course, correctly adjusted pressure.
To properly adjust the pressure in the drive, you need to find an assistant. Doing this work alone is extremely inconvenient, and for the final test you will need an outside perspective.
The VAZ 2114 brake pressure regulator allows you to adjust the operation of the brakes to the required level. To do this you just need to do certain things:
- First you need to drive the car into the pit and rock its rear end. This will bring the suspension to the middle position, and this is exactly what needs to be achieved;
- Then slightly unscrew the front bolt on the VAZ brake pressure regulator mount;
- Using a screwdriver, make a small gap (2 mm) between the lever and the spring. For convenience, insert wire or whatever is at hand. A special protrusion on the lever allows you to move it to achieve the desired clearance;
- Tighten the previously loose bolt.
Now you need to check whether everything was done correctly. Accelerate to 35-40 km/h and brake. If the car does not drive away, then everything is done perfectly. In addition, you need to check the wheel locking sequence. Here you need a second person who will see how smoothly the brakes of the VAZ 2114 work. The whole point is that when working correctly, the front wheels should lock a little earlier than the rear ones. If this happens, then the system is set up with a bang.
If the front wheels lock later, the clearance must be increased. It is also possible that the rear wheels will be very late, in this case we reduce the gap. After completing all the work, securely tighten the regulator mount.
It is important to consider that all tests should not be carried out with flat tires. The result depends on this, and accordingly the brake system can be adjusted incorrectly. The tire pressure of the VAZ 2114 must meet the requirements specified in the vehicle documentation.
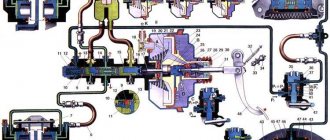
Operation diagram of the VAZ 2114 brake system
Classification of vehicle brake systems by drive type, device
One person, even a very strong one, cannot apply enough force to the brakes to stop the car. The brake system drive is used to multiply and transmit force. There are different types of drives:
Mechanical
A typical example is a parking brake, which is driven by a cable and levers. This system is as old as the car itself, but engineers have not yet come up with anything simpler and more trouble-free.
Hydraulic
Every passenger car has hydraulic brakes; this is the system we are most familiar with. We can say that hydraulics combines efficiency and accessibility: it works great, is quite easy to maintain, and components can be found in any auto supply store. Hydraulic brakes are divided according to the type of brake elements into disc and drum.
- Disc brake.
Effective? Yes. Reliable? Yes. Disc brakes once became a sensation in motorsport, and then in everyday life. In terms of efficiency, it immediately surpassed the then usual brake drums. The design of disc brakes Any driver knows the principle of operation of a disc brake: friction linings are located on both sides of a steel disc, which is put on the wheel hub and rotates with it. Pressing the brake pedal activates the drive, the linings clamp the disc and stop it, and with it the car. - Drum brake. Unlike a disc brake, a drum brake has friction linings located inside the brake drum. When you press the pedal, the drive pushes the pads apart and they are pressed against the inner walls.
The design of drum brakes In terms of efficiency, drum brakes are far behind disc brakes, both literally and figuratively. Since braking the front wheels is more important than the rear wheels to stop a car, drum brakes are sometimes installed on the rear wheels in inexpensive car models.
Pneumatic
Pneumatics are not used as a brake system drive in passenger cars; they are used in heavy commercial vehicles. The principle of operation is a bit similar to hydraulic, but the working medium is not liquid, but compressed air, which is pumped into the system by a compressor. When the driver presses the brake pedal, pressurized air flows to the brake elements and activates them.
Combined
The combined braking system can be found on heavy special equipment. It consists of different types of drive, which gives a bulky but reliable result. Electromechanical or hydromechanical drives are needed for heavy transport in difficult conditions.
Examination
You should make sure that the master cylinder is the culprit for the malfunction of the brake system. This is easy to do; you don’t even have to go to a service center and spend money on it.
Unit location
- Press the brake pedal with the power unit off.
- Start the engine without taking your foot off the gas pedal.
- During normal operation, the gas turbine engine fails under the influence of vacuum.
- If the pedal does not fail, you will need to conduct more thorough diagnostics and restore the device to functionality.
Malfunctions of the car brake system
There are several main problems that can happen with your brakes:
Wear of brake pads, discs, their malfunction, deformation, etc. We all know that brake pads and discs do not last forever, but from time to time we forget about their existence. But they themselves remind us when they begin to creak, whistle, grind and make other abnormal sounds. If diagnostics show that the pads are faulty, both them and the discs need to be replaced; Problem with the hydraulic system. This could be a leak through damaged hoses, an air lock, or worn master cylinder gaskets. Such problems are indicated by increased brake pedal travel. Repair consists of finding leaks, troubleshooting, replacing worn parts, bleeding the system; The vacuum booster has failed. In this case, when you press the pedal, you will feel more resistance than usual.
When inspecting, you need to pay attention to the condition of the amplifier; GTZ piston wedge. When this happens, a constant pressure is created in the hydraulic system, which also affects the brake calipers.
That is, the wheels will be heavy and slow. The master brake cylinder needs to be dismantled, checked and repaired, after which you can continue driving.
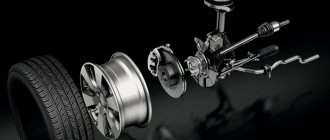
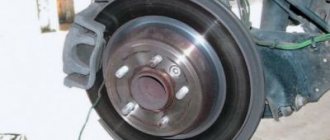
Where are the brake pads located and when to change them?
Front brake mechanism: 1 – brake disc; 2 – pad guide; 3 – caliper; 4 – brake pads; 5 – cylinder; 6 – piston; 7 – sealing ring; 8 – protective cover of the guide pin; 9 – guide pin; 10 – protective casing.
The brake pads are located in the caliper on the inside of the wheel. Inspection of pad wear is carried out through the inspection window in the caliper during seasonal tire changes; friction linings with a thickness of 1.5 mm or less must be replaced.
pads 1.5 mm or less must be replaced
How long do they last?
Each element of the car has a certain expiration date. It is influenced not only by the quality of workmanship, but also by the operating characteristics of the car.
Drum device
Rear pad wear is affected by:
- The climate of the region in which you operate your VAZ 2114;
- The condition of the roads that you have to travel on regularly;
- Control features, driver skills;
- Vehicle characteristics;
- The quality of the previous pads installed;
- The quality of the brake repairs performed, if any, etc.
Brake performance is low
The most common reasons for this problem are:
- brake pads are oily;
- pistons jam in wheel cylinders;
- the linings on the blocks have become unusable;
- the brake system mechanisms overheated;
- the pressure regulator was set incorrectly;
- one of the circuits has lost its tightness.
The linings on the brake pads will need to be cleaned using a wire brush, warm water and washing powder.
If the pistons jam, you will have to change the cylinders and bleed the system.
When the linings wear out, they need to be removed and new ones installed.
Overheating of the system is eliminated by immediate shutdown. It will take some time for it to cool completely.
Rear brake mechanism VAZ 2114, VAZ 2115, VAZ 2113, Lada Samara 2
Brake mechanism of the rear wheel of Lada Samara 2: 1 – hub fastening nut; 2 – wheel hub; 3 – lower tension spring of the pads; 4 – brake pad; 5 – guide spring; 6 – wheel cylinder; 7 – upper tension spring; 8 – expansion bar; 9 – finger of the parking brake drive lever; 10 – parking brake drive lever; 11 – brake shield
Wheel cylinder: 1 – pad stop; 2 – protective cap; 3 – cylinder body; 4 – piston; 5 – seal; 6 – support plate; 7 – spring; 8 – crackers; 9 – thrust ring; 10 – thrust screw; 11 – fitting; A - slot on the thrust ring
Drum type, with automatic adjustment of the gap between the shoes and the drum of the VAZ 2115. The automatic clearance adjustment device is located in the wheel cylinder of the VAZ 2114. Its main element is a split thrust ring 9 installed on the piston 4 between the shoulder of the thrust screw 10 and two cotters 8 with a gap of 1, 25–1.65 mm. The thrust rings 9 are inserted into the cylinder with tension, providing a shear force of the ring along the cylinder mirror of at least 343 N (35 kgf), which exceeds the force on the piston from the tension springs 3 and 7 of the Lada Samara 2 brake pads. When due to wear of the linings, the gap 1 .25–1.65 mm is completely removed, the shoulder on the thrust screw 10 is pressed against the shoulder of the ring 9, as a result of which the thrust ring moves after the piston by the amount of wear. When the braking stops, the pistons are moved by the force of the tension springs until the cracks stop against the shoulder of the thrust ring. In this way, the optimal gap between the pads and the VAZ 2113 drum is automatically maintained.
What to do if the caliper creaks or jams
If the brake caliper creaks or jams, and the part is in good condition, you can try to fix the problems yourself. To do this, it is recommended to perform the following set of actions:
- The first step is to unscrew the brake caliper; to do this, you need to put the car on a jack and remove the wheel. It is worth noting that in some car models the caliper can be unscrewed counterclockwise;
- Having removed the caliper, unscrew the piston using a wrench, then it must be pulled out of the cylinder;
- The removed parts must be carefully inspected for chips, rust, corrosion and various damages. If rust is found, it needs to be cleaned well. When the calipers are heavily worn, problems may arise with cleaning the rust with improvised means; in such a situation, the part will need to be sanded;