Any sound reproduction system consists of an electronic and mechanical part. The electronic part is the amplifier, and the mechanical part is the loudspeakers, which are the basis of the speaker system. They often fail, so do-it-yourself speaker repair
will save the owner of the acoustics from serious expenses.
High-quality systems are expensive, and it is not always possible to repair them in specialized workshops. To figure out how to restore a speaker with your own hands,
you need to know its design.
Car Speaker Repair
Car sound systems consist of two or three-way coaxial-type systems and a subwoofer. The coaxial device has an oval or round shape. Its design feature is the installation of a high-frequency head or “tweeter” on a special plate above the broadband acoustics diffuser. The system takes up little space, and the high-frequency head does not interfere with the propagation of sound waves. Car acoustics are subject to many negative influences. The presence of dust and constant vibration are the cause of failure of automotive audio systems.
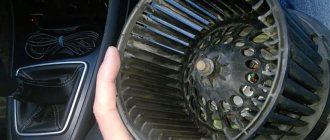
Some models of coaxial car speakers consist of three speakers. Two of which - high-frequency and mid-frequency - are installed above the woofer. Most often, a malfunction occurs in the broadband head. Restore the speakers in the car
Can. This will require a simple tool and some skills. When repairing oval speakers with your own hands, you first need to remove the high-frequency unit.
To do this, you need to unscrew the central screw located on the rear flange of the speaker.
The screw head is usually sealed.
You need to remove the label, then the screw head will be accessible.
After the module is removed, you need to carefully unsolder the wires that go to it. Now you can work on the broadband head. The rubber suspension of the diffuser is pressed against a plastic pad. It needs to be pryed off with a flat screwdriver or a knife blade and removed from the diffuser holder. Then separate the rubber diffuser suspension. It is glued with elastic rubber-type glue, so you can pick up the edge with a screwdriver and then carefully peel it off with your hands. When the edge of the diffuser is completely separated from the metal base, the centering washer is removed. First, the voice coil wires should be unsoldered from the contact plate. Then very carefully peel off the centering washer. It is very easy to damage, so it is better to do the job with a flat and thin screwdriver.
When the speaker is completely disassembled, you can start looking for the defect. A malfunction of the acoustic system is determined by ear during operation. The sound in the speaker becomes distorted, wheezing and crackling appear, especially at high volume levels. Sometimes high frequencies disappear completely, and the sound becomes dull and unintelligible. Mostly do-it -yourself auto speaker repair
comes down to cleaning the magnetic gap of the broadband head from foreign inclusions. Most often, dirt or dust gets into the gap of the permanent magnet.
You can use a vacuum cleaner to remove debris. It is more difficult to remove metal particles from the gap. The speaker magnet is strong and a vacuum cleaner will not help here. When removing magnetic particles, regular tape will help. Small strips of it are inserted into the gap using a thin plate of textolite or other non-magnetic material. Then they are removed along with the adhered particles.
This operation should be repeated several times. You can see the quality of work using a powerful lamp and magnifying glass. The assembly is assembled in the reverse order. It is better not to remove the old glue, as this will allow the diffuser to be installed accurately. All gluing can be done with regular Moment glue. After installing the diffuser, you need to check by hand how well the voice coil moves in the magnet gap. There should be no mechanical interference. The coil should move without effort or rustling. Car speaker restoration and repair
does not require special knowledge, so
anyone can repair speakers with their own hands
Garbage coil getting caught in gap
This can also be treated, but here you will have to tinker longer and it is not a fact that you will be able to properly remove the diffuser and clean the slot from dirt, and then put it back on the glue. How can you repair the column in this case:
- Open the lid.
- Unsolder (disconnect) the wires and remove the speaker.
- We take a cotton or other rope, soak it in acetone and place it around the perimeter of the contact of the upper part of the diffuser funnel with the basket body.
- We do the same with the centering washer, since the diffuser will have to be completely dismantled.
- When the glue softens enough, carefully tear off the diffuser from the upper rim of the basket, and the spider from its bed circle.
- Remove the diffuser and clean the slot from debris. This can be done with a compressor, a vacuum cleaner, or various mechanical devices, for example, cardboard. Under no circumstances should you poke into the slots of the magnet with pieces of iron. If you scratch the surfaces of the walls, the speaker will squeak as the coil rubs against the burrs.
- When everything is clean, we reassemble the speaker in the reverse order as we disassembled it.
- After immersing the coil magnet into the slot, before firmly seating it on the glue, the diffuser should be carefully centered so that no squeaks are heard when the diffuser is immersed down. The coil should move silently in the slot.
- Next, let the glue dry for 24 hours, assemble and test. If everything sounds great, you're doing great. If not, then you're still great. At least they tried. But the speaker will have to be replaced with a new one.
How to restore speakers
Do-it-yourself speaker restoration
largely depends on its design and the nature of the malfunction. When using the speaker system, the following defects may occur in the heads:
- Electrical breakdown of the coil
- The occurrence of short-circuited turns
- Winding damage
- Diffuser rupture
- Dirt getting into the gap of the magnetic system
If there is no sound in the speaker, you need to check the integrity of the voice coil winding using a tester. The resistance of the voice coils is small and the tester can only make sure that there is no break. The presence of short-circuited turns in a 4 or 8 Ohm coil will require special measuring instruments. After removing the diffuser and centering washer, the burnt coil is immediately visible.
If the enamel insulation of the wire has become very dark, this indicates that there may be short-circuited turns in the center of the coil and it will have to be rewinded. There are cases when, due to strong vibration of the voice coil, part of the turns comes unstuck and falls off the coil in a ring. In this case, they can be carefully returned to their place using tweezers and then glued. DIY car speaker repair
associated not only with coaxial, but also with component devices.
Such acoustic systems consist of three speakers and a crossover. A crossover or LC filter block divides the audio range into three frequency bands, each of which is fed to its own speaker. Repairing a component speaker
does not differ significantly from repairing other models.
Character of wheezing
Most often, owners of low-quality speakers complain about wheezing during work.
In this case, interference occurs only at high volumes. To try to find out the true cause of the defect, it is recommended to determine the nature of wheezing:
- temporary interference - wheezing appears immediately after switching on, and after a while disappears or is constant;
- symmetry - the speakers wheeze together or only one of them;
- dependence on volume - wheezing at high, low or when adjusted;
- the presence of wheezing if there is a telephone near the speakers.
You should also pay attention to the technology used to play audio files. Perhaps the reason is not in the speakers. So, if the connected speakers wheeze on the music center, but not on the computer, then problems arise precisely on the first audio equipment.
Important point! If new speakers begin to wheeze, you can send them for free diagnostics by contacting the seller.
Speaker restoration
A common defect is diffuser rupture. Repairing a torn speaker
with your own hands is to restore it. There are different reasons for diffuser damage:
- Wear and tear due to prolonged use
- Mechanical damage
- Voice coil compartment
As a result of wear and tear on the diffuser or exposure to moisture, ruptures may occur. This causes the sound in speaker systems to become distorted. In this case, repairing the acoustic speaker
possible by placing a patch on the damaged area. Despite the density of the diffuser, for its restoration you need to use soft paper such as newsprint. A4 office paper is not suitable for this purpose. Elastic glue is used to glue the patch. It could be PVA or something similar. The back side of the diffuser at the break point is coated with glue. Then a small rectangle of soft paper is coated with glue and placed on the back side of the tear. The paper must be smoothed carefully using a round and smooth object.
If the gap is large, then strips of paper are glued so that they overlap each other and extend onto the undamaged segment of the diffuser. After leveling and smoothing, a second layer of paper strips is applied. From the outside, the crack site is coated with glue. There should be no excess glue, so wipe the diffuser with a soft cloth. The finished structure must dry for at least a day. After complete drying, the quality of sealing and the free movement of the diffuser are checked. If the gluing area turns out to be thinner than the rest of the material, then the gluing procedure must be repeated. Different thicknesses will lead to a tear forming in this place again. The final quality check involves feeding a piece of music from the amplifier output to the speaker. It is best to listen to an excerpt from a symphonic work, since almost the entire frequency range is present there. Car speaker repair
is performed according to a similar scheme.
And now the donors have arrived
I think it’s clear that the donor headphone speakers should have the same dimensions. I was lucky, the drivers were 40mm in diameter at the outer edge, and the coil diameter was about 13mm. The vast majority of computer headphones have the same dimensions. But even among 40 mm speakers there are sometimes speakers with a larger coil diameter.
Now you need to gather all your concentration into a fist and carefully, as if you were a heart surgeon, peel off the diffuser. The diffuser is glued around the perimeter with some kind of rubber glue.
A needle is perfect for hooking up the diffuser. The main thing is to take your time. The diffuser is a thin polyethylene film that stretches easily and breaks quite easily.
It turned out to be more convenient to peel off from the place where the wiring runs. Before this, the wiring was sealed off from the contacts. As the peeling progressed, the knife was also actively used. By hooking the tip of a knife under the diffuser and pressing it on top with your finger, we slowly peel off the diffuser and move in a circle.
As a result, we have what we needed - a donor to repair the headphone speaker. We perform similar operations with the second speaker.
Do-it-yourself repair of pop-up speakers
Sound amplification equipment used in concert venues uses powerful, full-range speakers. Their design differs slightly from conventional models. Since they are designed for power of tens and hundreds of watts, they have a denser diffuser mounted on an elastic rubber suspension. Audio speaker repair
includes voice coil restoration and diffuser repair.
Tinding the wires
In order to be able to immediately solder the wires to the contacts later, it is better to tin them at this stage, i.e. Cover them with tin.
Attention - do not forget the fact that the wiring directly touches the diffuser, and the copper from which they are made conducts heat well. This can easily melt and deform the diffuser.
Wiring is often coated with varnish, which does not burn even with a soldering iron. In this case, an aspirin tablet will help. You can, of course, drink it and it will help with yesterday’s hangover, but in our case it will be more useful if you put wires on it and tin directly on it. But in any case, don’t forget that you need to do everything quickly and wait until the wiring cools down, otherwise the diffuser will go in the trash.
The resulting vapors are toxic! It is advisable to perform these tricks with aspirin in a well-ventilated area.
Speaker repair
When repairing woofers with your own hands, you need to know how to disassemble them so as not to damage the speaker system. All work must be done strictly sequentially. First, remove the dust cap. Since it is glued with synthetic glue, acetone or another organic solvent is used to dissolve it. It is necessary to carefully moisten the rim of the cap with solvent until it can be removed.
Then you need to unsolder the wires coming from the voice coil to the contact panel. After this, treat the edges of the protective ring and rubber suspension with acetone. After some time the diffuser will come off. After this, the centering washer is carefully trimmed and the diffuser, together with the voice coil, can be removed from the magnetic system.
Plug
Very often the problem is in the plugs. In this case, you will need to test with a multimeter. Here's how to fix the column in this case:
- First, let's diagnose the problem. To do this, first of all, remove the cover by unscrewing the fasteners.
- We set the multimeter (tester) to ring and, one by one, touching all the contacts of the plug in the places where the conductor is soldered, coming from the plug to the speaker board, we look for matches. If at least one of the contacts does not ring, that is, does not deflect the arrow or deflects barely, then the problem is either in the wire or in the plug.
- We change the wire and plug together so that “your head doesn’t hurt.”
- We tighten the column cover and check that the repair is complete.
Current speakers do not have plugs. Therefore, you need to ring the wire itself by squeezing out the contacts (clothespins) on the speaker and on the amplifier. If at least one wire does not ring, change the wire, and everything is in order.
Acoustic speaker repair
When repairing acoustic speakers with your own hands
The most difficult process will be rewinding the voice coil. This is labor-intensive and delicate work. After the diffuser along with the coil is removed from the housing, you need to carefully wind up the burnt or torn wire. You don’t have to count the turns so as not to get lost. It is enough to measure the length of the wound wire and measure its diameter with a micrometer to select a similar piece. To wind the coil, you need to use a mandrel of the appropriate diameter onto which the voice coil is placed. This way you can avoid creasing the paper frame. The voice coil is wound strictly turn to turn. For fixation, it is best to use BF-2 glue.
Once the coil has completely dried, the assembly can be assembled. With a little experience, the answer to the question of whether the speakers can be restored will be positive.
Separation of the spider (diffuser centering washer)
How to repair a speaker on a column if the membrane of the centering washer is torn off? We proceed according to the following instructions:
- To diagnose the problem, remove the cover.
- We unscrew the problematic speaker from the case by unsoldering the wires from it. If the speaker has a plug to the board, disconnect it.
- We examine the spider. If it is torn from the basket body, it should be glued in place. This is done using Moment glue or something similar.
Do-it-yourself speaker repair without disassembly
Speakers that are built into acoustic systems can experience not only internal defects, but also external ones. Most often, this is a loosening of the speaker mounts to the front panel of the speaker systems. This causes extraneous noise in the speakers and disrupts the acoustic picture. This happens especially often in car sound systems. If the fastening becomes loose, you need to remove the false panel and tighten all connections. If there is no sound from the speakers, this is often due to a break in the wires running from the amplifier to the speakers. Therefore, before opening the acoustic module, you need to check its functionality.
Failure of the tweeter
To the question of whether it is possible to repair a speaker if one of its speakers is burnt out, we will answer - it is possible. But in the case of a “tweeter”, that is, with a high-frequency speaker, this can only be cured by replacement, since such speakers have a closed diffuser basket and it is not worth trying to disassemble it. This item is disposable.
The damage is determined by hearing. If the speaker stops clicking, that is, producing high frequencies, or the top speaker produces a grinding noise, then the problem is in the “beeper”. What we do:
- Open the cover by unscrewing the fastening screws.
- We check the integrity of the soldering on the contacts of the low-frequency speaker, that is, whether the wires have fallen off from the contacts of the speaker. If everything is normal, then the problem is 100% in the tweeter itself.
- We unsolder the conductors from it, noticing which wire was on the plus and which on the minus (there are symbols on the side near the contacts).
- We take a new (or used, but working) tweeter from a radio equipment store or from friends, if someone has one lying around. The main thing is that the speaker matches the power. It's best to take it with you to the store. People there, if anything, will find an analogue in size.
- Let's put it in place. In order for the speaker to work without extraneous noise and produce high-quality sound, it is best to seat the speaker around the circumference on the sealant, making sure that it never gets on the diffuser funnel.
- Solder the wires. Plus - to plus, minus - to minus.
- Close the column cover by tightening all the screws.
- Let's check. Everything works great.