The smell of gasoline in the car interior is extremely unpleasant. This applies to all cars, and the VAZ 2107 is no exception. The smell is harmful not only to the driver, but also to passengers. There are many reasons why your car smells like gasoline. Let's look at the most common ones and see if they can be eliminated on our own.
- The smell of gasoline in the interior of a fuel-injected car
Leaking gas line - Electric fuel pump problems
- Poor injector adjustment and other reasons
- Fuel line leakage
- Adjustment sequence
- Adjustment sequence
Why the sensor may not show
Cases when the fuel level sensor does not work on a VAZ 2107 are not at all uncommon.
Experienced owners of 7s know what can cause a device to break down. Moreover, sensor breakdowns occur equally often on both carburetor and injection VAZ 2107 models. The fuel level sensor or FLS is a rheostat made of nichrome wire. The position of the moving contact is changed using a float. The device is located on both injection and carburetor models inside the tank. The only difference is that the injection sevens additionally have a fuel pump, which is located next to the sensor. If the fuel gauge does not work, then there is a high probability that there is a malfunction of the sensor in the tank.
Failures of this device manifest themselves in different ways:
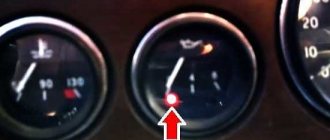
- The pointer indicator is constantly in the “0” position.
- When the car moves, the needle tends to “jump,” which also indicates a malfunction in the fuel level control system.
- When the ignition is turned on, the needle on the fuel level indicator is at zero, but when driving, after a while it begins to function.
- The indicator (light) does not light up, indicating that the amount of fuel in the tank is reduced.
What causes the fuel quantity indicator in the tank on the seven to not work needs to be disassembled in detail, this will help you find out where to start repair work. The causes of breakdowns are:
- The sensor fuse has blown - this element must be checked first so that you do not have to do unnecessary work. If the fuse is blown, the dial indicator will always show “0”.
- The board tracks are worn out - this type of malfunction is directly related to the sensor on which the tracks are erased due to their wear-out. This type of breakdown is not considered serious, as it can be easily fixed. To do this, you need to bend the slider so that it moves along the section of the track that has not yet been erased.
- If the true fuel level in the tank is distorted, it is necessary to adjust the sensor regulator. To solve the problem, you will need to change the position of the FLS pins. Changing the position of the pin is done by moving it to the side until the pointer arrow moves to “1”. The arrow in positions “0” and “1” must be stationary, and if it moves when installed in these positions, then it is necessary to bend the pin accordingly.
- Oxidation of the FLS contacts, which also causes the indicator to become inoperable. To eliminate the breakdown, you will need to clean the contacts.
- The sensor float is damaged - depending on the fullness of the tank, the float moves the moving contact of the rheostat to the appropriate position. The float is a sealed volume of air. If the integrity of the float is compromised, fuel gets inside, which results in the display of incorrect data.
Only after it has been determined why the fuel indicator is not working can the appropriate repair actions begin. However, to identify a breakdown, you will need diagnostics, which every owner of a domestic car can carry out.
Checking the fuel level sensor
Before replacing the fuel level sensor on a VAZ 2107, it is recommended to first verify the causes of the breakdown. Further manipulations should be carried out according to the instructions:
- You need to disconnect the pink wire from the sensor located inside the gas tank. In this case, the ignition must be turned on.
- If the arrow previously displayed a full tank, and after disconnecting the wire, the arrow on the fuel level indicator dropped to “0,” then the sensor itself is faulty.
- If the arrow displays a full tank when the wires are disconnected, this means that the indicator itself in the instrument panel is faulty.
- To check the pointer, you will need to remove the instrument panel, find the wires that are connected to the device and disconnect the gray wire with a red stripe.
- After disconnecting the wire, you need to turn on the ignition and observe the location of the indicator arrow. If the arrow deviates to zero, this means that the pointer is working properly, and the cause of the breakdown is a violation of the integrity of the wire.
REPAIR OF VAZ-2107 GAS TANK, FUEL SYSTEM, FILTER
The VAZ 2107 (classic) gas tank is protected from gasoline drainage!!!! Why is the fuel level sensor not working? Repair, disassembly, Toyota Haice 3L
Diagnosing problems on cars - what to pay attention to?
Diagnosis of a malfunction consists of checking the condition of all components that were discussed above and replacing faulty elements.
In this case, everything begins with a visual inspection, after which it is worth moving on to checking individual components - the fuel filter, carburetor, injector and others.
It is also worth considering that cars with a carburetor and an injector have their own nuances of searching for damage:
Carburetor cars VAZ 2101-2105/2106/2107.
As mentioned above, the weak point of the “classic” is the carburetor, the operation of which is based on a mechanical principle.
To avoid problems, it is recommended to periodically check the device for serviceability.
In case of unprofessional adjustment, fuel overflows from the top, and its vapor enters the vehicle interior.
In injection cars, the problem of overflow is eliminated.
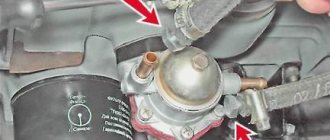
Diagnosing the problem is easy. When the engine is idling, the carburetor is dry and clearly performs its functions. But as soon as you add gas, fuel flows out from under the membrane.
The reason is broken threads or poorly tightened bolts. There are situations when the carburetor leaks the intake pipe to which the supply hose is attached.
Also, on the “classic” there are often problems with the fuel pump, from under the membranes of which fuel leaks. To eliminate the problem, it is worth tightening all the bolts.
Injection cars.
This category includes the currently popular Lanos, VAZ-2107, 2108, 2109, Niva (21213) and other models (including 2110, 21099).
In such cars, there may be a problem with the injector nozzle, which breaks off if there is a defect or improper use.
Problems often arise in the fuel line - in the area from the tank to the engine. For this reason, the first thing to start with is to inspect the fuel line. Once a leak is discovered, it should be repaired immediately.
The VAZ 2107 dashboard does not light up: reasons
If the device on the seven stops activating, check the components.
- Corresponding fuse. The insert often burns out due to moisture or power surges in the on-board network.
- Next, the wiring is checked. Some pins may not fit well or touch adjacent terminals, causing shorts and shorts.
Tidy 2107 does not work
If, when you turn on the ignition when the car is cold, the car does not start and the shield does not respond, check the above points and additionally inspect the ignition switch cylinder. Usually in this place the contact burns out or the connections oxidize, which causes loss of ignition. Highlight the mass damage. Wires may oxidize, resulting in loss of contact.
2107: the tidy does not light up, the starter turns
When the shield goes out or the light is dim, check the operation of the external lamps and the illumination of the car interior. When everything is in order, remove the device and check the contact groups of the module.
The reason for the smell of gasoline in the cabin
There may be several reasons for the smell of gasoline:
- Leaking fuel tank cap. Absence or damage to the seal, or loose lid tightening lead to leakage of fuel vapors during parking and splashing of gasoline while the vehicle is moving.
- Damage to the fuel tank. As a result of corrosion or mechanical stress, a crack or hole may form in the fuel tank through which gasoline leaks.
- Damage to rubber or metal fuel lines. Drying of rubber tubes or mechanical damage to the pipeline leads to fuel leakage from the fuel system.
- Fuel pump malfunction. Gasoline may leak through a damaged fuel pump. For example, in case of damage to the pump gasket on a carburetor engine.
- Depressurization of the two-way valve located under the protection of the gas tank.
- Increased pressure created by an electric fuel pump. This can happen if there is a malfunction in the control unit or pressure regulator. As a result, gasoline leaks in the filter area. Gasoline vapors enter the car through the ventilation and the smell of gasoline appears in the interior of the VAZ 2107.
- Depressurization of the carburetor or injection system. In this case, gasoline vapors also enter the cabin through the ventilation ducts.
How to convert a VAZ 2107 carburetor engine to an injection engine
Replacing the scenes on a VAZ 2110 on your own
Some owners of carburetor “classics” independently convert their cars to an injector. Naturally, such work requires a certain amount of experience in auto mechanics, and knowledge in the field of electrical engineering cannot be done here.
What will you need to buy
The kit for converting a carburetor fuel system to an injection system includes:
- electronic control unit;
- gas tank;
- cylinder head (new or used from VAZ 21214);
- receiver;
- ramp with nozzles;
- fuel pump assembly;
- fuel filter;
- fuel line with rubber hoses;
- throttle assembly;
- accelerator pedal with cable;
- air filter assembly with sleeves;
- front engine cover;
- crankshaft pulley;
- ignition module;
- sensors for mass air flow, damper position, detonation, coolant temperature, oxygen concentration, crankshaft position, detonation;
- high voltage wires;
- harnesses, cables, wires, terminals, thermal casings;
- brackets.
The cost of all these elements is about 30 thousand rubles. The electronic control unit alone costs approximately 5–7 thousand. But costs can be significantly reduced if you buy used parts rather than new ones.
Conversion stages
The entire engine tuning process can be divided into the following stages:
- Removing all attachments: carburetor, air filter, intake and exhaust manifolds, distributor and ignition coil.
- Removing wiring and fuel lines. To avoid confusion when laying new wires, it is better to remove the old ones. The same should be done with the fuel pipes.
- Replacing the fuel tank.
- Replacing the cylinder head. You can, of course, leave the old “head”, but in this case you will have to bore the inlet windows, as well as drill holes and tap them for the receiver mounting studs.
- Replacing the front engine cover and crankshaft pulley. In place of the old cover, a new one is installed with a shimmer for the crankshaft position sensor. At this stage, the pulley also changes.
- Installation of the electronic control unit, ignition module.
- Laying a new fuel line with the installation of a return line, a fuel pump and a filter. The accelerator pedal and its cable are also replaced here.
- Installation of ramp, receiver, air filter.
- Installation of sensors.
- Laying wiring, connecting sensors and checking the functionality of the system.
It’s up to you to decide whether it’s worth spending time and money on conversion, but it’s probably much easier to buy a new injection engine, which costs about 60 thousand rubles. All that remains is to install it on your car, replace the gas tank and lay the fuel line.
Despite the fact that the design of an engine with an injection power system is much more complicated than a carburetor, it is very repairable. If you have at least a little experience and the necessary tools, you can easily restore its functionality without the involvement of specialists.
REASONS FOR UNSTABLE OPERATION OF MOTOR 2114
Let's consider several standard situations that can happen with an 8-valve 4-cylinder engine.
UNSTABLE OPERATION ON A COLD ICE
It often happens that a VAZ 2114 stalls when cold, but as it warms up the engine levels out and starts working stably. There could be several reasons:
- The ECU sets the fuel mixture too rich to cold;
- The spark plug does not work, but when heated, the spark plug still “breaks through”;
- The high-voltage wires are damp or moisture has entered the ignition coil;
- Parts of the piston group are worn out.
UNSTABLE OPERATION OF A HEATED ENGINE
It also happens the other way around - a cold internal combustion engine operates more or less steadily, but as it warms up it begins to throttle. Usually the engine starts when hot because:
- The cylinder head gasket has burned out;
- The ignition coil breaks;
- The engine control unit is faulty.
Engine control unit for VAZ 2114
THE MOTOR STARTS AT IDLE SPEED
Most often, a situation arises when the engine stalls at idle speed. Moreover, it makes no difference whether this happens when it’s cold or when it’s hot. There can be many reasons for this, ranging from a simple spark plug failure to malfunctions in the piston group of the internal combustion engine. While it is very easy to replace a spark plug, wear on the cylinders in the block can lead to a major overhaul.
Most often, the engine does not operate stably at idle in the following cases:
- The valves are not adjusted (clamped);
- The timing belt is installed incorrectly (the marks do not match);
- The IAC is faulty;
- The cylinder head valves are bent or burnt out (the valves can bend during a water hammer when a large amount of water gets into the air filter housing);
- The piston burned out;
- There is a malfunction in the electronic engine control system. The sensors, the ECU itself, electrical wiring and I/O wires may be to blame here.
There are many options for why the car idles at idle, but there are still the most basic ways to determine faults.
How does the device work?
Replacing the fuel level sensor on a VAZ 2113, VAZ 2114, VAZ 2115 To understand the problem yourself, you need to understand how the fuel level is measured and information is transmitted to the instrument indicator. The circuit implemented in most vehicles includes the following main elements:
- a float made of lightweight polymer is immersed in the gas tank and is often combined with the pump block;
- gasoline sensor – lever-type potentiometer (otherwise known as rheostat);
- pointer arrow with scale;
- connecting wires.
In many modern cars, an electronic control unit is connected to the system.
The classic rheostat is an open coil of high resistance wire. A lever equipped with a contact and attached to the float rises or falls with the level of fuel in the tank, and the contact moves along the turns of the winding. The classic scheme works simply:
- The rheostat and the pointer device are connected in series in the circuit, both are powered from the vehicle's on-board network.
- When moving the float with the lever, the resistance of the potentiometer changes.
- A change in resistance causes an increase or decrease in the current in the circuit, to which the indicator arrow reacts. The scale is graduated according to the resistance values corresponding to the filling of the gas tank.
The updated version of the system works with the participation of a controller. The fuel level arrow receives a processed digital signal from the electronic unit that supplies power to the potentiometer. The principle of operation does not change, but the circuit allows you to obtain more accurate readings.
Injector adjustment
Adjusting the VAZ 2107 injector in a garage usually comes down to adjusting the idle air controls. This regulator is a miniature electric motor in which a small needle is installed. The purpose of the regulator is to receive signals from the control unit, supply air to the ramp and thereby maintain optimal idle speed of the “seven” engine. If any failure occurs in this system, the regulator should be checked.
Adjustment sequence
Before starting work, the VAZ 2107 engine must be allowed to cool. This is an important preparatory stage. This takes from forty minutes to an hour (it all depends on the time of year).
- Both terminals are removed from the battery. After this, the speed controller is unscrewed.
Video: how to change the idle air control on a VAZ 2107
Design features of the fuel tank and the possibility of modification
The technical documentation for this car states that it holds only 39 liters of fuel. However, car enthusiasts have proven experimentally that when filling “under the neck” you can pour in up to 45 liters. Such fuel tanks were installed on the entire VAZ family, starting with model 2101. Standard 40 liters of fuel are enough for 451 kilometers. To prevent refueling from taking longer, modifications to the “seven” were in vogue in the nineties of the last century. Many people installed an additional gasoline tank in these cars, which eliminated the need to carry cans with them. Due to the design features of the main tank, the additional tank was placed in the trunk of the car. In some cases, he filled the entire space of this compartment. On the one hand, this is convenient for moving long distances, but on the other hand, another problem arises - it becomes difficult to transport goods.
In addition, due to this modification, the cabin may smell strongly of gasoline, which is unpleasant and can cause poisoning from fuel vapors.
Why should a car's fuel system be sealed?
Currently, the VAZ 2107 car has been discontinued, so it has now become a domestic automobile classic. Despite this, a lot of people drive “Sevens” in our country. The tightness of the fuel system in these cars has always left much to be desired. This applies to both early carburetor “sevens” and later injection ones.
The tightness of the VAZ 2107 fuel system is the key to clean air in the cabin
Meanwhile, the fuel system of any car must be absolutely sealed, and here’s why:
- fuel consumption increases. It's simple: if the car smells like gasoline, it means gasoline is leaking from somewhere. And the larger the leak, the more often the car owner will have to refuel;
- risk of fire. If there is a high concentration of gasoline vapors in the cabin, the risk of fire increases significantly. One stray spark is enough and the interior will be engulfed in flames. And the driver will be very lucky if he survives;
- harm to health. When a person inhales gasoline vapors for a long time, this does not bode well for him. This may cause nausea and dizziness. In some cases, a person may lose consciousness. In addition, systematic inhalation of gasoline vapors can lead to the development of cancer.
Considering all of the above, if the smell of gasoline appears in the cabin, the driver must do everything possible to eliminate this problem, no matter how insignificant it may seem.
Is the range shown on the car's on-board computer accurate?
Many car owners often rely on the vehicle's on-board computer, which shows you the possible range. Therefore, some drivers bring the car to a low fuel level, relying on the on-board computer indicator, believing that the indicated range is true.
Also, many drivers, when a warning about low fuel level appears, immediately look at the on-board computer readings in order to find out how much longer the car can travel on the fuel remaining in the tank (power reserve).
But unfortunately, the range isn't accurate because it's only based on the average of your past driving on the road.
The fact is that the car’s electronics will not be able to show you the true range, since it cannot take into account in real time your current driving conditions that affect the consumption of gasoline or diesel fuel.
For example, if you were driving on the highway before a light appeared on the dashboard warning you about the low fuel level in the car tank, and now you are stuck in a traffic jam, then the range displayed on the on-board computer is actually incorrect, since this indicator is calculated using driving on the highway, where fuel consumption is actually much less than in heavy traffic in the city.
So don't expect to be able to drive very far when there is a low fuel warning.
How to solve the problem if the cause is identified and eliminated?
After the cause of the fuel leak and the strong smell of gasoline has been identified and eliminated, the problem still remains. This is due to the fact that the unpleasant odor remains for quite a long time as it is absorbed into the interior materials.
Car owners use a variety of methods. They treat the interior with household chemicals, a solution of soda or vinegar, and install purchased or homemade flavors, for example, bags of ground coffee. This helps for a while, but the fuel smell often returns.
Contacting specialists who will carry out chemical or ozone cleaning of the interior will radically help solve the problem. To remove the odor, professional equipment and special chemical cleaning agents are used, but they guarantee effective disposal of the problem.
In the video, the owner of a VAZ Lada Niva 4x4 explains in detail the reasons for the smell of fuel in the cabin and how to eliminate it. Applicable to all brands of cars.
Types of protective caps on the gas tank for VAZ 2101-2107
Plastic caps with a key are the basic and simplest protection against gasoline drainage. According to statistics, on average, an experienced attacker needs less than 1 minute to open this security accessory. Its cost is not high, but so is the degree of protection.
Aluminum cover with a code - this protective accessory is convenient because to open it the car owner does not need to constantly carry an additional key with him, and these covers are stronger in physical properties than plastic ones. However, attackers have found a way to break this protection in 2-5 minutes. In addition, there is a large number of defective lids, which is due to many fakes. The metal is very soft, brittle and can crack with little physical impact. The cost of this cover with a code is 50-100% higher than the plastic one.
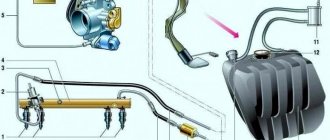
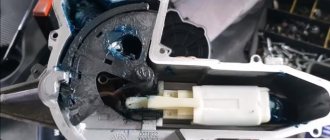
Electric fuel pump with fuel level indicator sensor
Electric fuel pump with fuel level indicator sensor
Repair and operation manual - Features of injection vehicles - Electric fuel pump with a fuel level indicator sensor Electric fuel pump with a fuel level indicator sensor VAZ-2104, VAZ 2105, VAZ 2107 Removing an electric fuel pump with a fuel level indicator sensor from a VAZ-2104, VAZ 2105, VAZ 2107 car
1. Relieve the pressure in the engine power supply system of the VAZ-2104, VAZ 2105, VAZ 2107.
2. Disconnect the wire from the negative terminal of the battery on the car.
3. Disconnect the wiring block and hoses from the electric fuel pump tubes and, having disconnected the fastening clamp, move the upper part of the fuel tank to the left.
4. Using a 7 mm wrench, unscrew the eight nuts securing the fuel pump to the fuel tank around the perimeter of the flange.
5. Raise the electric fuel pump and tilt the electric fuel pump, remove the fuel level indicator sensor float from the hole.
The connection between the fuel tank and the electric fuel pump is sealed with a gasket.
6. To remove the receiving mesh filter, carefully pry it off with two screwdrivers.
7. Remove the filter from the tip of the electric fuel pump.
8. Wash the filter in acetone or a similar solvent, clean it with a hard brush and blow it with compressed air.
9. To replace the fuel level indicator sensor on a VAZ-2104, VAZ 2105, VAZ 2107 car, use a screwdriver to release the locking block of the sensor and electric fuel pump wires. Disconnect the block.
10. Using a slotted screwdriver, press the wire clamp and remove the clamp.
11. Mark the position of the wires in the block so as not to confuse them during assembly. Using an awl, we squeeze out the wire ends of the fuel level indicator sensor and disconnect them from the block.
12. Using a slotted screwdriver, unscrew the screw securing the “mass” wire of the electric fuel pump and the lower fastening of the fuel level indicator sensor, as well as the screw of the upper fastening of the fuel level indicator sensor.
13. Use wire cutters or side cutters to cut the wire clamp.
14. Remove the fuel level indicator sensor.
15. To replace the electric fuel pump on a VAZ-2104, VAZ 2105, VAZ 2107 car, remove the filter from the fuel pump and disconnect the wire block.
16. Use a slotted screwdriver to pry off the electric fuel pump clamps.
17. Move the electric fuel pump from the bracket.
18. Use two slotted screwdrivers to pry up the latch and remove the electric fuel pump from the groove in the holder.
19. Using an industrial hairdryer or hot water, heat the plastic tube of the fuel pump to a temperature of 70-90 °C.
20. Remove the tube from the fuel pump pipe.
Installation of an electric fuel pump with a fuel level indicator sensor on a VAZ-2104, VAZ 2105, VAZ 2107 car
Installation of all removed parts on a VAZ car is carried out in the reverse order.
Quote
Depressurization of fuel sensor joints
Loose joints in the fuel supply system are the most common cause of unpleasant odors in the cabin.
You need to get to the junction of the fuel elements and tighten all the threaded connections of the fuel line.
For greater reliability, you can use laundry soap. It needs to be soaked and all cracks and joints in the fuel system lubricated. The substances that make up soap have the properties of an excellent sealant. They also prevent the smell of gasoline from spreading.
Car alarm with feedback
How to catch an attacker in the act and protect the car from draining gasoline, three conditions are necessary:
- the car must have a car alarm with feedback installed;
- additional alarm functions will be required;
- after the alarm signal, it will be possible to get to the car in a short time (up to 5 minutes).
Most cars on the modern car market are already equipped with an additional option upon sale - a car alarm with feedback. This is a rather convenient security system that has the necessary functionality, compared to ordinary squealers, which only harm those around you.
Imagine that the whole yard is filled with many different cars, but which emit the same sound signals, for various reasons, depending on what they are tuned to:
- strong wind,
- the dog hit
- a car passed nearby, etc.
Who can say with a high degree of confidence that it was the alarm on his car that went off? So car owners have to jump up at every squeak of the “alarm” in the yard and peer intensely through the window to see if the lights on their car are flashing.
Against this background, feedback signaling is much more convenient. The only drawback when installing it on a classic is the lack of protection against gasoline drainage. The gas tank hatch does not have a factory lock on the classic, that is, access to the neck is practically open - remove the cap, insert the hose and drain the gasoline.
The installation of special lids with locks on the neck has already been discussed above. This is not at all effective in protecting against gasoline leakage. There are car owners who have lost up to five covers of different designs. Moreover, during such break-ins, not only the paint near the neck suffers, but also dents remain on the wing.
The smell of gasoline in the interior of a carburetor car
The very first “sevens” were equipped only with carburetors. Due to problems with these devices, the smell of gasoline also appeared in the interior of the VAZ 2107.
Due to poor carburetor adjustment, a gasoline smell may appear in the cabin.
Let's consider typical malfunctions of carburetor "sevens", leading to the fact that the driver began to inhale a specific gasoline "aroma".
Fuel line leakage
Problems with various elements of the fuel line are the most common phenomenon in old “sevens”:
- gas tank leak. It was already mentioned above that in the new injection “sevens” the strength of gas tanks leaves much to be desired. In older carburetor models, the tanks were much stronger. However, the venerable age of these cars cannot be discounted. The tank, no matter how durable it is, begins to rust over time. And the older the carburetor “seven”, the higher the likelihood that the tank will rust through;
- fuel tank hoses. This is another vulnerable element of the fuel line. These hoses are located under the car. They are attached with clamps to the fuel line pipes. The clamps are thin and narrow. Over time, they weaken and the hoses begin to leak. As a result, fuel consumption increases, and the driver begins to breathe gasoline vapors;
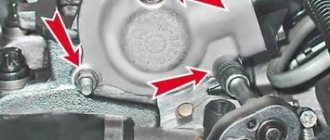
- hoses on the valve for return flow of gasoline. This valve is located in the engine compartment, next to the carburetor. The return hose periodically experiences high pressure, which may one day cause it to crack and leak. Interestingly, the clamps holding the valve almost never loosen or leak. The backflow valve on the “seven” has never been a particularly airtight device
Fuel level sensor of VAZ 2107 does not work
Replacing the fuel level sensor on a VAZ 2101-VAZ 2107
Welcome! Fuel level sensor. it performs only one important function in a car and that is this sensor detects how much petrol is left in the gas tank and then sends a signal to the fuel level indicator located on the dashboard and thus you will know how much petrol is left in the gas tank.
The note! To replace the fuel sensor, you will need to stock up on a basic set of wrenches, which will have a 7 wrench and a 10 wrench, and you will also need to take your screwdriver with you!
Summary:
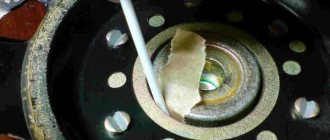
Where is the fuel pressure gauge located? It is located on one part inside the gas tank and the other is taken out and attached to the gas tank nuts. After unscrewing the nuts that secure it, as well as after disconnecting all the wires, clamps and hoses, the sensor can be removed from the hole in which it is located, but more on it a little lower.
For more information on the location of the sensor, see the photo below. As you can tell from the photo on it, this sensor is removed (the sensor is indicated by a red arrow) and the photo shows the same hole where the fuel sensor part is inserted.
When should I change my fuel pressure gauge? If the float wears out or if the sensor itself is destroyed, the following situations may occur with the fuel level indicator located on the panel:
Firstly, the pointer will not move when the tank is full, and its arrow will only rest on the o.
Secondly, when driving or simply when the engine is running, incorrect instructions can be given to the indicator due to wear on the sensor, for example, the tank is filled with gasoline upwards, and the indicator indicator moves or is at the middle sign or almost at the "min" sign.
Fuel level sensor. What's inside, why is it lying?
How to find the right video. about it here Support the project! MAP.
The note! Not in all cases, it is only the fuel level sensor; it happens that the operation of the indicator is disrupted by it, since it does not work, or it may even be in the wiring going from the sensor to the indicator! (If you are not sure if the sensor has failed, see the article "Checking sensors to work on a VAZ" and this article will have detailed instructions on how to check whether the fuel sensor is working or not)
How to replace the fuel level sensor, the same DUT, on a VAZ 2101-VAZ 2107?
Conclusion: 1) Firstly, remove the fuel tank from the car, otherwise the sensor cannot be removed as it will stick to the rear fender of the car when it is removed. (For information on how to remove the fuel tank, see the article: “Replacing the gas tank on a VAZ”)
2) Then remove the six nuts (several nuts have already been removed in the photo, but one nut is not visible) that secure the fuel sensor flange, and then pull out the sensor, thereby removing it from the car.
3) After this, notice where the sensor flange is secured with nuts, but after removing the sensor, the gasket was holding the sensor flange gasket to the pins, which also needed to be removed. The note! If this pad flexes a lot, it shows cracks or anything else, then in that case replace the gasket with a new one!
The note! If this pad flexes a lot, it shows cracks or anything else, then in that case replace the gasket with a new one!
Installation: 1) The new sensor and the gas tank itself are installed in the reverse order of removal, that is, first the sensor is installed in the gas tank, and then the gas tank itself is installed in its place.
The note! All six nuts that secure the sensor flange are carefully twisted and crossed, and with sharp and rough movements, the flange gasket can be damaged, and as a result, the gasoline in the tank will later leak through the gasket!
Tip: Before you buy a new sensor on your car, pay special attention to the markings that are on that sensor, so buy the new sensor with the exact same markings as the old one!
Additional video: For another way to replace the fuel level sensor, see the video clip just below:
The note! This video clip describes all the nuances associated with fuel-injected cars of the “classic” family!
Checking the fuel line
As mentioned above, the smell of gasoline most often occurs due to leaks in the fuel line. Therefore, the driver must know the weak points of this design. When inspecting the fuel line, pay attention to the following:
- integrity of the fuel tank. To inspect it, it is best to drive the car into a pit and use a powerful flashlight. There should be no leaks, dents, scratches or other mechanical damage on the tank;
- checking the fuel line. The fuel line is a system of hoses and tubes through which fuel is supplied from the tank to the engine. Most of this system is located on the bottom of the car. Therefore, the driver must carefully check all connections, clamps and joints of this line for leaks;
All connections on the fuel line pipes should be carefully inspected at least once a month. - connections on the fine fuel filter.
A pair of short tubes are connected to the filter. These tubes, in turn, are connected to hoses. As a result, eight connections arise at once, which very often begin to leak. Therefore, immediately after inspecting the line, you should check the connections on the fine filter; The hoses on the “Seven” fine filter have never had good tightness - air filter. Its condition should also be checked, although it does not relate directly to the fuel line. It's simple: if the air filter is clogged, then even with a completely sealed fuel line you will not be able to get rid of the smell of gasoline, since due to a bad filter the fuel mixture will be too rich.
So, the smell of gasoline in the interior of the “Seven” can arise for a variety of reasons, many of which are not always obvious. However, the driver can eliminate the vast majority of these reasons on his own. All you need to do is simply follow the recommendations above.
Replacement of gas tank and major repairs
Regardless of what type of fuel injection is used on your vehicle, the process for removing the tank will be the same. First drain all fuel from it. Next, carry out the following work:
- Remove the plastic casing from the container. To do this, you will need to unscrew several screws using a Phillips screwdriver.
- Disconnect the wires from the contacts leading to the fuel sensor.
- Use pliers to pry off the fuel hose.
- Unscrew the bolt of the tension plate that secures the gas tank.
- Remove the cap from the neck and carefully remove the tank.
Assess its condition. If there are several leaks or they are too large, then it will be easier to replace the entire fuel container. To do this, simply take a new tank and reassemble it in the reverse order.
If you do not have the opportunity to buy a new container, then stock up on:
- fiberglass;
- epoxy resin;
- acetone;
- sanding paper.
First, dry the tank thoroughly; if you start repairs immediately after dismantling, you will be disappointed with the result. Next, proceed to repair work:
- Cut the fiberglass into pieces so that they completely cover the leaks or holes.
- Impregnate the material with epoxy resin.
- Lay the fiberglass cloth over the leak area and level it so that there are no bubbles on the surface. Remove excess resin. The first layer is the most important, so take your time.
- Dry the patches, then putty them and paint them with primer.
Troubleshooting
If the pointer needle does not move at all, then the first step is to make sure that the wiring is intact. You can ring electrical wires with a multimeter or tester. You should also check the quality of fastening of the terminals to the output contacts of the FLS. If there is scale in such places, they should be cleaned with sandpaper or any other low-abrasive material.
If the wiring is in order, but the indication does not work, then most likely only replacing the fuel level sensor will solve the problem. If it is necessary to carry out this operation on a VAZ 2107 carburetor, then the work is performed in the following sequence:
- Disconnect the negative terminal of the battery.
- Remove the trunk trim.
- Disconnect the wires and hoses from the FLS.
- Unscrew the FLS mounting nuts.
- Remove the sensor with the float from the gas tank.
- Install the new part in reverse order.
On a VAZ 2107 injector, replacing the sensor will be complicated by the need to disconnect the fuel hoses from the fuel pump, which is also installed in close proximity to the fuel tank.
In most cases, a failed fuel level sensor cannot be repaired. The additives included in high-octane gasoline are quite aggressive substances and after a certain period of operation, the current-carrying parts of the FLS that come into contact with the fuel and its vapors can be completely corroded.
Fuel pump
On sevens, most often the appearance of an unpleasant odor indicates a malfunction of the fuel pump. And there may be three problems here:
- the gasket is worn out;
- the membrane has failed (holes or cracks have appeared on it);
- due to inept installation, the fuel line fittings were skewed or they were not tightened sufficiently.
It’s easy to find a repair kit for a fuel pump in the store, and even an inexperienced driver can replace a non-working element.