Replacing the fuel pump: features, instructions
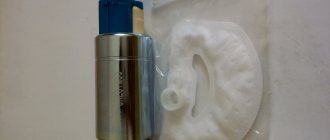
The fuel pump in the power supply system of an injection engine is an electromechanical device that pumps fuel from the tank, creating the required level of pressure in the line to ensure injection by injectors. Subject to operating conditions, the BN operates properly, on average 250 thousand km. However, if you drive with an empty tank, neglect to replace the pump screen, use low-quality fuel, or do not flush the tank in a timely manner, the fuel pump will need to be replaced much faster.
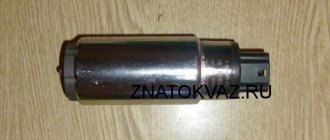
This mesh causes damage to the fuel pump.
Boosting and tuning the engine also affects the service life. Higher performance injectors installed on a car require reflashing the ECU while maintaining the standard fuel device, which begins to operate at the maximum limit, which leads to overheating and subsequent breakdown. These and the listed reasons, natural wear and tear, eventually require the driver to replace the fuel pump.
You can check the serviceability of the BN on an injection car by connecting a pressure gauge to the ramp. The noise when turning the ignition key in the form of a hum and buzzing indicates the operation of the pump - pumping fuel, creating pressure. If there are no operating signs, this may indicate a malfunction of the entire structure or its individual parts.
Common signs of failure are:
- Intermittent movement of the machine;
- Floating engine speed at idle;
- Reduced dynamic performance of the car;
- Retarded engine starting.
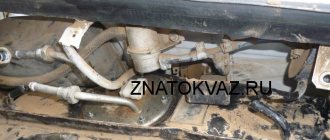
To begin the replacement procedure, you must remove the device. It is located in the tank, directly immersed in gasoline. In most cars, the fuel pump is located under the bottom in the rear. You can get to it through the salon.
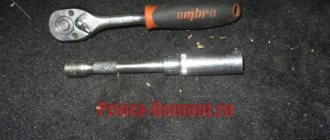
To dismantle the pump you will need the following tools:
- set of heads;
- open-end wrenches;
- tubular wrench;
- special key.
Despite the differences in the fastenings of devices of different brands, the principle of removal remains unchanged.
Important! Immediately before removal, it is necessary to reduce the pressure from the supply system.
This is done in two ways:
- disconnect the pump connector while the engine is running, wait until it stalls;
- release a certain amount of fuel by pressing the rack valve located under the hood.
Once the pressure has dropped, you can begin to dismantle the fuel pump. Be sure to disconnect the terminal on the battery during operation. Next, you should adhere to the following algorithm:
- remove the electrical connector (chip);
- loosen the clamps on the fuel lines (return line for returning gasoline to the tank, fuel supply pipe).
Now you need to remove the lines themselves from the fuel module. Before doing this, you need to pay attention to the type of attachment to the fuel pump terminals. As a rule, the standard fastening is unscrewed using a fitting using an open-end wrench.
Multi-plunger injection pumps and their design features
Each section of the system has special pushers. At the beginning of the power stroke, a certain amount of fuel enters the plunger through the inlet port. At the end of the stroke, the supply channel closes, the cylinder creates pressure under which fuel is pumped to the nozzle for subsequent spraying into the cylinder block.
Peculiarities:
- In a row arrangement, pairs of plungers are located side by side;
- With a V-shaped arrangement of cylinders, pairs of plungers are in two rows.
How distribution injection pumps work
The fuel pumps that replaced the carburetor engine have a longer service life and improved drive. Distribution systems often have one plunger, which provides efficient supply to the engine, but at the same time wears out quickly and requires service work.
The pusher drive is made in the form of a cam mechanism, rotary or mechanical. There are systems with external drive. When a push is received from the cam, the plunger is pushed upward with a subsequent increase in pressure. Thus, the high-pressure fuel pump supplies gasoline or diesel to the injectors through the distributor channel for subsequent delivery to the cylinder blocks.
Do I need to change the entire module assembly?
Repairs are carried out after determining the cause of the malfunction:
- First you need to unscrew the fuel lines, then the pressure ring using a tubular wrench, depending on the brand and mounting options. There are indicator arrows on the fuel pump itself and other parts of the device (remember how they are located, this will help during reassembly);
- Remove the O-ring, and then carefully remove the BN from the tank without damaging the float sensors;
- There is a rubber seal on the seat of the fuel module. We also take it out by pulling it up.
The final stage of replacement is the installation of a new pump with the replacement of rubber seals, sold separately or as a set. During installation, ensure the correct position of the pump, paying attention to the arrows on the pump itself, rings and covers. In some cars they should converge in one line, in others the arrow on the pump should point to the rear of the car. Therefore, when removing it, it is recommended to remember the original markings.
Assembly is carried out in reverse order. It is recommended to tighten fasteners to the permissible torque. Elements that are overtightened may burst. If you don't tighten it, the pump will hang in the tank, which is also wrong. Upon completion of installation, you need to attach the lines, connect the terminal and power connector. During installation, it is important not to break the sensor for determining the gasoline level in the tank in order to avoid replacing them in the future.
Flushing the pump mesh is necessary if, during diagnostics, the fuel module does not produce the required pressure or operates at the maximum possible limit to maintain it. To clean it, you need to dismantle the BN located under the seat. In addition to the mesh, the gas tank itself will need to be flushed, especially if the vehicle has been in use for a long time. Such measures are necessary because debris and dirt in the tank can accelerate the failure of the new filter. After washing or replacing the pump filter, you need to clean the injection nozzles and the pressure regulator in the rail. Such measures will help eliminate extraneous noise in the pump.
When is it necessary to replace the fuel pump motor? Then, after washing, the BN continues to make noise. Replacement is also necessary in cases of low fuel pressure or sudden changes in fuel pressure, which are visible at the time of diagnosis using a pressure gauge. If the BN whistles or hums, this is also a reason for replacement. In this case, you can save money on repairs and not replace the fuel pump assembly. The pump is dismantled and then disassembled into parts. The motor is sold separately, the worn one is removed, a new one is installed. The fuel sensor and housing, if they are in good condition, are left from the old BN.
How to remove the quick release from the fuel pump?
It is necessary to carefully press the buttons on the sides of the fitting and pull it away from the fuel pump module. If the quick-release connector does not come out, slowly treat it with a liquid wrench, blow it with a compressor and repeat the procedure. After this, dismantling can be carried out.
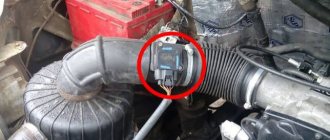
Carefully remove the connector from the fuel pump module
When is it necessary to repair the contacts inside the module, or more precisely at the power terminal?
A restoration procedure is required when contacts burn out. As a rule, a burnt contact is the cause of insufficient current, and therefore low pressure in the system. Repair work can be carried out at a service center or repaired yourself. Let's consider one of the options on how to do this. We remove the pump chip and carefully look at the contacts. If one of them is burned out, it needs to be cleaned with a needle, the rest should be pressed onto the chip. To enhance the pairing, the contacts in the BN connector can be slightly bent. These measures will help return the fuel device to operating mode, without complete replacement.
Basically, this picture happens on VAZ fuel pumps
PROS AND CONS OF INSTALLING AN ELECTRIC FUEL PUMP
The obvious advantages of using such a fuel supply system include:
- ensuring a stable supply of gasoline throughout the entire range of engine operating speeds;
- ease of installation, which does not require large expenses and the involvement of professional car mechanics: all work can be easily done in the garage with your own hands;
- minimal maintenance and system reliability. The pump does not require intervention during its entire service life. The main thing is to periodically change the fine fuel filter;
- ease and efficiency of returning the fuel route to its previous state using a mechanical fuel pump. This is a definite plus if you suddenly have to repair the car “in the field”;
- low cost of modernizing the fuel system. At least over the life of your car, you spent a lot more money on replacing standard fuel pumps.
But this system also has a number of disadvantages:
- The pump is cooled solely by the gasoline passing through it. It is enough to drive a “dry tank” several times for it to overheat critically and fail. This must be taken into account.
- Vibrations and noise of the pump during operation. But it is worth noting that you cannot hear them over the noise of the engine, not to mention the noise when the car is moving. If sound insulation is installed in the engine compartment, it is almost inaudible even when the engine is not running.
- Dependence on electricity. With such a pump, it is necessary to monitor the condition of the battery and the performance of the generator.
- The need for a return line. Excess pumped gasoline must be returned to the tank, which is why “return” is required. Therefore, owners of very old VAZs and AZLKs without a return line will be forced to buy additional pipes and install a return line.
In practice, the disadvantages of using a pump cannot even be called full-fledged disadvantages - these are simply features of the design and operation of the fuel system on an electric fuel pump as a whole.
Check the removed fuel pump
A malfunction in the pump does not always mean that the device itself is broken. The reason may be in any part or unit. For example, a common problem is a blown fuse. Each brand has its own location, which is described in the instructions. Often, you need to look for the fuse box on the left side of the steering wheel or under the hood.
To check the condition of the pump, diagnostics are needed. After assessing the condition of the fuse, the voltage on the device is checked. It is necessary to exclude damage related to the battery. Using a tester (multimeter), the voltage at the terminal is measured. No results? So you need to check the contacts. They must be in place and connected to ground. Oxidation or breakage of one contact can cause failure of the entire fuel module system. If a break is excluded, but the voltage reading drops by more than 1 volt, then the contact is oxidized or there is a problem in the wiring. If everything is fine with the contacts, then the problem is in the BN.
The operation of the pump will be checked according to the following scheme:
- Fuse. If the pump does not buzz when you turn the ignition, you need to check the plate on the BN fuse; it should be solid;
- Relay. If you don’t hear clicks from it, you need to check the relay coil for breaks by connecting a 12 V lamp to the contacts;
- Nutrition. To check the supply to the pump, it is necessary to connect a voltmeter to the connector; the operating voltage should be from 12 to 12.5 V. The resistance of the stator winding is measured at the moment the power is supplied;
- You can check the BN for functionality if you directly supply power from the battery. This test method will show the performance of the pump. Also at this stage it is recommended to check the level of contamination of the coarse filter;
- Pressure testing can be carried out in several modes: static and dynamic. Measuring the pressure in these conditions will show the performance of the injectors and check valve. The optimal pressure level is from 3 to 3.7 atm (depending on the brand of car). After the car is started, the pressure in the ramp should not drop sharply.
How does a fuel pump malfunction manifest itself?
It is necessary to check the functionality of the mechanism if:
- the power unit refuses to start;
- the engine often stalls;
- you can feel the car's power and dynamic characteristics being reduced.
What causes problems?
The fuel pump may simply stop delivering gasoline. This happens when the filter elements are too clogged. Their price is cheap. Therefore, they can simply be replaced with new ones.
Other parts may also wear out:
- the diaphragm may be damaged;
- the spring may stretch and lose its rigidity;
- valves may be dirty;
- the unit may lose its tightness.
Another common breakdown is that the pump works until it warms up. Then the device overheats and stops functioning. This is due to the fact that a so-called vapor lock forms inside, which closes the passage for gasoline. To eliminate the breakdown, you need to replace the gaskets, rod or entire pump. As a last resort, if you just need to drive to the nearest auto repair shop, you can cover the fuel pump with a wet rag to enhance heat transfer. If it overheats, run cold water over it until you arrive at your destination.
Replacing the gasket under the fuel pump
It is recommended to replace the rubber seals, including the pump gasket located under the fuel pump. This part is intended for one-time use, so it is not reinstalled after the device is removed.
Ring gasket
What to do if the pump fitting is broken? It requires urgent repair or replacement with a new one. It depends on the specifics of the breakdown, whether the fitting on the cover of the fuel pump module has broken, on the pump itself, or whether we are talking about the fuel supply and return fittings. If the problem is serious, it is recommended to purchase a new kit along with a cover, sold at a car service center.
REPLACEMENT GUIDE
Let's look at how to change the fuel pump yourself using the Hyundai Solaris as an example.
- Unscrew the mounting bolts and remove the rear seat cushion.
- Cut off the sealant with a utility knife.
- Remove the power plug.
- Using pliers, loosen the self-tightening clamp and remove the gasoline vapor removal hose to the adsorber.
- Remove the fuel supply hose.
- Release the ventilation hose going to the gasoline vapor adsorber from the bracket.
- Unscrew the fastening screws and remove the pressure plate.
- Pull out the fuel module.
- Remove the rubber seal.
- Disconnect the power plugs.
- We recommend removing the FLS to avoid damaging it during module disassembly.
- Remove the fuel pipe tip stopper.
- Remove the tube and O-ring.
- Press the latches of the metal guides, and then separate the parts of the housing.
- Release the latches and pull out the filter element housing complete with regulator and fuel pump.
- Unclip the fuel pump clamps.
- It is advisable to install a clean mesh on a new fuel pump. At this stage, all you have to do is assemble all the elements in the reverse order of removal.
Car won't start after replacement
Car won't start after replacing fuel pump? This phenomenon is not uncommon. In many cases, this is not a problem. The car cannot start immediately because the pump takes time to pump up the pressure that was previously reduced. To bring the pressure to the optimal level, you need to turn on the ignition for 5 seconds so that the instrument panel lights up. Next, turn the engine with the starter. If it doesn't work on the first try, you should wait about a minute and try again.
If cranking the starter does not help start the engine, then one of the following reasons may be occurring:
- errors were made when assembling or connecting the BN;
- the new fuel module is faulty;
- the car's security system has gone down or a blockage has occurred;
When installing and connecting a new pump, failures of various types are possible: from malfunction of the valves on the fuel pump to breakage of contacts, terminals or connectors.
It is important to identify the exact nature of the problem and determine its type - electrical or mechanical. The simplest breakdown relates to the power supply to the fuel pump; it either exists or it doesn’t. If we are talking about an immobilizer or alarm system, then the anti-theft system can turn off the power supply to the BN, preventing the car from starting. Don't forget about filter clogging either. If the valves are stuck, the device can operate and produce characteristic sounds, but at idle.
The listed malfunctions prevent fuel from entering the ramp, so the engine cannot start. To clearly determine the cause, it is important to make sure that there is no gasoline in the rail. Next, it is recommended to dismantle and connect the BN from the dimensions or batteries directly. This method is considered the fastest for checking the device.
What problems can you expect when replacing a fuel pump?
The main problem that can await a car enthusiast who decides to replace the fuel pump on his own is that the result, contrary to what was expected, may be negative. The fuel supply is still interrupted or not at all. To prevent this from happening, before starting the work described above, make sure that the problem was in the fuel pump and not in something else. It is necessary to remember that if you have low pressure in your car and the fuel flows intermittently, then the fine filter may simply be clogged, or the fuel lines are bent, or the injectors located on the fuel rail are clogged. Even if you did not replace the air filter on time or your throttle valve is coked, any of these malfunctions will be similar to a malfunction of the fuel pump. But as the video shows, the most common problem that occurs in this case is insufficient contacts in the electrical block, which is installed on the fuel pump, or the fuse has simply blown.
Replacing a fuel pump with your own hands: step-by-step instructions, features and recommendations
In this article we will talk about how to replace the fuel pump on various cars. In total, there are two injection systems on gasoline engines - injection and carburetor. The latter is rarely used and is no longer installed on new cars, since engines with such injection do not meet environmental standards. Today, carburetor engines can be found exclusively on motorcycles, gasoline generators, saws, and mowers. Injection systems are installed on all cars.
Classification and design of fuel injection pump
Pump sections that provide high fuel pressure for a diesel engine are of three types:
- In-line mechanisms - plunger pairs for each cylinder;
- Distribution, for passenger cars, more compact;
- Main line, used in fuel supply systems.
The latest type of fuel injection pump belongs to a new generation of systems and is controlled by a computer. An injection engine should not be confused with a high-pressure fuel pump, since this is primarily an injection system.
Depending on the type of plunger drive, fuel pumps are pneumatic, hydraulic and mechanical.
Design of the carburetor injection system
Before replacing the fuel pump on a VAZ, it is necessary to consider its design. There is nothing complicated about it, but the work is influenced by many factors. In fact, the entire design of the injection system consists of several elements:
- Fuel tank.
- Highways.
- Carburetor.
- Fuel filter.
- A fuel pump driven by a camshaft.
To understand how a pump works, you need to understand its design.
Useful information and nuances of installing filters
It’s interesting, but original filters for Ford Focus are practically never found on sale. Thus, the manufacturer forces you to change the entire pump assembly. The Ford Focus car uses two types of filters: FGO (for coarse cleaning), which is a mesh, and FTO in the form of a flask.
The purpose of the filters does not need to be described in detail. Let's just say that they efficiently clean fuel in two stages. This practice has long been found in the automotive industry: one filter removes all large particles of debris (mesh), the other qualitatively cleans the fuel before it is directly supplied to the engine.
The coarse mesh on the Ford Focus is located inside the pump
Fuel filters on a Ford Focus can have different designs and be located in different places, depending on the modification and system of the car. For example, on injection internal combustion engines, the FTO remote filter is located near the tank, and the FGO mesh is located inside the fuel pump.
Signs of a car fuel pump malfunction
On a Ford Focus, the FGO mesh is considered a disposable, non-removable element, and according to factory instructions, it can only be replaced when assembled with a pump. The replacement schedule for FTO (external) is every 60,000 km, for FGO (submersible) – every 120,000 km.
Replacing the remote filter is quite easy. You need to crawl under the car, which you have previously placed on a lift or pit. Before doing this, you should put on protective gloves and open the sash or window in the garage to allow benzene vapors to escape. To ensure fire safety, it is recommended to turn off all heating devices.
Next you need to act in the following sequence:
- Pour some fuel into the tank, start the engine and wait until it turns off (the system runs out of fuel - the pressure is released).
- The filter is attached to the body with a bolt, and you need to unscrew it.
- Disconnect the fuel hoses going to the filter (prepare an empty container in advance into which the fuel remaining in the pipes will be poured).
- The filter can then be removed by disconnecting it from the clamp.
- Tighten the new FTO into the clamp.
It is extremely important not to forget to mark the tubes, hoses and fittings that we remove
The Ford Focus remote filter is located separately from the pump
When installing a new filter, you should pay attention to the arrow marked on the housing. It indicates which side of the filter element should face the engine (i.e.
The filter must be placed so that it is directed with the arrow towards the car engine)
e. the filter must be placed so that it is directed with the arrow towards the car engine).
The arrow on the filter should point towards the engine during installation.
Replacement of the mesh is carried out together with replacement of the pump. However, there are motorists who know how to clean the mesh without changing it. There is another option: install a mesh from another car model at the inlet of the original fuel pump, thereby creating additional filtration. This is something like an upgrade designed to improve the stability of the engine for some time. In fact, only a full replacement of the element will make it possible to improve the dynamic and technical performance of the engine if the submersible filter no longer copes with its duties.
Almost all Ford Focus have a hole cut on top of the fuel tank, which is provided for removing the pump and filter without dismantling the entire tank.
The replacement algorithm looks like this:
- The rear sofa reclines.
- The wires going to the pump determine its location.
Wires to the fuel pump will help determine its location - If the hatch is not provided by the manufacturer, then you should use metal scissors to cut and bend the iron just enough so that it is enough to remove the pump.
A hatch cut out with scissors will provide easy access to the pump. - The pump is held on by a nut that must be unscrewed.
After the pump is dismantled, you need to remove the bottom plastic cover protecting the mesh.
The submersible filter is located inside the pump, it is hidden by the bottom plastic cover
All that remains is to remove the submersible filter and replace it. If the pump is being replaced, then you need to install a new unit in place of the old one. After assembly, be sure to pump some fuel into the system with the starter, but do not start the engine. Then you should check the connection for leaks. The car must also be tested in motion. If there are no leaks anywhere, all hoses and tubes are properly secured, then you need to drive the car at speed along the highway, then downhill. This is how the fuel supply is checked in different driving modes.
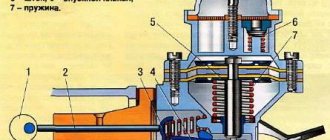
How does a fuel pump work?
Let's figure out how the pump works. It consists of a housing in which there is a membrane and two valves - inlet and outlet. The membrane is acted upon by a spring, which returns it to its original position. When replacing the fuel pump mesh, you will have to completely disassemble the housing. In some cases, you may have to install a repair kit. It includes gaskets, membrane and valves.
The pump is driven from the camshaft - it has an ellipse-shaped section. The convex part of the camshaft pushes the rod, which drives the fuel pump mechanism. At the same time, the spring is compressed, the membrane moves, the inlet valve opens, and the outlet valve, on the contrary, closes. Gasoline is injected into the pump chamber. When the membrane moves in the opposite direction, the intake valve closes, the exhaust valve opens, and gasoline flows through it to the carburetor.
Please note that a filter must be installed in front of the pump to clean gasoline from harmful impurities.
Fuel quality
In addition to failure to comply with maintenance intervals, another common reason that leads to fuel pump failure is gasoline. Not all gas stations have the same quality. Some of them violate transportation and storage rules. As a result of systematic refueling at such gas stations, a large number of foreign particles accumulate in the tank, which clog the fuel pump screen.
This is manifested by a loss of engine power, jerking of the car when driving and, oddly enough, excessive fuel consumption. You have to remove the fuel pump and service it. If this is not done, then it will become impossible to drive the car; fuel will simply stop flowing to the injectors. The reason for this is clearly visible in the photo of a fuel pump with a clogged screen.
When to change the pump?
When replacing a fuel pump, you need to perform simple manipulations, but what can lead to this work?
A list of reasons why the fuel pump malfunctions is given below:
- Rod wear can be solved by replacing it. In some cases, it is sufficient to remove one or more gaskets installed under the housing.
- Destruction of the membrane leads to gasoline leaking out of the housing. Air leakage begins, no pressure is created at the outlet.
- Valve malfunction - usually due to excessive heat. When cooled, valve operation returns to normal. As in the previous case, no outlet pressure is created.
And, naturally, physical damage to the pump housing leads to the fact that it stops working normally.
Is it possible to repair a fuel pump yourself?
Mechanical fuel pumps, due to their simple design, are subject to repair - in fact, there is nothing special about them that can break. Most often the membrane fails, sometimes the rod. All this can be replaced, although most car enthusiasts prefer not to bother and buy a new pump - it is inexpensive and can be replaced in literally 10 minutes.
As for the electric fuel pump, it is not recommended to repair it, especially on your own. Theoretically, the electric fuel pump cannot be repaired - this is provided by the manufacturer. In practice, some craftsmen open the case and try to repair or replace damaged or failed parts. Such amateur activity is fraught with serious damage to the fuel system, so there is no point in experimenting, and it is better to purchase a new pump.
https://youtube.com/watch?v=CGyxJakTXvM
How to change a gasoline pump on carburetor engines
The procedure for replacing a fuel pump on carburetor cars is not complicated. First, you need to turn off the engine and let it cool to make repairs more comfortable. Then perform simple manipulations:
- Remove the hoses from the inlet and outlet of the fuel pump.
- Unscrew the two nuts that secure the pump housing to the motor.
- Carefully remove the housing.
- Remove the pump rod and remove the old gaskets.
Reassemble in the reverse order, change the rod if necessary and install a sufficient number of gaskets. It is important that the rod protrudes no more than 1.2 mm above the surface.
Replacing the fuel filter Lada Kalina
1. First of all, you need to purchase a fuel filter and a fuel pump; you can find out the brand in the operating manual or technical documentation, or simply ask an experienced consultant at the store for advice.
2. Before installing the fuel pump mesh, you must remove the black rubber band.
3. Remove the rear seats and gain access to the cover under which the fuel pump is located; to do this, you need to unscrew the four mounting screws.
4. Before continuing, you need to clean the surface from dust using a vacuum cleaner or a damp cloth, everything must be clean, otherwise dust, sand, etc. may get into the tank.
5. In the photo I marked the place where it is necessary to remove the fuel hoses.
6. Now let’s talk about how to remove the fuel hoses of the fuel pump: press the screwdriver on the lock on one side, and use the other to pry the fuel hose in the direction of the arrow. Now remove it, be careful and extremely careful not to break anything.
7. Wipe the pump using a rag.
8. Remove the golden-colored locking ring; the arrows in the photo indicate the direction in which to unscrew. It will take a lot of force to move the ring out of place, for example I used a hammer and a screwdriver.
9. Carefully remove the fuel pump; if you are not confident in yourself, put some kind of rag on the fireman, this will “save” your interior in case you accidentally spill gasoline in the cabin. The pump is covered with a characteristic yellow coating.
Injection injection system
The injection system looks a little more complicated - it uses an electrically driven pump. It is placed inside the fuel tank and has a mesh filter for cleaning gasoline.
When replacing the fuel pump filter, you will have to completely remove the entire unit along with the fuel level sensor. The system works as follows:
- When the ignition is turned on, power is supplied to the electronic control unit.
- All sensors are polled, including the one that measures pressure in the fuel line. If the pressure is insufficient, the control system sends a pulse to the fuel pump switching relay. The pump turns off after the nominal pressure is reached in the line. You may hear a humming sound when you turn on the ignition.
- When the engine starts, the fuel pump works intermittently - it turns on and then turns off. The frequency depends on what operating pressure range is “sewn” into the control unit.
- When the engine stops, the electric pump also turns off.
In general, as you can see, nothing complicated. Let's now move on to fuel pump failures.
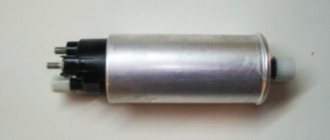
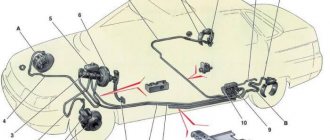
What is a fuel pump used for?
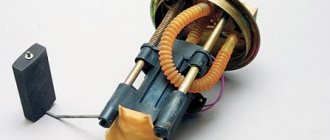
This unit is designed to ensure an uninterrupted supply of fuel to the engine during operation. In most cars it is located inside the fuel tank. This design feature can make it a little difficult to access. As you can see in the video, the entire fuel assembly, in addition to the pump itself, includes: a fuel sensor with a float and a fuel pump mesh (also called a coarse fuel filter). Two fuel lines are connected directly to the fuel pump itself:
- Fuel supply line. The ramp with injectors is powered from it (through a fine fuel filter);
- Fuel return line. Through it, with the help of a pressure regulator, fuel returns to the tank. This creates a constant circulation in the engine fuel system.
The main characteristic of a fuel pump is the pressure it creates. The pressure created will depend on the engine displacement. The larger the engine size, the greater the performance of the fuel pump should be.
What kind of breakdowns can happen?
On a Ford Focus, replacing the fuel pump is carried out in approximately the same way as on any other injection car. But what can lead to such, frankly speaking, expensive repairs?
Let's look at what malfunctions can happen to the pump:
- Failure of the switching relay or fuse.
- Impeller destruction.
- Wear of the brush assembly.
- Damage to electrical wiring.
- Failure of the stator or rotor winding.
- Filter element clogged.
In general, these are all the breakdowns that can occur with the fuel pump on any car. Moreover, the pump will have to be removed and repaired only in cases 2, 3, 5 and 6. In other cases, there is no need to remove it.
Electric fuel pump for VAZ 2107
Increasingly, owners of “classics”, including the VAZ 2107, are installing modern devices on their cars. So, the mechanical fuel pump is replaced with an electric one. The main goal of introducing an electric fuel pump is to get rid of the problems that arise with standard pumps. However, you need to understand that if on injection “sevens” such a mechanism is installed directly in the gas tank, then on carburetor cars it is placed under the hood.
Which one can be installed
As an electric fuel pump, you can install any device designed to work on fuel-injected cars on the “classic”. Based on reviews from Zhiguli car owners, Chinese-made pumps are often used, as well as Magneti Marelli and Bosch
It is important to know that the product must provide low pressure. A standard mechanical pump produces about 0.05 atm
If the indicator is higher, then the needle valve in the carburetor will simply let fuel through, which will lead to it leaking out.
Installation of an electric fuel pump
To install an electric fuel supply pump on a carburetor “seven”, you will need a certain list of materials:
- tee 8x6x8 mm;
- fuel line for VAZ 2107;
- check valve from the "eight";
- 8 mm threaded fitting;
- clamps, blocks from Kalina for a four-pin relay (3 pcs.) with a fuse holder;
- the four-pin relay itself (3 pcs.);
- fuel jet (150);
- fuel return hose from the V8;
- wires;
- non-latching button.
We carry out the work in the following sequence:
- We lay the fuel pipe (return) parallel to the standard fuel line, securing it in the factory locations.
Video: installing an electric fuel pump on a VAZ 2107
Once the installation of the mechanism is complete, it will function according to the following algorithm:
- after turning on the ignition and pressing the pumping button, the pump is activated and pumps up gasoline;
- when the starter starts, the fuel pump turns on;
- while the engine is running, the pump is powered by a generator;
- after the engine stops, the operation of the unit stops.
Installation benefits
Owners of Zhiguli cars who have installed an electric fuel pump on their cars note the following advantages:
- an engine with such a device operates more stable at idle speed;
- when accelerating sharply, the car responds well to the pedal, there are no dips, which is not the case with a mechanical pump;
- when switching gears there is a smooth ride, and when the gas is abruptly released there is no twitching;
- at high speeds the engine spins better;
- there are no jerks at low speeds when starting the car after a long trip.
The VAZ 2107 fuel pump sometimes has to be repaired or replaced. Doing this is not as difficult as it might first seem. Repair and adjustment work is carried out with a minimum set of tools in accordance with step-by-step instructions.
Signs of pump failure
Before replacing the fuel pump on a Nissan or any other car, you need to make sure that it is the one that is faulty. One of the main signs that the fuel filter is clogged is that when you turn on the ignition, the pump runs for too long and makes a loud noise. This suggests that he cannot quickly gain pressure. As a rule, this does not happen abruptly - it cannot be that everything worked perfectly yesterday, but today it pumps poorly. If this happens, then the reason is most likely not in the filter, but in the pump itself.
Signs and causes of malfunction
The design of the injection pump remains a mechanism that is difficult to diagnose in a garage environment. Detection of faults occurs at special stands. Among a large group of factors that confirm problems with a main or other type of injection pump is the presence of foreign media in the system - water, fuel and contaminants. In practice, problems with the pump are identified by increased fuel consumption, engine overheating, a drop in dynamics and power, and an increase in the amount of smoke in the exhaust gases. The lack of injector activation will be indicated by difficulty starting the engine, interruptions in idling and increased noise while driving.
Replacing the pump
To replace the fuel pump, you need to arm yourself with a set of tools. After this, proceed to dismantling:
- You fold down the rear seat and underneath there is a niche with a pump installed.
- Disconnect the block with wires.
- Remove the tubes and hoses that go to the fuel pump.
- Unscrew all the nuts that will secure the housing to the gas tank.
- Carefully remove the pump along with the fuel level sensor.
- Disconnect the pump from the fuel level sensor.
If it is not possible to replace the pump, repair it. To do this, as a rule, it is enough to install new brushes.
But it also happens that one or more windings on the rotor or stator fail. In this case, of course, it will be easier to install a new electric pump. But if you have suitable wire or working spare parts from old pumps, you can try to repair it. As a rule, this is quite difficult to do - the damage is usually so severe that the pump elements cannot be restored. Therefore, the best way out is to install a new or used device.
After repair work, everything must be reassembled in the reverse order. And don’t forget to install a rubber gasket, otherwise gasoline will start leaking out. When replacing the fuel pump mesh, you will have to perform similar manipulations, but you do not need to install a new electric drive.
Replacing the fuel pump and fuel pump mesh for Lada Priora
Replacing the mesh in the fuel pump of Lada Priora
Today I decided to change the strainer on the fuel pump. First, I removed the back seat and unscrewed two bolts on the cover that leads to the fuel pump.
We disconnect the wires going to the fuel pump and get behind the wheel. We start the car and let it idle until it stalls, thereby releasing the pressure inside the pipelines. Be sure to bleed.
Disconnect the wiring harness.
We disconnect the two pipelines that are attached to the fuel pump. Removed by pressing on the iron bracket and, pushing away from you, disconnect the pipeline from the fuel pump
Disconnect two pipelines
Unscrew the eight nuts by 10.
Next, remove the fuel pump holder ring and put it away so that it does not interfere with us.
Then, carefully removing the pipeline hoses, holding them with your hand, we pull the fuel pump itself out of its seat, most importantly, without excessive effort, and carefully so as not to damage the float on the fuel pump.
After removing the fuel pump, disconnect the plastic pipe. Without removing it we will not be able to disassemble the fuel pump
Remove the two small retaining rings on either side of these guides.
Then we disconnect the plastic fasteners (there are three of them) by detaching them, we can get to the mesh itself.
We got to the mesh, as we see, there are some shavings on it - this means the filter is working well. Next we will remove it to exchange it for a new one.
Using a screwdriver, pry up the mesh and remove it from the fuel pump seat.
Side view of the mesh here you need to insert a screwdriver
So we removed the strainer from the fuel pump to replace the old one with a new one.
Removed mesh from fuel pump
Installing a new mesh on the fuel pump and reassembling in reverse order.
Replacing the fuel pump on a Priora
Repair of priors and revision of the fuel system.
After the fuel level sensor (FLS) failed, I went for diagnostics, where it turned out that my fuel pump on the Priora did not hold pressure. The needle twitched and the mechanic said that the fuel pump would break very soon. So, in connection with replacing the sensor, you need to replace the Priora fuel pump motor, fuel filter and coarse filter.
All this is discussed in this article.
Bosch fuel pump motor for Lada Priora
Fuel level sensor DUT K2
Fuel filter SCT (article ST 342) Priora coarse filter 16V
We begin to disassemble and remove the Priora fuel pump.
– First of all, we reduce the pressure in the fuel system. We lift the rear sofa, unscrew the fuel pump cover and pull out the plug that goes to the fuel pump. After this, we start the car until it stalls on its own.
– Remove the terminals from the battery. This must be done before any repair of the priors
(optional) Vacuum to prevent dirt from falling into the fuel tank
– Remove the hoses (direct and return) going to the fuel pump
Using a regular 10mm wrench, unscrew the nuts and remove the iron and plastic rim
– pull out the fuel pump sideways, being careful not to catch the FLS. We disassemble the pulled out fuel pump of the Lada Priora
We disassemble the pulled out fuel pump of the Lada Priora
-remove the retaining ring from one of the guides.
-Disconnect all the wires, pull out the plug from the housing, the plug from the fuel pump motor and disconnect the wire
-Unbend the 3 latches and take it out along the plastic guides
-Remove the mesh from the motor
Pull back the latch and take out the motor
This photo is so that you can put everything back in place. Here you can clearly see the location of the motor and corrugated hoses
There is dirt on the mesh at the bottom of the fuel pump.
The Priora comes with FLS 11 from the factory. But according to reviews, FLS K2 is better.
Fuel level sensors are completely identical and interchangeable.
On the left is an old fuel pump. on the right is a new Bosch fuel pump for a Priora
This is what the Priora fuel pump looks like when disassembled:
We carry out assembly in reverse order.
We insert the motor into the stand along the guides, put on the mesh from below, simply pressing it against the motor.
We connect the new FLS and do not forget to plug in all three plugs.
This is what the new assembled Priora fuel pump looks like
DIY fuel pump replacement
The gasoline pump in the power supply system of an injection gasoline engine is an electromechanical device that pumps fuel from the gas tank and creates the necessary fuel pressure in the fuel line necessary for the most efficient dosed injection of fuel injectors. If a number of conditions are met during vehicle operation, the fuel pump will serve properly for quite a long time (on average, about 200-250 thousand km or more). It should be borne in mind that regular driving with an empty tank, refueling with low-quality fuel with a high content of impurities and debris, ignoring the need to periodically replace the fuel pump screen, flush the fuel system and the gas tank itself lead to the fact that the gas pump breaks down much faster.
Another factor that affects the service life of a submersible electric fuel pump is unprofessional tuning and boosting of the engine. More efficient injectors are installed on the car, the pressure regulator in the fuel rail is changed, the ECU is reflashed (chipped), etc., but the fuel pump remains standard. As a result, the pump constantly works at the limit of its capabilities, heats up and quickly breaks down. For the reasons stated above, as well as as a result of natural wear and tear, drivers often need to replace the fuel pump. Next, we will look at how to change the fuel pump yourself.
How to replace the fuel pump mesh and mesh in the Skoda Octavia A5 tank
A drop in pressure in the fuel rail leads to a disruption in the composition of the air-fuel mixture, which affects the behavior of the engine at idle speed, in medium and high load modes. Let's look at the main signs of a clogged fuel filter and mesh in the tank. We will cover all procedures for replacing filter elements and a fuel pump using the example of a Skoda Octavia A5 with a 1.6-liter gasoline engine (BSE).
Signs of a clogged mesh or fine filter
- Difficult start. Most often, the problem begins to manifest itself after a long period of inactivity, when fuel from the line is drained back into the tank.
- The engine does not develop speed.
- Failure when sharply pressing the gas pedal. The speed rises late, and under load the engine may stall.
- Loss of power, jerking at high speeds and when trying to accelerate sharply.
All these signs of malfunction are associated with insufficient pressure in the fuel line. The reason is clogged filter elements, which create great resistance to the passage of fuel. Often, due to the increased load on it, the fuel pump begins to howl/hum.
When should you look for the cause in the fuel pump?
Much less often, problems with fuel pressure occur due to wear on the fuel pump. Its performance is not enough to provide the engine with uninterrupted fuel supply in all operating modes. In this case, it is impossible to check the fuel pump without removing it.
The first step is to make sure that the coarse mesh does not create resistance to the passage of fuel. If everything is fine with the mesh, you can measure the pressure bypassing the filter element. To do this, just connect a pressure gauge to the fittings on the fuel section. In this case, it is much easier to first measure the fuel pressure in the rail in order to register the fact of a malfunction. After replacing the fine filter, repeat the measurement. If the situation has not changed, you will have to remove the fuel module to inspect the grid and check the fuel pump. In my case, the reason for servicing the power system was a high-frequency hum from the running fuel pump.
If the pump does not turn on, you need to check the power. “Plus” and “minus” are supplied to the electric motor through the Skoda Octavia fuel pump control unit and relay. The circuit is protected by a fuse.
How to relieve pressure in the ramp?
To prevent gasoline from pouring out of them when removing fuel connectors, use one of the pressure relief methods:
- With the car running, remove the fuse and the Skoda Octavia fuel pump relay or disconnect the fuel section connector. When the engine stalls, there will be virtually no pressure left in the system;
- Wait 30-40 minutes before repair work. The fuel from the pressure regulator is released into the tank. I also recommend pulling out the fuel pump fuse so that accidentally opening the driver's door does not trigger the fuel pump to turn on.
Replacing the fine filter
The fine filter on all petrol Octavias is located under the bottom, near the fuel tank on the right side. The sequence of actions when replacing it yourself is extremely simple.
1. Unscrew the screw securing the plastic clamp of the fuel filter.
2. Unclip the quick-release connections (you need to press the crescent-shaped latch with a screwdriver). When pulling the filter housing from the clamp, be careful. Over the years of use, plastic loses its elasticity.
Where is the fuel pump located
When faced with the need for repair or replacement for the first time, many car enthusiasts ask where the fuel pump is located. The pump is located directly in the gas tank and is in direct contact with the fuel, that is, it is immersed in gasoline. On most civilian vehicles, the gas tank is located at the rear of the vehicle under the floor.
The fuel pump is installed so that it is located at the top of the gas tank. Thanks to this placement, the pump can be accessed directly from the cabin. To do this, you need to remove the rear sofa, since the fuel pump is located directly under the seat on the left or right side.
Fuel pump Skoda Octavia A5 and A7
The main sign that the fuel pump requires replacement is that the Skoda Octavia stops starting, even after a short stay. If you doubt that it is the fuel pump that has lost its functionality, and the fault is with the fuel sensor or something else, check the voltage at the chip while the starter is cranking. If you see a reading of about 10-12 V on the multimeter screen, this is a sign that the fuel pump is guaranteed to be faulty and requires prompt replacement. But there are other “symptoms” of the death of the Skoda Octavia fuel pump:
- Additional noise when the engine is running;
- Howls and howls when starting up;
- Reducing the engine power of the Skoda Octavia A5.
Possible, just needs cleaning. There are not many options for solving the problem of a fuel pump failure - you can contact a service center, or you can replace it yourself. The cleaning process for repairing the Skoda Octavia A5 does not pose any particular difficulties and even a novice car enthusiast can easily cope with it. And if cleaning failed, repairs will be required. The main thing is to buy a new branded spare part for the Skoda Octavia A5, stock up on the necessary tools and work clothes, which you won’t mind throwing away later.
Step-by-step repair instructions
The first problem that you will encounter if you have not previously repaired or replaced the fuel pump relay is, in fact, the search for the very object of the breakdown. In the Skoda Octavia A5 1.6, the fuel pump is located in the tank, which is located at the rear of the body on the left. In order to get to the broken part and the relay, you need to lift the rear passenger seat. Tools that will be necessary when working with the fuel pump relay on a Skoda Octavia A5 with an engine capacity of 1.6:
- universal screwdriver with a flat working blade;
- You also need a hammer to replace the relay;
- a container in which you can collect remaining fuel.
After clarifying the location of the fuel pump, the repair of the Skoda Octavia A5 1.6 begins:
- The operating pressure in the Octavia Tour 1.6 engine is 300 kPa; repairs under such conditions are strictly prohibited, so the first thing to do is reduce the pressure in the fuel system.
- Next, you need to de-energize the Skoda Octavia A5 engine with a 1.6 engine capacity - to do this, remove the battery terminals and fuse.
- The next stage is dismantling the rear seat, the hatch secured with three bolts became visible. Unscrew the bolts using a screwdriver and pull the cover up. The cover must be removed carefully, otherwise the latch tongue may crack.
- After removing the cover, you need to carefully disconnect the fuel pump tubes - there is a lock a little on the side; when you press it, the tubes can be removed without any problems.
- Now the large plastic nut has become visible - it is quite difficult to remove it; to make it easier, you can help yourself with a screwdriver and a hammer. Keep in mind that if you work on the fuel pump relay at a low temperature, the plastic in such conditions becomes harder and less durable - a careless blow with a hammer may cause a crack to form.
- After removing all fasteners, remove the broken mechanism. When removing, remember that the fuel level sensor is located on the fuel pump itself - try not to deform it.
- Assess the condition of the removed part - it requires a complete or partial relay replacement.
- Remove the fuel sensor from the broken fuel pump and reinstall it with a new one.
- Be sure to replace the rubber gasket located between the plastic cover and the fuel pump module.
- When connecting the battery, check the condition of the fuses and, if necessary, replace them with new ones. Please note that many parts, clamps and covers in the Skoda Octavia Tour 1.6 are made of plastic, which can easily break and deform if the force is applied incorrectly.
After completing all these manipulations, start the Skoda Octavia A5 engine with a 1.6 engine capacity and check the operation of the fuel pump relay. Don't forget that it needs cleaning periodically.
How to remove the fuel pump
To answer how to change the fuel pump, you need to study the procedure for removing the fuel pump.
Removing the fuel pump and replacing it involves dismantling the device. To extract, you will need a special key for removing the fuel pump (puller), open-end wrenches, a tubular wrench, and a set of sockets. We add that the fuel pump mount may differ on different cars, although the general principle remains almost the same.
You can do this as follows:
- turn off the negative voltage on the battery;
- on the fuel rail under the hood, press the valve through which a certain amount of gasoline will flow out;
You can also go the other way. First, remove the terminal from the battery, then turn off the power to the fuel pump by removing the electrical connector from it. Then the terminal is put back on the battery and the engine is briefly turned with the starter. After a short period of time, the remaining fuel will leave the system. On some cars, the engine may even start and then stall.
So, the fuel pressure has dropped, now we proceed to remove the fuel pump. Remember, the terminal on the battery must be disconnected during work! The first thing to remove from the pump is the chip (electrical connector), if this has not been done previously. Then you need to pay attention to the fuel lines (1 fuel supply pipe and 1 return line to return fuel to the gas tank). On these tubes, you should loosen the tightening of the clamps and clamps (if any), which usually secure the electrical wiring sections to the lines to supply power to the pump.
How to remove the tube from the fuel pump
Now you need to remove the lines themselves from the fuel pump. To figure out how to remove the hose from the fuel pump or disconnect the line, you need to accurately determine the method of attachment to the pump terminals. Often, the standard fastening of the fuel supply line is implemented in the form of a nut (fitting), which must be unscrewed with an open-end wrench. The so-called return line can be secured with a clamp.
Removing the fuel pump and replacing
After unscrewing the fuel lines, you will need to either unscrew the pressure ring of the fuel pump with a special puller, or use a tubular wrench to unscrew the nuts (which depends on the method of mounting the fuel pump on a specific car model).
- Before starting removal, it is worth noting that there are special arrow indicators on the pump and other fixing elements. We recommend remembering their position, which will facilitate subsequent reassembly.
- Then you need to remove the special o-ring. After removing the ring, you can remove the fuel pump from the tank. During removal, care must be taken, since devices for determining the fuel level in the gas tank (float sensor) may be attached to the fuel pump body.
- After removing the pump, there may be a rubber seal on its seat. For example, on cars of the VAZ family this seal is fixed on studs. This seal also needs to be removed by simply pulling it up.
The completion of the fuel pump replacement procedure is the installation of a new fuel pump, as well as the replacement of all rubber seals, which must be included in the kit or purchased separately.
We would like to add that during installation you should:
- Make sure that the pump is positioned correctly. To do this, there are special arrow-shaped markers on the pump itself, covers and pressure rings (depending on the make and model of the car). On some cars the arrows should line up, on others the arrow on the fuel pump should point towards the rear of the car. It is for this reason that it was recommended above to remember the position of the indicated arrows before removal.
- Also, in the process of placing the pump, you should carefully handle the float and other solutions to determine the fuel level in the gas tank. Often, during unprofessional installation, such elements are bent or broken, after which there is a need to replace them.
If the fasteners are over-tightened, they may break. If the fuel pump fixing elements are not tightened enough, then the pump may dangle in the tank, which is unacceptable. After the pump is installed, all that remains is to attach the fuel lines back, connect the pump power connector and the terminal to the battery. This is what replacing a fuel pump with your own hands looks like.
Skoda Octavia 2.0 Octasha › Logbook › Replacing the fuel pump for Skoda Octavia Tour
Replacing a fuel pump for a Skoda Octavia So the diagnostics showed that the fuel pump had a long life. Based on the markings of the old one, a new one was purchased as a complete set. Now we need to change it. If you did something wrong or didn’t do it, comments are welcome!
If possible, it is better not to carry out these manipulations on a full tank. I had half. Initially, you need to remember or photograph the fuel level readings. I took out the fuel pump fuse in the fuse box to the left of the driver's foot,
I folded back the sofa seats, unscrewed the fuel pump hatch cover with 3 screws.
Now you need to remove the connector and two fuel lines (outlet and return)
In order to remove the connector, it looks like you need to lift the latch and pull it out. But I can’t say that because... Someone damaged the mount before me. After removing the connector, for convenience, you can remove the two latches securing the wires coming from the connector, but for some reason I haven’t figured out how to unclip them.
Then I disconnected the fuel pipe hoses; to do this, press the lock on the head on the opposite side of the hose and pull it up.
Now the fuel pump doesn't hold anything. Using a twisting motion, the fuel pump is pulled out. It may be difficult to come out due to the hoses sticking out to the sides and you need to be careful with the float. Drain the fuel from the fuel pump while it is in the tank, then pull it out to drain the remaining residues in the fuel pump itself. The fuel pump has been removed. Appearance: there is no yellow coating as in the photographs of those who replaced it, the tank is transparent like a mountain river. It’s not for nothing that I fill up at the best gas stations.
I removed the rubber seal ring and installed it on the new pump.
Installation: installed the rubber ring and the pump itself, tightened the black retaining ring, connected the fuel hoses and the wiring connector. The fuse is in place. I turn on the ignition, but don’t start it, several times so that the pump pumps gasoline into the system. Then I start it up and it works great! And the fuel readings are correct. Everything took about 40 minutes, at minus 10C outside. So the manipulation is simple and not complicated.
Already 300 kilometers have passed, the flight is normal. Now I’m thinking about what to do with the old one, I’ll probably turn it into a spare one.
Why do you need to remove the pump?
As a rule, the electric pump lasts for quite a long time. About 200 thousand kilometers of a vehicle on normal roads, a foreign-made fuel pump works properly, then it needs repair or replacement. In Russia, its service life is significantly reduced, which is due not only to bad roads, but also to low-quality fuel. In addition, the service life of the fuel supercharger is negatively affected by regular driving with an almost empty tank, rare cleaning of the pump screen from dirt, and much more.
How to remove the fuel pump
Dismantling the pump is carried out not only for replacement purposes. Much more often it is removed due to cleaning the mesh from debris. We are talking about a coarse filter that is equipped with a modern injection engine pump.
Finally, another factor that negatively affects the service life of the fuel supercharger is illiterate modernization or chip tuning of the power plant. More powerful injection elements are installed on the car, the old RTD is also changed, the ECU is reflashed, but they forget about the fuel pump. As a result, the device operates under heavy load, at the limit, heats up and soon fails.
Thus, the fuel pump on injection systems is dismantled for two main reasons: for the purpose of replacement or repair and for cleaning/replacing the mesh.