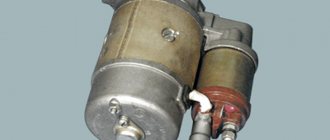
How to check the rear struts for functionality on a VAZ 2114, 2115, 2109, 2108.
Unlike the front struts, the rear struts don’t fail as often, but it does happen. Usually in such cases a knock is heard when driving over bumps from the rear of the car. How can you understand that it is the rack that is knocking? There are three ways to check:
- Inspection of the rack.
- Rocking the car.
- The feeling of driving a car.
Inspection of the knocking rack.
By lifting the car on a lift, you can see the rack and what condition it is in. If the stand is damp (moistened with oil), this means it’s time to change it. In such cases, they say that the stand has leaked. You can also look at the strut rod. It should be free of burrs and scratches. If the strut rod is damaged, the strut also needs to be replaced.
Rocking the car.
Approach alternately from the left and right sides of the rear of the car and begin to press on it from above, as if rocking it. Five compressions and releases will be enough. After the last release, the machine should not continue to rock.
The feeling of driving with faulty struts.
You can understand that your shock absorbers are faulty while driving the car. When driving on the highway, notice whether the car continues to rock after passing a section of the road laid by the wave. If the car continues to rock, the shock absorbers should be replaced.
Malfunctions
- Failure of shock absorbers, together with wheel imbalance, leads to sudden wear of tires, and wheel bearings are subject to destruction.
- Traveling a couple of thousand kilometers with faulty struts leads to breakdown of the support bearing.
- A properly functioning shock absorber helps increase the life of the brake pads.
- In case of malfunctions, the braking system does not work properly as the braking distance increases, thereby increasing the likelihood of an accident on the road.
Modern intervention allows you to save your car from various breakdowns, reduce the likelihood of an accident, and significantly save the car owner’s budget. Replacing struts is much cheaper in cost at the first symptomatic signs than after repairing the brake and chassis.
A couple of practical recommendations for diagnosing shock absorbers on a vibration stand
Testing at a stand naturally costs some money. Your money. Therefore, before you drive your car to the stand, find out for yourself:
- The stand's computer can be adjusted to the model of your car or a similar suspension.
- How is the life expectancy of a car calculated? Over time, the rigidity of the body changes, so a 10-year-old car will in no way meet factory depreciation standards. And the stand will show it.
- Before checking, it is necessary to check the wheel alignment and tire pressure.
Diagnostics of shock absorbers is not an easy task, but it is worth it, since it turns out that a lot depends on a working shock absorber. First of all, the serviceability of the car and traffic safety.
Results of the influence of a shock absorber on car performance
Braking distance at a speed of 100 km/h: before replacement 51.5 m, after – 47.5 m.
The maximum speed for passing the “reference” turn before the replacement is 84 km/h, after it is 105 km/h.
So draw your conclusions. Good luck, car lovers.
Bench testing
If you are unsure of the accuracy and correctness of your own conclusions regarding the proper operation of the racks, it is recommended to rely on specialists who perform diagnostics on a vibration stand. Naturally, the verification procedure is paid, but with the help of verification, you can get an opinion from specialists and precise instructions for the next action.
To avoid wasting money, you should use the following tips:
- Check the computer settings by technicians to diagnose a specific vehicle model.
- Taking into account the age of the machine, the weight of the body, settings and standards may have certain discrepancies.
- Check wheel alignment and tire pressure before the test.
- Contact a good service center that suits you individually.
Replacing the rear pillar on a VAZ 2108, VAZ 2109, VAZ 21099
Welcome! Rear strut - it performs the function of holding the car on the road, does not allow it to roll too much in corners, and also keeps the car on the road when hitting a bump and thus it does not lose control from this, in addition, the struts cause either discomfort (If not high-quality rack), or, on the contrary, it gives pleasure from driving and makes the car smoother and more confident on the road.
Note! In order to change the rack, you will need to take with you: A set of wrenches, in which you will have large wrenches of approximately “17” and “19”, in addition to this you will also need a screwdriver, and you can also stock up on a wrench and to it with cap heads! (Also take an adjustable wrench or some healthy pliers with you)
Where is the rear pillar? From the title you can already assume that since it is the rear, then it is located in the rear of the car, but not everyone knows where exactly, so just below you can see a photo in which the wheel has been removed from the car and you can almost completely see the rack itself.
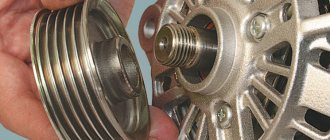
Note! Any car strut, no matter the front or rear, consists of two important things, namely the shock absorber itself (Indicated in the photo above by a red arrow) and, accordingly, a spring (Indicated by a blue arrow) that holds the car and does not allow it to drop to too low a height, Well, in some ways, the spring softens the blow when hitting a bump, but still the most basic unit thanks to which the shock is absorbed when hitting a bump is the shock absorber itself!
When do you need to change the rear strut? To find out when it has become unusable, you need to go to a specialized car service center and have them undergo a technical inspection of the car (They have a special device for this) which will tell you whether the struts need to be replaced or not, but you can always manage to go to a car service station (For example you live in a village where there is no service that specializes specifically in suspension), so in this case you need to check the racks for serviceability yourself, namely look at them, you already know where they are, and if you suddenly find traces of oil on them then it is necessary to replace it quickly (Applies only to shock absorbers), and there should be no deformation on all parts, including the spring itself, namely, the spring should not have cracks, and in conclusion, let’s note a couple of facts, if when hitting a bump recently you start to experience knocking noises, and also if the car behaves loosely in corners and easily tips over to its side, then this all indicates a malfunction of the struts, which in this case you will need to replace.
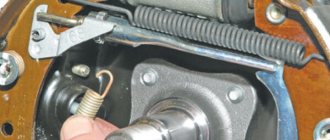
Note! Carry out a small experiment that will help identify the malfunction of the struts, to do this, put your hands on the outer part of the rear wing of the car and rock the car, and then when the wing is at the lowest point, immediately remove your hands from it and if the car then swings first up, then down and stop, then everything is fine with the racks, but if it floats without stopping or sways more than once, then you will have to replace the racks! (Do this operation on each side, that is, if, for example, the car floats on the rear left side, and sits rigidly in place on the right side, then only the left strut is faulty and needs to be replaced)
Basic check
Further checks are carried out with the vehicle stationary. To do this, you need to press firmly on the body above each pillar. If the struts are in good working order, the car should make no more than one oscillatory movement.
Next, conduct an external inspection of all racks. There should be no fluid leaks, any damage or deformation on working shock absorbers. Then check the strut springs for cracks or breaks.
If the suspension constantly works all the way - “breaks through”, then this means that the springs have exhausted their service life and must be replaced. You cannot operate such a car, because the body can be deformed.
After this, check the condition of the spring cups for cracks or deformation. The compression damper must also be intact and free of mechanical damage.
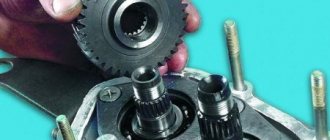
Before disassembling the strut, it is necessary to compress the spring with a special puller/
Disassemble the telescopic struts removed from the vehicle and conduct a thorough inspection and troubleshooting. The shock absorbers of the struts must be dry and clean, without visible signs of wear. The shock absorber must be checked before installation.
Checking the smooth movement of the shock absorber rod is carried out only on a vertically mounted stand. To do this, insert a large screwdriver into the lower hole under the mounting bolt, step on it and pull the rod up or press down. On a working shock absorber, the rod moves smoothly, without jamming or failure.
Replacement
To replace or partially repair you have to go through a rather labor-intensive path.
You will need the following set of tools and materials:
- Screwdriver Set;
- Set of wrenches;
- Jack;
- Partner.
Decide in advance whether you are going to change the entire assembly, or whether you want to change only the damaged elements of the rear pillar. The volume of your purchases depends on this.
You can start working. Based on our instructions and the video lessons provided, you will be able to replace the rear struts yourself.
- Turn the gearbox into first gear mode.
- Raise the rear wheels using a jack.
- Install supports, strengthening the reliability of fixing your car in a given position.
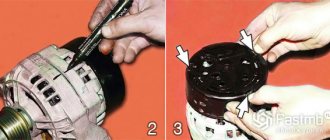
- Remove the racks. To do this, first go to the trunk, remove the decorative rubber plug, which is located on top of the rack mount. It is better to remove all unnecessary things from the trunk.
- Take a 17-size spanner and a 6-size open-end wrench. With their help, you can unscrew the nut with a spanner, and the open-end wrench will be useful for holding the shock-absorbing strut rod.
Removal process
- That's it, this allows you to remove the mounting nut, support washer, spring washer and top pad without any problems.
- Now we go under the car to finish what we started.
- Take a 19 mm wrench and remove the shock absorber mounting bolt to the rear beam. Remove it.
- In some cases, problems may arise with dismantling this bolt, since it simply sticks. To do this, pre-treat the bolt with the almighty WD40 and give it time to react.
- If even this method did not help, then you will have to take the guide and simply knock out the fastening element.
- Next, remove our shock absorber along with the spring.
- Do not forget that during such manipulations most often the spring gasket remains on the body. It sticks to the metal. Many people forget to take it out, which causes difficulties during reinstallation. Don't make this mistake.
- Clean all the seats to make it more convenient for you and make it all look more aesthetically pleasing. Plus, neatness never hurts to extend the service life of new spare parts.
- To make it more convenient for you, wrap the gasket on the new spring with electrical tape, or secure it with thin wire. This will prevent it from slipping when you begin installation.
- When putting the assembly back together with the new rear strut, be sure to make sure that the raised portion of the spring cup faces the direction of the wheel.
- Secure the lower end of the rack with a nut and bolt, but there is no need to tighten the fasteners just yet.
- Using the lever of your jack, raise and lower the rear of the car. This is necessary in order to eventually insert the shock absorber rod into the hole in the body of your nine.
- With the spring in place, pull the shock absorber rod out to its full length.
- Insert the rod into the lower ear and secure with a bolt.
- Place a jack under the beam and begin manipulating the lifting mechanism.
- At the same time, the spring will begin to compress, and the rod will move towards the glass.
- You or your assistant must be alert in the car in order to have time to pry the rod with a screwdriver and ensure it is directed in the right direction.
- Once the rod is in place, the work can be considered almost complete.
- Fix the rod, not forgetting to insert the cushion, washer and engraver. All this is securely fixed.
- Now you can lower the car onto its own wheels and fully tighten the bolt of the lower shock absorber mounting.
Reassembly stage
Changing rear strut assemblies is easier and faster than dismantling, disassembling the old strut, looking for defects in it and replacing individual damaged components. But this requires less financial costs.
Changing racks is not that difficult, even if you have little experience in such matters. But if there are none, be sure to contact trusted car services. Do not risk your own car, otherwise subsequent repairs will be even more difficult and expensive.
Loading …
Shock absorber replacement procedure
Replacement of the rear struts on the VAZ-2109 is done less frequently than the front struts. They have a higher resource due to the fact that they are less loaded. Most of the car's weight falls on the front axle. The struts will have to be removed when replacing suspension silent blocks, shock absorber pads, protective casing, buffers, gaskets, as well as when dismantling the rear beam.
Tools and accessories
To carry out the work you will need the following tools:
- Key set to “8” (required open-end).
- Curved socket wrench "17". Instead, you can use a special wrench designed for unscrewing the rear shock absorber mounts.
- Socket wrenches “19” – 2 pcs.
- A device for compressing springs.
It is recommended to carry out work on an overpass or pit with an assistant. But if you don’t have such amenities, it’s okay. Spend a little more time, but there will be no problems during repairs.
Removing the shock absorber strut
If even one rack has become unusable, it is necessary to replace the second one on the axis. The same applies to suspension springs. Sequence of work:
What are racks
First, let's figure out what racks are. Stabilizer struts are a technical device consisting of several components designed to dampen vibrations when driving on uneven roads. The system may be filled with oil or gas inside.
The service life of the struts is 80,000 km if they are installed during scheduled maintenance. After this they should be replaced. Some people wonder how to change the racks - in pairs or one at a time. Even if you need to replace one, it is better to change a pair at once, regardless of whether it is the rear or front struts of the car.
The main signs of malfunction of the stabilizer struts:
- oil leaks on the body;
- the car shakes violently on uneven roads;
- poor contact of tires with the road surface.
If all this is present, you need to immediately contact a car service or repair the fault yourself. You shouldn’t put off repairs until later so that you don’t have to change the entire suspension.
Purpose of shock absorbers
The main function of shock absorbers is to keep the vehicle on the road no matter the condition of the road surface. Due to the struts, control is not lost when hitting bumps, which ensures a comfortable ride. Also, the front and rear struts do not allow the car to roll too much when entering a sharp turn.
Both the rear and front shock absorber struts of the VAZ 2108, 2109, 21099 consist of two elements - the shock absorber itself and the softening spring. The shock absorber is a cylindrical pipe with smooth inner walls, filled with working fluid. While the car is moving, the spring prevents the shock absorber from falling too low.
Front suspension elements: 1 — protective cap; 2 — compression stroke limiter of the support; 3 — upper support of the rack; 4 — upper support bearing; 5 — upper spring cup; 6 — front suspension spring; 7 — adjusting bolt; 8 - eccentric washer; 9 — protective casing; 10 - compression progress buffer
How to install a rear pillar on a VAZ 2115
Rack assembly process:
- We pump up the rack.
- We put on a duster.
- We put the bump stop on the rack rod.
- We place a washer with a cushion on the rod.
- We put on a spring with a pillow attached to it.
- We put the stand in place by screwing the top first and then the bottom.
The process of installing a rear shock absorber is not complicated, but everything has its own subtleties.
First of all, we pump the racks before installation. Usually the instructions for bleeding come with the strut, but if there is none, just squeeze the strut rod 5 times until the end and remove it. and do not turn it over after pumping (after pumping, the stand should always be in a vertical position).
One more important detail. If the washers that secure the strut rod with the body are installed incorrectly, we will get a creaking of the rear strut of the VAZ 2114. In order to prevent creaking in the strut, it is necessary to install the lower washer with the cup down, and the upper one, on the contrary, with the cup up. In this case, there will be no creaking in the rear of the car.
The spacer must be between the car body and the spring. To install it without problems, tape it to the spring with molar tape. You need to use masking tape; in extreme cases, you can use electrical tape. When using simple tape, it can make extraneous sounds on bumps.
Sources
- vaz-zona.ru/zamena-zadnih-stoek-vaz-2114-2115-2108-2109/
- drive2.ru/l/3563204/
Selection of new
Look at different photos to see what the assembled rear pillar for a VAZ 2114 looks like. This will allow you to understand what you generally need to look for for this car.
Kayaba kit
We will not rant about which ones to buy, with what characteristics, from what materials, and so on. We will simply offer you objectively the three best options.
| Name | Advantages | Flaws |
| SS20 | A high quality device that will provide excellent performance characteristics to the car. | When replacing, you need to additionally purchase a support from the same company. |
| Plaza | Available in three types - Sport, Comfort and Supersport, they have excellent performance characteristics. | Not frost-resistant, therefore problems may arise when used in winter |
| KYB | Available in several types of execution, depending on the driver’s style, they are distinguished by the best characteristics | High cost and widespread counterfeits due to the popularity of racks. |
General information about car struts
Replacing struts on a VAZ 2109 yourself
From a practical point of view, the VAZ rack performs the function of a mechanical stabilizer, being a kind of rational connecting link between the body and the track. Many motorists often confuse a car strut with a shock absorber. In this regard, the most logical solution would be to consider the functions and structure of the shock absorber and strut.
VAZ 2109 do-it-yourself replacement of front struts
Main functions of the rack
- ensuring stabilization of the car body during movement;
- accumulation of kinetic energy during vehicle movement;
- ensuring the correct orientation of the vases body in space;
- ensure not only the comfort of the vehicle, but also its safety.
Main functions of the shock absorber:
- assistance in stabilizing stands;
- increasing the degree of smoothness of the car during movement;
- dynamic adaptation of the car to rapidly changing track conditions, etc.
Replacing front struts on a VAZ 2109
Over time, the racks lose the proper degree of functionality and must be replaced immediately. It is quite possible to carry out the replacement yourself, which allows you to save a very significant amount of financial resources by refusing the services of a car service in this matter.
Causes of shock absorber failure
If the struts unexpectedly fail, this indicates that its main elements - the oil seal and the valve system - have collapsed. The main reasons for the failure of any shock absorber:
- Accumulation of dirt and dust.
- Presence of corrosion.
- Damage to the protective boot.
- The presence of burrs and scratches on the rod.
- Breakdowns, leakage.
- Deformation.
You can also add the initially low quality of the shock absorber. If it is operated under harsh conditions - large temperature changes, driving on bad roads, traffic jams - this will lead to premature failure of the structure.
Therefore, when replacing the front struts of a VAZ-2109, you need to carefully select spare parts and check them for any, even the smallest, defects.
The lower shock absorber is mounted using two bolts to the wheel hub. And from above it is attached to the body by means of a support bearing. The entire load falls on this element, so they need to be changed more often than the shock absorbers themselves.
Before replacing struts, make sure the support bearings are in good condition. They can become deformed, and the rubber part often crumbles.
Sometimes the reason for the knocking lies in the weakening of the fastening. Monitoring the condition of suspension elements is the best way to delay expensive repairs. Carry out a thorough inspection and look for:
- Body swaying and poor vehicle controllability. The shock absorber rod moves without resistance - either the oil has completely leaked out or the liner is destroyed.
- Low stability when cornering and skidding.
- Excessive sagging during braking and acceleration.
- Excessive sensitivity when hitting potholes and holes.
- Shaking and increased vibration.
- Uneven and severe tire wear.
If one shock absorber malfunctions, you will have to replace two (on the same axis). It is imperative to install new support bearings - in this case, it will be possible to achieve high reliability of the suspension and increase the service life of the new shock absorbers. You will also feel that the car will become safer and more comfortable.
Reasons for failure of the rear strut
There are quite a lot of them, but the most common ones are:
- abrasion by the rear wheel of the locker protecting the rack itself;
- fracture of the element in question in the area of the lower silent blocks.
Signs of malfunction:
- The silent block has various types of damage - cracks or other defects;
- the rubber seal and boot have lost their elasticity;
- the compression buffer was deformed;
- There are cracks directly on the springs.
Such problems require immediate replacement of the rack or its individual elements - otherwise there is a risk of breaking it and causing even greater damage, which is much more difficult to eliminate.
As practice shows, many car enthusiasts, in order to do without spring tensioners, cut off several turns from them. This, among other things, achieves a decrease in clearance. This should not be done under any circumstances.
Tools and accessories
When carrying out repairs, you will need some tools, and wrenches alone will not do. First, you need a special wrench to remove the shock absorber rod nut. Of course, you can use wrenches 17 and 8. Lastly, hold the rod from turning. If you plan to completely replace the rack, you can use a pipe wrench to clamp the rod. Secondly, a puller for the tie rod ends is a must. Without it, it will not be possible to dismantle the tip. Be sure to have a jack, supports, and wheel chocks on hand. The presence of wrenches, pliers, and screwdrivers is also mandatory; no repair can be done without these tools.
How to check shock absorber struts?
Many inexperienced motorists do not know how to check the struts for faults. There are several ways to check shock absorbers:
Visual inspection
The operation can be performed without removing the wheels
It is important to consider that the front and rear struts are located next to the springs. In some cases, they come with them
There should be no oily smudges or traces of them on the flasks. These signs indicate that the rack is broken. You also need to inspect the rods. This operation is performed when driving the car onto a lift. The part must have no signs of corrosion or damage. The disadvantage of the method is that the test results will not be able to provide objective information on the condition of the suspension elements. The thing is that the racks may have internal defects that cannot be seen during a visual inspection, and as a result, the diagnosis will be incomplete. Important! If the cover is worn unevenly, this indicates a malfunction of the racks.
Checking damping properties
To do this, you will need to rock the car.
It is important that more than 1-2 presses on the wing of the car are not allowed. The method allows you to identify a completely failed suspension element
The important thing is that such a test will not allow you to evaluate the performance of the components if the rod is jammed. Then, as a rule, the buildup will not be successful.
Diagnostics while driving a car
Constant skidding, an acute reaction to even the slightest bumps or bumps, an increase in braking distance - as a rule, all this indicates problems with the suspension, including shock absorber struts. These problems put traffic safety at risk; such a suspension cannot be used.
Diagnostics by removing parts
The dismantled suspension element is installed vertically, relative to the ground. Next, you need to grab the upper rod and pull it out, then push it down. The working component will have strong resistance. If the rod moves freely, it means that the working fluid has run out or air has entered the mechanism. This check makes it clear that you should purchase a new set of racks.
Diagnostics on a vibration stand
One of the most reliable ways to detect suspension failure. The bottom line is that the device simulates the movement of a car on the road, thereby checking the racks and other mechanisms of the vehicle.
Before carrying out diagnostic work, you should wash the car and perform a number of preparatory measures. The vehicle must be driven to an overpass, inspection hole, or use a jack. Thoroughly wash the wheels and arches from dirt, and use a wire brush to clean these components from corrosion. In addition, diagnostics are performed in a well-lit, spacious room or outdoors, provided that the weather allows the work to be carried out comfortably.
Diagnosis
The slightest suspicion of a malfunction requires immediate diagnostic work. There are measures that a car enthusiast can do on his own, which will be the first test of the struts.
Some car owners do without testing at the stand and spontaneously rock their vehicles in order to determine the shock absorbers. True, this check is very ineffective, since the weakening and performance of the racks does not affect the swaying of the vehicle, in the end it seems that everything is in order.
Why did it happen so?
Perhaps the automatic requests do not belong to you, but to another user accessing the network from the same IP address as you. You need to enter the characters into the form once, after which we will remember you and be able to distinguish you from other users exiting from this IP. In this case, the page with the captcha will not bother you for quite a long time.
You may have add-ons installed in your browser that can make automatic search requests. In this case, we recommend that you disable them.
It is also possible that your computer is infected with a virus program that is using it to collect information. Maybe you should check your system for viruses.
If you have any problems or would like our support team, please use the feedback form.
Hello. The quality of Russian roads cannot be compared with the roads of European countries. Especially in the spring, when the snow melts, a bunch of new holes appear, falling into which the suspension suffers
The racks receive the most energy from impacts, so it is important to monitor their condition. Otherwise, impacts will be transmitted directly to the body
This article explains how to check the rear struts on VAZ cars and how to replace them.
How to check a shock absorber
To make sure it works, you will need to do the following:
- it is clamped in a vertical position;
- raise to the maximum;
- quickly lowered.
This procedure must be repeated several times.
The following signs indicate failure of this part:
- presence of sounds during the above procedure;
- jamming;
- failure.
This shock absorber is replaced with a new one. However, before doing this, it is better to make sure that any individual element is not damaged. If this is the case, then only what is broken is replaced.
The procedure is as follows:
- the rod is pulled out to the maximum;
- the nut is unscrewed;
- take out the fixing elements and the rod itself;
- remove the working cylinder;
- every detail is inspected.
If defects are found, they are replaced. Assembly is carried out in reverse order.
After installing the compression valve, you need to make sure that its discs move smoothly. Jamming is not acceptable.
Finally, it’s worth telling that on average in Russia a new rack will cost approximately 3 thousand rubles. As you can see, the price is quite serious, and therefore it makes sense to treat the car more carefully and regularly care for it.
To fully familiarize yourself with the process, we recommend watching the video below:
Troubleshooting
Deformation of the suspension elements, especially body braces, disorganizes the wheel angles and makes it impossible to adjust the camber and toe. First of all, you should check the car's silent blocks, rubber cushions, ball joints, and the shrinkage of telescopic struts.
Repairing a VAZ-2109 requires replacing rubber cushions and silent blocks if there is rupture and one-sided swelling, including after trimming the end surfaces of rubber elements.
You can check the condition of the front suspension ball joint on the car after removing the wheel, by measuring the distance between the lower arm and the disc element of the brake system. If, after pumping the unit, the distance increases from 0.8 mm or more, the hinge should be replaced.
Front suspension of VAZ 2109 diagram.
- Upper suspension strut support.
- Top cup.
- Progress buffer.
- Buffer support.
- Coil spring.
- Lower spring support cup.
- Ball traction control.
- Rotary lever.
- Shock absorber strut.
- Washer.
- Adjustment bolt.
- Rack bracket.
- The cam is rotary.
- Protective casing.
- Brake disk.
- Retaining ring.
- Hub cap.
- Grenade.
- Guide pin.
- Wheel bearing.
- Ball bearing.
- Lever arm.
- Washers.
- Front stabilizer.
- Stabilizer bar.
- Stabilizer silent block.
- Internal rod bracket.
- Crab. (outer rod bracket)
- Lever stretch.
- Bracket for fastening the brace.
- Silent block of the lever hinge.
- Suspension spacer.
- Stock.
- The upper support housing is external.
- Internal upper support housing.
- Upper support bearing.
- Rubber element for upper support.
- Travel limiter.
- Protective cap.
- Extension joint bushing.
- Stretch joint cushion.
- Washers.
- Stabilizer link joint.
- Rear hinge.
- Ball joint housing.
- Ball bearing.
- Ball pin.
- Protective cover.
What are the consequences of a faulty shock absorber?
Shock absorbers (dampers) are devices that serve to dampen vibrations while a car is moving (damping) by converting mechanical energy into thermal energy. Shock absorbers operate in conjunction with such vehicle suspension elements as springs, springs, torsion shafts, cushions, etc.
Diagnostics of shock absorbers must be carried out systematically by the driver. Why, you ask, because MOT was passed, and everything was fine. Unfortunately, like everything in this world, shock absorbers tend to fail. And the sooner the driver notices a shock absorber malfunction, the less money will then be spent on restoring the consequences.
The most important thing is for you to remember that systematically checking the shock absorbers yourself takes a couple of minutes, and can save you from troubles with other car systems.
- A faulty shock absorber in combination with a wheel imbalance (you understand that perfect balance simply cannot exist) leads to intense and rapid tire wear. Add here broken wheel bearings, check the cost of tires and bearings - your budget will not like the figure.
- A faulty shock absorber causes other suspension parts to fail. After all, the suspension is designed to work with all the elements together. For example, after several thousand km. The support bearing of the strut may fail.
- The health of the shock absorber directly affects the service life of the brake system, in particular brake discs and pads. If you are not interested in repairing brake discs, then timely diagnostics of shock absorbers will help postpone this procedure.
- A faulty shock absorber increases the braking distance, which means a few extra meters can lead to an accident. And here you can’t count, you can’t count – your body repairs and... you don’t even need to think about it. And you just need to check the shock absorbers in time.
Consequences of wear
If there is a skid, we can conclude that the shock absorber has become unusable.
Consequences Failure of the shock absorber system can lead to the following troubles:
How to remove and install the front ones on the “nine”
It is somewhat more difficult to remove the front strut from the car and change it, so when performing work it is important not to deviate from the prescribed instructions. To replace the front shock absorber, you need to do the following:
Remove the protective cap of the desired pillar under the hood of the car. The cap, which prevents dirt from penetrating the rack, can be removed without additional tools - just grab it and apply a little force.
Removing the plug
After removing the cap, loosen the nut located inside the shock absorber rod. To do this, put the small part of the removable key on the rod and install the larger part on top.
Loosen the stem nut
Raise the car with a jack and remove the wheel from the side where the faulty shock absorber strut is located. Then use pliers to remove the cotter pin.
We take out the cotter pin
Unscrew the nut that secures the ball joint, and then remove it from the hole.
Removing the ball joint
Move the brake hose away from the bracket to avoid damaging it.
It is better to hide the bracket hose
Remove the front steering knuckle and all the components located on it. Next, unscrew the mounting nut on the top of the shock absorber and remove the strut.
Dismantling the rackFollowing the reverse procedure, install the new shock absorber strut in place. Once the process is complete, perform a wheel alignment and camber check.
After replacing shock absorber struts, it is important to check the secure fit of all fasteners. In this case, even if all parts are secured, the check should be repeated after 100 kilometers of the vehicle.
Operating a vehicle with faulty shock absorber struts can significantly reduce the level of driving comfort and negatively affect vehicle control. Timely replacement of struts will ensure safety on the road and prevent breakdowns of other components. As practice shows, the financial costs of installing new shock absorbers VAZ 2108, 2109, 21099 are disproportionately small in comparison with the possible consequences of ignoring the malfunction.
Didn't find the information you are looking for? on our forum.
We recommend reading:
VAZ 2110: how the heater on a car works, possible causes of failure
VAZ Priora cooling system 16 valves
VAZ 2114 lock from viburnum on
Replacing valve stem seals without removing the head of a VAZ 2112, 16 valves, step-by-step instructions with photos
What racks to install on a VAZ 2110, the best manufacturers, a brief overview
VAZ 2107 - type of brake system
Replacing the throttle cable on a VAZ 2115
Fuel system VAZ 21083 injector
Reasons and signs of the need to replace racks
Failure of shock absorber struts in VAZ 2108, 2109, 21099 cars can be determined by a number of signs. Including:
- a characteristic knocking sound from under the car's bottom, which occurs due to wear of the fastening;
- the presence of black streaks on the shock absorber body, which can be easily detected by visual inspection;
- ineffective vibration damping, leading to excessive sway of the car body on uneven roads;
- strong shaking when hitting bumps.
To obtain reliable information about the technical condition of VAZ 2108, 2109 or 21099 shock absorbers, test the car on a vibration stand. The computerized stand takes into account the design features of the struts of a specific car model and performs testing by simulating various road conditions. The test results allow you to find out about the serviceability and remaining life of shock absorbers.
Checking shock absorbers for performance on VAZ 2101-VAZ 2107
Welcome! Checking car shock absorbers for functionality - in fact, it is very important to do this from time to time, otherwise, due to failed shock absorbers, the car may simply roll over when sharply entering a turn. Where are the shock absorbers located? On all cars of the classic family, the location of the shock absorbers is identical:
Where are the shock absorbers located? On all cars of the classic family, the location of the shock absorbers is identical:
The rear shock absorbers are located directly at the rear of the car, they can be very easily seen if you crawl under the bottom of the car. For clarity, we took a photo from which it can be seen that the left rear shock absorber is located next to the wheel, respectively, and the right one is located in exactly the same way, but only on the other side.
But it’s not so easy to see the front shock absorbers in their entirety, because they are covered by the car body and suspension parts. But in order to understand where they are, it is enough to just look approximately at this place to understand it. Just below is a photograph in which the right front shock absorber is clearly visible.
When do you need to change shock absorbers? They need to be changed if oil particles are detected on the shock absorbers themselves, as well as if their properties are lost due to which one or more shock absorbers will no longer perform their main function of “Preventing vibrations”.
Why do you need to change the shock absorber when oil appears on it, you ask? The thing is that standard shock absorbers operate under the pressure of the oil that is in them, and therefore, at the first detection of a leak, it is recommended to replace the shock absorber with a new one.
Is there any way to fix the shock absorbers? Essentially it’s “Yes”, but here’s the rub! It is best for experienced people who have been doing this for a long time to undertake the repair of shock absorbers, because repairs require special tools and skills. Where can you find these experienced people, you ask? For example, in specialized workshops, there should be craftsmen who can do all this for you at a reasonable price!
Examination
Self-check shock absorbers for performance.
To check it yourself, you need to follow a number of the following tips:
- Bring the car to the inspection hole and check the shock absorbers for oil leaks, changes in shape, and contamination.
- Pay attention to the piston rod; if it is damaged, the system may depressurize.
- Listen for knocking sounds in the car's suspension while driving.
- Inspect the tire tread; if there is uneven wear, the shock absorber(s) may need to be replaced.
- Drive the distance of the same turn repeatedly at the same speed, pay attention to whether the car skids.
How to check a shock absorber
To make sure it works, you will need to do the following:
- it is clamped in a vertical position;
- raise to the maximum;
- quickly lowered.
This procedure must be repeated several times.
The following signs indicate failure of this part:
- presence of sounds during the above procedure;
- jamming;
- failure.
The procedure is as follows:
- the rod is pulled out to the maximum;
- the nut is unscrewed;
- take out the fixing elements and the rod itself;
- remove the working cylinder;
- every detail is inspected.
If defects are found, they are replaced. Assembly is carried out in reverse order.
After installing the compression valve, you need to make sure that its discs move smoothly. Jamming is not acceptable.
Finally, it’s worth telling that on average in Russia a new rack will cost approximately 3 thousand rubles. As you can see, the price is quite serious, and therefore it makes sense to treat the car more carefully and regularly care for it.
To fully familiarize yourself with the process, we recommend watching the video below:
Replacing the rear pillar of a VAZ
We wondered when to change the rear struts of a VAZ, you can change them at home yourself. My answer is that you can change the racks yourself at home, but how do you know when to change the racks?
Signs of a faulty rear strut: when driving on the road, the rear of the car sways, and when the rear wheel hits a hole, an impact occurs in the strut.
A sign of a good rear strut, the rear of the car does not sway on the road; when the rear wheel hits a hole, the wheel falls into it without impact, softly.
Based on these signs, we decided that the rear struts need to be replaced. Rear struts are now mostly produced as non-separable ones, so it is better to buy new ones in advance rather than try to pump up old ones, as they may turn out to be non-removable.
Now we need to decide on the choice of rear struts. The rear struts are divided into gas and oil.
Which racks are better to install?
To make your choice, analyze what is most important to you in a car and which roads you drive on most often. Gas struts perfectly hold the car on a good road at high speed, but as soon as you go off-road or on a gravel road, the car turns into a rattle. Since gas struts provide little resistance to compression, small and frequent bumps will be poorly absorbed and will be released into the body of the car. Oil struts are good for those who often drive off-road (in Russia, half the country is off-road), they hold the car a little worse at high speed, but they behave smoothly off-road, since they have no compression resistance, they only resist decompression, thereby , better than gas ones, absorb small and frequent bumps.
To replace the rear struts at home, it is advisable to have spring ties; if there are no ties, you can change them without them, but it will be a little more difficult.
The photo below shows how to lift the car and remove the wheel; be sure to secure the jack with hemp or bricks.
Photo. The car is on a jack, with a safety stump.
Unscrew the strut bolt, it is shown in the photo below. But this bolt does not always come out easily; sometimes the bolt is on the customer’s strut bushing. A jammed bolt can simply be cut off with a grinder or a hacksaw. You can try to knock it out, first try to turn it with a key; if it turns, it’s fine, pull it out in a circular motion. But don’t try to hit the thread, you can break the thread, thereby widening the end of the bolt, then it will definitely rest against the strut bushing and jam. Try to knock out the bolt like this, take a thin chisel or a powerful screwdriver, drive it between the head of the bolt and the post mount, if the bolt comes out, hammer it in again, drive the chisel in again, swing it with such blows. It is advisable to have WD-40 and spray it into the bolt. If it suffers for so long, the bolt will come out, and if it doesn’t work out, the bolt sits as if welded, then cut it off without sparing it.
Checking the car on a vibration stand
For the reason that it is not always possible to identify a malfunction on your own or without removing the element, you can contact the service. Here, trained craftsmen will perform it with high professionalism.
How are shock absorber struts checked without removing them from the vehicle?
To do this, you should drive the car onto a special vibration stand. The price of this diagnostic is a thousand or more rubles. This service is also good because not only the strut/shock absorber, but also other elements of the chassis and the brake system are subject to professional inspection. On the vibration stand, road irregularities are simulated, which will allow you to correctly determine the breakdown of a specific mechanism. In addition, this makes it possible to determine the serviceability of bearings (ball and wheel) by checking the lateral rolling of the machine.
The stand has a huge number of sensors that transmit information every second to the main computer.
Vibration test
Advantages of testing with a vibration stand
- the highest accuracy in identifying the slightest faults;
- minimum amount of time.
In addition, owners of freight transport cannot do without this service. Because it is impossible to rock a large car. On a vibration stand it will be possible to establish the problem in its entirety. The only downside is the low prevalence of auto repair shops with similar equipment, even in big cities. In addition, the cost of the service for some car owners can be quite high.
So, we have given several ways to check shock absorbers for malfunctions; you just have to choose the most relevant one for you.