Adjusting the fuel pump drive for VAZ 2108, 2109, 21099 cars
As you know, on VAZ 2108, 2109, 21099 cars the fuel pump is mechanical, driven from the camshaft through a pusher.
The performance of the fuel pump, and therefore the normal operation of the engine, directly depends on how correctly the fuel pump drive is adjusted.
If there are dips, jerks, twitches in the engine operation, throttle response has decreased at medium and maximum loads, or no fuel is supplied to the engine at all, it makes sense to adjust the fuel pump drive.
The essence of the adjustment is to change the amount of minimum protrusion of the pusher relative to the plane of the heat-insulating spacer and gaskets of the gas pump, in order to ensure its optimal performance.
If the minimum protrusion of the pusher is greater than the norm, then its maximum protrusion will increase, which will lead to the creation of excess pressure by the fuel pump (as a result, “overflow”)
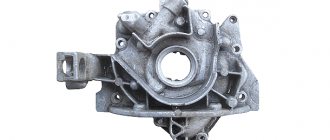
Minimum pusher protrusion
Adjusting the fuel pump drive for VAZ 2108, 2109, 21099 cars
— Remove the fuel pump from the car engine
In this case, the heat-insulating spacer and gaskets remain on the engine.
— Rotate the crankshaft until the pusher protrudes to a minimum
The moment of minimum protrusion can be determined visually by placing a finger on the pusher. Using a large slotted screwdriver, we slowly rotate the crankshaft by the flywheel teeth in the hatch on the clutch housing, and use our finger to control the movement of the pusher.
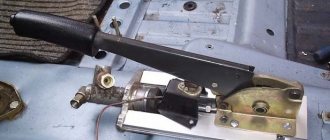
— We measure the minimum protrusion of the pusher
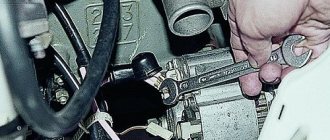
There is a special device for these purposes (67.7834.9506), but you can get by with a caliper. In the image below, the measurement was made generally using a conventional drill (1 mm). The minimum protrusion of the pusher should be in the range of 0.8 - 1.3 mm.
Measuring the protrusion of a VAZ fuel pump pusher using a drill
If the obtained value is less than the required one, the performance of the fuel pump will be low. As a result, the negative consequences for engine operation described above occur. Otherwise (the value is higher than normal - the fuel pump “pumps”), an “overflow” of fuel occurs in the carburetor, since the gas pump produces high fuel pressure, and the valve in the float chamber is not designed for such a load.
You can adjust the minimum protrusion by selecting gaskets for the fuel pump. There are two of them: between the heat-insulating spacer and the engine (0.27-0.33 mm), between the fuel pump and the heat-insulating spacer (0.79-0.80 mm).
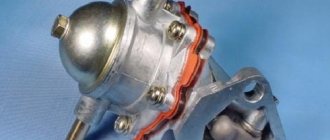
Fuel pump gaskets
If the protrusion of the pusher is insufficient, replace the gas pump-spacer gasket with a thinner one similar to the spacer-engine gasket (0.27-0.33 mm). If the protrusion is greater than normal, then install a thicker gasket for the fuel pump-spacer (1.10-1.30 mm). Such a thick gasket can be taken from the fuel pump repair kit or cut from a paronite sheet of the required thickness. The gasket between the heat-insulating spacer and the engine does not change and is not involved in adjustment.
If it is impossible to adjust the fuel pump drive by selecting gaskets, it is necessary to replace the pusher.
Notes and additions
— The performance of the fuel pump of VAZ 2108, 2109, 21099 cars is 1 liter per minute at an engine speed of 2000±40 rpm and an air temperature of 20 degrees. The fuel injection pressure is 0.21-0.30 kgf/cm².
— If the fuel pump diaphragm is leaky, then adjusting the drive may not help in eliminating poor fuel supply. See “Symptoms of a faulty fuel pump diaphragm on VAZ 2108, 2109, 21099.”
Replacing the fuel pump on carburetor VAZ 2108, VAZ 2109, VAZ 21099
Note! Not every person knows that there is a filter inside the fuel pump that needs to be periodically changed or cleaned of dirt, so before starting work, remove it and, if necessary, replace it, or clean it of dirt. (see “Removing the fuel pump filter”)
When should you change the fuel pump? 1) If the car is idling, or while driving it, it starts to stall. 2) And also if the car began to twitch while driving, and there was a feeling as if the gas in the gas tank was running out.
Note! Not in all cases it is necessary to replace the fuel pump with a new one; sometimes it is enough to simply repair it! (see “Fuel pump repair”)
We jerk after 80 km/h?! The fuel pump is sick!
And if there is a chance to purchase a low-quality fuel pump, but it is small, then you can buy a repair kit of a very low grade. From my own experience, I will say that I personally purchased kits in which the valves either did not fit into their grooves at all, or fell into them like a spoon in a mug. I don’t know, it’s quite possible that fate doesn’t like me very much, but this happened not only to me. Therefore, I decided that the best way to repair the VAZ 2101 fuel pump is to purchase a new one. Did you pick up speed over 80?! And suddenly there were pokes? Is the car jerking?!.. Most likely, your fuel pump has caught a cold! In this video, Nail Poroshin explains the reason and shows how easy it is to solve! Be careful, don’t let yourself be deceived!.. Enjoy your viewing everyone.
How to replace the fuel pump or is it the fuel pump itself?
Removal: 1) First, disconnect both hoses from the pump, or to be more precise, you need to disconnect the left and right hoses from the pump, to do this:
1. Take a screwdriver in your hands, and then use a screwdriver to loosen the screw of the left and then the right hose clamp.
2. Next, disconnect both hoses from the fittings that are located on the fuel pump itself.
Note! The hoses can be removed in any order; there is no sequence as such when removing them!
2) Then use a wrench to unscrew both nuts securing the fuel pump to the engine.
3) And then remove the fuel pump from the studs, thereby removing it from the car engine.
Replacing fuel pump gaskets:
1) After removing the pump, where it was located, an external sealing gasket is installed immediately behind it, which must be removed and preferably replaced with a new one.
Note! The size of the new outer sealing gasket is 0.75 mm!
2) Next, in the same place where the outer sealing gasket was located, there is a heat-insulating spacer, which you will also need to remove in order to get to the inner gasket.
Note! Inside the heat-insulating spacer there is a pusher, which, if deformed, must be replaced with a new one!
3) After removing the heat-insulating spacer, the last internal sealing gasket will remain on the seat studs, which must also be replaced if it burns out.
Note! The size of the new internal sealing gasket is 0.30 mm!
Installation: 1) First install the new inner sealing gasket onto the thermal insulation spacer.
2) Then install the thermal insulation spacer, together with the new internal sealing gasket, into its seat.
Note! If you previously removed the pusher from the heat-insulating spacer, then install it back!
3) Next, install the outer gasket in its place.
4) Next, check whether there is a small plug on the clutch housing; if it is there, then remove it, because under it there is a flywheel that will need to be turned in the future.
5) After removing the plug, place your finger on the tip of the pusher “upper arrow”, and at the same time, using a screwdriver, gradually turn the flywheel by its teeth “lower arrow”.
Note! You need to turn the flywheel until you feel the minimum protrusion of the pusher with your hand!
6) When the minimum protrusion of the pusher from the spacer is reached, use two metal rulers and use them to measure the protrusion of the pusher from the spacer, as shown in the figure:
Note! The protrusion of the pusher from the spacer should be within 0.8-1.3 mm, if the protrusion of the pusher on your car goes beyond the limits, then it needs to be brought back to normal; how to bring it back to normal, read in the “Important” section!
7) After all the operations performed, install a new fuel pump in the reverse order of removal.
Note! When installing the pump, pay attention to the arrow that is shown on it; when installing, this arrow must be strictly directed towards the carburetor!
Important! 1) To bring the pusher protrusion back to normal, for this: 1. Replace the outer gasket with a thinner one if the pusher protrusion is less than 0.8 mm! 2. And if the protrusion of the pusher exceeds 1.3 mm, then replace the same outer gasket, only this time with a thicker one!
2) When turning the flywheel, set the gearbox to neutral gear!
CHECKING AND ADJUSTING PUMP PRESSURE
Everyone knows that all car parts have a certain resource. Thus, the “nine” fuel pump, like any other part, sooner or later fails. It stops pumping gasoline properly. The following instructions will help you understand the problem.
It should be said that the problems on the VAZ 2109 are not always the same.
- The cause is almost always a leaky valve or housing, fuel line or diaphragm. Often the cause is clogged fuel filters or overheating fuel supply lines. And the most important problem is insufficient gasoline pressure at the outlet of the fuel pump.
- In the case where the fuel pump initially could not show the appropriate outlet pressure, all of the above problems only further aggravated the situation.
- You need to know exactly the pressure that the fuel pump should develop when the engine is idling. As a rule, all fuel pumps must develop a pressure of 0.20 to 0.35 atmospheres. If the fuel pump has this pressure at the outlet, there should be no problems with fuel supply.
- Pressure is measured by a pressure gauge with a scale of 1.6 atmospheres.
- If the pressure is below normal, you may only need to adjust the pump.
- The fuel pump can be adjusted, moving it closer or further from the engine block by changing the thickness of the gasket.
- Another way is to strengthen the spring; washers need to be placed under it, taking into account the strength of the spring and the wear of parts.
- The third way is to change the length of the rod.
- Any of the above actions will help raise the pressure of the fuel pump to a level of 0.20-0.30 atmospheres.
- When the engine starts running at higher speeds, this figure will increase a little more.
CHARACTERISTICS OF PETROL PUMP VAZ 2109
In order to understand how a working pump works and check its operation, you need to know its characteristics:
- The rod length should be 82.4 mm.
- The rod should protrude 0.8 - 1.3 mm above the gasket.
- The thickness of the very first gasket should be 0.3 mm.
- The rod stroke is 2.5 - 2.8 mm.
Some useful tips
- Please note that on vehicles that have a return line, the problem may be caused by the vent hole being too large, as most of the pressure is released by the return line.
- If the pump installed on your car cannot be adjusted, it will have to be replaced.
- Today, the market sells a wide variety of models of pumps for VAZ from various manufacturers.
- Approach your purchase very responsibly so as not to purchase a fake. Choose a branded store and a reliable manufacturer. Buy only those models of fuel pumps that are recommended by the VAZ plant.
- The best option would be to contact an official VAZ spare parts dealer in your region. This will allow you to quickly get the part you need without worrying about it being of poor quality. This way, you don’t have to look for and buy another gasoline pump.
Fuel pump repair for VAZ 2109 (carburetor)
If the fuel pump on a VAZ 2109 malfunctions, the fuel supply to the carburetor is completely or partially stopped. Therefore, it is not possible to start the engine cold or hot. It will start at first, but then immediately die. Plus, instability at idle is often observed.
Before changing the fuel pump, it is recommended to first check the condition of the device. It is not uncommon for a breakdown to be corrected with minor repairs.
Checking the general condition of the fuel pump
First of all, let’s check whether the supply system of your VAZ 2109 is working at all. To do this, you need to take the following steps:
- Remove the pump fuel hose from the source or discharge fitting;
- Manually press the fuel pump lever several times;
- If the pump is operational, a strong stream of fuel will immediately flow through the fitting;
- If there is no jet or it is very weak, it will be necessary to carry out other checks.
Intake Valve Check
- Disconnect the hose from the suction fitting so that both hoses are eventually removed, each from its own fitting.
- Simply plug the suction fitting with your finger, then pull the lever several times to manually pump fuel. If everything works fine, your finger will begin to be sucked into the fitting. This effect indicates that the pump is working properly. Therefore, we look for the problem in the tank or lines.
- If there is no suction, you will have to disassemble the device to replace the inlet valve. Its tightness is most likely broken.
Leak test
To check the tightness of the intake valve, you must:
- Place your finger on the hole from the injection fitting and pump up the fuel several times using manual pumping;
- In this case, a stream of air should come out of the hole, significantly repelling the pressed finger;
- If the stream turns out to be weak or does not exist, the fuel pump simply does not pump.
In this situation, there are two options - look for the problem inside the fuel pump device, disassembling the pump, or change the entire unit.
The filter is clogged or damaged
To fix the situation, you need:
- Remove the cover from the fuel pump, remove the filter, clean and rinse it with clean fuel. Then be sure to blow out with compressed air;
- Check the condition of the filter. If it is deformed, no repair will help. You will have to change the filter device;
- If you have a Pekar pump or a similar one, the filter can be removed by unscrewing the suction fitting from the cover. That is, it is not necessary to remove the cover at all.
Pump diaphragm failure
You need to do the following for your fuel pump:
- Remove the upper part of the fuel pump housing and remove the diaphragm assembly from there;
- Unscrew the nut on the rod, and then pull out the 3 diaphragms;
- Replace faulty elements with new ones. They are available in any repair kit for the VAZ 2109 fuel pump;
- Reassemble the assembly in reverse order;
- If you have a Pekar pump, there is only one diaphragm. It can be removed by removing the cover;
- To disconnect the diaphragm assembly, rotate it 90 degrees.
Be sure to simultaneously check the condition of the spring located under the diaphragm. To do this, you need to remove the upper part of the pump housing, remove the diaphragm rod and look at the current state of the spring. If it is broken, deformed or lacks elasticity, replace the element.
Node elements
Intake and exhaust valve malfunctions
If both valves raise doubts about their functionality, certain measures will have to be taken.
- Remove the cap from the fuel pump and remove the strainer.
- Visually assess the condition of the pump cavity and inlet valve.
- With the top of the pump body removed, you can take a look at the outlet valve.
- If both valves are not installed tightly enough, they are not pressed well or have become motionless, replace the entire pump completely.
- If you find traces of clogged valves, remove them and blow out the housing with compressed air.
In the case of the Pekar pump, two valves are located in the cover, so to assess their condition, simply remove the cover from the fuel pump housing.
Damage to the pusher
It is not uncommon for a fuel pump to fail to operate due to damage to the pusher. We have prepared separate instructions for this case.
- Remove the pump from the studs by unscrewing the fastening nuts. The thermal insulation insert, pusher and gaskets remain on the motor.
- Rotate the crankshaft to extend the pushrod as far as possible.
- Measure the distance that the pusher protrudes relative to the top gasket. Normally, the figure is 0.8-1.3 millimeters.
- If the protrusion is smaller or larger, try adjusting it using thicker or thinner shims.
- Between the thermal insulation insert and the pump there is an external gasket with the greatest thickness. It is this that needs to be changed when adjusting the protrusion.
- New gaskets are available in repair kits, although many make their own. To do this you will need a piece of paronite.
Causes of malfunction
Troubleshooting is an incorrect air-fuel mixture ratio in the combustion chamber or a lack of spark. In this case, the crankshaft may turn with difficulty, or there will be misfires.
Many car enthusiasts started with carburetor engines and therefore know perfectly well why the engine misfires, but not everyone can fix the problem because they don’t know what the problem is. It is worth understanding that the tripping effect occurs due to a disruption in the supply of one of the elements - air, fuel and spark. It is in the systems that are responsible for these elements that we should look for the cause.
So, let's look at the components where you should look for the reason why the VAZ 2109 engine with a carburetor injection system is tripping:
- Carburetor.
- Fuel.
- Fuel pump and filter.
- Spark.
- Air filter.
Disassembling and replacing the fuel pump
So, now we’ll tell you specifically about how to properly disassemble, replace damaged elements of the fuel pump, or completely replace this device with a new one.
Hatch
- In any case, we recommend purchasing a repair kit. It doesn't cost much. But there is no need to rush into buying a fuel pump. Who knows, maybe a simple repair will bring the pump back to life.
- Remove the air filter along with its housing.
- Disconnect the fuel supply and return hoses from the fuel pump fittings.
- Unscrew the mounting nuts that hold the pump itself.
- Carefully remove the pump, being careful not to damage the gaskets.
- Inspect the pump parts for cracks or damage. Check the fuel pump valves for leaks and perform all the operations we described above.
- Assess the current condition of the suction and discharge fittings. When dismantling, they must remain motionless in their seats. They break extremely rarely, but nothing should be ruled out.
- Check the fuel pump diaphragm. The presence of ruptures and peelings indicates that it must be replaced.
- Look at the current filter. Damage and excessive contamination are clear signs of wear and warrant replacement.
- Treat the filter components with clean gasoline and blow with compressed air using a compressor.
- If you find damaged elements, replace them with new ones using a repair kit.
- Replace the pump gaskets if necessary.
- When installing new gaskets, be sure to first treat their surface with Litol 24.
- If the pump housing itself is damaged or there are other serious problems, you will have to completely replace the fuel pump. Repairs won't help him.
- Next, when partial repairs are completed or you decide to take a completely new pump, it’s time for reassembly.
- Be sure to adjust the feed using shims of the required thickness so that the pusher output has an optimal indicator. We talked about this above.
- If the pushrod protrudes too much, it will cause the fuel pressure to be too high, causing your carburetor check valve to break.
- If the distance is less than required, as the load increases and the vehicle speed increases, the engine will not be able to receive enough fuel.
- Reassemble by following the reverse sequence of dismantling the fuel pump.
- Make sure the arrow on the body points towards the carburetor.
- When installing the diaphragm pump assembly, the holes in the gasket are located away from the muffler pipe.
Well, you figured out how you can repair and replace the fuel pump yourself. The task is really not difficult, although this unit plays a very important role in the performance of the entire VAZ 2109 car.
Carburetor check sequence
On the car we tested, the engine air filter is located directly on the carburetor. Therefore, to gain access it must be disassembled.
- Remove the filter cover using a wrench. We take out the filter element (at the same time check its cleanliness) and unscrew the bolts securing the casing to the carburetor. Remove the body;
- Let's look inside the carburetor. Depending on the engine temperature, the throttle valve may be open or closed. In the second case, we open it by hand. Then we press the throttle mechanism drive and check whether a stream of gasoline appears from the pump;
- After making sure that there is gasoline in the carburetor, we get into the car, press the gas, and try to start the engine. If it doesn’t start, look further;
- Remove the top carburetor cover so that the fuel level in the carburetor chamber can be seen. The cover is secured with 5 screws. You should also disconnect the throttle cable bracket and turn off the idle air valve;
- Having released the float chamber, we assess the gasoline level. During normal operation of the fuel supply system, the level should be 23 mm below the walls. You can estimate the level using the tail of a caliper, having previously set it to a depth of 22-23 mm;
- We put the cover back on, fix it with a pair of screws, and start the engine again, having first depressed the gas pedal all the way;
- If the chamber is empty, the verification algorithm is slightly different. We put the lid on, leaving a small gap between the upper edge of the float chamber and the plane of the lid. We fix the gap with a flat steel ruler or a small screwdriver;
- We fill the chamber by manual pumping or by turning the crankshaft a few turns with the starter. After filling the chamber, we try to start again, having first secured the lid;
- The motor starts working - this is a sign of a malfunctioning needle valve. It should be replaced because it is almost impossible to restore it.
VAZ 2109 carb stalls while driving.
titoff2100
Young-green
- 17 May 2014
- #1
- 17 May 2014
Oduvan4ik1988
Experienced
titoff2100
Young-green
- 17 May 2014
Oduvan4ik1988
Experienced
- 17 May 2014
titoff2100
Young-green
- 18 May 2014
titoff2100
Young-green
- 20 May 2014
Posts 8
1 Topic by pfz 2009-09-09 19:38:40
- pfz
- User
- Offline
- Registered: 2009-06-28
- Messages: 4
- Reputation: [ 0 | 0 ]
Topic: Fuel pump rod
VAZ-2109 carb camshaft new
This problem constantly flattens the fuel pump rod (this iron rod) on the camshaft side. Accordingly, the pump stops pumping. I'm tired of changing them. Sednya already installed 4. I tried it on with the new one, but the old one had 2-3mm off. people say that the spare parts are crap and only hardening the rod will save them. I would like to hear your opinion.
2 Reply from Lacoste 2009-09-10 02:52:35
- Lacoste
- User
- Offline
- Registered: 2009-04-12
- Messages: 10
- Reputation: [ 0 | 0 ]
Re: Fuel pump rod
This problem constantly flattens the fuel pump rod (this iron rod) on the camshaft side. Accordingly, the pump stops pumping. I'm tired of changing them. Sednya already installed 4. I tried it on with the new one, but the old one had 2-3mm off. people say that the spare parts are crap and only hardening the rod will save them. I would like to hear your opinion.
I had this happen. Only the pump got terribly hot. I changed the pump and rod and then had no problems.
3 Reply from maniboo 2009-09-10 06:40:03 (2009-09-10 06:40:45 edited by maniboo)
- maniboo
- Moderator
- Offline
- Registered: 2008-11-10
- Messages: 2,196
- Reputation: [ 0 | 0 ]
Re: Fuel pump rod
which rod is that pusher? Did you set it up by eye or by letter? There should be a certain number of spacers and some of them of different thicknesses to set the correct distance.
4 Reply from Driver 2009-09-10 17:24:17
- Driver
- User
- Offline
- Registered: 2008-12-08
- Messages: 460
- Reputation: [ 0 | 0 ]
Re: Fuel pump rod
Still, I think it’s a problem with the pump.
5 Reply from pfz 2009-09-10 17:46:47
- pfz
- User
- Offline
- Registered: 2009-06-28
- Messages: 4
- Reputation: [ 0 | 0 ]
Re: Fuel pump rod
yes it's a pusher. the pump is new. I installed the old one the same way. I installed the gaskets that were included in the kit, one thinner and the other thicker. installed correctly
6 Reply from maniboo 2009-09-11 06:27:51
- maniboo
- Moderator
- Offline
- Registered: 2008-11-10
- Messages: 2,196
- Reputation: [ 0 | 0 ]
Re: Fuel pump rod
4 pumps in a row? I doubt that they are all marriageable, unless of course they were bought in one place, maybe it’s a batch. As far as I remember, the kit includes gaskets, but when I changed the pump I had to buy a different thickness, because... those that were in the box did not provide the required gap. In mm I don’t remember how much it should be, I can’t tell you
7 Reply from GUTA 2009-09-11 16:30:42
- GUTA
- User
- Offline
- Registered: 2008-11-12
- Messages: 402
- Reputation: [ 0 | 0 ]
Re: Fuel pump rod
Why did he get eaten the first time? because of which? This is almost wear-resistant weight. The car will be completely rotten, the engine will have been capitalized 10 times, and this pump rod - a fucking stick - will still work. Here you need to find out the reason, if you installed a new pump and it was immediately chewed up, then the problem is in the pump and it is not a fact that you installed everything correctly. I'm talking about gaskets. You need to accurately measure the output of the pusher with a barbell or ruler. and then install gaskets of the required thickness. Like that:
Before installing the pump, we measure the minimum amount of protrusion of the pusher (when turning the crankshaft) from the end plane of the heat-insulating spacer.
The protrusion is regulated by selecting sealing gaskets of different thicknesses.
Gaskets are available in thicknesses of 0.30, 0.75 and 1.25 mm. We install a 0.30 mm gasket between the heat-insulating spacer and the engine, and a 0.75 mm gasket on the outer side of the spacer (facing the fuel pump) and check the minimum protrusion of the pusher from the spacer, which should be 0.8–1.3 mm. To do this, slowly turn the engine crankshaft, pressing the pusher with your finger and periodically checking its protrusion above the plane of the gasket. If the minimum protrusion is less than specified, the outer gasket is replaced with a thinner one, if more, with a thicker one.
8 Reply from kos127 2009-10-24 12:06:27
- kos127
- User
- Offline
- Registered: 2009-01-12
- Messages: 6
- Reputation: [ 0 | 0 ]
Re: Fuel pump rod
It seems to me that the pushers are completely G. As an option, remove the distributor and look at the camshaft cam, maybe there’s something wrong with it (it’s crumbled, for example). I understand that this is unlikely, but still. On my car the cam itself is polished to a shine.
What is the length of the Tavria fuel pump rod?
Inveterate Zhigulist
Group: Zhigulists Messages: 961 Registration: 1.1.2008 User No.: 1947 Car: VAZ 2106 Color: midnight blue Year of Issue: 1993 Thanks said: 1 time
Rustam Shamsiev View Profile
Zhigulenish
Group: Zhigulyonok Messages: 77 Registration: 10/22/2007 User No.: 1438 Car: VAZ 21063 Color: yellow Year of Manufacture: 1988 Thanks said: 0 times
zid2106 View Profile
Inveterate Zhigulist
Group: Zhigulists Messages: 961 Registration: 1.1.2008 User No.: 1947 Car: VAZ 2106 Color: midnight blue Year of Issue: 1993 Thanks said: 1 time
BlackCat View Profile
Zhigulist
Group: Zhigulists Messages: 154 Registration: 11/6/2007 From: Zheltiye Vody city, Ukraine User No.: 1548 Car: VAZ-21063 Color: gray-blue Year of Issue: 1990 Thank you: 4 times
denis-21061 View Profile
Inveterate Zhigulist
Group: Zhigulyonok Messages: 726 Registration: 6.9.2007 From: Balashikha, microdistrict Zarya. User No.: 1155 Car: VAZ-21061 Color: white (201) Year of Manufacture: 1995 Thanks said: 0 times
zid2106 View Profile
Inveterate Zhigulist
Group: Zhigulists Messages: 961 Registration: 1.1.2008 User No.: 1947 Car: VAZ 2106 Color: midnight blue Year of Issue: 1993 Thanks said: 1 time
It is useless, where the fitting of the copper tube connects to the fuel pump is depressurized (loose). I'm already tired of it - in the heat there are problems with it in traffic jams. I just went and bought Pekar for 450 rubles.
denis-21061 View Profile
Inveterate Zhigulist
Group: Zhigulyonok Messages: 726 Registration: 6.9.2007 From: Balashikha, microdistrict Zarya. User No.: 1155 Car: VAZ-21061 Color: white (201) Year of Manufacture: 1995 Thanks said: 0 times
KENIG View Profile
Zhigulenish
Group: Zhigulyonok Messages: 68 Registration: 1/13/2008 From: Kaliningrad User No.: 2046 Car: 21063 Color: Dark beige Year of Issue: 1991 Thanks said: 0 times
Zakhar View Profile
Lada
Group: Zhigulyonok Messages: 105 Registration: 17.6.2007 From: Dmitrov User No.: 405 Car: VAZ 21043 Color: Bright white Year of Issue: 1995 Thanks said: 0 times
How can you tell if the fuel pump is leaking? Is oil oozing from under it, and is gasoline flowing like a fountain? If it’s oil, then you need to evaluate the gaskets and replace them; if it’s gasoline, then replace the diaphragm and filter gasket. I don’t understand why everyone makes so much noise from Peker’s fuel pumps - nothing special, just spare parts.
Mr. Lieutenant
Fuel pump repair for VAZ 2109 (carburetor)
If the fuel pump on a VAZ 2109 malfunctions, the fuel supply to the carburetor is completely or partially stopped. Therefore, it is not possible to start the engine cold or hot. It will start at first, but then immediately die. Plus, instability at idle is often observed.
Before changing the fuel pump, it is recommended to first check the condition of the device. It is not uncommon for a breakdown to be corrected with minor repairs.
Disassembling and replacing the fuel pump
So, now we’ll tell you specifically about how to properly disassemble, replace damaged elements of the fuel pump, or completely replace this device with a new one.
Hatch
- In any case, we recommend purchasing a repair kit. It doesn't cost much. But there is no need to rush into buying a fuel pump. Who knows, maybe a simple repair will bring the pump back to life.
- Remove the air filter along with its housing.
- Disconnect the fuel supply and return hoses from the fuel pump fittings.
- Unscrew the mounting nuts that hold the pump itself.
- Carefully remove the pump, being careful not to damage the gaskets.
- Inspect the pump parts for cracks or damage. Check the fuel pump valves for leaks and perform all the operations we described above.
- Assess the current condition of the suction and discharge fittings. When dismantling, they must remain motionless in their seats. They break extremely rarely, but nothing should be ruled out.
- Check the fuel pump diaphragm. The presence of ruptures and peelings indicates that it must be replaced.
- Look at the current filter. Damage and excessive contamination are clear signs of wear and warrant replacement.
- Treat the filter components with clean gasoline and blow with compressed air using a compressor.
- If you find damaged elements, replace them with new ones using a repair kit.
- Replace the pump gaskets if necessary.
- When installing new gaskets, be sure to first treat their surface with Litol 24.
- If the pump housing itself is damaged or there are other serious problems, you will have to completely replace the fuel pump. Repairs won't help him.
- Next, when partial repairs are completed or you decide to take a completely new pump, it’s time for reassembly.
- Be sure to adjust the feed using shims of the required thickness so that the pusher output has an optimal indicator. We talked about this above.
- If the pushrod protrudes too much, it will cause the fuel pressure to be too high, causing your carburetor check valve to break.
- If the distance is less than required, as the load increases and the vehicle speed increases, the engine will not be able to receive enough fuel.
- Reassemble by following the reverse sequence of dismantling the fuel pump.
- Make sure the arrow on the body points towards the carburetor.
- When installing the diaphragm pump assembly, the holes in the gasket are located away from the muffler pipe.
Well, you figured out how you can repair and replace the fuel pump yourself. The task is really not difficult, although this unit plays a very important role in the performance of the entire VAZ 2109 car.