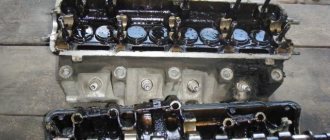
cylinder head VAZ 2106
The cylinder head is made of an aluminum alloy containing a certain percentage of copper and tin in order to give it softness and elasticity. With these properties, it is pressed tightly against the gasket, preventing gas breakthrough.
The entire head is attached to the cylinder block with eleven bolts, ten large and one small, which are tightened with a certain sequence and force.
Replacing the gasket
1. Remove the cylinder head from the engine complete with intake and exhaust manifolds.
2. Disconnect the wire from the negative terminal of the battery. Drain the coolant.
3. Remove the carburetor.
4. Remove the ignition distributor with high-voltage wires.
5. Remove the block head cover.
6. Remove the camshaft assembly with the bearing housing. Disconnect the exhaust system from the exhaust manifold and remove the coolant drain pipe from the heater radiator.
7. Remove the chain from the camshaft sprocket.
8. Disconnect the supply hose from the heater radiator pipe.
9. Remove the hoses from the two pipes of the cylinder head.
10. Using a 13mm wrench, unscrew the bolt securing the cylinder head near the ignition distributor.
11. Using a “12” socket, unscrew the ten bolts securing the head to the cylinder block.
12. Remove the bolts from the holes.
13. Remove the cylinder head assembly with manifolds
14. Then remove the head gasket.
15. Install the head in the reverse order. We replace the head gasket with a new one.
16. To center the gasket and head, two bushings are installed in the block.
17. Tighten the cylinder head bolts in two steps. First, tighten bolts No. 1–10 with a torque of 33.3–41.16 N.m, and then tighten them with a torque of 95.9–118.3 N.m. Lastly, tighten bolt No. 11 to a torque of 30.6–39 N.m.
What is the price for valve stem seals in the link.
Finalization
Removing the cylinder head (cylinder head)
We eliminate the shortcomings of the casting of the cylinder head and manifolds (we grind the cylinder head and combine the manifolds). Using cutters and sandpaper.
Fundamentally important: the inlet channels must not be polished! If the surface is polished (mirror-like), the mixture condenses on it and is written. We remove tides and irregularities in the channels.
We mill the cylinder head by 1 mm.
We wash the cylinder head with all available means (gasoline, kerosene, washing powder, etc.)
It's better to do this at home (at room temperature)
We check whether the valves are bent (we worked in vain for 4 hours). If necessary, we buy new ones and rub them in with lapping paste, applying drops to the supporting surface of the valves. For convenience, glue the 17 nut to the valve with superglue
We dry the valves by inserting new valve stem seals and install the rocker arms and manifolds with the carburetor so that all channels match perfectly
Then the work was created on the engine installed in the engine compartment
We install the cylinder head, and at the same time we definitely buy NEW cylinder head BOLTS (length 120mm). We observe the order and tightening torques.
Torque
Take a torque wrench and tighten all the pins in the order shown in the diagram. In this case, the pulling torque should be 3.5 – 4.1 kgf*m. First of all, you need to tighten the two screws located in the middle. Then, in order to maintain the correct order, two upper and lower pins are tightened, located on each side of the middle elements. Next, the two outer pins are tightened - first the left ones, then the right ones. In this case, the element numbered eleven does not need to be touched.
After these steps are completed, you need to tighten the pins again, in the same sequence. Please note that now the tightening torque with a torque wrench should be 10.5 - 11.5 kgf*m.
After these steps, you only have to tighten screw number 11. Do this using a torque wrench, and the torque should be 3.5 - 4.0 kgf*m.
Take off
This procedure itself is not that complicated, but it does require a little preparatory work. And I’ll immediately give a list of the necessary tools, which you simply cannot do without when performing this repair:
Wrench with extension
Head for 19 and 10
Firstly, if you are going to repair the engine, then you must drain the coolant.
Then you need to remove the camshaft, since the cylinder head bolts are located right under it and it is simply impossible to get to them without removing the camshaft.
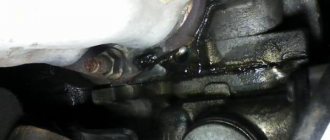
And it is also necessary to disconnect the coolant supply pipe to the head, which is located on the right rear side of the engine, as shown in the photo below:
And disconnect the tube, moving it slightly to the side:
You also need to disconnect the plug from the temperature sensor, which is shown in the photo:
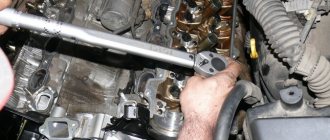
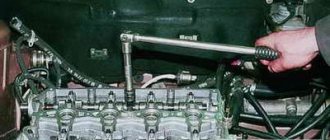
Now everything is ready and you can begin to unscrew the bolts securing the cylinder head to the engine block, using a fairly powerful socket wrench:
Once the bolts have been loosened, you can use a ratchet handle to complete this procedure several times faster:
After all the head bolts have been unscrewed, you can lift it by grasping the front part, or whatever is more convenient for you:
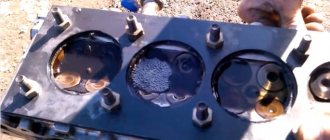
Now a few words about installing the cylinder head back onto the block. Firstly, be sure to replace the gasket, since it is installed only once. Of course, you must first clean the block and the surface of the head from traces of old gaskets. I did this using a special Dutch-made Ombra gasket remover, applying this liquid to the entire surface of the cylinder head:
As a result, after about 10 minutes of waiting and careful work with a regular clothes brush, you get a fairly noticeable result. For comparison, I decided to do it as follows: I cleaned the first three combustion chambers with various means, from gasoline to WD-40, and the last one with this special tool.
About tests
I added this paragraph for the “graphomaniacs and scribblers” who scream and drool on the forums about “how does a Frenchman know about valve material and long-term tests.” Tests can be laboratory or popular. I won’t tell you about the laboratories, so everything is clear. And traditional ones are to somehow imitate the operation of a spare part under simpler conditions. My academic education and work experience in an experienced tank design bureau helped me out. Let me remind you that the temperature in the engine combustion chamber is 600-650 degrees. I collected valves from several manufacturers that interested me, froze them in the freezer to -25, and then put them in a muffle furnace, with precise temperature graduations. Moreover, at first I set it to 500 degrees, and then with a reserve (like a true tank driver) I added up to 750. This was an approximate imitation of an engine standing in the cold and started in the morning. I pulled the valve out of the stove and laid it on the metal to cool. This primitive test was used quite often in Soviet times as an indicator of valve material. You can’t imagine what “bizarre forms” some of the subjects took)). I won't go into details about the manufacturers. In some valves the valve stem was deformed, in others the geometry was lost, that is, the chamfer appeared to run out relative to the axis of the stem. The German Kolbenscmidt valves emerged as the undisputed leaders. Today, the valves of good quality are AE (Germany), AMP (Poland), SM (MVI Group, Germany), Freccia (Italy, Fiat supplier).
inlet and outlet valve, SM
How to tighten correctly?
You can tighten the bolts with the help of professionals or without the help of others. If you have never encountered the need to perform this task before, then below we will look at how to tighten the screws and in what sequence to do it. Observe the tightening torque precisely, as if the cylinder head bolts are overtightened, this will lead to cracks and damage to the cylinder head. If this happens, the car owner will have to do a complete repair of the unit. The working surface of the hole, as well as the threaded connection of the screw, must be very clean. A wire brush can be used to clean the cylinders. If during the task you find blind holes for the head screws, then carefully use lubricant for processing. If the volume of the substance is greater than required, it will be difficult to install the pin all the way.
It is recommended to lubricate the threads of new bolts with a small amount of engine oil or another type of lubricant.
Algorithm of actions
You need order and strength when you pull the cylinder head bolts:
Recommended tightening torque
Before you begin tightening, several conditions must be met:
You need to tighten the cylinder head fasteners of a VAZ-2106 car according to the following diagram:
You need to work in accordance with the diagram using a torque wrench. That is why it is so important to observe the tightening torque, as in the table:
| Circle number | Required tightening torque, kgf/m |
| 1 | 3,5-4,1 |
| 2 | 10,5-11,5 |
| 3 | only 11 screws are tightened with a torque of 3.5-4 |
Equipment and tools for work
Replacing the VAZ-2106 valve stem seals should be carried out directly on the vehicle, which greatly simplifies and can speed up the work. Performing these actions does not require removing and then replacing the timing block element. It is enough to park the car in a place that is protected from dust, dirt and precipitation.
Apply the handbrake and place the gearshift lever in the neutral position.
To replace oil seals on a VAZ-2106 car, you need to have a set of new oil seals and a new gasket for the timing cover, a set of open-end wrenches and some equipment.
How to properly tighten the cylinder head bolts on a VAZ 2106: cylinder head tightening torque
When is it necessary to puff?
First, let's look at the cases in which it is necessary to tighten the cylinder head bolts of a VAZ 2106 car engine:
The Ilyich Garage channel has published a video that will help you understand the process of tightening the cylinder head on a six.
Tools and materials
When purchasing bolts, it is recommended to give preference to branded parts. Be sure to look at the thread; it should be intact, without damage or flaws; if any, the fasteners are replaced.
Motor Repair Channel! And exciting! published a video that describes all aspects of the stretching process.
User Sergey Samarsky made a video where he carefully showed and outlined all aspects of the process of independently tightening the cylinder head screws of a VAZ car engine 2106.
Replacing the cylinder head gasket of a VAZ 2106
Replacing the cylinder head gasket of a VAZ classic on an engine with a chain drive is generally a fairly simple job; the main difficulty is aligning the crankshaft and camshaft marks during assembly. If the marks are set incorrectly, the engine will not work normally, or may not start at all.
You can change the cylinder head on a “Classic” without a pit or a lift; before performing work, you should prepare the necessary tools and a container for draining the coolant. From the tool you will need:
We replace the PGBC on engines 2101/03/06 as follows (on a carburetor engine):
After dismantling the head, we carefully protect the surfaces of the block and the cylinder head itself; there should be no irregularities on them. During assembly, all parts are installed in place, but there are some features:
When to change valve stem seals on 2106
Of course, there are car enthusiasts who carefully monitor their iron horse and carry out many procedures according to schedule
However, there are very few of them, so we will pay attention to external signs
First of all, oil consumption
Before we talk about liters, it’s worth paying attention to this. Over time, when the oil seal wears out, it turns into a filler neck, and the valve stem turns into a piston that pushes this oil
Imagine that the engine is running at 1600 rpm. This means that 800 strokes are performed per minute in one cylinder, which means the valve moves back and forth 400 times. What if there are eight such valves? In general, a lot of oil can leak through the valve stem seals.
Further - increased smoke, reduced engine power. You need to remember one simple truth - engine oil does not burn, it cokes. Only the additives burn. We all know motorcycles in which oil is mixed with gasoline. We all remember how much smoke they make. But there the fuel is diluted with oil in proportions of 1:200. Here they are much larger. That is, if you see blue smoke from the exhaust pipe, then you should think about replacing the valve stem seals. Of course, with such a mixture the engine will not develop full power, as with pure gasoline.
How to remove the cylinder head without errors. Stages of work
And disconnect the tube, moving it slightly to the side:
It is also necessary to disconnect the plug from the temperature sensor, which is shown in the photo:
Everything is ready now. You can begin to unscrew the bolts securing the cylinder head to the engine block. For all this, we use a fairly powerful wrench with a head:
After the bolts have loosened, you can use a ratchet handle to perform this function a couple of times faster:
After all the bolts of the head are unscrewed, you can lift it by grasping the front part, or as it is more convenient for you:
↑ Camshaft
The camshaft is cast, cast iron, the same for all engine models. It rests on 5 journals and rotates in an aluminum bearing housing mounted on the cylinder head. A driven sprocket is attached to the front end of the camshaft. The camshaft is held against axial movements by a thrust flange placed in the groove of the front support journal of the shaft.
The camshaft is driven by a double-row roller chain from the crankshaft drive sprocket. The same chain drives the drive shaft of the auxiliary units. The chain drive has a semi-automatic tensioner with a shoe and a chain guide with plastic linings. A limit pin is installed at the bottom of the cylinder block to prevent the chain from falling into the crankcase when removing (on a car) the camshaft sprocket.
For the correct relative position of the stars, i.e. To set the valve timing, there are upper and lower timing marks. The upper marks are located on the camshaft sprocket and bearing housing, the lower marks are on the crankshaft sprocket and the camshaft drive cover.
Determining the best engine oil for a Chevrolet Niva car
The requirements for an SUV engine at the time of design were:
- increase power and torque, at least at medium speeds;
- ensure acceptable fuel consumption within 12 l/100 km;
- provide a basis for injection modification in the future.
| Manufacturer | AvtoVAZ |
| Engine brand | 21213 |
| Years of production | 1994 – … |
| Volume | 1690 cm 3 (1.7 l) |
| Power | 61 kW (82 hp) |
| Torque moment | 126 Nm (at 3000 rpm) |
| Weight | 117 kg |
| Compression ratio | 9,3 |
| Nutrition | Solex carburetor |
| Motor type | in-line |
| Ignition | distributor |
| Number of cylinders | 4 |
| Location of the first cylinder | TVE |
| Number of valves on each cylinder | 2 |
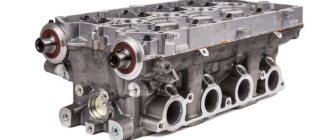
| Cylinder head material | aluminum alloy |
| Intake manifold | duralumin |
| An exhaust manifold | cast iron |
| Camshaft | original cam profile |
| Cylinder block material | cast iron |
| Cylinder diameter | 82 mm |
| Pistons | original |
| from 2103 | |
| Piston stroke | 80 mm |
| Fuel | AI-92 |
| Environmental standards | Euro-0 |
| Fuel consumption | highway – 8.3 l/100 km mixed cycle 10.5 l/100 km city – 11.5 l/100 km |
| Oil consumption | maximum 0.7 l/1000 km |
| What kind of oil to pour into the engine by viscosity | 5W30, 5W40, 10W40, 15W40 |
| Which engine oil is best by manufacturer | Liqui Moly, LukOil, Rosneft |
| Oil for 21213 according to composition | synthetic in winter, semi-synthetic in summer |
| Engine oil volume | 3.75 l |
| Operating temperature | 95° |
| ICE resource | declared 80,000 km actual 160,000 km |
| Adjustment of valves | nuts |
| Cooling system | forced, antifreeze |
| Coolant volume | 10.7 l |
| water pump | with plastic impeller |
| Candles for 21213 | BCPR6ES from NGK or domestic AU17DVRM |
| Spark plug gap | 1.1 mm |
| Valve train chain | double-row, from 2103 with a new tensioner shoe design |
| Cylinder operating order | 1-3-4-2 |
| Air filter | Nitto, Knecht, Fram, WIX, Hengst |
| Oil filter | with check valve |
| Flywheel | with clutch landing diameter 200 mm or 215 mm |
| Flywheel mounting bolts | M12x1.25 mm, length 26 mm |
| Valve stem seals | manufacturer Goetze, inlet light, exhaust dark |
| Compression | from 10 bar, difference in adjacent cylinders maximum 1 bar |
| XX speed | 750 – 800 min -1 |
| Tightening force of threaded connections | spark plug – 31 – 39 Nm flywheel – 62 – 87 Nm clutch bolt – 19 – 30 Nm bearing cap – 68 – 84 Nm (main) and 43 – 53 (rod) cylinder head – three stages 20 Nm, 69 – 85 Nm 90° 90° |
Also interesting: What kind of oil to fill in the Niva Chevrolet engine
Taking into account the year of manufacture (1994) and the low compression ratio (9.3 units), users filled in 92 gasoline, and the engine manufacturer recommended AI 91 - 93. Compliance with the environmental protocol has not yet been discussed, so the engine is considered Euro-0.
Installing the cylinder head
Now a few words about installing the cylinder head back onto the block. Firstly, be sure to change the gasket, because it is installed once. Obviously, you need to first clean the block and the surface of the head from traces of old gaskets. I did this using a special Dutch-made Ombra gasket remover, applying this liquid to the entire surface of the cylinder head:
As a result, after about 10 minutes of waiting and painstaking work with an ordinary clothes brush, you get a fairly tangible result. For comparison, I was going to do the following: I cleaned the first three combustion chambers with different means, from gasoline to WD-40, and the last one with this special tool. You can see the result clearly:
After all this is done, you can start installing the cylinder head back. In order to do this, you will need a special torque wrench, because these bolts need to be tightened with a certain torque in the following order:
It should also be noted that the following order must be observed:
We install all the removed parts in reverse order and completely assemble the VAZ 2106 engine. This is how you can remove the cylinder head yourself and install it back. I wish you success.
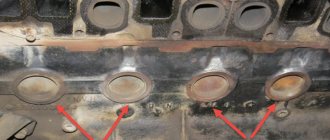
Damage to the cylinder head mating plane
To the formation of defects in the mating surface of the block head
The following reasons may be given:
Disadvantages of this kind are eliminated by processing the plane, with preparatory dismantling of the head.
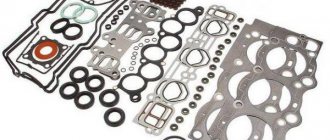
Cylinder head gasket
Head gasket
ensures a tight fit of the cylinder head to the cylinder block. The material for the production of the seal is reinforced asbestos, which is able to withstand the effects of high temperatures that arise during operation of the unit. In addition, reinforced asbestos can withstand high pressure under various engine loads.
How to tighten the cylinder head of a VAZ 2107
This article will talk about how to replace the gasket and tighten the cylinder head of a VAZ 2107. In fact, it’s not difficult to do it yourself, although you’ll have to tinker a little. The head gasket is a small and cheap element, but it affects the operation of the entire internal combustion engine. And first, it’s worth finding out what symptoms of a damaged gasket may appear.
Basic faults
There is damage to the gasket in which the operation of the VAZ 2107 is strictly prohibited. But there are also breakdowns in which it is still possible to drive. So, here is a list of the main breakdowns:
And now you have decided that you really need to replace the gasket, your car has one or more symptoms. What to do? Arm yourself with keys and other tools, and then begin preparation.
Start of work
The very first step is to remove the air filter. Of course, on a carburetor engine it is somewhat easier to remove it. If you have an injector, you will have to tinker with its rubber fasteners. But the essence remains the same - it is necessary to disassemble the fuel system completely to get to the cylinder head. But we will look at the example of not an injection, but a carburetor seven. Still, there are many more classic cars with such a power system.
It is advisable to dismantle the carburetor, since if you remove the head along with it, you can accidentally damage it. On all classic series cars, the carburetor is removed in the same way. This procedure is quite simple, but it will take some time. Now you can unscrew the nut securing the distributor and remove the distributor along with the wires. Getting closer to the engine, all that’s left to do is drain the antifreeze from the system.
And then turn off all the pipes that you see. After this, it will be possible to dismantle the cylinder head cover. It is secured with nuts and shaped washers. Don't lose them during repairs. That's all, the preparation is complete, you can begin the most difficult part - dismantling and installing the cylinder head.
Valve lid
The valve cover protects the timing mechanism from external influences, as well as from leakage of lubricant to the outside. However, over time, oil leaks can be observed on the engine, which are the result of gasket damage. In this case, the seal needs to be replaced.
Replacing the gasket
To replace the gasket, you will need to remove the cover. In this case, you will need the following tools:
- heads for 8 and 10;
- extension;
- ratchet or crank;
- pliers.
Next we carry out the dismantling procedure:
- Unscrew the nuts securing the air filter cover, remove it and the filter itself.
- We unscrew the nuts securing the housing and remove it, after first pulling off the crankcase gas exhaust hose.
- Disconnect the carburetor throttle linkage.
- We remove the air damper control cable by loosening the nut by 8 and the screw using a flat-head screwdriver.
- We unscrew the valve cover fastening with a socket wrench or a 10mm socket.
- Remove the cover.
- Remove the old gasket and clean the surface of the cover and cylinder head where the seal meets.
- We put on a new gasket and reassemble in the reverse order.
To ensure that the cover is installed properly, the nuts are tightened in a certain order.
If there is a need to replace valve seals or the valves themselves with elements that ensure their normal operation, it is not necessary to seek help from a service station. By following the step-by-step instructions, you can do the repair work yourself.
Cylinder head repair
If problems arise with the cylinder head of a Lada sixth model that requires removal of the unit from the car, then repair work can be carried out in a garage, having prepared the appropriate tools and components.
replacing valve guides
Broken spark plug
Quite rarely, but it happens that as a result of over-tightening the spark plug, a part breaks off on the thread in the spark plug hole. To remove the remains of the cylinder head spark plug element, you need to dismantle the threaded part and unscrew it using available tools.
In what cases is it necessary to remove and repair the unit?
There may be several reasons for repairs, let’s consider them in order:
- The first and most common reason for which it is necessary to remove the VAZ 2106 cylinder head and repair it is wear of the gasket. The sealing gasket wears out over time and holes may appear in it, which can result in antifreeze getting into the engine fluid and oil into the coolant.
- The appearance of microcracks in the cylinder head structure. In this case, it is necessary not only to remove the cylinder head of the VAZ 2106, but to have special equipment that will allow for high-quality repairs.
- Broken guide bushings. Failure of these elements requires urgent replacement of components.
- The need to repair the head seat or replace it.
- Replacement of the camshaft or the need for its repair and troubleshooting.
In fact, there may be many reasons, but we have given the most common and most frequently encountered in the case of VAZ 2106 cars. You can find out more about how repairs and dismantling, boring and modification of the cylinder head on a VAZ 2106 occurs below.
Sorry, there are no surveys available at this time.
Malfunctions when removal and installation of the cylinder head are required
There are a number of malfunctions due to which the cylinder head of the VAZ six has to be removed from the car for further diagnostics or repairs. Let's look at them in more detail.
Valve seat wear
Valve seats can wear out for several reasons:
The malfunction can be solved by straightening or replacing the saddles. In addition, the ignition system must be checked.
What does it consist of?
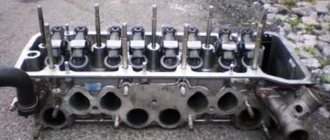
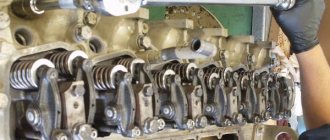
The cylinder head of the six is 8-valve and consists of the following structural parts:
The node in question is common to four cylinders. Cast iron seats and valve bushings are installed in the body. The working edges of the seats are processed after they are installed in the body to ensure a clear fit of the valves. The holes in the bushings are also processed after pressing into the cylinder head. This is necessary so that the diameter of the holes in relation to the working planes of the seats is accurate. The bushings have spiral grooves to lubricate the valve stem. On top of the bushings are valve seals, which are made of special rubber and a steel ring. The collars fit tightly onto the valve stem and prevent lubricant from entering the combustion chamber through the gaps between the bushing wall and the valve stem. Each valve is equipped with two cylindrical springs, which are supported by special washers. On top of the springs there is a plate that holds two crackers on the valve stem, shaped like a truncated cone.
Gasket burnt out
The following signs indicate that the cylinder head gasket has failed (burnt out or was punctured):
tightening the cylinder head on a classic. Replacing saddles
To replace the seat, it will need to be removed from the cylinder head. Since in garage conditions there is no special equipment for these purposes, welding or improvised tools are used for repairs. To dismantle the seat, the old valve is welded to it and then knocked out with a hammer. The new part is installed in the following sequence:
Removing the head
To remove the cylinder head you will need the following tool:
The sequence of actions for dismantling the unit is as follows:
↑ Valves
The valves are driven by a camshaft rotating in a bearing housing through intermediate levers. The gap between the camshaft cams and the lever is set with an adjusting bolt, on the spherical head of which the lever swings. The bolt is kept from loosening by a locknut.
The valves have two cylindrical springs - external and internal, sandwiched between a plate (top) and two support washers (bottom). The spring plate is held on the valve stem by two crackers, which when folded have the shape of a truncated cone. Each lever is pressed against the end of the valve with a special (hairpin) spring.
To increase the wear resistance of the rod, both valves are nitrided, and the ends of the rods on which the levers rest are hardened with high frequency current.