Three main components of electric current
Electricity has become an integral part of our lives. It is used almost everywhere, including in vehicles.
This type of energy has three main components - voltage, current and resistance.
As for the last parameter, due to the possibility of creating additional resistance at any point in the electrical circuit, you can influence the first two parameters.
The main element for creating resistance is a resistor. This element is one of the most in demand, and not a single electrical circuit can do without it, and it will not be possible to replace it with anything else. And in any car there are plenty of electrical circuits.
Marking of SMD elements
Surface-mounted components (for example, SMD resistor, diode, capacitor, etc.) began to be marked with numbers, but due to the small size of the parts, this information needed to be encrypted. For resistances, in most cases, a designation of three numbers is accepted, where the first two are the value, and the last is the multiplier (see Fig. 3).
Rice. 3. An example of decoding the value of an SMD resistor
Purpose
The main purpose of a resistor is to create resistance to be able to control and adjust the current and resistance. In fact, it is a kind of filter that allows you to obtain electricity with certain parameters at the output.
It provides all this by holding current, dividing and reducing voltage.
The main parameter of a resistor is the resistance it creates in the circuit, and it is measured in Ohms.
Resistors in the electrical circuit of a car.
It is precisely because of its function that this element is so often used in cars. Below we will look at some of the main components of a car, where a resistor is used and what specific function it performs there.
The main reasons for the failure of the stove fan
There are many more reasons for failure, they arise for a variety of reasons, we will look at the most basic causes of failure, which even an ordinary car enthusiast who is not involved in professional repairs can eliminate.
The stove brushes are worn out or damaged
In such a situation, you need to disassemble the stove motor and be sure to replace the brushes. To do this, the impeller wheel is removed from the electric motor housing (it is usually secured with latches). If the catalog of automobile spare parts does not contain the necessary brushes, then you can unsolder the old analogues and replace them with identical ones in size. As a last resort, graphite-copper brushes are filed using a needle file.
Cooling system
So, the load resistor is used in the car’s cooling system, or more precisely, in the radiator fan power circuit.
It is worth noting that previously this electrical element was not used in this circuit, and everything worked very simply - when a certain coolant temperature was reached, the temperature sensor closed the contacts of the fan power circuit, and it started working.
The use of a resistor made it possible to make the fan motor operate in two or even three modes.
The process of supplying power to the fan has changed somewhat. Relays have also been added to the system, and in modern cars the electronic control unit is already responsible for turning on the fan.
That is, the electronic unit analyzes the temperature readings of the sensor and sends a signal to the relay.
Depending on the temperature, the relay directs electricity through a specific circuit. If the coolant temperature is slightly exceeded, but it is already required to be reduced, and a signal from the ECU is received, the relay directs electricity through a load resistor, which creates resistance, and the fan begins to rotate at low speed.
If the temperature continues to rise and reaches a critical point, the relay will redirect the electricity through another circuit - bypassing the resistor, directly to the fan, which will ensure its operation at full power, with a high rotation speed.
This is a dual-mode fan operation circuit, which is ensured by the presence of a load resistor in the circuit. Moreover, it is simplified to make it more understandable.
In a car with three-mode fan operation, the principle remains the same, but it already uses two resistors - one is responsible for low fan speeds, the second for medium ones.
The third mode is emergency, in which the fan rotates at maximum speed, and is ensured by supplying power directly to it.
Why do you need a stove rheostat?
I started the car in the evening, started it, and smelled something burning. The heater was turned on at first speed and when I started it, apparently all the energy was spent to start the engine, but the heater motor did not start. As a result, the heater heater resistor burned out. I turned on the 4th one, it works. And the stove fan works at 4 even without a resistor. Just don’t know why a turbo aircraft is needed at all)
The photo shows that the thermal fuse is located by bending it as close as possible to the heater resistor coil. If the resistor is heated to 117 degrees, its internal circuit melts and breaks. The same thing can happen when soldering a new one. But in fact, it burns out not from temperature, but from increasing current strength when the stove fan cannot move. When the fan cannot move, the load on this fuse increases to 17 amperes.
removed resistor In fact, the resistor itself rarely burns out; the shiny part soldered to pin 4, called a thermal fuse, burns out. Such fuses are still installed in irons and refrigerators. And since this is a fuse, it’s very easy to check whether the resistor itself is working; take any piece of wire and try to short it with a “bridge”. That's exactly what I did. I turned the heater on to first, shorted it out, it works at all speeds. If it works, then it's the fuse. We go to the radio parts store (“World of Electronics” SAMARA on Fizkulturnaya Street) and buy a new one for 15 amperes 117 degrees for 25 rubles. Solder in a new fuse. When soldering, do not overheat, overheating more than 117 degrees will cause the fuse to fail! You need to solder with a heat sink. Overheating will cause the part to become unusable. We put it in place under the glove compartment shelf. Voila, the stove works on all 4.
Ignition system
The second element of the car where you can find a resistor is the spark plugs. But not all candles are equipped with it.
It began to appear in the design of these elements not so long ago, and its task is to suppress radio interference.
By the way, there is now a lot of debate about whether it is needed in candles. After all, the resistor creates resistance, which ultimately affects the spark. But the stronger the latter, the better the combustible mixture ignites.
But in fact, the presence of a resistor has a slight effect on the quality of the spark, but only positively on the spark plug. A very strong spark charge leads to the destruction of the electrodes, and the resistance reduces the spark voltage.
But this is not its main purpose. A powerful spark discharge creates quite strong interference in the radio frequency range, which can affect the operation of a car audio system, mobile phone and any other equipment that is sensitive to this type of interference.
Interestingly, it is not necessary to install spark plugs equipped with resistors on the car.
The fact is that in many models a noise-reducing element is installed in the tips of high-voltage wires. Also, some types of wires themselves have quite good resistance, which is enough to suppress radio interference.
The resistor can also be installed in the distributor slider, and it is found there on many models. Its task is the same as that of a spark plug or tip.
It is important to understand that resistors cannot be used simultaneously in all of the listed ignition elements.
When these elements are connected in series, all the resistance they create is summed up.
That is, if a resistor is installed in the distributor runner, tip, or spark plug, then they will create such a strong resistance that they will significantly weaken the spark charge, and it will no longer be able to properly ignite the mixture. And this will lead to interruptions in engine operation, loss of power, and increased fuel consumption.
Therefore, deciding whether to install spark plugs with a resistor on a car is necessary by carefully reading the technical documentation that comes with the car.
If the manufacturer indicates that the use of such candles is necessary, then it is better to use them.
What tools should be used for diagnosis?
You can check the power supply to the engine connector with a regular test. But when carrying out full diagnostics and identifying faults of a high degree of complexity, a multimeter is needed. If you have knowledge of using a multimeter, you can easily measure the power on the connectors and check the resistance, which will make it possible to quickly troubleshoot wiring problems or identify problems with resistors.
In addition, measuring resistance and diagnosing wires in this mode will greatly facilitate the search for a short circuit.
You can diagnose PWM controllers for electrical systems that control fan speed using an oscilloscope. But purchasing this device for diagnostics is not advisable due to its high cost.
Isn’t it better to use the diagnostic methods listed below, which in most cases will help identify the sources of malfunctions in the stove fan without expensive equipment. So let's get started.
If it is impossible to start the fan , this situation occurs due to:
- worn brushes. When performing the functions of a conventional DC motor for a stove fan, the main problem is the abrasion of the brushes, with the help of which voltage is supplied to the commutator. With strong abrasion of the copper-graphite brushes, the pressing spring force that creates the contact is reduced, which in turn leads to the fan operating at a variable frequency. For example, it turns on when you hit the front panel or hit potholes in the road.
- faulty electrical control circuits. The source of the problem is contacts that have been sealed off due to strong heating;
- break in wires, oxidized contact;
- blown fuse element. If a fuse constantly blows (after replacing it), the technician must find a section of the circuit with a short circuit.
Interior heating system
Another element in the design of a car where a resistor is used is the interior heating system, or more precisely, the control of the operation of the electric motor of the stove.
Every car uses a variable resistor to change the speed of the heater motor.
In it, using a rotating element, it is possible to change the resistance value.
When the electric motor is turned on to the 1st rotation speed, the resistor provides maximum resistance; when switching to the 2nd speed, it decreases, and when switching to the 3rd speed, it is almost completely removed.
How to replace
The algorithm for replacing the heater resistor is as follows: 1. It is necessary to remove the negative terminal from the battery; 2. Remove the lining, then the windshield frame trim, remove the upholstery for sound insulation; 3. It is also better to remove the vacuum booster for ease of repair; 4. Disconnect the block with wires located on the resistor; 5. In order not to accidentally replace a device that is still in good working order (after all, the reason may not be in it), it is worth checking it with an ohmmeter, connecting it to the contacts one by one. If there are significant differences from normal readings, then it is necessary to change; 6. To remove a faulty heater resistor, simply unscrew the screw and remove the damaged part; 7. Install the new one in reverse order. Please also note that the block with wires can only be connected in one position.
That's all - your VAZ 2110 can hit the road in cold weather. You will not freeze, and you will not experience inconvenience due to the increased operation of the stove.
A non-working heater fan, even in the warm season, can cause many unpleasant moments. For example, when it rains, the windows sweat in the absence of airflow. One of the reasons for the breakdown is a faulty resistor of the VAZ 2114 heater. In most cases, you can find and fix the problem yourself, without resorting to the services of car service specialists.
Lighting
Recently, resistors have begun to be used in conjunction with LED lamps. This type of lamps has increasingly begun to be used on cars.
But not all cars yet come from the factory equipped with LED lighting devices, but it is quite possible to buy them separately and install them instead of standard incandescent lamps for the same turn signals or brake lights, and many do so.
But here a problem arises that requires the use of resistors.
The fact is that the electricity consumption of these lamps is very small, which is why the electronic unit regards the operation of the LEDs as a malfunction of the standard lamp.
To correct the situation, resistors are used to create a load on the wiring lines that power those lighting fixtures in which LED lamps are installed.
As a result, the ECU perceives the resistance of the element as the work of an incandescent lamp, so no error code occurs.
It is interesting that when using such decoys, the main advantage of LED lamps - low energy consumption - is reduced to zero, and they have only one advantage over conventional incandescent lamps - a long service life.
General air circulation diagram
Air is drawn into the car interior by a fan, which can be installed in the cabin or behind the engine shield. The cabin filter is located above the electric motor. If heating is necessary, the air flow passes through the heater radiator. The heater radiator is connected to the car's cooling system, so when the engine heats up, circulating fluid from the engine cooling system heats the heater radiator honeycomb. Therefore, passing through the honeycomb, the air flow also becomes warm.
When there is no need for heating, intake air purified by the filter is supplied to the cabin directly from the environment. If the car is equipped with air conditioning, in the cooling mode, the flow passes through the evaporator before entering the cabin, after which the cold air is directed into the deflectors (more about the principle of operation of the air conditioning system).
Air dampers
Redirection of air flows to regulate temperature is carried out by a special damper. Types of damper control:
- mechanical. The damper drive is connected directly to the switch in the cabin via rods and cables. In this case, the driver, by moving the regulator, manually doses the temperature of the incoming air;
- electronic. The damper is equipped with a servo drive. The electric motor changes the position of the damper, receiving commands from the control unit. This scheme is used on cars with climate control systems. The driver just needs to set the desired temperature in the cabin in the on-board computer, after which the electronic control unit, focusing on temperature sensors, will control the air damper servomotor.
Channels extend from the stove fan into the cabin, through which air can be supplied to the windshield, to the feet, or through the central deflectors. Depending on the operating scheme, the modes can be either combined or single, when all the intake air is supplied to only one zone. Switching modes can be done mechanically or using a servo drive and a control unit. The mechanical method involves direct connection of the air dampers to the switch on the dashboard. The electric drive of the dampers allows you to control them by pressing a key, as well as to implement automatic control of the electronic unit of the interior air conditioning system.
Recycling
In recirculation mode, the main air damper closes, after which the heater fan begins to draw air from the passenger compartment. This mode of operation allows you to block the access of unpleasant odors and polluted air from the street if, for example, you are driving a car along a dusty gravel road.
In winter, the recirculation mode allows you to warm up the car interior faster, since not frosty air, but warm interior air passes through the heater radiator. Accordingly, in summer, recirculation makes it easier for the air conditioner to cool down.
Types of recirculation drive:
Types of resistors, their features
Of the resistors described above that are used in the design of a car, two types can be noted - load, they are also constant and variable. In general, these are two main types that have fairly wide application in various fields.
Of course, there is a whole range of different resistors that differ in their design features. For example, thermistors, in which the resistance changes with temperature, or photoresistors, which change their parameters depending on the illumination. But we will not touch on them for now, but will consider only the two types indicated.
Fixed resistors are so called because the resistance they create is constant.
For example, if it is indicated that the main parameter of a given element is 30 Ohms, then it provides the resistance of exactly this value and it is impossible to change it.
In variable resistors, the resistance can be changed, manually. An example of this is the already mentioned control of the electric motor of the heating system.
Variable resistors also include trimmers.
In such resistors, you can also change the parameter manually, but its adjustment is not performed at any time, as is done in a variable one, but only when it is necessary to reconfigure the operation of the entire circuit in which it is included for a long period.
Trimmers are not used in vehicles, although they can often be found in household appliances.
Recycling
In recirculation mode, the main air damper closes, after which the heater fan begins to draw air from the passenger compartment. This mode of operation allows you to block the access of unpleasant odors and polluted air from the street if, for example, you are driving a car along a dusty gravel road.
In winter, the recirculation mode allows you to warm up the car interior faster, since not frosty air, but warm interior air passes through the heater radiator. Accordingly, in summer, recirculation makes it easier for the air conditioner to cool down.
Types of recirculation drive:
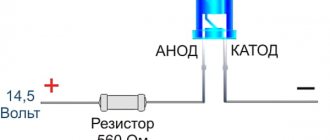
Selecting a resistor by resistance
Most people, when an electrical appliance fails, send it in for repair or replace it, although in many cases it is the resistor that is to blame, especially since it is one of the most common elements in any circuit. But there are also those who undertake repairs on their own.
And often DIY repair enthusiasts have a question about how to choose the right resistor for a particular circuit.
To do this, let's take the simplest circuit, including a power source and one consumer.
Even at the beginning, it was indicated that electricity has three main characteristics - voltage, current and resistance. It is based on these parameters that all the necessary calculations are made using Ohm’s law.
According to this law, since we need to determine resistance, we should divide the voltage by the current.
For example, our power supply provides a 12 V circuit with a current of 0.02 A.
To determine the resistance, we carry out mathematical calculations - 12/0.02 and get a circuit resistance of 600 Ohms.
Now directly about how to calculate the resistance of a resistor for use in a particular circuit. For example, let's take a 12 V power source and a consumer (3.5 V incandescent lamp, 0.28 A).
First, the lamp resistance is calculated - 3.5/0.28 = 12.5 Ohms. Now we find out how much current will flow through the existing lamp - to do this, take the voltage of the power source and divide by the resistance: 12/12.5 = 0.96 A, which is 3.5 times the current required for the consumer to operate, and if you connect consumer, then the lamp filament will simply burn out.
To prevent burnout from occurring, a resistance in the circuit of 43.75 Ohms (12.5 * 3.5) is required. And since the lamp itself creates resistance, an additional 30 Ohm resistor must be connected to the circuit. During the calculations, we get - 12 V / 42.5 Ohm (lamp and resistor resistance) = 0.28 A.
That is, we received the current strength necessary for normal operation of the consumer. In this case, the element included in the circuit acted as a current limiter.
Repair and restoration of the stove damper
The deformed heater damper of the VAZ-2110 cannot be repaired; it only needs to be replaced. In this case, it is better to purchase a replacement metal part that is not so susceptible to temperature effects.
Whatever heater is installed on the VAZ-2110, to carry out repair work, the heater must be completely disassembled. In this case, the process of dismantling and disassembling depends on the design of the stove.
A positive aspect of the heater design on the VAZ - 2101 is its location - to get to it and the dampers you can from the engine compartment and you don’t have to remove the front panel.
Disassembling an old-style stove
For example, let's look at how to disassemble an old-style heater:
- Remove the terminal from the battery.
- We remove the windshield wipers, the seal, remove the air intake near the windshield (“jabot”) from the car, in the process you will need to disconnect the windshield washer nozzle tubes.
- We dismantle the insulation that separates the stove body from the engine compartment.
- We remove the gear motor.
- We divide the housing of the stove and air filter into two halves. To do this, unscrew the coupling bolts around the perimeter of the housings and remove the mounting brackets.
- Disconnect the fan power wires.
- Remove the outer half of the air filter and heater housing (along with the fan).
- We dismantle the inner part of the fan housing.
After this you will have access to the dampers. If you are only planning to repair or replace the heater dampers, there is no need to drain the antifreeze, since the heater radiator will remain in place and will not be removed.
Before removing the dampers, carefully inspect and remember their position and the way they are engaged. Further actions depend on the nature of the damage. Deformed damper parts cannot be repaired and only need to be replaced. As for damaged rods and levers, try to repair them or simply replace them. The damaged seal is replaced.
When assembling the stove, pay special attention to the engagement of the dampers. Do it as it was before disassembly, otherwise the dampers will not work correctly, which will affect the performance of the heater
Disassembly and repair of a new type heater
The new model stoves are disassembled differently:
- disconnect the battery terminal, drain the antifreeze;
- dismantle the frill and insulation;
- disconnect the power wires of the fan and micromotor gearbox;
- unscrew the fasteners that secure the stove body to the body;
- disconnect the coolant supply pipes to the heater radiator;
- We remove the heater from the car along with the filter housing.
Differences in design
The VAZ 2110 was equipped with stoves of the so-called new or old model. Both systems, including those on the VAZ, which has an injector instead of a carburetor, are not particularly different in design.
So, the immediate differences:
- The main difference between the new stove and the old one is in the design of the heater radiator. Therefore, if you are repairing a heating system and decide to install a new model instead of an old radiator, then take into account some nuances;
- In addition, the SAUO controller is also not exactly like that. 4 or 5 position controllers manufactured before the fall of 2003 have already been discontinued and are not suitable for new heater models;
- The micro-gearboxes are also different, starting from release in September 2003. They differ in resistors (shaft position sensors), so you need to check whether the resistor in the MMR model that you purchased is interchangeable.
Power dissipation
In addition to resistance, the resistor has another important parameter - power dissipation.
Any resistor acts as a kind of limiter and, due to its resistance, conducts only a certain voltage and current through itself. At the same time, the excess that it did not miss does not accumulate in itself, but converts it into thermal energy and dissipates it.
Therefore, resistors are designated by power dissipation.
The discrepancy between this element and its dissipation power will lead to its overheating and destruction. Power dissipation is measured in Watts.
The power dissipation can be determined both by the voltage passing through it and by the current strength.
As for voltage, the formula for calculation looks like this:
P= U2/R
Where:
What to do if the car's heater fan stops turning on?
- P – power;
- U – voltage in the circuit;
- R is the resistance of the resistor.
To calculate the current strength, the formula looks like this:
P= I2*R
Where:
- P – power;
- I is the current passing through the resistor;
- R – resistance.
An important condition when choosing a resistor for this parameter is that its power dissipation should be twice as large as that obtained in the calculations.
For example, we have a current of 0.1 A and a resistor resistance of 100 Ohms.
Based on the formula, we obtain a dissipation power of 1 Watt (0.12 * 100 = 1), but for normal operation of the element we select a resistor with a dissipation power of 2 Watts.
Note that all manufactured resistors have a strictly defined power dissipation value, which makes their selection easier.
In addition, you can even visually determine what power dissipation the resistor has. Everything is simple here, the larger the element, the higher the value.
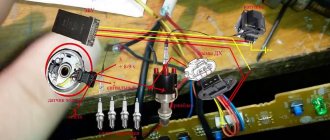
The procedure for repairing a VAZ 2110 stove resistor with photographs
Here we looked at resistors - one of the most common elements in any electrical circuit of a car. After all, they allow you to control the basic parameters of electrical energy by influencing just one of its characteristics.
Finally, we note that during calculations it is necessary to monitor the dimension of the parameters. That is, use only amperes, volts and ohms, and if it is indicated that the current is 20 mA, then you should convert this value into amperes, obtaining a value of 0.02 A for calculations.
Decoding the fuses of the mounting block for VAZ 2109, 2108, 21099.
Decoding will be done in double format, where F1-F16 is the mounting block 2114-3722010-60, 2114-3722010-18, and numbers from 1 to 16 are the old-style mounting block 17.3722.
- 1 (8 A) F9 (7.5 A) – Right fog lamp;
- 2 (8 A) F8 (7.5 A) – Left fog lamp;
- 3 (8 A) F1 (10 A) – Headlight washers, relay and washer valve;
- 4 (16 A) F7 (30 A) – Headlight cleaners, headlight cleaner relay, heater fuse, front and rear window washer motor, radiator cooling fan relay, glove compartment light, rear window heating relay;
- 5 (8 A) F16 (15 A) – Oil pressure lamp, turn and hazard indicators, rear lights, windshield wiper switch gear, brake fluid level lamp, parking brake lamp, “STOP” lamp, temperature and fuel level indicator.
- 6 (8 A) F3 (10 A) – Tail lights and interior lighting.
- 6 (8 A) F6 (30 A) – Window regulators and power window relays.
- 7 (8 A) F10 (7.5 A) – Rear state lighting. numbers, dashboard lighting, cigarette lighter lighting, heater lever lighting.
- 8 (16 A) F5 (20 A) – Horn, engine cooling fan motor and its relay.
- 9 (8 A) F10 (7.5 A) – Dimensions of the left headlight and left rear light.
- 10 (8 A) F11 (7.5 A) – Dimensions of the right headlight and right rear light./li>
- 11 (8 A) F2 (10 A) – Hazard alarm and its lamp.
- 12 (16 A) F4 (20 A) – Cigarette lighter, heated rear window and its activation relay.
- 13 (8 A) F15 (7.5 A) – High beam of the right headlight.
- 14 (8 A) F14 (7.5) – High beam of the left headlight and lamp for turning them on.
- 15 (8 A) F13 (7.5 A) – Low beam of the left headlight.
- 16 (8 A) F12 (7.5 A) – Low beam of the right headlight.
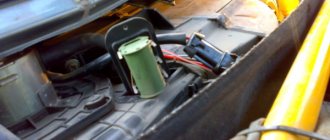
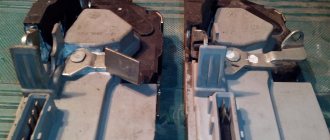
6. Removing and installing the heater fan and additional resistor
Heater block
| 1 – heater radiator; 2 – screw; 3 – air flow distribution box; 4 – executive motor of the “fresh/recirculated air” switching valve; 5 – screw; 6 – heater fan; | 7 – heater fan casing; 8 – screw; 9 – block of resistors with overheating protection; 10 – screw; 11 – lever of the central damper; 12 – damper lever that controls air temperature |
Removal
| EXECUTION ORDER |
| 1. Remove the glove box. |
| 2. Disconnect the electrical connectors from the auxiliary resistor (9). |
| 3. Disconnect the electrical connector from the heater fan (6). |
| 4. Unscrew the screw (10) and remove the additional resistor. |
| 5. Pull the heater fan down. |
Installation
| EXECUTION ORDER |
| 1. Install the heater fan. |
| 2. Install an additional resistor and secure with a screw. |
| 3. Connect the electrical connectors of the additional resistor and the heater fan. |
| 4. Install the glove box. |
Website design and development
After the expiration of copyright, in Russia this period is 50 years, the work becomes public domain. This circumstance allows you to freely use the work, while respecting personal non-property rights - the right of authorship, the right to a name, the right to protection from any distortion and the right to protect the author's reputation - since these rights are protected indefinitely.
© Auto manuals. All information presented on this site is the property of the project or other indicated authors.
DIY fuse replacement
One of the reasons why the heating system refuses to work is a burnt-out fuse for the VAZ-2112 stove, located behind the heater. The fuse that belongs to the heating system is marked F7. The current strength is at 30A. This part is also related to the operation of the cigarette lighter, optics washer, lighting system in the glove compartment and heating on the rear window. Thanks to such a system, you can easily determine that it is the fuse for the VAZ-21124 stove that needs to be replaced - not only the heater will refuse to work, but also all the elements that were listed above.
There is nothing difficult in replacing the VAZ-2112 heater fuse, you already know where it is located and what marking it has. We simply remove the burnt out part and install a new one in its place. But fuses don't just blow. This is caused by a short circuit in the car circuit. If it is not found and repaired, the fuse will blow again and require replacement. And this is much more difficult, because in some cases it is necessary to go through the entire circuit of the car in order to detect the short one.
In these simple ways you can return the heater to its normal state and continue to enjoy comfortable operating conditions of the car during the cold season. You just need to believe in yourself and strictly follow the recommendations that were described, and when contacting a service station, you will have to wait some time (with the onset of winter, more clients) and say goodbye to your hard-earned money.
Important nuances
There are several important points that must be taken into account when changing the heater fan on a Chevrolet Niva. Here they are:
- The cabin filter cover should be removed very carefully, since the latches that hold it in place are easily broken. This point is especially relevant if you have to change the fan in the cold;
- when lowering an unscrewed electric motor, you should remember that there is a small guide bushing on its shaft, which is very easy to lose: it falls, rolls down the glove compartment directly into the engine compartment and it will be very difficult to find it there;
The guide bushing from the Chevrolet Niva heater fan is very easy to lose
Installing a LUZAR fan on a Chevrolet Niva is justified only as a last resort
Replacing a broken fan on a Chevrolet Niva is not that difficult. Even a novice car enthusiast who has held a Phillips-head screwdriver at least once in his hands can cope with this task. The main thing is not to damage the latches on the cabin filter cover and not to lose the fan guide bushing.