July 29, 2015 Lada.Online 307 255 183
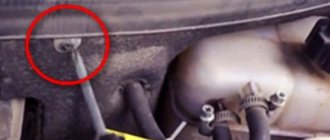
Owners of Lada Priora have to periodically deal with malfunctions of power windows (ESP). In some cases, the problem lies in some small detail that can be easily fixed with your own hands; in other cases, you will have to contact a service center to repair the ESP. We decided to look into the main reasons why power windows do not work.
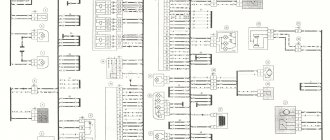
Priora window lift diagram, connection features.
Despite the fact that the window lifters are controlled in the same way as on previous models, the design of the Priora's window lifters is somewhat different. There is no power window unit on the Priora. The power windows are controlled by the electrical package controller. This was done for ease of control of electric windows. To completely open and close the glass, you no longer need to hold down the key, but simply press it briefly. If you hold the button for a while, the window lifter will work until the button is released. The buttons in this case do not switch the circuit, as on previous models, but are a kind of sensors for the electronic unit.
Connecting the driver's door power windows is somewhat different from the connection in the passenger doors. This is due to the use of an all control module in the driver's door. When you turn on any button on the block, a corresponding signal is generated from it, which is transmitted to the electrical package control controller via the wire connecting pin 5 of the driver's door block with pin 5 of block 3 of the double-glazed window control unit. When troubleshooting without using diagnostic equipment, you can check the integrity or short to ground of the wire through which the signal passes and the presence of power on the driver's door module unit.
In addition to the use of electronic units in the Priora window lifter circuit, there is a feature of supplying power to the electric drive. One of the wires is multifunctional and is involved in supplying power to the heating and mirror control, as well as to the door lock solenoid. Therefore, this wire can have either a plus or a minus, depending on which consumer is turned on. The value is controlled by the electrical package controller. On the right and left sides of the wire, pins 4 and 6 are connected separately to connector X1, respectively. This property can be used to troubleshoot a circuit.
Self-repair of the Priora comfort unit, is this possible?
If you have never encountered soldering, diagnostics of printed circuit boards of varying complexity and configurations, or do not have the necessary diagnostic or soldering equipment, then it is better to address the repair question to qualified specialists. If you have the above skills and understand the causes of malfunctions, independent repairs are carried out quite often. This is due to the fact that various microcircuits or chips constantly fail. For example, having established that the reason for the turn signal failure is a failed control driver, it is always possible to purchase a new part and simply re-solder it to replace the faulty one.
Malfunctions and their possible causes
The cost of a new, original unit is quite high, so do not rush to buy a new product, figure out the causes of the malfunctions. Of course, there are always cases when the board cannot be repaired and it is more advisable to simply install a new product to replace the faulty one. Do not forget that the causes of malfunctions can be frayed or broken wires that are connected to energy consumers.
According to statistical data collected on technical support forums, car owners quite often complain about malfunctions in the operation of power windows, turn signals, and parking lights.
If we talk about the components of the printed circuit board itself, the most common breakdowns are associated with: - a break in the W-Line communication line; — burnout of control drivers; — burnout of controllers responsible for correct operation; - the output of their transponder; — significant oxidation of contacts.
Diagram of Priora window regulators, troubleshooting.
How to find a fault in the Priora power window diagram if the passenger door power windows do not work? A malfunction of the power windows of all doors is unlikely and the reason for this will most likely be a malfunction of the electronic control unit for the power accessories. A malfunction of the electric lifter in one of the doors is a very common breakdown, especially on early cars. And it is again associated with a malfunction of the unit, and in particular the burnout of the microcircuits that control the operation of the electric drive. The reason was a flaw in the circuit design by the manufacturer. For the same reason, the window lifts could work jerkily. Subsequently, the block manufacturer corrected the defect, but failure of the block is still the main malfunction at the moment. But from the above, it in no way follows that if the power windows malfunction, it is necessary to immediately change the unit. Other more prosaic malfunctions are also possible.
It is best to start troubleshooting by checking the functionality of the door lock on which the lift does not work. If the lock also does not work, then you need to check the presence of power or negative on the wire from the glass unit control unit, connector X1, pin 4 or 6, depending on which side you are looking for the fault. To do this, connect the test lamp to the car body and turn on the power window in one direction or the other. Then connect the test lamp to the positive wire and repeat the operation. It is also worth checking conclusions 1, 5, 11, 13. If the warning lamp lights up in all cases, then the control unit is working and most likely there is a broken wire on the door or a malfunction of the electric drive. To check, you need to remove the door trim and connect a test lamp between the wires going to the electric drive. If the foot lights up when you turn on the lift, then the electric drive is faulty, otherwise the wire is broken. If the unit malfunctions, it is necessary to find out the cause. This could be not only a manufacturing defect, but also a short circuit between the wires or to the housing.
What is an immobilizer in Priora?
Characteristics of the immobilizer on Priora Immo on VAZ cars is a device that activates the power unit locking system in the event of a car break-in. The presence of a lock allows you to start the engine only after recognizing the key installed in the lock.
Interesting materials:
How long does it take to cook poses in a saucepan? How long should you cook raw shiitakes? How long does it take to cook rolled oatmeal? How many watts should a UV lamp have? How many vertices and how many angles does a triangle have? How much does 1 carat of ruby weigh? How much does 1 cube of liquid oxygen weigh? How much does 1 Kfs Nuggets weigh? How much does 1 samsa weigh? How much does iPhone 5s weigh?
Priora window lift buttons in Vladimir
VAZ-2110 window control unit with 2 keys
VAZ-2110 window control unit with 4 keys
Power window switch 2170 Priora 51.3769
Window control kit Vympel R01-2W-B
OAT Window lifter VAZ-2110 rear left (DAAZ)
Block of buttons for power windows VAZ 2110 four buttons
VAZ-2110 window control unit with 4 keys
Power window switch block (4 doors) 2110-12 18.3763
Window lifter button Francecar fcr210345 Francecar art. FCR210345
Front electric windows of VAZ-2110 and LADA Priora | Pomegranate
Power Window Button With Block 92.3709 With 7 Wires
Power window switch block (2 doors) 2110-12 181.3763
Block of buttons for power windows VAZ 2110 two buttons
Window lifter button for VAZ, GAZ cars
Right window lifter switch (button) 935804F000WL PORTER2 PORTER2
Window lifter button block VAZ 2110, GAZ four buttons 18.3763
Block of buttons for power windows VAZ 1118 two buttons with locking
Power window button 2110 Block 4 Keys 18.3763
Axiom RK Block for the window lifter button VAZ-2113-15,2110-12 with wires (Cargen)
Power window button VAZ, GAZ
Window lifter electric grenade VAZ 2110, 2170
Motor super door limiter VAZ 2110-12, VAZ 2170-72 Priora front.
Front right electric window lifter VAZ-2110 | Metprom LLC
Window lifter button VAZ 2170
Power window button 1118 Kalina 2190 Granta 921.3709
Window lifter button VAZ 1118, 2190 Granta
Rear window lift button Asam 30989
Window lifter 2110 rear (right) (electric) (assembled) “DZS”
Window lifter button block VAZ 2110, GAZ two buttons 181.3763
NBN power window button nexia nbn
Window control unit 2170 Priora (2 buttons) 2170-3763080-20
Window lifter button Rus (11796) – Window lifter
Window lifter button VAZ 1118, 2190 Granta
Block of Buttons for Windows VAZ 2110 Two Buttons
Window control unit (driver's door) Mazda 6 (GG) (02-07) GJ6A-66-350 / RUGJ66350M6
Electric rear windows of VAZ-2110 and Lada Priora | Pomegranate
Mobis Power window button right Porter 93692-43600
Priora power window switch
Window lift motor 2110 right (electric) “Olympus Motors”
Window switch Lada Priora
Window lifter VAZ 2110, 2170 Priora electric. front right (D) 2170-6104010-30
Power window switch VAZ 2170 Priora 51.3769
Button renault sandero/logan/duster/largus 09 - window regulator ASAM-SA art. 30624
DZS Window lifter VAZ-2110 rear right, electric. Dimitrovgrad
LADA Priora Lux driver door module (4 switches, mirror adjustment)
Rear electric windows of VAZ-2110 and Lada Priora | Pomegranate
Power window button VAZ, GAZ
VAZ-2110 window control unit with 2 keys
Power window button 2170 Priora 51.3769
Block of Buttons for Windows VAZ 2110 Four Buttons
Power window button Lada Largus Renault Logan 10- Sandero Front Manover Mr6000004
Design and types of window lifters
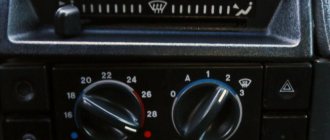
The Lada Priora has tempered glass on the front and rear doors. A window lifting mechanism is used to raise and lower them. The power windows are controlled using a button on the car door module. The driver can control the movement of the glass of all doors, and the passenger can only control the glass of his door. According to the principle of operation, the devices are divided into rack and cable.
Despite the fact that the Priora's window lifting mechanism is similar to other models, its difference lies in the absence of a window lifter block. Its function is performed by the built-in electrical package control controller (CBKE), located near the ECU.
In addition, power is supplied to the drive in a specific way. One of the wires is multifunctional. It changes polarity depending on the function performed: it controls the central locking, mirrors, and power supply. This makes it difficult to troubleshoot and repair the window regulator.
Priora window lift diagram
Electrical package control unit: vehicle electrical equipment is under control
March 8, 2018
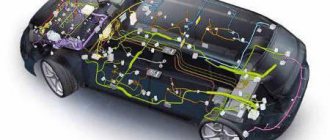
In modern cars, all electrical equipment is combined into a single system called an electrical package. The control of the electrical package is entrusted to special electronic units - read all about these devices, their design and functionality, as well as the correct selection and replacement in the article.
What is an electrical package control unit?
Electrical package control unit (electrical package controller, comfort unit, central body electronics unit) - a component of the vehicle’s electrical system; an electronic device based on microprocessors/microcontrollers that acts as a central control unit for auxiliary systems and electronic components of the vehicle in order to increase its comfort and safety.
In modern cars and many trucks, various electrical equipment - power windows, external and internal lighting and light alarms, door locks, rear-view mirror drives and others - are assembled into a single system called an electrical package (EP). The functions of monitoring and control of the electric drive are assigned to the central control unit (controller). The use of an electrical package control unit allows you to implement various control schemes for automotive electrical equipment:
- Manual control via appropriate switches on the dashboard, doors, steering column switch, etc.;
- Remote control of electrical equipment using a car alarm or telematics system;
- Automatic control of certain elements in accordance with the state of the vehicle, engine controller and on-board computer;
- Automatic control of the main elements that ensure the safety of the car (central locking, windows, lights) when the status of the car alarm and/or immobilizer changes.
Thus, the electrical package control unit allows you to increase the comfort and safety of the car, as well as expand the functionality of its electrical system by using the advantages and capabilities of the CAN, LIN, K-Line and other data transmission protocols.
A malfunction of the electric drive controller can completely disrupt the functioning of the vehicle's electrical equipment, so this unit must be replaced as soon as possible. To make the right purchase of a new unit, you need to understand the existing types of these devices, their features and functionality.
Internal structure of the electrical package control unit
All modern electronic controllers are built on the basis of microprocessors or microcontrollers, which take on the functions of controlling electrical equipment circuits. The processors contain algorithms for controlling equipment in various situations - during manual control, in automatic mode, etc. Direct control of the equipment is carried out using small-sized electromagnetic relays or electronic switches based on powerful field-effect transistors.
Electronic components are located on a printed circuit board, which is installed in a plastic case; connection to electrical equipment is made using standard electrical connectors. One to three connectors can be installed on one block; often the power and control circuits are separated, and separate connectors are used to connect to them.
The electrical package control unit is located under the dashboard or under the center console; it is usually installed near the relay and fuse mounting block - this reduces the length of cables between these units. The unit is mounted with screws or using a metal bracket.
Types and functionality of electrical package control units
Electrical package control units used in various vehicles may differ in functionality and operating features, but in general they are responsible for controlling the following electrical equipment:
- Windows on all doors and window locking mechanism;
- Drive of external (side) rear-view mirrors;
- Heated exterior mirrors;
- Heated rear window;
- Heated front seats;
- Central locking;
- Locking mechanism and locks of the trunk and hood;
- Front and rear direction indicators;
- Interior lighting - lamp on the ceiling, lamps on the central pillars, lamps on the thresholds, luggage compartment lighting;
- Dashboard lighting;
- Exterior lighting devices - fog lights and rear fog lights, side lights, reversing lights.
Removal and installation instructions
To carry out the work, you will need a “10” key and plastic or wooden wedges. It is important to know how to remove the window regulator on the front doors; dismantling and installing the rear window regulators on the Priora is carried out in a similar way.
The procedure consists of the following steps:
- First of all, for safety reasons, it is necessary to de-energize the car by removing the negative terminal from the battery.
- Next, the door trim is removed.
- Then you need to raise or lower the glass so that there is access through the upper door opening to the bolts with which the glass frame is attached to the device slide. These bolts should be unscrewed.
- At the next stage, you should lift the glass up to the end with your hands and secure its position with the help of prepared wedges.
- Then you need to disconnect the block with the wiring harness from the window lifting mechanism.
- After this, the nuts are unscrewed, thanks to which the gearmotor is held in place.
- Then the fastening nuts of the device guide are unscrewed.
- When all the nuts are unscrewed, the window regulator is removed through the technological hole. When removing the glass lifting mechanism, you need to ensure that the glass is securely fixed.
- Installation of the device is carried out in the reverse order.
When purchasing a new window lifter, you need to pay attention to its markings and select exactly the same one.
Photo report on replacing the front right electric window on a LADA Priora
This illustrated report on the installation of a front right electric window on a LADA Priora was prepared by our buyer Ivan Igorevich Fokin from Moscow, as part of participation in our promotion.
There was a problem in our Priora, specifically - the glass of the front right door stopped opening. All that was left was the sound of the motor running. It was decided to order a new window regulator and replace the old assembly.
Window lifter-donor JSC "Lepse" for VAZ-2110 front right.
Tools and more: shaped screwdriver, star screwdriver, 10mm head, plastic tool, tape, electrical tape, scissors.
Unscrew the screws according to the numbering - black arrow. We take the tool for plastic and also according to the numbering - red arrow.
Using tools, pry the sockets and door lights in the direction of the same arrow, turn off the chips, and put them aside. Again, use this tool to remove the door panel, starting from the lower right corner, moving in a counterclockwise direction, unfasten the panel clips - the blue arrow is where the clips are.
Unfasten the panel with clips and lift it up. The panel has been removed.
Unscrew the two screws and remove the handle.
We connect the donor to the chip and check the operation of the window regulator.
We remove all the insulation so that it does not interfere. Unscrew the nuts.
We lower the glass a little in order to remove the rail from the door body mounted on the bolt.
Raise the glass to its highest position and secure it with tape.
We remove the engine bolts and racks from their mounted places and pull out the window regulator through the upper right corner.
Don’t forget to remove the engine holder from the original and place it on the donor.
In the reverse order, we insert the window regulator (donor) and, first of all, install the engine onto the bolts with the nuts.
Perform subsequent manipulations strictly in reverse order.
Thank you, Ivan Igorevich, for the prepared photo report. We will transfer the promised prize to your mobile phone account.
You can buy an electric window lifter from JSC Lepse for the front right VAZ-2110 in our online store
Restoring the power window button
An electric window regulator (ESP) is a car device that allows you to raise and lower the door windows using a button. The ESP consists of a drive mechanism, a lifting mechanism and a control unit.
Like any other systems subject to intensive use, electric windows have an increased service life - about 30 thousand opening/closing cycles.
This resource is sufficient for 10 or more years of uninterrupted operation, however, if handled carelessly and/or under the influence of other negative factors (for example, water ingress), the device may fail much earlier than the stated period.
Most often, problems arise in the mechanical part, that is, some part of the lift itself breaks. In this case, when you press the button, you will hear the sound of a running motor, but the glass will remain in place.
It is worth inspecting the lifting mechanism for damage to the guides along which the glass moves.
To fix this problem, you will have to replace the entire mechanism, since parts are rarely sold separately.
If the ESP electric drive itself at one point suddenly stops responding to the press of a button, you should not rush to a car service center.
About the repair of the comfort unit
This is a very tricky issue. It’s worth clarifying right away that an ordinary car enthusiast has no business even trying to do this. For such an operation, you need to have at least a professional kit for soldering microcircuits on hand. Or better yet, a soldering station. No service station will undertake this work. So it’s easier to replace the failed unit with a new one.
In the video below, a specialist checks the serviceability of the Priora comfort unit.
lekha=60, I don't know. I'm having a hard time finding my way around here. Now I tried, the right mirror to the right and down is still not working. What to do ?
Added after 1 hour 32 minutes Can anyone help me figure it out?
Can anyone help me figure it out? To diagnose the EP controller, there are no psychics on the forum who can identify errors in your ECP through a monitor.
The learning key does not fit into it. Pull the chip out of the old learning key and insert it into the learning key of the new lock.
Maybe there is a link on how to teach when changing the comfort unit? Just as always teach https://www.priorovod.ru/showthread.php?t=22169
Gyzmi58, So do I need to change my key with buttons to a new one? It seems like he can be trained once?
Added after 2 minutes Gyzmi58, So do I need to change my key with buttons to a new one? It seems like he can be trained once?
Thank you very much for your attention to me. Please;)
If I connect it there and just check the locks and mirrors and then put my old BC back, the engine will start. You can only connect the connectors and check everything, you don’t have to remove the unit. Although it is not difficult to remove it. The engine will start with its block.
Gyzmi58, In general, I went to pick up the block and dropped it off on the spot. Nothing changed. I came home and decided that I would go for diagnostics, but... weekend I decided to dig deeper and for good reason. When opening the rear right door, everything started to work; when closing it stopped, everything was clear. It turns out that the door actuator wire got under the limiter loop inside the door and got jammed there. That's why there was whistling at that door. I fixed everything, reconnected the wire, reassembled everything and it works. Thanks everyone for the advice.
Added after 1 minute Look for the shorty by whistling from the BC and probably from the place where the short was lost.
I came home and decided that I would go for diagnostics, but... weekend I decided to dig deeper and for good reason. Well done for figuring it out yourself: good::good: It’s much more difficult to understand in virtual reality..
How to remove and connect the window lift button - using the example of LADA Kalina/Priora
Repairing the window lifter button on Kalina, Priora or Grant is not difficult. And no serious financial costs will be required, since the price of the “native” passenger door button is only 150 rubles. The cost of the control unit on the driver's door is about 600 rubles.
To remove the button on the passenger door or the control unit, you do not need to remove any decorative trim or door trim. There is no need to look for screws to unscrew them, since there are none.
- It is enough to carefully pick up the button or block with a flat screwdriver and simply pull it out of its seat. To avoid accidentally scratching the casing, it is recommended to wrap the screwdriver in a thin cloth.
- Then you need to disconnect the wire terminals to completely free the power window control module. Next, you need to tightly connect the terminals to the new button and return it to its place.
VIDEO INSTRUCTIONS ” alt=””>
How to identify a malfunction
To determine the malfunction, follow the instructions:
- Connect the light bulb located under the door trim with the wiring coming from the electric drive. If the last one is broken, the light is on, which means the problem is in the wire.
- If the operation of the power window control unit leaves much to be desired, the main reason is the contact of the wire with the box or another wire.
If a breakdown in the Lada Priora needs to be repaired with your own hands, without having special tools, first rule out the possibility of a wiring break or short circuit that falls on the ground of the wire responsible for controlling and powering the door structure module unit near the driver’s seat.
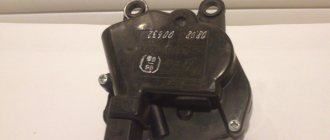
How to fix stuck power window buttons on a Priora
If the power window buttons work every once in a while or get stuck , but at the moment it is not possible to purchase a new control unit, you can fix the problem as follows:
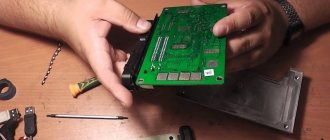
- We remove the control unit. To do this, you need to carefully snap off the 6 plastic clips on the body of the decorative cover;
- Let's disassemble the block. To do this, you also need to unclip 6 clips on the body of the unit itself;
- We take out the control board and clean it of any contaminants;
- We remove the buttons themselves by carefully bending the side fastenings with a screwdriver;
- We remove all dirt and debris from the paths using alcohol and cotton wool;
- Lubricate the working part of the button with silicone grease (this is not necessary, but this will make the button move smoother);
- We assemble everything in reverse order.
Replacing the power window button Renault Logan and Megan
VIDEO REVIEW ” alt=””>
You can also replace the power window button block on Renault Logan and Megan cars yourself.
- All you need is a flathead screwdriver and a cloth or tissue.
- To remove the control unit, just carefully pick it up with a screwdriver and gradually pull it out of its seat. To avoid accidentally damaging the casing during dismantling, it is recommended to wrap the screwdriver in a thin cloth.
- Next, you need to disconnect the terminals with the wires, making sure that they do not fall inside the casing. Then you need to connect the new unit and install the buttons in place.
Replacement cost
Replacing VAZ-2114 window regulators is cheaper than installing electric mechanisms to replace manual ones. If, in order to simply change the window regulator, you need to disassemble the door trim, dismantle the old mechanism and install a new one, then to install an electric version instead of a manual one, you need to partially disassemble the instrument panel, select a power source and run the wiring from it inside the door. This work requires the intervention of an electrician. Because power cannot be taken from anywhere: the source must match the power of the electric drive, and in the event of a short circuit, the fuses must protect the main wiring of the car. In addition, the power windows must operate when the ignition switch is on.
To summarize, we can say that in the first case, the qualifications of the work are minimal, and it can be done by yourself, without having specific knowledge, while working with an electrician requires a specialist who needs to be paid.
The price of a VAZ-2114 window lifter ranges from 2.5 thousand to 3.5 thousand rubles, depending on the design and manufacturer. But as was said earlier: the lever and rack and pinion options are preferable. If you buy a device for only one side, then the left front window regulator will be more expensive, since it is more in demand.