With the onset of cold weather, the main task of every motorist is to create warm and comfortable living conditions in the car. After all, you will agree that it is much more comfortable to drive in a warm car than to be cold. However, if heat is not supplied, then it is necessary to figure out what could be causing this. In this article I want to talk about repairing the Kalina stove switch.
Main causes of malfunctions
So, what should we do if heat does not flow inside our car and cold air blows. Let's consider the main causes of such malfunctions:
- Failure of the Kalina heater switching control cable. The reason for such a malfunction may be that the latch has fallen off, and the cable stretches normally in one direction, but does not reach the opposite direction.
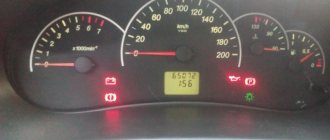
- On Kalina, the stove only works at speed 4. Associated with a broken thermistor.
- On a Kalina car, the heater switch often breaks when turned on abruptly, which is due to insufficiently strong plastic.
Here is a list of the main breakdowns that may occur. Next, we move directly to the repair itself and replacement of failed parts.
Heater radiator repair
It’s worth paying attention right away to change Kalina’s stove - you need to do a very labor-intensive task. The manufacturer of this car provides a proprietary manual that describes repairs for the most common breakdowns. Replacing the radiator is included in the instructions
Replacing the radiator is included in the instructions.
Craftsmen have developed their own loophole on how to carry out repairs without significant expenditure of effort and time. But when replacing the Kalina stove, you will need to cut out a piece of the housing under the casing so that you can remove the radiator without disassembling the dashboard.
Repair and replacement of faulty parts
Many novice motorists ask questions: how to remove the heater regulator on Kalina, what LED is in the heater switch on Kalina, what should be done when the heater mode switch on Kalina does not work. Answering these questions, I want to say that initially it is necessary to dismantle our entire mechanism, after which we proceed to disassembly according to the following scheme:
- First of all, disconnect the negative terminal from the battery. This is done to de-energize the system so as not to short-circuit any of the sensors during the disassembly process.
- We remove the radio and turn off the power coming from the wiring harness.
- We remove the damper switch lever, then remove the temperature regulator and the air flow distribution regulator.
- At the bottom, remove the plugs behind which there are 2 screws, unscrew the fastening screws and gradually begin to remove the instrument panel console.
- After our panel is removed, it is necessary to disconnect the power supply connectors located on the back.
- After eliminating the malfunction, assembly is carried out in the reverse order.
To carry out this work, we only need a flat and Phillips screwdriver from the tools.
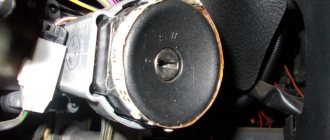
Difficult or impossible switching of the temperature regulator may be due to a breakdown of the switch itself. On a Lada Kalina car, replacing the heater switch is quite easy (provided that work has previously been done to remove the heater control mechanism). On the rear console of the control panel, unscrew the four screws securing the switch block. We remove the cable fastening clamps, then remove the cables from engagement with the drive unit. We replace the broken switch and reassemble it in the reverse order. When performing this work, I give you useful advice: the location of the cables on the lever block must be marked with a marker; this is done in order to install the rods in their original places during assembly.
When the stove temperature regulator does not work on Kalina, the main reasons for the breakdown may be: a disconnected connection wire or a failure of the thermistor. Such malfunctions are treated by soldering the wire and replacing the broken element. It happens that the stove regulator on Kalina does not work due to a breakdown of the temperature sensor, which happens quite rarely. This sensor is located inside the car interior lamp. If it is found to be damaged, it must be replaced with a new one.
Answering the question about what kind of LED is installed in the stove switch in Kalina, I want to say that there are LED lamps with a power of 3 Watts and a voltage of 12 Volts. This lamp is quite enough for illumination, but some motorists install LEDs with a power of 5 Watts. This does not affect the work process, the backlight just becomes a little brighter.
To summarize, it should be noted that it is much more comfortable to drive in a warm car. To ensure that the heater switching mechanisms do not break, it is necessary to switch them smoothly and not jerk sharply. Good luck and may your cars be warm and cozy in winter.
Fan replacement
The most convenient way to get to the unit is from the passenger seat, which will have to be dismantled so that you don’t have to do acrobatics inside the cabin. The chair runners are held in place by 4 13 mm nuts; unscrewing them is not difficult. Further work on replacing the fan is carried out in the following sequence:
- Remove the cabin filter and remove dirt and dust from the opening.
- Unscrew 4 screws located on the back wall of the glove compartment, and another one under the right heater grille.
- Remove the plastic cover from the stand and unscrew the 2 screws that secure the panel and the blower unit.
- Remove the blower unit, lift the plastic panel and loosen the 2 fan mounting nuts underneath it.
- Move the dashboard as far back as possible and secure it. The turbine must be removed from below, from a lying position.
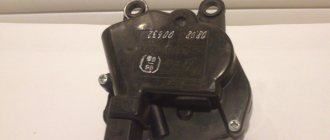
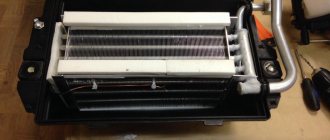
You should not rush to change the fan when it only works at speed 1 and the heater switch is at maximum. This is a sure sign that the resistor located below the glove compartment has failed. The part is a small green plastic panel with a connection connector. Replacing the heater resistor is carried out without any disassembly; you just need to disconnect the connector and unscrew the 2 screws that secure it to the body.
Basically, troubleshooting the Kalina stove is not a difficult job, but very labor-intensive. To change a small part, you need to spend time disassembling to get to it.
The device of the stove adjustment mechanism
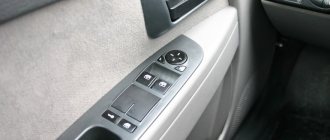
On the Lada Kalina car, the heater switches are located on a panel in the central part of the dashboard. It contains control mechanisms, namely:
- heater temperature regulator;
- fan operating mode regulator;
- air flow distributor control regulator;
- recirculation flap switch lever.
Actually, this is what our mechanism looks like. Now let's move on to possible causes of failure.
Windshield cleaner and washer
The Lada Kalina windshield cleaning system includes:
- Electric motor with gearbox;
- Set of levers and brushes.
Standard electrical wiring Kalina windshield cleaning system
The diagram below shows:
- Electric washer fluid reservoir pump;
- Standard ignition switch;
- Control unit for electric motor operating modes;
- The windshield wiper motor itself;
- Fuse and relay block;
- Terminal “A” from the power supply.
Washer kit includes:
- Polyethylene tank with pump;
- Injectors located on the hood of the car;
- Set of flexible connecting hoses.
Possible heater malfunctions
So, what should we do if heat does not flow inside our car and cold air blows. Let's consider the main causes of such malfunctions:
- Failure of the Kalina heater switching control cable. The reason for such a malfunction may be that the latch has fallen off, and the cable stretches normally in one direction, but does not reach the opposite direction.
- On Kalina, the stove only works at speed 4. Associated with a broken thermistor.
- On a Kalina car, the heater switch often breaks when turned on abruptly, which is due to insufficiently strong plastic.
Faulty heater resistor of the Lada Kalina car
Here is a list of the main breakdowns that may occur. Next, we move directly to the repair itself and replacement of failed parts.
Pinout of the dashboard / instrument panel of Lada Priora, Kalina, Granta, Largus
Lada Priora instrument panel pinout
Lada Kalina instrument panel pinout
Lada Granta instrument panel pinout
Lada Largus instrument panel pinout
Lada Priora instrument panel pinout
Instrument panel wiring harness connection diagram:
No. Connection of the Itelma gearbox with navigation without CAN 1 To the electric power steering 2 MUTE 3 To the oil pressure sensor 4 Parking brake switch 5 To the immobilizer control unit (electrical package) 6 To the airbag control unit 7 To the light control module (light on indicator) 8 Turn signal switch (right side) 9 Turn signal switch (left side) 10 To the engine control system unit 11 AUDIO OUT - “Battery” 12 To the seat belt sensor 13 To the ABS unit (EBD malfunction) 14 Steering column switch “Buttons” 15 Brake fluid level sensor 16 To the ABS unit (ABS malfunction) 17 To the high beam switch 18 To the light control module (scale lighting regulator) 19 Housing 20 Terminal “30” of the battery 21 Terminal “15” of the ignition switch 22 To the control unit (signal fuel consumption) 23 To the steering column switch “UP” 24 To the steering column switch “DOWN” 25 To the radio receiver “AUDIO OUT “+” 26 To the outside temperature sensor 27 To the fuel level sensor 28 To the speed sensor 29 To the coolant temperature sensor. liquid 30 To control unit engine (tachometer signal) 31 Service diagnostics 32 To terminal “L” of the generator relay regulator
Pinout of the Lada Priora instrument panel with CAN bus
Lada Kalina instrument panel pinout
Pinout of the instrument panel Lada Kalina 1
Pinout of the instrument panel Lada Kalina 2
Lada Granta instrument panel pinout
Lada Granta instrument panel pinout
Lada Granta instrument panel pinout
Connection diagram of the instrument panel wiring harness on a Lada Granta VAZ 2190:
1, 2 — connectors of the instrument panel wiring harness to the connectors of the front wiring harness; 3, 4 — connectors of the instrument panel wiring harness to the connectors of the rear wiring harness; 5 — external lighting control unit; 6 — ignition switch; 7 — on-board computer mode switch; 8 — glass cleaner and washer switch; 9 — instrument cluster; 10 — switch for direction indicators and headlights; 11 — trunk lock drive switch; 12 — diagnostic connector; 13 — connector of the instrument panel wiring harness to the connector of the wiring harness of the air supply box; 14 — rear window heating switch; 15 — alarm switch; 16 — brake light switch; 17, 18 — connectors of the instrument panel wiring harness to the head unit and audio device; 19 — driver airbag contact ring; 20 — driver airbag module; 21 — mounting block connector; 22 — mounting block; 23 — electric power steering; 24 — cigarette lighter; 25 — backlight lamp for the heater control unit; 26 — backlight lamp; 27 — connector of the instrument panel wiring harness to the connector of the ignition system wiring harness; 28 - controller; 29 — clutch pedal position sensor; 30 — electronic accelerator pedal; 31 — additional resistor; 32 — heater electric motor; 33 — heater motor switch; 34 — control unit for the door lock system; K1 - relay for the electric fan of the engine cooling system; K2 - door lock relay; K3 - additional starter relay; K4 - additional relay; K5 - relay-interrupter for direction indicators and hazard warning lights; K6 - windshield wiper relay; K7 - headlight high beam relay; K8 - sound signal relay; K9 - relay for low beam headlights; K10 — relay for turning on the heated rear window; K11 - main relay; K12 - fuel pump relay.
Lada Largus instrument panel pinout
Lada Largus instrument panel pinout
Lada Largus instrument panel pinout
Repair and replacement of faulty parts
Many novice motorists ask questions: how to remove the heater regulator on Kalina, what LED is in the heater switch on Kalina, what should be done when the heater mode switch on Kalina does not work. Answering these questions, I want to say that initially it is necessary to dismantle our entire mechanism, after which we proceed to disassembly according to the following scheme:
- First of all, disconnect the negative terminal from the battery. This is done to de-energize the system so as not to short-circuit any of the sensors during the disassembly process.
- We remove the radio and turn off the power coming from the wiring harness.
- Remove the damper switch lever, then remove the temperature regulator and air flow distribution regulator.
- At the bottom, remove the plugs behind which there are 2 screws, unscrew the fastening screws and gradually begin to remove the instrument panel console.
- After our panel is removed, it is necessary to disconnect the power supply connectors located on the back.
- After eliminating the malfunction, assembly is carried out in the reverse order.
To carry out this work, we only need a flat and Phillips screwdriver from the tools.
Difficult or impossible switching of the temperature regulator may be due to a breakdown of the switch itself. On a Lada Kalina car, replacing the heater switch is quite easy (provided that work has previously been done to remove the heater control mechanism). On the rear console of the control panel, unscrew the four screws securing the switch block.
We remove the cable fastening clamps, then remove the cables from engagement with the drive unit. We replace the broken switch and reassemble it in the reverse order. When performing this work, I give you useful advice: the location of the cables on the lever block must be marked with a marker; this is done in order to install the rods in their original places during assembly.
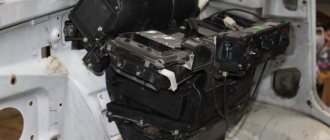
The dashboard of a Lada Kalina car disassembled
When the stove temperature regulator does not work on Kalina, the main reasons for the breakdown may be: a disconnected connection wire or a failure of the thermistor. Such malfunctions are treated by soldering the wire and replacing the broken element. It happens that the stove regulator on Kalina does not work due to a breakdown of the temperature sensor, which happens quite rarely. This sensor is located inside the car interior lamp. If it is found to be damaged, it must be replaced with a new one.
Visual instructions for removing the fan resistor
Answering the question about what kind of LED is installed in the stove switch in Kalina, I want to say that there are LED lamps with a power of 3 Watts and a voltage of 12 Volts. This lamp is quite enough for illumination, but some motorists install LEDs with a power of 5 Watts. This does not affect the work process, the backlight just becomes a little brighter.
Every car owner knows how important the operation of the heating system is, especially in winter cold conditions. If the stove fails, it will, at a minimum, cause considerable inconvenience for the driver and passengers, so the performance of this unit must be at the highest level. You can learn more about how to replace the stove on Kalina and in what cases it is required from this material.
Some useful tips
Any car owner who has to carry out work to replace or repair a heating system radiator wonders about the reason for the failure of the unit
It is important to consider 2 factors that allow you to extend the continuous operation of the device
- It is necessary to timely replace the system air filter. A clogged radiator is more likely to fail. There is a set period for periodic replacement, but you can do it more often, for example, change the filter after winter use and at the end of the summer season.
- Replace the coolant in a timely manner. This operation should be carried out every 60 thousand kilometers. Accumulating wear products destroy the light metal of the radiator, depriving it of its tightness. Many car owners believe that by periodically adding antifreeze to the system, they will not have to change the unit. However, corrosion products continue to accumulate, having a detrimental effect not only on the heater radiator, but also on the engine as a whole.
A pressing issue is the use of high-quality antifreeze. You should buy it from trusted sellers and do not use water in the cooling system.
The operation of any vehicle involves not only the maintenance and repair of parts and systems that ensure its movement. Assistive devices play an important role in the operation of a car. And if the radiator of the cooling system fails, not only the microclimate in the car is disrupted, but it also becomes unsafe to drive due to fogging of the windows.
The heating system in the cabin of the budget Lada Kalina model can significantly increase comfort for the driver and his passengers. It ensures that the required temperature conditions are maintained inside the car. Along with such useful options as:
- "ABS";
- airbag;
- electric power steering;
- electric front windows;
- front seat heating function,
The design of the interior heater allows the manufacturer to achieve a fairly acceptable level of equipment, which is very worthy for a small-class Lada Kalina model and makes it competitive among its rivals in this segment.
Possible heater malfunctions and ways to eliminate them
If the stove blows very weakly or in the current mode it basically refuses to blow air, then there may be several malfunctions, as well as solutions:
- The heating system hoses are worn out. As a rule, if antifreeze leaks or the stove does not heat, this may be due to wear and tear on the pipes. To solve this problem, it is necessary to carry out a thorough diagnosis of each of the pipes. Coolant may escape through cracks or other damage.
- The heater valve has failed. If the stove control valve is broken, this can be indicated by traces of leakage of consumables in the vehicle interior.
- There are malfunctions in the operation of the control unit. If the problem lies in the unit, then first of all you need to check the quality of its connection to the on-board network. If it is connected correctly, then most likely the problem lies there. It is better to entrust unit repair to specialists.
- Wiring faults. Perhaps the unit does not turn on the heating system due to lack of contact with the on-board network. In this case, the problem is solved by checking the circuit to find the broken section.
- The additional resistor is broken. This device is used to control the heater fan, so if the stove on Kalina does not heat, you also need to check the functionality of this element. If it doesn't work, then it will need to be changed.
- The Kalina heater regulator, located in the car's interior, does not work. If the heater only blows hot air, but does not react in any way when switching its mode from hot air to cold air, then most likely the regulator installed on the center console has failed.
- The radiator of the heating unit is broken. This problem is considered one of the most common on domestic cars, and it is especially relevant for Kalina. You can try to repair this device or change it yourself. We will tell you more about how to shoot and how to replace the device below (the author is the Interesting Video channel).
Climate control Lada Kalina Lux
The system design is similar to that described above, with the exception of some details. To maintain a given temperature in the cabin, two new elements are used in the design: a temperature sensor in the cabin (built into the ceiling light) and a damper micromotor reducer. Also, the mechanical control unit has been replaced with an electronic one, with degrees of air temperature in the cabin marked on it.
The operation scheme is as follows: the control unit periodically receives a signal from the temperature sensor in the cabin and compares it with the temperature set on the unit. If the difference is too large, the control unit sends a signal to the micromotor gearbox, which already controls the heater dampers (opens or closes hot air from the heater).
Instructions for replacing the stove
Before removing all the necessary parts, cables and other components from Kalina, prepare a new radiator, pipes and clamps. The pipes will be required in case the old ones are worn out or they have never been changed over the years of operation. As practice shows, hoses are most susceptible to wear due to temperature changes, so in any case they need to be changed from time to time.
Instructions on how to change the radiator are presented below:
- We begin the replacement procedure in the engine compartment. First, place a container under the drain hole and drain all consumables from the radiator. If you notice that the coolant is already old and has exhausted its service life, which can be understood by its color and deposits, then it is also better to change the antifreeze.
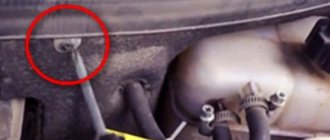
- You need to ensure the most convenient access to all pipes and hoses of the radiator assembly in the engine compartment. To do this, dismantle the power unit air filter housing, the battery, and its platform. Next, you need to disconnect all the lines from the radiator unit in the engine compartment. Having done this, you can use a wrench to unscrew the nut that secures the metal casing to the engine shield. This nut is located next to the pipes that go into the Kalina's interior.
- Next, we move into the car interior. You need to remove the gas pedal; to do this, unscrew the three nuts. As for the brake pedal, it cannot be removed, so just move it to the side as far as possible.
- Now you have to cut the steel casing as shown in the photo, and then cut off the tubes of the radiator assembly. Having done this, you can dismantle the device from the pedals, but to do this you will also need to unscrew the bolts that secure it.
- Before installing a new radiator device, it will be necessary to carefully sand its tubes. Please note that they should be as even as possible. After all surfaces are ready, a line with a widened end is put on the upper tube, and a line with a narrower end is put on the lower tube. The remaining outputs must be connected in the engine compartment instead of the old ones. Also note that on the side of the Kalina’s interior, it is advisable to treat the place where the lines exit into the engine compartment with sound-insulating material.
Price issue
The range of radiator units for Kalina is not particularly large. On average, prices for radiators are as follows:
How to choose the right heater radiator
| When the engine is running, heated fluid from the cooling system circulates through the heater core, heating the air passing through it. The amount of air passing through and around the radiator is set by the central heater damper, depending on the position of the temperature control knob installed on the instrument panel. |
The air distribution throughout the cabin can be adjusted by rotating the control knob for the air distribution flaps, as well as by turning the flaps and guide blades of the instrument panel ventilation grilles.
First of all, you need to pay attention to the metal from which the heating system element is made. Cheap options are made of aluminum
If it cracks, the owner has only one choice - throw it away and buy a new one.
Meanwhile, the brass-copper model, although more expensive, can be easily repaired - cracks in it can be easily sealed.
It is also important that the swirlers of the new radiator are made of durable plastic. As practice shows, such models last for many years and rarely become clogged.
Before choosing a stove radiator, you should know that they can be either aluminum or copper-brass. It is difficult to clearly prioritize the choice of one material, but each one has specific features of its work. These features are dictated by the properties of the material. Copper has a slightly lower thermal conductivity than aluminum, and therefore warms up more slowly. This cannot be said to be bad, since the thermal inertia of such a radiator is quite large. This means that it may not cool down for a long time.
We recommend: How to choose speakers for a car
An aluminum radiator is the opposite. It warms up quickly, but cools down just as quickly. It has a few more disadvantages. Firstly, the aluminum radiator cannot be repaired. Once it drips, you can throw it away. Copper is soldered quite simply and as many times as necessary. You just need to choose it correctly, because when selling, especially in the car market, you may come across a repaired copy with the partitions removed. It won't leak, but it won't provide heat either. Antifreeze will simply pass through such a radiator as if through a pipe.
The stove has a simple design. Its main element is the heater radiator. During the first 20-30 minutes, the engine heats the coolant to a temperature of 40-50 degrees, and then it circulates through the cooling system and enters the heater radiator. Warm air is distributed throughout the cabin using fans.
Each type, depending on the properties of the material, has its own advantages. The thermal conductivity of copper is less than that of aluminum, so it heats up more slowly. But it also retains heat for a long time. Copper products have high maintainability and can be soldered a large number of times.
Aluminum, on the contrary, heats up quickly and cools down quickly. The disadvantage of an aluminum radiator is low resistance to mechanical damage and non-repairability. If it leaks, it should be replaced. The advantage of aluminum devices is their low cost.
Swirlers in pipes
In any case, it is better to buy original products to avoid fakes. The car owner decides which radiator is best to purchase.
DIY heating system repair
To change this or that part of the heating system, it is not at all necessary to seek help from specialists. This will help save time, but not money. If you follow the recommendations, you can replace some system components yourself.
Heater fan
Even beginners can replace the Kalina stove fan. The main problem is its location. For this reason, most of the time is spent not replacing the part, but dismantling it.
Fan replacement with panel removal
The method is recommended by AvtoVAZ engineers, but it is not the simplest. Not everyone decides to use it in a regular garage. When performing work, you must follow the instructions:
- First, turn off the power to the on-board network by disconnecting the battery terminals.
- Drain all coolant and remove the cabin filter.
- After unscrewing the fastening nuts, lower the steering column to its lowest position.
- Release the brake light switch from the wires, unclip the clips, and remove the upholstery from the pillars.
- Unscrew the screws and remove the front panel (cladding), then remove the dashboard along with the deflectors.
- Now you can begin dismantling the fan. To do this, you need to disconnect the terminal with wires from it, remove the ventilation hose, and unscrew the fastening nuts.
After installing the new fan, all further actions are carried out in the reverse order of dismantling. The procedure requires attention and accuracy and takes a lot of time. At some points, the help of a second person will be required.
Replacing a fan without removing the panel
It is not practical to remove the entire dashboard just because of the heater fan. You can replace the device without removing the dashboard - you just need to lift its right side. Next, you should “arm yourself” with a knife and a flashlight and crawl under the panel. The noise insulation is cut off, the fasteners are unscrewed, and replacing the Kalina stove motor becomes much easier. This method will significantly save time and nerves, although it will create some inconvenience.
Before you start replacing the electric fan, you need to make sure that this particular device is faulty.
Replacing the temperature controller
To dismantle the part and replace it, it is necessary to remove the control unit assembly. The procedure looks like this:
- the on-board network is de-energized by removing the “negative” terminal from the battery;
- the radio tape recorder (if any) is removed, and the terminal block of wires is unhooked from it;
- the damper control lever is removed;
- Next, the handle for controlling the temperature and direction of air flow is dismantled;
- there are plugs located at the bottom of the control unit - they need to be removed and the fastening screws underneath must be unscrewed;
- the center console should be carefully pulled towards you;
- After removing the console, disconnect the terminal blocks from the switches.
After replacement, everything is assembled in the reverse order. This operation is simple and only requires a couple of different screwdrivers to get the job done.
Replacing the heater core without removing the panel
Changing the heater radiator on a Lada Kalina, as on all front-wheel drive VAZ cars, is not an easy task. You will have to remove most of the front panel. To work, you will need a new heater radiator, hoses, clamps, an angle grinder and a standard set of tools. First you need to carry out some manipulations in the engine compartment:
- drain antifreeze from the cooling system;
- remove the battery and air filter housing, ensuring unhindered access to the heater pipes;
- you need to disconnect all the rubber pipes from the stove in the engine compartment, unscrew the nut securing the metal shield that covers the hoses going to the stove into the cabin.
Cabin filter
| Air intake is carried out through an air intake installed under the windshield frame. To clean the air entering the cabin, a filter element made of non-woven synthetic material is installed at the heater air intake. The exhaust is carried out due to the vacuum that occurs near the rear of the body when the car is moving. |