Drivers are notified of the presence of malfunctions in various vehicle systems using icons on the instrument panel. It is not always possible to decipher the meaning of such burning icons intuitively, since not all car enthusiasts are well versed in cars. In addition, on different cars, the graphic designation of the same icon may differ. It is worth noting that not every light on the panel only indicates a critical malfunction. The indication of light bulbs under the icons is divided into 3 groups by color:
- Red icons indicate danger, and if any symbol lights up in this color, you should pay attention to the signal from the on-board computer in order to take measures to quickly resolve the malfunction. Sometimes they are not so critical, and it is possible to continue driving the car when such an icon on the panel is on, but sometimes it is not worth it.
- Yellow indicators warn of a malfunction or the need to take some action to drive the car or service it.
- The green lamps of the symbols inform about the vehicle’s service functions and their activity.
We will present a list of the most frequently asked questions and an explanation of the icons and indicators that light up on the instrument panel.
There are many badges with a car silhouette emblem. Depending on additional elements, this indicator may have different meanings.
When such an indicator lights up ( a car with a key ), it informs about malfunctions in the engine (often a malfunction of a sensor) or the electronic part of the transmission. To find out the exact cause, you will need to perform diagnostics.
A red car with a lock lights up , which means that problems have arisen in the operation of the standard anti-theft system and it will be impossible to start the car, but if this icon blinks when the car is locked, then everything is normal - the car is locked.
A yellow vehicle indicator with an exclamation mark notifies the driver of a hybrid vehicle that there is a problem with the electric drive. Resetting the error by disconnecting the battery terminal will not solve the problem - diagnostics are needed.
the open door icon lit when a door or trunk lid is open, but if all the doors are closed and the light on one or four doors continues to shine, then often the problem should be looked for in the door terminals (wire contacts).
The slippery road icon begins to flash when the stability control system detects a section of slippery road and is activated to prevent slipping by reducing engine power and braking the slipping wheel. There is no need to worry in such a situation. But when a key, a triangle, or a crossed out skid icon appears near such an indicator, the stabilization system is faulty.
The wrench icon pops up on the display when it’s time to perform vehicle maintenance. It is an information indicator and is reset after maintenance.
Why does the check light come on on Kalina 8 and 16 valves? What to do and how to act?
Download PDF
Specialists and experienced drivers know that the reasons why the check light on Kalina 8 and 16 valves are often identical to the problems of other domestic cars and some foreign cars. The Check Engine system is a device for monitoring the operation of the engine and some compatible units. Prolonged activation of this sensor may indicate a serious breakdown in the power unit. Finding out this with 100% accuracy is only possible at the diagnostic station. However, the warning light can also light up due to minor problems in the heart of the car, which can be eliminated independently, without significant costs.
Code typing and alternative launch
Let's say you come to the conclusion that the immobilizer cannot read the key. Then, without removing the key, perform the following steps:
- Try to start the starter, then return the key to position I;
- The lamp with the “machine” will blink;
- Wait 60 seconds for the Check Engine light to go out;
- Dial the code value using the gas pedal (see above);
- Even though the Check Engine light is on, the engine can be started.
If you decide to erase your code, simply follow what is stated in "Chapter 1". When dialing the first digit, press the gas and do not release the pedal for 20 seconds.
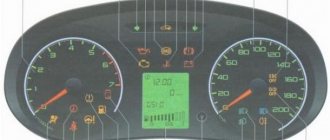
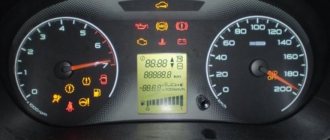
Dashboard of the car "Kalina"
On the car panel there are several instruments showing the operating status of the engine, speed, coolant temperature, and the amount of fuel in the gas tank. Modern VAZ models also have an on-board computer.
Tachometer
This device is located on the far left of the panel. It shows the number of revolutions of the crankshaft per unit of time. The numbers on the dial are in multiples of 1000. Values starting at 5000 rpm are placed in the red zone. It shows a dangerous operating mode.
Speedometer
The device with the largest scale. Located in the center of the panel. Shows vehicle speed. The value is kilometers per hour. The pointer dial is graduated with numbers from 0 to 200.
The icons on the panel of the VAZ Kalina car in the form of two green arrows located on top of the speedometer indicate left and right turns. When the driver switches on the selected direction of travel, the lights begin to blink.
Coolant temperature dial gauge
The calibration of this device is from 60 to 130 degrees Celsius. Operating temperature is from 90 to 105. Next is the red zone, warning the driver of overheating.
The readings on the device come from a temperature sensor. If the coolant overheat reaches 105 degrees or higher, the arrow will move into the red zone and the driver will hear a buzzer. It is not recommended to operate the car in this case.
Fuel quantity indicator
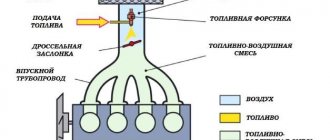
The dial of this device has three values - 0, 0.5 and 1. These numbers show the fuel level in a tank designed for 50 liters. When the arrow of the device is in position 0, an icon is turned on, schematically depicting a gas station. This means that there are less than 7 liters of gasoline left. When the symbol lights up, the buzzer sounds.
Digital display of on-board computer
Under the speedometer there is a display of the BC - on-board car computer. The readings on this device are displayed in two lines.
Indicators included in the panel
The Kalina dashboard consists of 23 main elements. These include:
- rotation speed meter;
- indicator showing battery charge;
- speed meter;
- indicator displaying lubricant pressure in the engine;
- temperature indicator;
- turn signals;
- fuel level sensor in the tank;
- hand brake;
- daily mileage reset;
- reserve fuel quantity lamp;
- computer display.
Why is the battery light on the Lada Kalina dashboard?
We list the main reasons why the battery indicator on Kalina blinks or lights up:
- Problems with the belt. Insufficient tension can lead to slippage, and a rupture will definitely render the generator inoperable.
- The fuse is blown, the contact is loose. Many motorists know that in case of electrical problems, the first thing to do is check the fuse - it can blow out due to a voltage surge, and oxidation or weakening of the fuse contacts often leads to a circuit break. If the fuse is intact, it is also worth checking the condition of the contacts on the generator itself, as well as on the battery.
- The generator regulator relay has burnt out. A breakdown of the voltage regulator can have several consequences: the battery will receive a current of an increased rating, which is why the battery will be charged beyond the permissible limit, that is, constantly boil. This is bad for the battery. The second option is even worse, when due to a faulty voltage regulator the generator runs idle - the current does not reach consumers.
- Worn ignition switch. The ignition switch, it turns out, is also not eternal; its constant twitching may one day lead to a break in the circuit. The same trouble happens with wiring on any part of the battery-generator circuit.
- There are other possible reasons. The largest number of malfunctions that lead to the Lada Kalina battery not charging are associated with the functioning of the generator itself. These include a winding break in the rotor/stator, critical wear of the commutator brushes or their sticking on the brush holders due to contamination, and wear of the slip rings.
Error codes
Self-diagnosis mode displays certain codes. Due to the simplicity of the design of the diagnostic unit, digital values only indicate the area where the fault occurs. The most popular encodings:
- 2 – there is a short circuit in the on-board network with a critical increase in voltage;
- 3 – open circuit or malfunction of the float in the gas tank;
- 4-5 – error or breakdown of the antifreeze or ambient temperature sensor, respectively;
- 6 – the motor is very overheated;
- 7 – too low oil pressure in the engine boat;
- 8 – the brake system is not working properly;
- 9 – the battery is faulty or severely discharged;
- E – standard error of the firmware data package;
- 0 – no errors – all on-board systems are operational.
Specialization : Graduated from the State Automobile University, worked for 20 years at GAZ-56, now I drive a Zhiguli.
Source
How to check the sensor
Since the cause of error 4 on the Lada Kalina is not always the failure of the controller, you need to learn how to diagnose it. First of all, inspect the wiring; if there are no breaks in it, then you need to move on to checking the sensor itself. Follow the instructions:
- Turn off the ignition and disconnect the wire connector from the coolant sensor. For the convenience of motorists, the block is marked “AB”.
- Place the probes of the electronic tester on contact B of this block and on engine ground. If the power circuit is not broken, the tester will show a voltage of 4.8 to 5.2 V. Otherwise, you need to check the power circuit.
- If the device shows sufficient voltage in the circuit, then you need to check the controller itself. To do this, place the tester probes on contact A and engine ground. Switch it to resistance measurement mode. If the circuit is grounded, the device will show a resistance of less than 1 ohm.
- The following measurements should be carried out on a warm and slightly cooled engine. The probes of the device are placed on the contacts of the sensor itself to measure its resistance. It is also important to know the temperature of the coolant; the hotter it is, the lower the resistance should be. The maximum resistance is achieved at negative temperatures, and at 100 degrees it is minimal - 180 Ohms.
Instructions for dismantling and repair
Dismantling the tidy may be required to perform tuning, replacing backlight bulbs or repair work. You can find out how to remove the instrument panel on a Lada Kalina from the car's operating instructions.
LED instrument lighting
Tools and materials
Before disassembling the Kalina 2 instrument panel, you need to prepare the following materials and tools:
- a set of keys;
- Phillips and flat screwdriver;
- replacement parts and bulbs.
Before carrying out work, turn off the power to the vehicle by removing the negative terminal from the battery.
Removing the Kalina torpedo
Algorithm of actions
The disassembly procedure consists of the following steps:
- Using a Phillips screwdriver, you need to unscrew two self-tapping screws.
- Next, you need to remove the trim from the instrument panel.
- At the next stage, the spring clips are removed from the clutch.
- After unscrewing two screws, you need to slide the panel towards you.
- The latch holding the block must be pryed up using a flat-head screwdriver and turned.
- Next, you need to disconnect the connectors with the wires and you can safely remove the tidy.
- To remove the glass from the instrument panel, unclip the plastic clips.
After dismantling, you can replace faulty parts and lighting tabs. If the LED warning lights on the Lada Kalina have burned out, it is impossible to replace them, since they are soldered in. In this case, you need to change the entire instrument panel of the Lada Kalina 2. The Kalina instrument panel is assembled in the reverse order.
Thus, knowing how to disassemble the panel on Kalina, you can repair it yourself if the backlight or signal lights do not light up.
What does the Check Engine icon mean on Kalina?
When the check light is on on Kalina 1, the engine is first tested. Perhaps this is where the problem lies and urgent emergency maintenance will need to be performed. In situations where the engine is normal, but there is a signal, you need to check the quality of the fuel.
The check engine icon looks the same in different cars
If the check light on Kalina 8 valves comes on, the reasons can be sought in the fuel supply system. Even minimal failures, failure of the tank cap or catalyst lead to serious malfunctions over time. It is easy to identify such problems; the main thing is to regularly carry out visual inspections.
The signal indicator is located on the instrument panel in the area of the revolution counter. It looks like a rectangle, inside of which there is a corresponding inscription. If the simplest tests do not help determine the cause, routine diagnostics are needed.
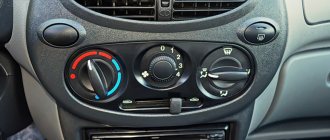
Instrument clusters and tuning
The listed devices and controls are located on the so-called dashboard of the car. You can install an original torpedo on Kalina, thereby diversifying the interior of the car.
The instrument cluster is closed with a special cover, which is an overlay on the panel. If necessary, the cover can be easily removed and replaced.
Auto-tuning instructions can be found on special websites and forums. Tuning the combination of all devices is not difficult if you have minimal skills in working with a soldering iron. The instrument cluster on Kalina is identical to the combinations on the VAZ 2118 and 2119. Nowadays, the GF 618 instrument cluster on Kalina, based on LEDs, is very popular; it has a built-in route diagnostic computer.
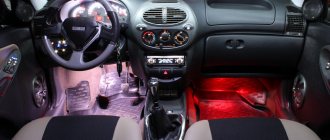
A panel that was installed at the factory can quickly become boring. In order not to purchase an alternative, but very expensive panel with a built-in computer, you can make inexpensive tuning with the existing one. The easiest way is to install an overlay on the instrument panel, which can be easily purchased using the services of online stores.
Using the instrument panel, the driver can monitor the vehicle’s condition, driving characteristics and other functions and processes that affect the safety of movement. Also, with the help of indicators, the car owner will be able to operate it correctly. Next, a description of the indicators on the instrument panel will be given to make it easier for a novice driver to understand.
How to disable the immobilizer with your own hands?
There is an option to temporarily disable the immobilizer, which may be required when installing an alarm system with auto start.
To install the bypass system, use:
- A control unit with a key or tag embedded in it. A key or chip is inserted into a device located deep in the dashboard. When autostart is activated, the alarm relay activates the unit and the engine starts, bypassing the main circuit.
- Blockless immobilizer bypass unit. A separate control device is installed that emulates an ignition key with a chip.
Another way to disable the immobilizer on Kalina depends on the type of ECM (control unit).
Bosch M7 4 block
Before you begin performing an operation on a car with a Bosch M7.4 unit, you must prepare:
- a computer or laptop with Winflashecu v.1.14 preinstalled (the distribution is available for free download);
- adapter and cord K-Line, for example, VAG-COM 409.1;
- pre-downloaded software for the unit with disabled immobilizer support;
- several wires with different lengths.
To disable the immobilizer on Kalina, you need to perform the following steps:
- Remove the wires from the battery terminals and disconnect the wiring harness connectors from the ECM installed under the hood of the vehicle. To disconnect, you need to remove the protective top cover and pull out the flat connector lock. All work is carried out on a large block. The small block can not be disconnected from the block.
- Insert the wire into contacts A4 and B2 from the harness side. These cables will be used to supply additional 12 V positive voltage. To do this, they are connected to the battery terminal through an intermediate switch.
- Reinstall the connector and fasten the fastener.
- Connect the adapter to the diagnostic connector located in the passenger compartment. The connector is located under a plastic cover installed on the center console.
- Set the data transfer rate to 38400 bps in your computer settings.
- Launch the Winflashecu application and select the port number, speed (38400 bps) and block type M7.4 in the dialog box. In the lower right corner of the window there will be a message “No connection”.
- Apply additional power to pins A4 and B2.
- Turn on the ignition. The “No communication” notification should change to “Communication with the ECU” and the buttons for starting operations will become active.
- Read the EEPROM (unit software) data and save it to the computer's hard drive.
- Select new software and load it into the unit’s memory using the “Write EEPROM” button.
- Wait for confirmation that the download was successful.
- Close the program and turn off the ignition.
- Remove the auxiliary power wires.
- Check whether the car can be started with a key without a chip. The immobilizer symbol will light up in the instrument cluster when starting and go out after a few seconds.
Bosch block 7 9 7
When installing the Bosch 7.9.7 control unit (Euro 2 standards), it must be modified by resoldering one resistor. It is best to entrust this task to a person who has experience with soldering small electronic components. After this, the block is “reflashed” according to the procedure described above.
Block January 7 2
In the case of using ECM type January 7.2, the procedure has a completely different look.
Before starting work you need to prepare:
- K-Line adapter, for example, VM9213;
- computer or laptop with ChipLoader 1.97.7 installed;
- soldering iron with a power of 25-40 W;
- solder and rosin;
- wires and switch;
- resistor with a resistance of 3.6 to 5 kOhm;
- plugs for connecting wires to the control unit;
- 12 V battery (standard or from an uninterruptible power supply);
In order to remove the immobilizer function from the unit, you should:
- Disconnect power from the vehicle's on-board network and remove the ECU.
- Wrap the block body with insulator.
- Assemble the diagram in accordance with the photo.
- Connect the adapter to the computer.
- Using the toggle switch, simulate turning on the ignition.
- Launch the application and establish a connection with the block.
- Read the factory data of the unit and save it to the hard drive.
- Read the EEPROM and click the “Delete IMMO” button. Wait for the confirmation window to appear with the text “Immobilizer successfully removed.”
- Close the application.
- Turn off the ignition with the toggle switch.
- Before installing the control unit on the car, you must turn off the signal from the immobilizer device. If the block is removed from the IMMO block, then it is necessary to close the contacts numbered 9 and 18.
Block January 5 1
To disable the immobilizer in the January 5.1 block, it is necessary to unsolder and reprogram the EEPROM flash memory. It is not recommended to perform this operation yourself, but rather to perform it in a workshop, since in the process of performing the task you will need a programmer and a hot air gun for soldering.
Emergency immobilizer shutdown
To disable the immobilizer, a digital code is used, which must first be written into the memory of the control unit.
To do this, you need to go through the activation procedure described above, and then follow the steps:
- Turn the red key to the ignition on position and wait until the immobilizer warning light on the instrument cluster goes out.
- Dial the numbers of the future six-digit code. For this, any numbers from 1 to 9 are allowed. The dialing is performed by quickly pressing the gas pedal all the way. When pressed, the immobilizer lamp will light up, and when released, it will go out. After dialing the number, press the gas pedal and hold it until the immobilizer indicator goes out (about 5-6 seconds). Then you can dial the second number and so on. If you make a mistake when typing and saving, the immobilizer indicator will not go out, but will start flashing. In this case, the entire procedure is carried out again, starting with activation.
- After dialing and recording the last digit, the immobilizer indicator will not go off. You need to hold the gas pedal for another 10 seconds and release.
- Turn off the ignition and remove the red key from the lock.
In case of problems with starting, you need to disable the immobilizer using the previously recorded code, for this you will need:
- Turn on the ignition system. If you use a key with a damaged or unrecognized chip, the starter may briefly engage, which will not lead to starting, since the fuel supply and ignition circuits are disconnected. The immobilizer indicator on the instrument cluster will activate and flash.
- Wait about a minute until the icon goes out.
- Enter the code by pressing the gas pedal. To enter a number, quickly press the pedal all the way. The number of presses corresponds to the code number. To separate between numbers, use a long press on the pedal (about 6 seconds). The input procedure essentially repeats the process of programming the code.
- After entering the sixth digit, the fuel pump circuit will turn on, and the immobilizer indicator will also light up. If you enter a number incorrectly, the icon will flash. In this case, the code entry procedure is repeated from the first digit.