How to properly connect a car radio in a VAZ 2108-2115 car
A radio is the head unit of a car's sound system. The GU has connectors for connecting to car wiring. But in order to correctly connect the radio in a 2112 car, you need to have an idea of the pinout. This is the connection of the power and acoustic wires of the head unit to the power supply of the machine and its acoustic equipment.
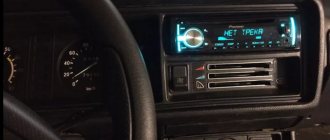
Dictionaries interpret the word “radio tape recorder” as a radio receiver combined in one housing with a tape recorder. The device is installed on the dashboard of the car and is needed to play music, play movies and clips. What kind of radio is needed in a VAZ 2108-2115 car, how to select and install high-quality equipment - the topic of many thematic forums for motorists.
How to connect your phone to the radio via AUX?
Connecting via AUX is one of the first and easiest ways to connect a car radio with external media. The connection is made using a cord, at the ends of which there are 3.5 mm connectors.
To listen to music, you just need to insert the plugs into your phone and radio. With this connection, the phone's player is used. The radio plays the role of an amplifier; you can use it to adjust the volume of the music. The cord that is used for connection can cause some inconvenience, and rapid drainage of the phone battery is inevitable.
Types of radio tape recorders
A car without an audio system is not a full-fledged means of transportation, no matter what technical characteristics it has. The car will not lose driving performance if it does not have a car radio, but the driver will lose comfort and pleasure from the trip.
Before connecting the radio in the car to the VAZ-2110, you need to understand the types of equipment:
- Hi-end. This is an expensive device of good quality with excellent sound. But the functionality is not the richest: the device is not equipped with USB connectors and Bluetooth adapters.
- C USB. The most popular car radios that play music from flash cards rather than CDs.
- No CD. The most promising devices, since CDs are no longer relevant.
- CSD. Diskless MP3 devices that support SD cards.
- From DVD. The design of the device implies a display, since the equipment works with DVDs.
- With Bluetooth. The system with Bluetooth has a speakerphone, that is, sound through a built-in or external microphone.
- CD/MP3. These are inexpensive, universal, but already outdated devices. They are not produced, but the demand for CD/MP3 is still high due to its low cost.
Types of car radios
The devices are also divided into standard and multimedia radios. The first ones have poor functionality. The latter should be considered in the context of audio equipment parameters.
What can you encounter if your car radio is not connected correctly?
This is not to say that to properly install a radio, you don’t need to have any skills at all. It is advisable to have at least initial experience in connecting electrical devices, but this is not a prerequisite; following the instructions, a person can complete the installation without any experience. To understand whether everything was done correctly, it is worth monitoring the operation of the radio. A sign of an error will be the presence of the following factors:
- The radio turns off when the volume is increased.
- When you turn off the ignition, the radio settings are lost.
- The radio drains the battery when turned off.
- The audio signal is noticeably distorted, especially when listening at high volumes.
In very rare situations, it is not the person who connected it who is to blame, but the seller who sold the low-quality product. Of course, this option cannot be ruled out, but you will still need to double-check the connection diagram.
Radio size for 2108-2115
Multimedia systems are divided according to the German standard DIN 75490 from 1984 according to the size of the mounting socket:
- Type 1Din. The width is the same for all cars – 178 mm, height – 50 mm. The system picks up the radio, plays tracks from discs, and supports DVD format. For the latter function, the car radio is equipped with a 3.5-inch display.
- Type 2Din. The width of the device remains the same, the height is 100 mm, which allows you to install a 7-inch touch display.
The standard does not define the depth of devices, but for audio devices with discs it is 16 cm. Both types are full-fledged multimedia systems with which they can watch movies in the car, listen to tracks, and play information from USB drives and SD cards. Most importantly, the multimedia is equipped with a GPS module.
The most popular models and their characteristics
Before connecting the car radio to a VAZ-2114 car, study the rating of the best models based on user reviews.
- Sony DSX-A212UI. An inexpensive (up to 3,000 rubles) model with adjustable backlight directly plays tracks from a smartphone. For lovers of rich bass, there is an “EXTRA BASS” key, there is also a USB port for flash cards and mobile phones, and a 10-band tone block that allows you to adjust the pitch and timbre of the sound. Four amplifier channels have 22/50 W of power.
- KENWOOD KMM-304Y. Priced from RUB 6,100. you will get a device with 4x50W at peak power. The radio supports iPhone/iPod and RDS. If desired, you can connect a joystick for control from the steering wheel. The advantages of the device include multi-color adjustable backlight, 11 equalizer programs (tone block).
- Pioneer DEH-S5000BT. For 8,980 rub. The Japanese one offers a car radio with a one-color screen, radio, and playback of tracks using AUX, USB or CD. Device power – 4x50 W. Connecting a car radio in a VAZ-2110 car with your own hands is not difficult - detailed instructions are included. The equipment supports Android and iOS operating systems - you can “talk” with Siri.
- JVC KD-X355. The price of the product on Yandex Market is from 6,100 rubles. For little money you can buy a radio with adjustable backlighting and the ability to charge your phone. The radio supports all modern formats.
- Pioneer SPH-10BT. Install the Smart Sync application on your gadgets (there is a holder for a smartphone) and configure the sound parameters of the car radio you need. The device from the Japanese manufacturer performs voice commands, and it is possible to connect a parking sensor.
Problems with the operation of the radio and cigarette lighter
Car enthusiasts often face the problem of cigarette lighter and radio failure. Here are the main reasons for their refusal:
- Short circuit in the circuit.
- The fuse has blown.
- Contacts often oxidize and burn during operation; this needs to be checked.
- The backlight bulb has burned out.
- failure of fuse contact in the block.
Car radio
These are the five main reasons for the failure of the radio and cigarette lighter. In general, the cigarette lighter is not designed to constantly supply power to external devices. And in most cases, when installing with your own hands, the main mistake is the low strength of the contact assembly and the power supply unit itself; often it is simply impossible to tightly link and connect everything. And subsequently, the natural vibrations of the car and the peculiarities of Russian roads worsen the quality of the already unreliable assembly at the contact points, which leads to their burning and short circuit currents. Therefore, when you undertake to install the radio with your own hands, do not skimp on consumables and the necessary tools for high-quality fastening of your device.
How to install or replace a radio
Car owners, especially young ones, like to use musical devices on their own. To replace the car radio, you will need tools and materials: a jigsaw, a knife, a screwdriver, a set of screwdrivers. Stock up on sandpaper, automotive putty, and foam. Take epoxy glue and primer, electrical tape and a pencil.
Removing the old radio
Before dismantling the device, turn off the power to the car by removing the negative voltage from the battery.
- do not pull the plugs, pull them out of the connectors with caution;
- insulate the wires, mark them with a pencil so as not to be confused during installation;
- understand the fasteners, prepare the appropriate tool;
- OEM radios are usually supplied with keys;
- Some car radios have “slides” that help remove the device from its seat.
Algorithm for removing the speaker system:
- Remove the front panel.
- Using a Phillips screwdriver, remove the screws that secure the device to the housing.
- Pull towards you and remove the device.
When you have the device in your hands, disconnect the connectors and remove the antenna from the socket.
Connector pinout
A radio is the head unit of a car's sound system. The GU has connectors for connecting to car wiring. But in order to correctly connect the radio in a 2112 car, you need to have an idea of the pinout. This is the connection of the power and acoustic wires of the head unit to the power supply of the machine and its acoustic equipment.
Standard car radios (especially old ones) are equipped with their own connectors and connection diagrams. On the cover of the device it is indicated what color the wire is responsible for. This made it difficult to replace one model of musical devices with another, because an incorrect connection damages the acoustics and power system of the vehicle.
What to do if the new radio has a different pinout
If the standard car plug does not fit into the radio connectors, you cannot cut it off and connect it directly. In such cases, the connection oxidizes and becomes loose, which leads to repair of the car wiring. It is better to use ISO adapters with marked and signed wires.
But the car may not have connectors. Then twist or solder the wires, use a terminal block and connect the radio connector to the cable. Use heat shrink tubing for twisting and soldering.
What to do if the radio does not fit into its normal place or hangs in it
If the device does not fit into its regular place, you need to make cuts in the panel with a jigsaw. Having expanded the space to fit the size of the device, treat the edges with putty, primer, then paint.
For the opposite situations (the radio is dangling), there are ready-made frames for radios of different models. The mounting holes on the frame and the acoustic device match.
Is it possible to install 2DIN and what is needed for this?
The great functionality of 2DIN pushes drivers to install a new multimedia system on VAZs that are not suitable for large equipment. But this doesn’t stop savvy car enthusiasts.
First, determine the location of the device, cut out an opening in the dashboard with a grinder or jigsaw. It is necessary to take into account that before installing the device, the control of the stove is transferred to the place of the car radio.
The process of installing and connecting a car radio
The installation process for car radios of different types and manufacturers is not much different from each other. To do this, the container without a radio is installed in a standard socket and fixed by bending outward the metal petals along its perimeter.
- In modern cars, a special ISO standard connector is provided for connecting the car radio. The whole connection in this case comes down to the fact that you will need to insert the connecting block of the car radio into the corresponding ISO connector of your car.
- In older cars, as well as in many domestic cars, the ISO connector is not provided by design. To install a car radio in this case, you will have to purchase the appropriate connector and connect it yourself. Fortunately, the wires on such connectors are usually marked and signed.
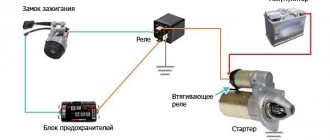
Let's move on to connecting the car radio wires to the ISO connector. Take a look at the connection diagram below. As can be seen from the diagram, the left side of the ISO connector is responsible for powering and controlling the radio, and the right side is for connecting speakers to it.
Typical connection diagram for a car radio The main step in connecting a car radio is connecting the power. It is at this stage that most mistakes are made.
Power is connected to the car radio through a separate fuse using a flexible stranded wire with a cross-section of at least 3 mm 2. In most cases, it will be enough to use a 10 ampere fuse; it will reliably protect the power circuit from emergency situations.
The radio is powered through three wires: yellow, red and black.
+12 V (yellow) – main power wire. It powers the built-in amplifier and also serves to save car radio settings. This wire is connected through a fuse directly to the battery. It is advisable that the length of the wire from the battery to the fuse does not exceed 30 cm.
ACC (red) – control of turning on the car radio from the ignition switch. On many vehicles, the ignition switches have an ACC (accessory) position. When you turn the key to the ACC position, power is supplied to the car radio, interior heater and cigarette lighter socket, but the car's ignition system is de-energized.
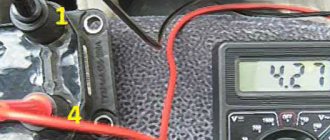
GND (black) – connects to the negative terminal of the battery. But this is ideal. Due to the low power of the car radio, it is allowed to connect the black wire to the car body. You must first ensure good contact with the body by cleaning the joint from dirt and oxides. You can also use contact lubricant to protect them from oxidation.
How to properly connect a radio to a VAZ 2114: finding out the nuances
Music is an integral part of our lives, it shortens the journey and the wait in the car; without it, any journey seems incredibly long. The musical preferences of their owners are heard from the windows of millions of cars, so why stay away. To enjoy life on the road and fully enjoy it, you need little - purchase and install a radio.
Many car owners who bought a new car for the first time are surprised by the unexpected lack of an audio system in the car, and even if there is one, it is not a radio, but at best a radio.
There are many manufacturers on the market that offer a variety of models with a huge range of capabilities. With the knowledge of how to connect a radio to a VAZ 2114, you can choose any radio, but some will have to suffer, which we’ll talk about.
Connection process
Connecting a car radio in a VAZ 2109
Before you begin the process of connecting and installing the car radio, you need to decide on the location of the speakers. There are standard panels for installing speakers behind the rear seat. But this shelf is made of thin plastic and can warp or break under their weight, and there is only enough mounting space for very small speakers. In this case, either special podiums are installed in the front doors of the car for speakers 16 cm in diameter, or a shelf is made or purchased that is mounted behind the rear seats. Then the wires connecting the speakers to the radio are laid on the floor or under the rugs after unscrewing the door sill covers.
To connect the car radio, use the car's ISO connector, then the connection is reduced to connecting the device's connector to this connector. But if there is no such connector in the car, then you need to buy and install it.
Connecting car radios to VAZ 2109
To connect you will need:
- A pair of copper wires;
- Fuse with holder 15-20 A;
- ISO connector.
The ISO connector is two blocks with wires of different colors. One is designed to control and power the car radio, and the second is for connecting acoustics.
How to connect a radio to a car
Consult an audio equipment store directly with the choice of the radio itself. This device will accompany you the entire time you are in the car, so you must immediately decide what you expect from it in advance.
IMPORTANT! You can get advice and purchase equipment in online stores, but always be careful, purchase car accessories only in trusted stores and use the cash on delivery system. Recently, cases of fraud have become more frequent, when Chinese consumer goods are sold to gullible customers under the guise of interesting accessories.
Having acquired the long-awaited high-quality “sound”, you will find that you now need to install it. Of course, you can go to a car dealership or find another workshop, but after buying a car, not everyone has an extra couple of thousand to work with the craftsmen. Therefore, understanding how to properly connect a radio to a VAZ 2114 with your own hands will come in handy.
To connect you will need:
- Selected radio.
- Tools that are present in any garage.
- Understanding the connection process.
- A certain amount of your time and desire.
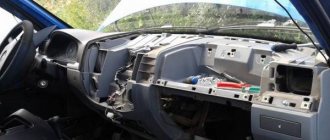
If the first and third points are present, let's deal with the second. The first thing you really need to do is make sure there is a niche for the audio system in the torpedo body and check its dimensions. If you select a future radio that matches the size of the special section in the dashboard preinstalled by the manufacturer, there will be no problems at all, and connecting the VAZ 2114 radio will take a minimum of time.
In the fourteenth there is no standard sound, there is only a pre-allocated place at the bottom of the torpedo and acoustic preparation. The latter is the distribution of audio wiring throughout the car interior to four speakers.
Connecting a car radio in a VAZ 2109 yourself
Car radio in VAZ
Connecting a car radio to a VAZ 2109 is a short process, but quite painstaking, with several points that you should pay careful attention to. In general, the installation of this equipment can be done directly in your garage, but for this you should be well prepared. Connecting a VAZ 2109 car radio, as a process, has its own main nuances and connection method.
Correct connection of the radio
Although the seller’s consultations are important for choosing acoustic equipment, you need to know about some nuances regarding installing a radio on a VAZ 2114. Radios come in two types: 1DIN and 2DIN.
In the VAZ 2114, space is reserved for a 1DIN device, so if you want to purchase a 2DIN, you will have to modify the torpedo visor to suit the needs of the new device. 2DIN are common in America, Korea, China and Japan, and European cars, like the VAZ 2114, are mainly equipped with a 1DIN radio. Therefore, the problem of choosing one or the other option does not exist.
In the upper price segment, you should focus on: Pioneer, Kenwood, JVC, Alpine, Nakamichi, Blaupunkt. The products of these companies are of the highest sound quality, but also cost some money.
If you can’t afford such a solution or you want to save money, but don’t agree to lose significantly in sound quality, choose an option from the model range: Sony, Mystery, Prology. If you do not have an ear for music and subsequently do not plan to hold an autoparty using the acoustics of your car, then the difference will be imperceptible to you.
Connection nuances
I think no one will have any problems or difficulties in removing the stock radio. There is an instruction manual and a number of videos online that can help you do the work step by step.
There is no point in describing the removal and installation procedure, since each machine has its own dismantling nuances. But most often 2 din are installed:
- to Granta;
- Ford Focus;
- Lada Kalina 2;
- Kia Rio;
- VAZ 2110;
- Lada Largus;
- Lada Priora;
- Renault Logan;
- Renault Sandero;
- VAZ 21099;
- VAZ 2114;
- Nissan Almera, etc.
If you have a regular radio, you can easily replace it with more functional and multimedia-rich 2-din equipment.
VAZ 2114, do-it-yourself radio connection
So, there are several installation options, which depend on your approach to choosing a radio. If you took the path of least resistance: you selected a model with standard connectors and dimensions suitable for the slide in the dashboard, then installing the radio on the VAZ 2114 is as follows:
- We find all the wires and terminals in the car.
- We distribute them according to the markings.
- We read the instructions and additionally double-check the electrical connection diagram from it.
- Now we separate similar wires and connectors on the radio.
- We connect in the order specified in the instructions of the radio.
- We install a unified ISO adapter (this step is additional; it is needed if the car's wiring connector does not match the connection option proposed by the radio manufacturer).
- We lower the radio into the dashboard on the slide and put on the cover.
The only stage where you may encounter problems is the additional one. Of course, the most correct way would be to buy the necessary adapter.
If for some reason you cannot do this, there are two other options:
- less correct, but the fastest method is direct connection. Simply disassemble the wires according to the standard, clean their edges and connect them with regular twisting. An option that may subsequently give a spark that can create a fire hazard. Therefore, if you decide to resort to it, try to take care of reliable insulation;
- A long and expensive method is to completely replace the wiring. This is a separate procedure that consists of complete dismantling of the car wiring and serial connection from the zero cycle. It makes sense to resort to it only if you are simply interested in it - buying a normal connector is cheaper, even if you order it from afar (from China?).
Video instructions for installing and connecting a car radio with your own hands
In most cars, the radio was installed either by the dealership or by the previous owner. If you are unlucky and your car does not have the necessary wiring, then this article is for you. Let's consider connecting the radio from scratch, or after incorrect installation.
Before we start connecting, we will need to purchase (find at home or in the garage):
- two copper wires with a cross section of 2.5-4 sq. mm
- fuse with holder rated 15-20 amperes
- connector for radio connection
Do-it-yourself modification of vases and frets
If you are tempted by the multimedia characteristics of 2DIN devices, then in order for your radio on the VAZ 2114 to become “like native” you will have to worry about modifications.
To do this, you need to acquire the following consumables:
- panel for 2114 (do not spoil the standard one, it may be useful when reselling the car);
- polyurethane foam;
- automotive putties, starting (fiberglass) and finishing;
- epoxy glue (resin);
- primer and paint (the material you will use to cover the panel afterwards);
- sandpaper.
Tools that will be useful:
- jigsaw;
- mounting knife;
- screwdriver;
- automotive spatula;
- brush.
The installation algorithm is as follows:
- We choose a place on the panel for the future radio (remember, the air vents can be moved, and most of the buttons move perfectly within 10 cm).
- We put the slide under the radio and outline the place.
- We cut it out with a jigsaw.
- Now from the scraps we assemble a full-fledged rectangle for fastening the sled. We cut them with a mounting knife and “plant” them with epoxy glue.
- We insert the slides and fix them with screws on four sides (there is a little secret - secure the future radio with a vertical angle offset, then the sun will not blind the screen).
- We select a place for the air ducts and lengthen them, if necessary, using corrugations.
- When the slides are mounted, we blow everything with foam.
- We cut off the foam and cover it with epoxy resin.
- We putty the start, then the finish.
- We prime.
- We paint or cover with self-adhesive.
- We connect the radio in the same way as described above.
Briefly about the history of VAZ
It all started back in 1966, when the ruling, and only at that time, party realized the lack of civilian automotive industry. After collecting and analyzing data, it was decided to build the production and assembly of passenger cars intended for the needs of ordinary citizens; the city of Tolyatti was chosen as the construction site. And already in the winter of 1967, the construction of the plant itself began.
VAZ 2114
The entire construction was designed for a period of six full years. But according to the customs of that time, everything was completed ahead of schedule - in just over three years. Perhaps we are still reaping the fruits of the plant’s early commissioning to this day. At the end of 1970, the first batch of VAZ 2101 cars was formed and sent, which was almost entirely a FIAT-124 car. In the normal place for the radio there was a simple radio receiver operating in HF/VHF format.
In conclusion
As you can see, installing a radio is simple and for the most part requires only your desire. The main thing to note is that with any modernization not intended for the design, it is necessary to take care of the insulation of electrical connections and thermal insulation of coolants (corrugated air ducts).
The torpedo of the fourteenth, like most modern cars, is made of synthetic, flammable materials, so the issue of safety is very relevant. If you are not confident in your abilities, contact a professional workshop, because it is much cheaper than a burnt-out car.
Source
Main nuances
- Before connecting the car radio, you must carefully study the instructions, since incorrect actions will lead to equipment breakdown or even fire.
Connecting a VAZ 2109 car radio
- In modern players with automatic tuning, due to the wiring features of domestic cars designed for older models, settings may fail when turning the ignition key.
Note: therefore, it is also necessary to study the features of VAZ cars.