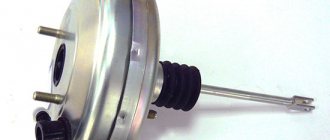
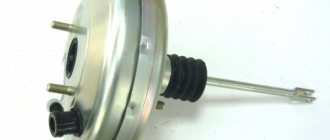
VUT device
This node consists of five constant components:
- separating diaphragm made of plastic material;
- return spring;
- pedal assembly pusher;
- stock;
- valve mechanism.
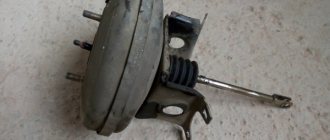
At first glance, the vacuum seal in the engine compartment is invisible, since it is located in a monolithic block with a scientific and technical center between the pedal mechanism and the brake master cylinder. It is a chamber delimited by a diaphragm-type partition. The separated cavities are sealed and equal. One side of the cavity is connected to the atmosphere, and the other to the exhaust manifold of the engine, where during operation a lower pressure occurs than in the atmosphere.
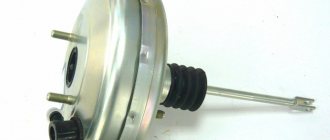
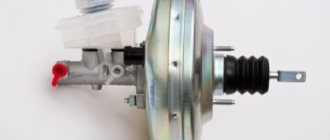
VUT location
The atmospheric part is located closer to the pedal, and the vacuum part is located near the cylinder. In the rear atmospheric compartment on the body there is a check valve that delays the vacuum in the engine suction pipe and prevents the gasoline mixture from entering the unit. The degree of vacuum in this chamber is regulated precisely by the valve follower mechanism. And in the front cavity, the check valve maintains constant voltage. So, the pressure of the same value presses on the partition from both sides. The valve itself is moved by a pusher connected to the brake pedal. The return spring is responsible for returning the diaphragm to its original state after braking. When a machine requires an emergency braking system, a special electromagnetic drive is mated to the rod.
Checking the operation of the check valve of the vacuum brake booster Renault Megane 2
/ Renault/ renault-megane-2/ Brake system/ Checking the operation of the brake booster check valve
Check the check valve installed in the vacuum hose.
Remove the brake booster vacuum hose.
| NOTE The check valve is installed with an interference fit in the vacuum hose according to the installation marks. |
Check the operation of the check valve using a vacuum pump.
ATTENTION If the check valve is faulty, replace it complete with the vacuum hose.
Repairing auto parts yourself is a responsible task that should be taken as seriously as possible. Sometimes a faulty spare part takes the driver by surprise, forcing him to spend a lot of time and money searching for a good service station, but there is an alternative solution to the problem; this requires a small amount of knowledge and a set of tools.
When checking the operation of the check valve of the Renault Megane 2 brake booster is being repaired, you need to be extremely careful and not neglect the little things. To get acquainted with the issue, car enthusiasts often use various Internet portals dedicated to auto parts. Some of them use narrowly focused forums. But, as a rule, only generalized information is provided there, which is known initially. Where can you find a reliable source that offers really useful things? Our portal is open for this 24 hours a day. Online mode allows us to help clients at any time convenient for them. Moreover, a mobile version has been developed that is available to everyone.
A detailed description of such a unit as checking the operation of the check valve of the Renault Megane 2 brake booster has a good structure with thematic headings. In addition, there is always the opportunity to familiarize yourself with the intricacies of installation. There are often situations when a driver is confident in his abilities, but when he gets down to work, questions begin to arise. Thanks to our portal, such moments can be easily avoided. The site is a database that is updated regularly. By using it as a support during repair work, the car enthusiast receives a serious advantage. Each of the articles has reliable support, tested in practice.
In addition to the repair manual, the owner of a personal car will be able to prevent a lot of breakdowns that occur due to the human factor, thanks to the information located on the site. Users are presented with a lot of useful recommendations for proper operation, which will help significantly extend the life of the unit and avoid many negative consequences.
Online support is an excellent and most convenient way to obtain the necessary information. Another significant plus is that articles are written for people. We understand that the reader will do everything with his own hands, and we try to make it as convenient and efficient as possible. Use the resource at any time of the day and find the answer to any question you may have regarding cars.
Softness of the brake pedal
As the brake booster control valve malfunction worsens, air begins to enter the brake system lines. In this case, the air that should be removed from the system using the control valve enters the master cylinder and then into the brake system pipes. This causes a drop in brake pressure and a soft brake pedal. In addition to the feeling of softness on the pedal, this entails an increase in the brake response time.
In such a situation, you should immediately diagnose the brake system. Once air enters the brake system, it becomes “locked in.” To remove it, the brake system must be bled. If you observe the described symptoms, immediately stop driving and have your brake system professionally diagnosed.
Vacuum booster repair
It is worth noting that the process of repairing a vacuum amplifier is a fairly simple task, so you can do everything yourself. At the same time, if you are not confident in your abilities, seek professional help. In any case, the most important thing is to carefully read the instructions on the operation of the device on a specific car model. On the other hand, the process itself is quite similar on different vehicles, so there should not be any special problems.
You don’t need anything extra special in terms of tools; a standard set of tools will be enough. Next, we proceed to step-by-step repairs:
- read the vehicle repair and operation instructions, determine the key nuances;
- the drive rod is disconnected from the brake pedal, which is located near the steering shaft;
- We dismantle the master brake cylinder, which is located in the engine compartment;
- We carry out repair work based on the type of breakdown. If necessary, we replace the faulty element.
Vacuum brake booster - how to get to the breakdown?
In order to accurately determine the malfunction, you must carefully study the vehicle's operating instructions, which describe the specific model of the vacuum booster. Sometimes the reason is quite simple, when the engine starts to stall due to excess air being sucked in and the working mixture becoming lean. When conducting a visual inspection, it is necessary to identify leaks on the amplifier housing and be sure to find out the reasons for their occurrence.
To effectively repair a vacuum booster, a repair kit corresponding to a specific model and a standard set of tools are required. Most often, the device is completely replaced with a new one installed assembled. In order to begin repair or replacement, the drive rod located in the cabin, near the steering shaft on the brake pedal, is disconnected. After this, you need to disconnect the brake master cylinder in the engine compartment. Finally, the vacuum hose from the check valve is removed. Now the amplifier is open for access, it can be repaired or replaced.
Home →
Maintenance and Repair → Brake system →
The brakes stopped working
In the worst case scenario, the brake booster control valve fails completely, resulting in complete inoperability of the brake system. Fortunately, such an outcome is unlikely. But if suddenly it does occur, carefully stop the car, tow it home and contact a qualified specialist in the diagnosis and repair of brake systems. Depending on the severity of the case, the matter may be limited to only replacing the valve, but serious repairs of the entire brake system may be required.
The brake booster control valve is an important element of the braking system, ensuring driving safety. That is why the presence of the described symptoms should not be ignored or postponed “for later”. Contact a qualified mechanic who can professionally diagnose and repair your vehicle's brake system.
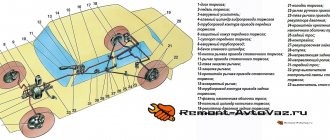
The design of the brake system of any car must include a booster. The most widely used in transport is the vacuum type amplifier, which provides additional force due to vacuum.
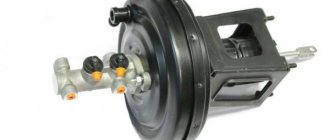
Vacuum brake booster design - schematic overview
The vacuum brake booster is inextricably linked to the master cylinder of the brake system. Its basis is a body divided by a diaphragm into two chambers. The vacuum chamber is located on the side of the master cylinder, where it is connected to the intake manifold using a special check valve. It is in this area that a vacuum is created. The atmospheric chamber is located on the brake pedal side and, using a follow-up valve, is alternately connected to the vacuum chamber or to the atmosphere.
The valve itself is moved by a pusher, and the brake fluid is pumped into the working cylinders by a piston. At the end of braking, the return spring sets the diaphragm in motion, returning it to its original position. Some amplifier models can be equipped with an electromagnetic rod drive, which acts as an emergency braking system.
Stiff brake pedal
When the brake booster control valve is working correctly, the brake pedal is pressed easily and smoothly. If the valve malfunctions, controlling the brake pedal becomes noticeably more difficult. Instead of being soft and light, the pedal becomes hard and tight. It is very difficult to press. This is due to increased pressure in the master cylinder, which the control valve is designed to regulate. Abnormalities in the brake pedal operation are a sign of possible brake malfunction and indicate the need for immediate diagnostics of the brake system.
How to replace a check valve?
The vacuum booster is responsible for creating vacuum pressure that can be used by the engine to increase pressure. If the valve fails, the vacuum pressure generated by the booster cannot be used effectively to power the brakes.
In the event of a malfunction, the pressure in the brakes is usually less than necessary. This can lead to accidents as the brakes will not be able to function to their full potential.
Step 1 - Locate the brake check valve.
Find your brake check valve to start working on it. The brake check valve is usually located in the engine area of the car where the engine connects to the vacuum booster. This connection can be further identified by searching for the vacuum line.
Step 2 - Remove the clips.
Most vacuum lines have clamps to hold them in place. Before you remove the vacuum line to move to the next step, you need to carefully remove all the clips
Remove the clamps carefully to avoid damaging the vacuum line. You will connect the same vacuum line at the end of the process
Step 3 - Remove the brake check valve.
Once the vacuum line is removed, you will have full access to the brake check valve. Now you can easily remove the valve. Use a screwdriver to loosen the screws around it and a wrench for the valves. Once you do this, you can easily pull the valve out. Then use a hand vacuum pump to apply vacuum to the inlet end of the valve. The vacuum should be between 15 and 20 degrees. If the pump shows loss, it means the valve is faulty.
Step 4 - Install the new brake check valve.
Reverse the process you went through to remove the old brake check valve, install the new one on the booster. Tighten the valve with a wrench and the screws with a screwdriver. Once the new valve is installed, reconnect the vacuum line, reversing the process you used to disconnect it.
Step 5 - Check the brakes.
Once installation is complete, start the engine and check the brakes. If the brake pressure and power still seem low, the problem may be with the vacuum booster.
How to repair or replace a VAZ 2110
- If during diagnostics it turns out that the intake manifold hose is faulty, its clamps are loosened using a flat-head screwdriver, after which it is removed manually and replaced with a new one. If the cause of the hissing is not damage to the hose, but the loose clamps themselves, they are tightened using a flat screwdriver.
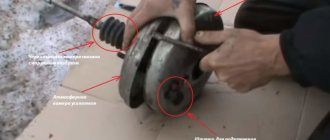
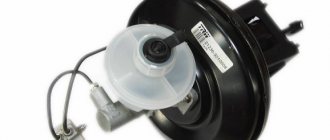
- If the VUT itself is faulty, it is replaced. First, the connector of the sensor indicating the brake fluid level is disconnected. It can be easily removed by hand.
This connector is disconnected manually.
Next, the vacuum hose is disconnected from the VUT. It is also removed manually, while holding the VUT check valve with the other hand.
Diesel fuel system air leak
Typically, airing in the fuel system of a diesel engine is caused by damage at the junction of the tubes connecting the fuel tank and filter or the filter and high-pressure fuel pump.
On diesel cars that have been produced in recent years, air penetration into the fuel system occurs more often compared to older type diesel engines. The reason lies in the different design of the hoses, the service life of which has been noticeably reduced. Previously, these elements were made of brass, but now they are made of plastic. Constant vibrations lead to wear of the plastic and rubber seals. Most often, owners of cars with a mileage of about 150-200 thousand kilometers encounter such difficulties, and suction often appears in winter.
The most popular causes of suction in such cases:
- wear of clamps and hoses;
- damage to the fuel filter seal;
- damage to the fuel pump cover seals or drive shaft;
- leaking fuel pipelines;
- damage to the return fuel line;
Signs of air leaks on a diesel car
Most often, the engine does not want to start after long periods of inactivity. The driver is forced to repeatedly turn the key in the ignition using the starter. This is accompanied by the appearance of smoke from the exhaust pipe, which is a sign of normal fuel supply. If the suction is very significant, the engine will not only have difficulty starting in the morning, but also stall while driving.
The reason is that the pump cannot operate normally at idle speed because too much air enters the chamber. At higher speeds, the fuel injection pump copes even more or less well. Such symptoms are not always caused by suction, so we advise you to check the “diagnosis” by installing transparent fuel pipes.
How to find air leaks in the fuel system of a diesel engine
Air may enter the system through a connection, fuel tank, or pipe. The search is performed quite simply - by applying pressure or by exclusion. In the first case, you need to apply pressure to the fuel tank, after which you will hear a characteristic hissing sound or see drops of fuel at the leak point. The second method is to check the elements of the fuel system one by one, ensuring that fuel is supplied from the container, not the tank. First we connect to the fuel pump and move on.
How to check the vacuum brake booster
A logical question arises: how to determine whether the vacuum brake booster is faulty. In fact, this is quite simple to do, and without the use of additional equipment, the test can be performed in a garage or even on the street.
The simplest check is performed using the following algorithm:
- With the engine off, it is necessary to pump up the vacuum booster (brake system). This is done by pressing the brake pedal about 4...5 times.
- At the end of the last press, the pedal must be locked in the pressed position.
- Start the engine at idle speed.
- If the “vacuum reservoir” is working properly, then when the engine starts, a vacuum will immediately enter it, as a result of which the brake pedal will move down a little, which will be clearly felt when your foot is placed on it.
- Accordingly, if the pedal does not move and does not respond to starting the engine, then there is a depressurization in the system.
It makes sense to perform another check if the brake system seems to be working properly, but when you press the brake pedal, a change in the operating mode of the internal combustion engine is observed. So, the check is performed according to the following algorithm:
Disconnect the pipe from the intake manifold.
- Its fitting must be hermetically sealed. To do this, you can use a clamp or a tightened rubber tube with a clamp.
- Start the engine and let it warm up a little.
- Press the brake pedal several times.
- If, at the moment of pressing the corresponding pedal, no changes occurred in the engine operating mode (its speed did not increase or decrease), it means that there is depressurization in the vacuum brake booster system.
- Accordingly, if the engine begins to “choke” when you press the pedal, it means that the “vacuum reservoir” and its system are working normally.
Please note that the described check must be carried out with the car stationary, since in this mode the vacuum brake booster will not work with all the ensuing consequences.
If the check reveals the presence of depressurization, then the next step is to localize the location of the damage. This is not always easy to do, since the crack or leak can be very small and sometimes located in the most unexpected places. However, as a check and preventative measure, it is necessary to check the following elements of the vacuum booster system:
- tightening and general condition of VUT pipeline clamps;
- VUT sealing tube at the clamping points and along the entire length (if possible), often the cause of depressurization is the appearance of a crack in the said tube;
- condition of the vacuum booster check valve seal, this is also a common cause, especially on older cars (for example, VAZ classic).
If the check does not produce results, then it makes sense to simply replace all the vacuum booster tubes with clamps.
Check valve
You can check the VUT check valve using one of two methods. The first of them involves dismantling the specified element, and the second involves holding the brake pedal with the engine running.
How to check a removed brake booster
After the valve is removed, you just need to blow into the fitting that was connected to the amplifier with your mouth or using an air compressor. If the valve is working properly, then air should flow freely. The next step in this case is to draw air from that fitting. Best by mouth. Accordingly, the valve should not let air back in. Otherwise, the check valve is partially or completely damaged and must be replaced. Instead of a mouth, you can use a thick rubber bulb, for example, from a hydrometer.
However, removing the check valve is not the best solution, since the process of removing it can damage the seal of the vacuum brake booster system. It is better to check the brake booster check valve on a car in the simplest way. In accordance with the second verification method, it is recommended to proceed as follows:
- start the engine and let it run for about one to two minutes;
- press the brake pedal all the way and turn off the engine;
- if the check valve is working properly, it will close, since there is no vacuum on the side of the manifold, and a vacuum will remain in the chamber, accordingly, the pedal will not press up (there will be no need to exert additional force to hold it);
- otherwise (if the pedal is pulled up sharply), the VUT check valve is damaged.
As in the case of a pipeline, it is easier and faster to replace the check valve with a new one, since this unit is usually non-removable and cannot be repaired, and its price is relatively low.
Basic device malfunctions
There are not so many types of vacuum seal failures, namely:
- Loss of tightness of the pipeline through which the vacuum is supplied, or its connection points;
- Failure of the check valve;
- Depressurization of the working chambers of the amplifier.
The first two faults are the main ones, but the third is very rare.
It is also worth noting that in most cars the vacuum pump operates from the vacuum created in the intake manifold (the pipeline connects them together).
But on some models, the amplifier is additionally equipped with a vacuum pump to increase operating efficiency. Moreover, this element can be either mechanical (driven by a camshaft) or electrical, with its own electric motor.
But these pumps are only an auxiliary element that increases the efficiency of the amplifier. In this case, the main vacuum is still taken from the intake manifold.
In cars equipped with this unit, the pump is another component that may become unusable. In this case, the booster will continue to operate, although in some driving modes the pedal force will increase.
Its repair and replacement
In the event of a failure of the VUT, it is necessary to immediately take measures to restore its functionality.
You can replace the vacuum hose yourself. It is also possible to replace the vacuum pump in cars with diesel engines.
More complex repair work related to restoring the tightness of VUT chambers, the serviceability of the diaphragm, valves, and other structural elements is best entrusted to professionals at a certified service station. It should be remembered that serviceable brakes are the basis of safety; you should not skimp on this.
After repair, it is necessary to check the synchronization of wheel braking and diagnose the ABS and ESP systems. This should be done on special stands and appropriate diagnostic equipment.
In most cases, repairing a vacuum booster can cost much more than buying it or replacing a VUT with a used one in good condition. There is a reason to look for an amplifier at a disassembly site. Moreover, they are unified: one model can be used on different brands of cars.
Video - replacing VUT on a GAZelle car:
May be of interest:
Choose a DVR: an indispensable gadget for the driver
Scanner for self-diagnosis of a car
Select any auto chemicals for your car
Some drivers prefer a DVR in the form of a mirror
Checking the membrane and chamber tightness
There are several ways to check the serviceability of the vacuum brake booster (VBS), but to ensure that it is 100% operational, it is better to use them all. First of all, press the brake pedal several times with the engine off. When pressed for the first time, the pedal will lower with a fairly insignificant force by about 1/3 of the full stroke, with each subsequent press it should become tighter and the stroke should decrease. If this does not happen, the VUT is most likely faulty, and diagnostics of the vacuum brake booster is required. Next, we will tell you how to check the vacuum brake booster on Kalina.
If VUT diagnostics have shown ambiguous results and it is difficult to determine the difference in pedal stroke and pedal stiffness, you can try another method. Press the brake pedal two or three times and start the engine without removing your foot. There are several options for the development of events:
- If the pedal goes deeper a few centimeters, the vacuum brake booster is working properly. You can finally verify this by turning off the engine and not releasing the brake pedal for 30 seconds.
- If the pedal starts to rise, this indicates a leak in the vacuum chamber.
Best driving instructors:
Automotive instructor Svetlana Automatic transmission: Hyundai AccentTeaches in Northern Administrative Okrug, North-Western Administrative Okrug, Khimki REVIEWS
Driving instructor Elena Automatic transmission: Chevrolet Lacetti Manual transmission: Chevrolet LanosTeaches in the Southern Administrative District, South-Eastern Administrative District, Vidnoye, Domodedovo REVIEWS
Driving instructor Marina Automatic transmission: Kia Cerato Manual transmission: Chevrolet LanosTeaches in the Northern Administrative Okrug, Dolgoprudny REVIEWS
Driving instructor Elena Automatic transmission: Kia Cerato Manual transmission: Chevrolet LanosTrains in the Northern Administrative Okrug, North-Western Administrative Okrug, Khimki REVIEWS
Driving instructor Natalya Automatic transmission: Kia Spectra Teaches in the Eastern Administrative District, Balashikha, Reutov REVIEWS
Driving instructor Oleg Automatic transmission: Chevrolet Lacetti Manual transmission: Chevrolet LanosTeaches in the Northern Administrative District, Dolgoprudny REVIEWS
Driving instructor Yana Automatic transmission: Kia Spectra Teaches in the Northern Administrative Okrug, Dolgoprudny REVIEWS
Driving instructor Yulia Automatic transmission: Chevrolet Lacetti Manual transmission: Chevrolet LanosTrains in the Eastern Administrative District, South-Eastern Administrative District, Lyubertsy, Reutov, Zheleznodorozhny REVIEWS
Automotive instructor Svetlana Automatic transmission: Chevrolet Lacetti Trains at Northwestern Administrative Okrug REVIEWS
Driving instructor Tatyana Manual transmission: Chevrolet Lanos Automatic transmission: Kia SpectraTeaches in Krasnogorsk REVIEWS
Driving instructor Peter Manual: Daewoo Nexia Trains at Northwestern Administrative Okrug REVIEWS
Automotive instructor Oksana Automatic transmission: Hyundai Accent Teaches in North-Eastern Administrative District, Mytishchi, Korolev, Pushkin REVIEWS
Driving instructor Dmitry Automatic transmission: Volkswagen Golf Manual transmission: Chevrolet Lanos Trains in North-East Administrative District, Northern Administrative District, North-Western Administrative District, Dolgoprudny REVIEWS
Driving instructor Oksana Automatic transmission: Kia Spectra Manual transmission: Chevrolet Lanos Trains in the Southern Administrative District, South-Western Administrative District, Vidnoye, Podolsk REVIEWS
Automotive instructor Dmitry Manual transmission: Lada Granta Teaches in the South-East Administrative District, Lyubertsy REVIEWS
Chevrolet Lanos: Checking and adjusting the brake pedal position
Chevrolet Lanos / Repair, maintenance and operation manual for Chevrolet Lanos / Brake system / Checking and adjusting the position of the brake pedal
The correct position of the brake pedal in the free state and when pressed all the way (pedal stroke) is one of the criteria for checking the serviceability of the brake system. At the same time, the position of the pedal largely ensures the proper operation of the system. If the pedal is located at a distance from the floor that is greater than the norm, the wheels may not fully release when the pedal is released (usually there is no free play of the pedal). If the pedal is too low, the brakes may become less effective due to reduced pedal travel.
You will need: a ruler, keys “13”, “14”, pliers.
1. Press the brake pedal all the way and measure the distance from the pedal pad to the floor.
Note
The ruler should be installed perpendicular to the floor plane.
2. Release the pedal and re-measure the distance from the free pedal pad to the floor. This distance should be 100-105 mm. The difference in size in two dimensions is the full working stroke of the pedal, which should be 60-5 mm. If the distance from the pedal pad to the floor does not correspond to that specified in point 2, adjust it by changing the length of the brake booster pusher.
3. Remove the vacuum brake booster from the vehicle (see “Replacing the vacuum brake booster,” page 191).
Note
The need to remove the amplifier is explained by the fact that the car does not have access to the adjusting unit for the amplifier rod.
4. Loosen the tightening of the lock nut 2 of the adjusting sleeve and, holding the rod 3 from turning, rotate the adjusting sleeve 1 in the desired direction.
Note
If the vacuum booster and pedal assembly parts are in good working order, the optimal full travel of the brake pedal is automatically set when setting the size to 278.55 mm. from the amplifier body to the center of the hole in the form of a pusher (see “Replacing the vacuum booster”, p. 191)
5. Check the free play of the brake pedal by moving the pedal by hand until the pedal stops moving without resistance.
Determine the free play value using a ruler; it should be 8-10 mm.
If the free play does not correspond to the specified value, it may be caused by the following reasons:
— increased play in the connection of the vacuum booster pusher forks and the pedal, which may be a consequence of wear of the fork pin and holes in the pedal fork; — the distance from the pedal platform in the free state to the floor is incorrectly adjusted (see point 2) 6. If the pedal stroke is greater than the value given in point 2, then this indicates the presence of air in the hydraulic brake drive or extreme wear of the brake pad linings brake discs or drums. Remove the air from the hydraulic drive (see “Bleeding the hydraulic drive of the brake system,” page 187) or replace the brake pads (see “Replacing the brake pads of the front wheel brake mechanism,” page 194;
“Replacing the brake pads of the rear wheel brake mechanism,” p. 197), discs (see “Replacing the brake disc,” p. 195) or drums (see “Removing and installing the brake drum,” p. 196)
Warning
If the pedal, pressed all the way and held in this position, gradually moves to the floor, this indicates a fluid leak from the hydraulic drive or a malfunction of the brake master cylinder. These faults are very dangerous, so immediately find the leak and fix it or replace the master cylinder!
Bleeding the hydraulic brake system
The hydraulic brake drive is pumped to remove air that got in when it was filled with fluid after replacing it or after repairing hydraulic drive units associated with its depressurization. Signs on...
Master brake cylinder
As practice shows, in many cases, reassembling a cylinder in a garage does not lead to the desired result. In addition, the brake master cylinder directly affects safety...
Signs of problems at work
Malfunctions of the vacuum amplifier and the components that ensure its operation are sure to manifest themselves, and quite clearly.
If the vacuum reservoir does not function, this will be accompanied by a “stiffness” in squeezing the pedal.
If this element completely fails, it is very difficult to press the brake pedal (to verify this, it is enough to press the pedal 4-5 times with the engine not running; on the last squeeze, the resistance will be very high).
Since the vacuum is taken from the intake manifold, the loss of tightness of the vacuum booster may be accompanied by a change in engine operation during braking (although this should not happen).
Moreover, in some cases, the speed of the power plant may drop when you press the brake pedal (even to the point of stopping the unit), while in others, the speed increases.
Everything is simple here - if there is a leak in the vacuum seal, air will leak into the manifold, which affects the proportions of the air-fuel mixture, hence the change in engine operating mode.
Another obvious sign is the appearance of hissing when the pedal is depressed. The appearance of such a sound indicates the appearance of air leaks.
As for vacuum pumps, mechanical ones can make knocking noises, and constantly (the drive rod is usually to blame for this), while in electric ones the operation noise increases, and strong heating is also possible when the motor is running (here the fault usually lies in the drive motor).