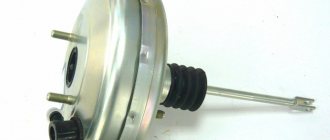
The vacuum brake booster (abbreviation VUT) is rightfully considered one of the main mechanisms of modern cars. This is not surprising, because the effectiveness of braking and, consequently, the level of safety of the driver and passengers depend on the correct operation of the device.
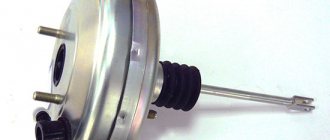
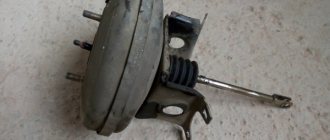
Vacuum brake booster
This is why periodic inspection and troubleshooting of the brake booster is important. What are the easiest signs to use to diagnose a malfunction? Is it possible to repair or replace a device in a garage? We will consider these and other points below.
About malfunctions
The main factor in the malfunction of the “vacuum unit” is the inability to create a vacuum in the chamber. It may not be fully produced or may be completely absent from the system. Often the source of the problem is the loss of tightness of the hose that connects the engine to the amplifier.
But breakdowns are also possible due to loss of elasticity of the valve or damage to the working surface of the diaphragm. In any case, before replacing the vacuum brake booster, it needs to be checked. You can do this yourself.
How to check the vacuum brake booster?
There are several ways to do this. So, you need to start the engine and turn it off after at least 10 seconds of operation. Next, press the brake pedal. With the engine turned off, it will be squeezed out to the fullest extent. Since there is remaining vacuum in the system, it will pull on the diaphragm and increase the force. The second and third press will require more effort. The pedal travel will become shorter. But if it is hard already at the first press, it means that the brake booster valve is not doing its job. Additional force is not implemented in the system.
After completing the operations, you can do one more. The motor must be turned off. Next, press the brake pedal. If this method is done first, you need to press the pedal several times. It is important for us to completely free the system from vacuum. Then, with the brake pedal pressed, we start the engine. In the first seconds of engine operation, you will feel the pedal smoothly begin to press to the floor, with much less effort. If it remains in the same place or only drops slightly, it can be stated that the vacuum brake booster is faulty. If the mechanism is working properly, a vacuum will form in the vacuum chamber. The membrane will press on the rod, and the latter will pull the pusher, which is connected to the pedal.
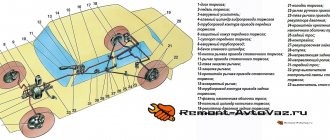
Brake system VAZ 2109
Brake hoses of the VAZ 2109 must be elastic and free from tears and cracks. Hoses must be firmly sealed at the ends. The threads of the hose ends must not be damaged. If the hose swells when you press the brake pedal, it means the cord threads are torn. If any of these defects are detected, the hose must be replaced.
While holding the brake hose from turning with a wrench, unscrew the pipe fitting. Remove the spring clip
Remove the rubber seal along with the hose from the bracket
Unscrew the end of the VAZ 2109 brake hose from the wheel cylinder and remove it. Plug the holes in the pipeline and wheel cylinder
Install the hose in the reverse order of removal. When installing a brake hose on a VAZ 2109, do not forget to install a copper gasket under the tip attached to the wheel cylinder
When installing the hose, make sure that it is not kinked. For control, a colored stripe is applied to the hose
The rear brake hose of the VAZ 2109 is replaced in the same way, supplying working fluid to the brake mechanisms of the rear wheels. After replacing the hose or hoses, add brake fluid to the reservoir and bleed the brake system.
What if it is not replaced in time?
Very often, when an amplifier breaks down, air begins to enter the system. Typically this happens due to a faulty control valve. As a result, the pressure in the circuit drops. The pedal becomes too soft. Often drivers think that the system is simply airy and bleed the brakes. But after the first trip, the pedal becomes soft again. The response time of the system also increases. This can lead to accidents on the road.
In the worst case scenario, the valve fails completely. Because of this, the system is not able to work at all. In this case, driving out onto the road is extremely dangerous. Therefore, if there are any signs, you should carefully inspect the system and replace the faulty element.
Let's get started
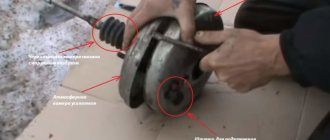
Work should be carried out during daylight hours or in a garage with good lighting. So, put the car in gear and raise the hood. The amplifier is located on the left, driver's side and is screwed to the engine bulkhead. At the first stage, we need to disconnect the clamp of the rubber tube that is connected to the body. This can be done with a flat or Phillips screwdriver. At the next stage, remove the brake fluid level sensor chip. then move the driver's seat as far back as possible. This is necessary in order to conveniently perform work under the steering column. So, lowered into the pedal assembly. It can be dark here, so a portable lamp will not be superfluous. Next, using pliers, remove the stopper from the bushing that connects the pedal to the vacuum rod. The rod connector itself is easy to identify. It is a U-shaped plate with several holes.
Next, remove the rod and lower it to the floor. We return under the hood to the amplifier. To remove it, you will first need to remove the brake master cylinder. It is dismantled along with the iron tubes. Do not unscrew them separately under any circumstances. Otherwise, air will get into the system, some of the fluid will spill out and you will have to fill it in, followed by pumping all four brake mechanisms.
Then we clean the threaded connection on the master cylinder bushings with a metal brush. If necessary, you can use a liquid key lubricant. Please note: the nuts must be unscrewed carefully without damaging the threads. If the nut does not “go”, tighten it one turn, and then unscrew it back. This should help. Also, together with the nuts, remove the washers that are in a compressed state. If they are stuck and difficult to remove, use a flat-head screwdriver. By walking slightly along the cylinder body, you can get these washers out.
What's next?
At the next stage, you can proceed to dismantling the master brake cylinder. It is important not to damage its tubes. The element is removed forward, without distortions to the side. Now you can unscrew the vacuum booster. As we have already said, it is located on the partition and mounted on brackets. The latter is secured on two studs. They often rust. Therefore, it is recommended to first apply lubricant or soda solution here. After this, unscrew the nuts and remove the amplifier along with the bracket. Next, unscrew the two “blind” bolts from the vacuum seal. We screw the new amplifier to the bracket and install it in the reverse order.
Is it necessary to carry out additional work on the brake system? If the tubes were not damaged and the fluid level did not drop, there is no need to bleed or do anything else.
Cost and how to spot a fake
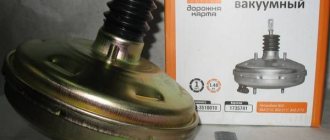
If we talk about the VAZ-2109, a vacuum brake booster costs from 1.2 to 1.5 thousand rubles. You can buy it in any store or online. A VAZ-2110 vacuum brake booster will cost exactly the same. The exception is the yellow “Sport” amplifier. It is sold for 2.3 thousand rubles. We also note that the amplifiers are interchangeable on VAZs. For example, the vacuum seal from the “eight” is ideally installed on the “nine”, 13, 14 and 99 models. The amplifier for the “ten” is also suitable for “Lada” 11th and 12th models. If we talk about manufacturers, Pekar and DAAZ have proven themselves well. The so-called sports amplifier works in the same way as regular factory ones. Therefore, there is no point in overpaying money for it.
When purchasing, it is important to pay attention to the packaging. It should be made of corrugated cardboard. There is always a label on the box that says:
- Item release date.
- Manufacturer's name.
- Batch number.
- Factory article number.
Checking and adjusting brakes
The brake system of VAZ-2114, 2115, 2113 is designed to stop or reduce the speed of the vehicle. It also keeps the vehicle from moving spontaneously, so it is very important that it is always in good condition.
Checking the vacuum booster
The vacuum brake booster VAZ-2114, 2115, 2113 is designed to create force on the brake pedal. You can read in more detail about how to properly check and adjust the vacuum booster of a car on the website in the article “Vacuum brake booster VAZ-2114, 2115, 2113”.
Checking pipelines and their connections
- There should be no scratches, chafing or nicks on metal pipelines;
- all fastening bolts must be well tightened and intact;
- brake hoses must be free of visible cracks and signs of chafing;
- there should be no grease or mineral oils on the brake hoses, as they dissolve the rubber;
- detected faults must be eliminated by replacing parts with new ones;
- Replace flexible hoses with new ones after 125,000 km or 5 years of operation.
Checking the brake drive and adjusting it
When the engine is not running, the brake pedal travel should be between 3 and 5 mm. To adjust it, you must move the brake light switch, while the nuts must be lowered.
Attention! Adjusting the brake pedal free play should only be done when the engine is not running. We install the switch so that the buffer rests against the pedal. In this position, tighten the nuts.
Checking and adjusting the parking brake system
If you notice that the car does not hold on a slope of 25%, then you need to adjust the parking brake system:
- loosen the locknut by tightening the adjusting nut, while tensioning the cable;
- We check the full stroke of the lever, which should be from 2 to 4 teeth per sector, and then tighten the locknut. For more details, read the article: How to pull the handbrake?
Checking and adjusting the operation of the brake system pressure regulator
- check the pressure regulator for damage to it and its parts;
- the plug should be recessed 1-2 mm into the body;
- Absence, excessive or insufficient piston stroke indicates poor performance of the regulator and its drive. In this case, it is necessary to replace or repair the pressure regulator and its drive.
Let's sum it up
So, we found out what a vacuum brake booster is. This is a very important element in any car. In general, a vacuum brake booster rarely fails. This is a fairly reliable and simple mechanism. Sometimes it is not changed for 10 years. It does not have a specific resource. And malfunctions most often relate to air leaks due to the hose through which the vacuum flows from the engine to the amplifier. But if during diagnostics the pedal does not behave as it should, it is worth making an urgent replacement. Indeed, in emergency situations, you simply may not have enough distance to stop the car.
Failure of the “vacuum seal” is a rather rare failure, but unpleasant - to slow down and stop the car, the driver has to press the brake pedal hard. A sudden failure of the mechanism while driving can provoke an accident - the driver does not have time to change lanes and apply the required force at the right time. To identify signs of critical wear of an element, it is proposed to consider the operating principle of a vacuum brake booster (VBR) and diagnostic methods in a regular garage.
The level of hissing when you press the pedal - which is normal and which is not
There is a category of drivers who listen very carefully to every slightest squeak or sound and try to hear signs of a breakdown. A car is a mechanical vehicle that contains a sufficient number of components and mechanisms that can create a small permissible noise level. You shouldn’t listen too much to this and go straight to the service center, where, with a lot of persistence, they will definitely find the problem and offer to fix it. The brake pedal, when pressed, in most cases emits a slight hiss.
Design and operating algorithm
The first passenger cars produced in the last century were not equipped with “vacuum seals”. To sharply slow down the car in case of emergency braking, the pedal had to be pressed with a force of about 80 kg. The device of the vacuum brake booster installed on modern vehicles makes it possible to reduce the mentioned force to a light press.
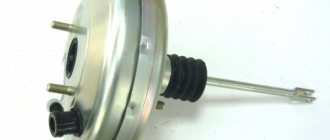
To diagnose malfunctions of this unit, you need to know its design and operating principle. The amplifier is a cylindrical metal housing, inside of which the following elements are located:
- a diaphragm pushed by a return spring;
- air valve with two channels - atmospheric and vacuum;
- in the center of the body there is a rod connected at one end to the brake pedal, the other to the main cylinder, and a diaphragm is attached to it;
- vacuum supply pipe from the engine intake manifold connected to the check valve.
In fact, the body of the “vacuum generator” is divided by a membrane into 2 separate chambers. The first is supplied with vacuum from the power unit, while in the second the air pressure is equal to atmospheric pressure. The chambers communicate with each other through the channels of the air valve, which alternately open when the driver presses and releases the pedal.
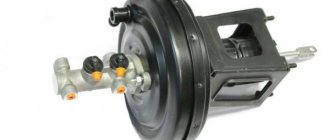
Master brake cylinder
It is not uncommon to discover problems with the master cylinder when checking the condition of the brake assembly.
When changing the vacuum seal, it would be logical to study the current state of the gas turbine engine and, if necessary, replace it.
The replacement procedure itself is as follows.
- Disconnect the negative terminal from the battery.
- Disconnect the wire block from the fuel oil level sensor. It is located in the tank and is built directly into the lid.
- Use a special wrench for brake pipes to loosen their tension. There is no need to unscrew it completely.
- Unscrew the pair of nuts that secure the GTZ to the vacuum chamber. Only now can the brake pipes be completely unscrewed.
- Remove the cylinder from the studs.
- If necessary, remove the brake fluid reservoir itself at the same time. To do this, you need to carefully rock the tank and remove the leg from the bushing.
- Assess the condition of the removed cylinder. Also be sure to check for any defects on the tank. If there are any, be sure to replace the brake fluid reservoir with a new one.
- Armed with a new GTZ, put it in place and tighten the nuts. Fasteners can be fully tightened immediately.
- Install the reservoir and fill it with brake fluid to the maximum mark.
- Now a very important step is to extract air from the cylinder. To do this, you need to close the holes in the front brake pipes with your fingers. At the same time, your assistant should gently, but not sharply, press the brake pedal. This will create pressure in the system. Continue this manipulation until you feel liquid coming out of the holes.
- As soon as the liquid flows, put on the tubes, install and fix them in place. In this case, the brake pedal cannot be released.
- By analogy, the rear tubes are connected. When they are installed in place, there must be pressure in the system, that is, the brake pedal is pressed to the floor.
After completing the replacement of the turbocharger, do not forget to bleed the brake system according to the rules.
Disassembling the unit with the TJ tank
It is quite possible to change the vacuum seal and cylinder with your own hands. The work will take a few hours, but will save a lot of money on visiting a car service center.
vacuum booster The vacuum booster, which “lightens” the brake pedal, is a toroid divided by a diaphragm into two chambers: one is permanently connected to the intake manifold, the other is connected to the atmosphere when the pedal is pressed. The “assistant” is mounted in the engine compartment behind the main brake cylinder and is connected to the brake pedal through a rod.
Signs and causes of malfunctions
A breakdown of the booster does not lead to a complete failure of the braking system, but much more physical effort is required to slow down the car. The first and main symptom of VUT failure is a sharp decrease in braking efficiency and a feeling of “hardness” in the pedal. Other signs also appear:
- increase in free play (up to about half);
- unstable operation of the power unit, especially at idle;
- the mechanism continues to slow down the car after releasing the pedal - the brakes “stick”.
Note. The amplifier is unable to function normally without supplying vacuum from the motor. Therefore, symptoms of problems should only be checked with the engine running.
The above symptoms of a faulty vacuum brake booster occur for the following reasons:
- air leakage through a gust or loose connection of the vacuum hose;
- wear of the diaphragm leading to loss of tightness;
- failure of the air valve;
- depressurization of the housing;
- decrease in spring elasticity.
The first reason can be easily eliminated in your own garage; the main thing is to check the “vacuum unit” for functionality. Sealing connections or replacing the pipe will not be a big problem. Another issue is when the amplifier breaks down; usually the entire mechanism has to be replaced.
Node examination
The need to replace the vacuum booster on a VAZ 2109 should already be stated in the event of an increase in the force applied to the brake pedal. However, a simple check will help ensure the correctness of the diagnosis:
- turn off the engine;
- press the brake pedal 5-6 times;
- hold down the brake pedal;
- start the engine.
The identifier of a serviceable VUT is an immediate, noticeable movement of the brake lever forward.
An alternative symptom will help diagnose a unit malfunction: when the engine is running, a “hissing” can be heard under the hood in the area where the intake manifold pipeline connects to the VUT check valve fitting. Experienced specialists additionally prefer to check:
- integrity of the suitable pipe; tight fit of the main element on the fitting (hissing may appear as a result of a loose connection).
( 1 rating, average 4 out of 5 )
Methods for diagnosing VUT
If one of the above symptoms is detected, you should immediately check the vacuum brake booster for functionality without removing it from the car. Diagnosis is simple:
- Start and warm up the engine.
- Leaving the engine idling, use your hand or pliers to press down the vacuum outlet pipe leading from the manifold. Another option is to disconnect it from the fitting and plug the latter with a wooden wedge.
- Constant behavior of the motor indicates the tightness of the system. The serviceability of the air valve is checked in another way, described below.
- If the speed of the power unit has stabilized or increased, air is leaking through the VUT or supply hose.
Having determined that the amplifier is faulty, exclude the vacuum transmission hose from the list of “suspects”. Disconnect the pipe and inspect for cracks and tears. Check the condition of the clamps, install new clamps if necessary.
If sealing the pipe does not produce results, proceed to checking the “vacuum tank” itself:
- Without starting the engine, sit in the driver's seat and apply the brake 3-5 times. The first presses will be light, but on the last ones the stroke will be greatly reduced. In this case, the diaphragm draws air through the hose and pumps it inside the housing; a check valve prevents it from coming out. Remember, the atmospheric channel is closed.
- Having completed the last movement, hold the pedal depressed and start the engine.
- After starting the engine, the pedal should go down about halfway.
This brake booster test identifies problems with the check valve or air valve. If the first one is faulty, then it will not be possible to pump air into the housing - the pedal will sag all the way. A worn air valve will not open the air passage while the engine is running and the pedal lever will remain in the up position or drop very slowly.
The tightness of the VUT housing is checked as follows:
- Start the power unit.
- Squeeze the brake all the way.
- Without releasing the pedal, turn off the engine.
If the amplifier housing or diaphragm does not allow air to pass through, the pedal lever will remain depressed. Otherwise, it will return to its original position under the action of the spring. Then you need to remove the mechanism and replace it with a new one. Repairing a VUT in a garage is a rather difficult task, since the body of the element is held together by factory rolling.