A vacuum brake booster, or VUT for short, is one of the main operating mechanisms of a car’s braking system. The effectiveness of braking, and therefore your safety, largely depends on its serviceability. Therefore, the VUT must be regularly checked to promptly detect its malfunctions or malfunctions.
In this article you will learn about malfunctions of the vacuum booster, signs indicating problems in the operation of the VUT, as well as how to check and replace the VUT on a VAZ 2114 at home.
How to replace the vacuum brake booster on a VAZ-2114
Owners of domestic Lada-2114 cars are periodically haunted by a situation when the brake pedal begins to work inadequately to the applied force. With a light touch it falls into the floor or, conversely, with enormous effort it is possible to somehow move it from its place. All these phenomena may be accompanied by a characteristic hissing sound. Most likely, the problem lies in a breakdown that requires replacing the vacuum brake booster (hereinafter referred to as VUT) of the VAZ-2114. It is up to the owner of the car to do it with your own hands according to the instructions posted in this article or in special service centers. Let's get started.
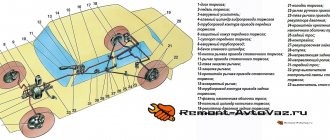
The feasibility of installing EUR
Does it make sense to install power steering (power steering) or power steering on the “four”? In this case, it is impossible to give a universal answer, since it is unique for each motorist. Of course, with power steering or electric power steering, the process of turning the steering wheel will be easier, making driving more comfortable. But there is another side to the issue - firstly, the cost of the power steering or electric power steering kit, as well as the rather complicated installation of the system yourself. In general, it’s up to you to decide, but if you decide to install an electric booster on your car, we will help you with the installation.
Installation kit for electric power steering for the "four"
What is a vacuum amplifier?
The vacuum brake booster is responsible for ensuring that the physical stress transmitted from the pedal lever to the master cylinder is increased not due to input from the driver, but automatically.
The vehicle's handling itself benefits from this, creating more comfortable braking thanks to the additional effort. This plays an important role in emergency situations, when you need to stop in the shortest possible time and at the shortest distance. Install the structure in the engine compartment, up to the brake pedal. There is a cylinder on it. The structural elements of VUT are listed below:
- round body;
- internal diaphragm;
- follower valve;
- pedal lever pusher;
- spring;
- stock.
The VUT operates based on the occurrence of a pressure difference created in the chambers. There are two of them - vacuum and atmospheric. The vacuum between them is possible due to the presence of a durable separating membrane in the design of the mechanism. It is its damage that disables the vacuum device. “Aging” of the valves themselves is a natural process that also leads to wear and tear of the entire assembly.
If the VUT fails, the brake system will be able to continue operating. But it will become much more difficult for the driver to control the entire stopping process.
Design features and operating principle
The first thing you should understand is the design features of the vacuum brake booster and the subtleties of its functioning in the system. As a rule, the device is located in a common block with the main cylinder. In the initial state, the channel connecting the system with the surrounding air is closed.
In turn, the second channel remains open. At this stage, the diaphragm, which is located inside, receives identical pressure on one side and the other. In addition, thanks to the action of the return spring, it is always located in its original position.
When the driver presses the brake, a special rod moves, deflects slightly and closes the entrance to the channel. At the same time, another channel opens, connecting the VUT with the surrounding air.
After this, atmospheric flows converge on both sides and press each with its own force. Due to the pressure difference, the return spring is compressed, and the rod itself moves with the cylinder piston.
After reducing the force (while the foot remains on the pedal), the channels open so much that the movement of the piston assembly is completely blocked, and the VUT itself is in standby mode and ready for work. In such a situation, any change in the position of the pedal leads to an adjustment of the pressure difference in the device. As a result, the car stops if the driver presses on the pedal, or continues to move when the foot is released.
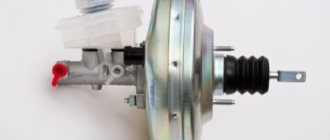
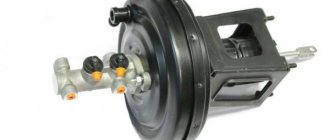
Vacuum booster device
When you press the pedal hard, there is a sudden change in pressure, causing the brakes to work at their limit. It is believed that thanks to VUT, the efficiency of the vehicle’s braking system increases by 5-7 times. As soon as the pedal is released, the diaphragm returns to its original position.
If the vacuum brake booster system does not work, diagnostics, identification of the cause and prompt elimination of the defect are required. How to do this will be discussed below.
Troubleshooting methods
What signs may indicate that the unit requires replacement?
- When applying the same force, the braking process becomes more difficult.
- When you apply pressure to the brake pedal, the speed begins to drop.
- The engine is adjusting.
- The appearance of hissing noises when the brake is pressed while driving. In this case, it is possible to increase engine speed.
- Inadequate operation of the brake pedal.
- Increased fuel consumption.
The results of a simple inspection will tell you whether the device needs to be replaced.
- Method No. 1. With the engine off, vigorously pump the brake pedal to the floor 4-5 times. Detection of creaking or hissing or other extraneous noise during these manipulations indicates that there are serious malfunctions. After this, holding the pedal in the lowest position, turn on the engine. A vacuum will begin to create in the VUT chamber. The pedal should move on its own. If this does not happen, then the breakdown is serious and repair is inevitable.
- Method No. 2. Let the car idle for 3-6 minutes. Silence it. Fully press the pedal (creating a vacuum in the chamber of the device) and release. Repeat again. If the stroke of the lever changes with each subsequent press, it means that creating a vacuum is difficult. Therefore, replacement of the problematic device is required.
- Method No. 3. Start the engine and squeeze the brake lever all the way. Turn off the engine and release the pedal. If it doesn’t move within half a minute, then everything is fine. The opposite result is a signal of a malfunction.
Sometimes deviations appear due to a broken fastening, flange failure, or mechanical damage to the vacuum hose. Therefore, in order not to complicate the situation, the inspection should begin by checking these positions.
At the same time, the condition of the brake pipes and their connections to the body, those places that are potentially places of leakage of special fluid, is examined. Which outwardly manifests itself in the form of streaks on the housing of the vacuum booster or brake cylinder.
Changing a unit yourself is not difficult if you have at least some mechanical skill and understanding of the design of the car. To replace it yourself, you will need the vacuum unit itself, some tools and parts.
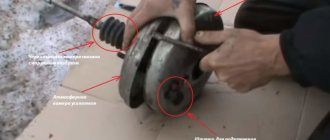
Features of visual inspection of the vacuum amplifier
A good car owner should know how to check the vacuum brake booster visually. Such skills help to identify a malfunction in a timely manner, and if something happens, confirm a previously established diagnosis.
When visually inspecting the VUT of a vehicle, proceed as follows:
- Check the junction of the check valve and the pipe (hose) for quality of connection.
- Inspect the flange to ensure there are no defects.
- Assess the condition of the hose bends. If there are cracks or wet traces of oil, replace the faulty components.
- Take out the carpet under the steering wheel and inspect the protective cap (boot). It should be intact and without any liquid leaks.
- After detecting a malfunction, replace the unit. The cost of the device is low, and you can save additional money by doing everything yourself.
Let's move on to replacing the vacuum booster on a VAZ-2114 with our own hands
So, the inspection has been passed, and the diagnosis has been confirmed: the vacuum booster on the VAZ-2114 is damaged and must be replaced. Everything you might need - parts, tools - are prepared. Let's get started.
- They start by dismantling the faulty VUT. First you need to unhook the rod protruding from the amplifier from the brake pedal.
- Then, under the hood, the brake cylinder itself is unscrewed from the VUT. In this case, you should not remove all the hoses, since you will then have to bleed the system. Only unscrew nut No. 10, and then the cylinder moves quietly and does not interfere with further work.
- It is moved aside and the hose connecting the vacuum valve and the intake manifold is unscrewed.
- Then the body mounts are separated using a cardan wrench and four nuts No. 13. Additionally, the strut spacer is unscrewed. That's it, dismantling the faulty vacuum booster on the VAZ-2114 is ready.
- Using 2 nuts No. 17, move the mounting bracket from the faulty VUT to the working one.
- Installation is carried out in reverse order. Experienced mechanics advise starting it by connecting the brake pedal to the VUT rod. And then move on to all the work under the hood.
From the point of view of experienced auto mechanics, it is more convenient to first connect the brake pedal to the booster using a finger, and then install the entire unit in the car. Particular attention should be paid to ensure that the seal is installed correctly between the housing and the cylinder. The gasket must be installed very accurately, along the contour.
Also check out
- It is often recommended to disconnect the tubes that complicate the process of removing the VUT, but you can do without this.
- Three of the four tubes coming from the brake cylinder make it difficult to remove the cylinder. To dismantle the cylinder, you can unscrew only one nut to “10”.
- Disconnect the hose that goes from the intake manifold to the vacuum booster valve.
- Remove the mounting bracket. It is better to use a special cardan (its image is in the photo). The VUT itself is attached to the body with four turnkey nuts “13”.
- Move the mounting bracket to the new vacuum brake booster (you will need to unscrew a couple of nuts to “17”).
Reassemble in reverse order.
general information
The design solution of the brake system of the 2114th model is almost the same for most VAZs. Therefore, these instructions will help you change the vacuum seal on many cars.
If you decide to change the device yourself, you need to read the manufacturer’s recommendations in the operating manual of your VAZ. And purchase exactly the vacuum booster whose model is recommended by the car’s creators.
During operation, the mechanical connections of parts become clogged with dust, residual working fluids, and dirt. After a long period, it becomes very difficult to unscrew such bolts and nuts. They seem to grow and become a monolith. To make work easier and not damage the surfaces, you should use WD-40: first spray a small amount of aerosol into the joint and after a few seconds, start working.
Service replacement cost
You may not be able to change the part yourself because you don’t have enough tools, knowledge, or a place where you can do it. In this case, you can contact a car service; the repair price will be around 1000 rubles, taking into account the average prices in Russia. In this case, the total repair budget will be around 3,000 rubles , unless replacement of additional elements is required. There is one important advantage when contacting a service center. When people who know their stuff work there, they will be able to identify other shortcomings of the system during the analysis and show them to you clearly so that you know exactly what you are paying for. Remember that repairs should be made immediately when the problem is diagnosed, since driving with a broken vacuum booster is very dangerous. For this repair you do not need special knowledge, so you can easily replace the vacuum booster yourself, saving a third of your budget.
Vacuum brake booster hisses VAZ 2114
Hi all. Today I changed the vacuum seal on a VAZ 2114. Before the replacement there was a characteristic hissing sound, after some time the brake pedal became tight. After the replacement, it became easy to press the brake pedal, but the hissing remained, not the same as it was before the replacement, but still there. A little intermittent. Also, when you press the brake, you can hear a squeaking sound in the rear of the car. When replacing the vacuum seal, I did not unscrew the tubes from the brake cylinder.
Please tell me what could be causing the hissing? I tightened everything tightly, no air should pass through.
Some time after replacing the brake hoses on the front wheels, a problem arose with the VUT. The problem began to appear about a week ago, the brake started to be pressed very hard, but the car slowed down more or less acceptable. Yesterday the vacuum exhausted all its useful resources and died safely. In my case, the symptoms are the following, when I press the brake pedal: — the engine speed jumps; — there is a hissing sound in the area of the pedals, as if you are not pressing the brake, but pumping something with your nose; — hard brake pedal; — the effectiveness of the brakes has dropped sharply. I’ll call this phenomenon the “step effect” when you press the brake pedal, at first the pedal travel is free, and then your foot rests on the “step” and then that same “pump”, tight and ineffective)) The procedure for replacing a vacuum brake booster takes about 3 hours for beginners, those like me.
I can see the instructions for replacing the VUT HERE! In this article, everything is described in such detail and clearly that anyone can replace the vacuum; all you need is straight hands. In this method, the replacement of the VUT occurs without disconnecting the brake pipes from the master cylinder (MBC), thereby eliminating hemorrhoids with bleeding the brakes.
The VUT or vacuum brake booster of the VAZ 2114 is, of course, a very important mechanism in the car’s braking system. Its malfunction can become a source of danger, so periodic performance checks are required.
Next, we will talk about the signs of a malfunction of the vacuum brake booster on VAZ 2114 cars and step-by-step instructions for replacing it yourself.
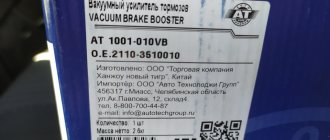
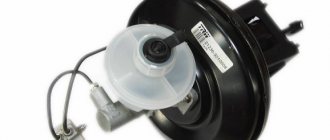
Article: 2108-3510010-01, additional articles: 21080351001001
Order code: 003503
This model of vacuum cleaner has proven itself in the automotive market.
Applicable in the following cars:
Samara / VAZ 2108, 21081, 21083, 2109, 21093, 21099. Also used: Samara / VAZ 2113,2114,2115 Niva / 21213.
When purchasing a VUT (vacuum brake booster), you need to consider the following:
1. VUT must be equipped with a valve.
2. Look at the year of manufacture on the pusher fork, there is also the DAAZ marking.
3. When the pusher stops and the VUT is pressed. the latter should not poison the air.
4. No visible mechanical damage to the body.
During installation, do not forget to apply sealant between the brake master cylinder and the VUT.
Here is a video on how to replace the VUT:
The vacuum booster, using vacuum, creates additional force on the brake pedal. A malfunction of the VUT not only worsens the braking dynamics of the car, but can also cause interruptions in engine operation. Replacing the vacuum brake booster, as well as checking for faults, can be done by yourself.
Signs of a malfunction of the vacuum brake booster of the VAZ 2114
Brake booster malfunctions have several fatal negative consequences:
- Significant reduction in vehicle control during braking cycles. In the absence of the amplifier, the load on the gas pedal increases proportionally - the pedal goes hard, and the braking effect is significantly reduced. For an unprepared driver, such behavior of the car can come as a shock and lead to a traffic accident due to the increased braking distance; If the brakes malfunction, a car loses significant braking potential and becomes practically uncontrollable;
- The gas pedal is slow. When moving, the pedal is very difficult to press. This is a clear sign of a malfunction of the amplifier housing diaphragm chamber. In this case, the car must be operated with great care, since it has lost a certain effectiveness of the braking system;
- A sign indicating a faulty brake system lights up on the dashboard at short intervals. This symptom may also relate to other malfunctions in the brakes, but in combination with a tight brake pedal it clearly indicates a faulty booster. The electronic unit of the car constantly monitors all systems for operability (and although on the VAZ 2114 model this unit has not been considered modern for a long time with its functions, it copes with its functions at a good functional level and with high efficiency despite the small number of sensors);
Deterioration in the braking performance of the system, along with other signs, indicates a direct involvement of a faulty brake booster in the risk of an accident. This symptom is the main one among all the others; however, operating a car with a very weak brake system is very dangerous - the circuits in this case do not receive additional force and cannot effectively brake.
Troubleshooting most often involves replacing the faulty element with a new unit - this will save repair time, since resuscitation of an old product will require no less time and a slightly lower cost of parts. That is why car enthusiasts most often resort to complete replacement of a failed part.
How to check the vacuum brake booster of a VAZ 2114
The process of checking the vacuum brake booster on a VAZ 2114 is as follows:
- Press the brake to the floor 4-5 times with the engine not running. This will create uniform pressure in the two parts of the amplifier. When you press the brake, the valve will immediately show itself: if it squeaks, then you need to seriously think about it.
- After the pressure has become uniform, start the fourteenth. But at the same time you need to keep the brake to the floor. If everything is in order with the brake booster system, the pedal will rise after the engine starts. If this does not happen, then repair is definitely required.
- In the event that you realize that there is a problem with the amplifier, you need to look to be sure how the hose is secured and what condition the flange is in. If the fastenings at any point do not correspond to the norm, this may affect the fact that the pedal does not lift, and in fact the fault will be on a separate incorrect fastening, and not on the entire system as a whole.
Reasons for replacing the brake booster
Brakes are a whole system. Therefore, as soon as you have checked the amplifier, do not be lazy and check whether the brake fluid is leaking and whether the pedal itself is in order. Maybe it's worth looking at the brake master cylinder and generally running diagnostics. And if, nevertheless, you have not found any problems in the brake system, then you can think about how to change the vacuum on a VAZ 2114.
It is important to understand that replacing the vacuum on a VAZ 2114 or any other VAZ model is a mandatory process. If the unit is malfunctioning, then the engine is also malfunctioning. The power that the engine will produce depends on the correct functionality of the amplifier. What Russian doesn't like driving fast? As they say, if you love to ride, you also love to change the vacuum.
Vacuum brake booster VAZ 2114 - which is better, selection criteria
In order to choose the best vacuum brake booster for the VAZ 2114, I recommend that you pay attention to the following points:
- Price. Price is one of the most important criteria for choosing a vacuum amplifier. You should not buy cheap Chinese options in order to save money, since they will not last long. It is advisable to give preference to products in the mid-price category - not the most expensive, but not the cheapest.
- Package. This packaging, used by a genuine manufacturer, is made by Point of Sale. You should not buy goods from market traders. There are plenty of good, trusted auto parts stores in any city. Ask to see certificates and documentation for the parts.
- Label. The label should be clearly legible - the date of production of the part, the production batch number and the name of the manufacturer. I am made of corrugated cardboard.
Unit cost
It is better to find out how much a vacuum brake booster for a VAZ 2114 costs directly from the stores. Since the regions are different, the price categories are different and it’s easier to navigate the area locally. The approximate cost is from 2,000 to 3,000 rubles. Installing it in the service will cost a third, or even half, of the cost. Despite the inaccessibility of the unit and some inconvenience, it is much easier to change the amplifier yourself. The frequency of breakdowns or replacements directly depends on the quality of the track, driving style and the general wear and tear of car parts, in particular the chassis. Therefore, it is difficult to say that there is any specific regulatory period. The only thing you need to remember is about timely diagnosis: sometimes it’s worth getting confused and going over your fourteenth with the eye of a caring owner. And, of course, you shouldn’t delay repairing or replacing the unit.
Source
Replacing the vacuum brake booster of a VAZ 2114 - step-by-step instructions
To replace the vacuum brake booster of a VAZ 2114 you will need a certain set of tools and materials. It includes:
- Screwdriver Set;
- Pliers;
- Socket wrench for 13 and 17 millimeters;
- Special wrench for brake pipes;
- New plugs;
- New fittings.
And so let’s begin the replacement process itself:
- Removing the vacuum booster can be difficult due to the brake cylinder. Therefore, we advise you to remove it first. Another option is to disconnect the pipes from the brake cylinder and move them to the side for a while. Here you decide for yourself what is more convenient for you.
- The cylinder is not the main problem. It is difficult to cope with the mounting of the vacuum booster. It's just not very convenient to do this. This is the design of the VAZ 2114.
- Start with the valve - remove the hose fasteners from it, remove the support bush, after which you can pull out the brake pin.
- Next, using a 13 mm wrench, all four fasteners of the vacuum booster are dismantled.
- After all the inconveniences of the work done, you can remove the element and get ready to install a new amplifier in its place.
- To do this, you will have to install a special mounting frame. The frame is tightened with a 17 mm wrench, after which the new component is installed inside the car.
- If you want to make your work as easy as possible, do not forget to first connect the brake pedal to the booster with your finger when reassembling it. After this, it is much easier to cope with putting the vacuum seal back into place.
How to change it yourself
Let's look at how to change the VUT using the example of the VAZ 2110, 2111, 2112. The design of the system is quite monotonous, therefore, after watching the video, you can replace the vacuum brake booster of the VAZ 2114 and many other cars.
- Remove the low brake fluid level sensor connector.
- Unscrew the 2 bolts 17 securing the brake cylinder to the VUT body. There is no need to unscrew the lines, just move the cylinder with the tank a little to the side.
- Disconnect the vacuum hose from the check valve. Check the condition of the valve and install it on the new brake booster.
- Unscrew the 4 bolts securing the VUT to the engine shield. The working space in the area of the pedal assembly on the interior side is limited, so an extended socket, extension and ratchet are best suited for unscrewing.
- Disconnect the brake sensor connector.
- Pull out the VUT along with the mounting bracket and the brake pedal.
- Using pliers, remove the locking plate of the brake pedal lever rotation axis.
- Pull out the “finger” that secures the VUT pusher in the lever.
- Unscrew the 2 nuts securing the vacuum body to the bracket.
All you have to do is replace it by installing a new amplifier and assembling all the elements in the reverse order of dismantling.
Be sure to correctly install the sealing gasket between the brake cylinder and the housing, if one is present in the design of the vacuum brake booster of your car.
Design options
On some cars, to replace the vacuum seal, you must first disconnect the booster pusher from the lever in the car's interior. As we see in the GAZelle example, this can be done in two ways:
- unscrew the bolt of the fastening element connecting the pusher and the pedal lever;
- loosen the adjusting nut, and then unscrew the pusher from the fastening element. The peculiarity of this method is that after replacement the pusher must be screwed in the same number of turns. To do this, you need to either measure the distance from the edge of the pushrod to the adjusting nut, or count the number of turns. Otherwise, you will not be able to accurately install the adjusting nut on the pusher of the new amplifier.
If during the replacement process the position of the pusher does shift, adjust the free play of the brake pedal.
Stem adjustment
The stem offset determines the distance from the adjusting bolt to the stem buffer. This parameter is extremely important for the normal operation of the braking system. If the overhang is too large, certain contours will jam. A small overhang will increase the free play of the rod (the distance from the rest position to the contact of the buffer).
Self-replacement of the vacuum booster on a VAZ 2114
First you need to figure out what this vacuum amplifier actually is.
- This is a casing within which the valve is located. The element is structurally divided into two parts, which are separated by a layer of rubber - the diaphragm;
- One part of the amplifier is atmospheric, and the second is vacuum - it is connected to the inlet pipe from the power unit;
- The amplifier valve is a plastic casing containing the main elements that are subject to wear. It is because of them that the operation of the gearbox is disrupted. To be more precise, the gearbox begins to rattle;
- The composition of the valve is as follows: there is a rod on the bushing, adjacent to the buffer and piston. There is also the valve itself on the pusher and return springs with a filter.
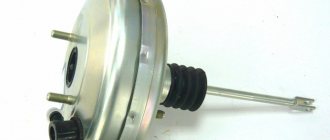
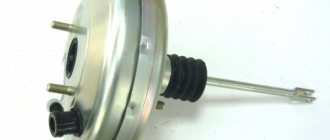
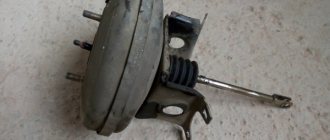
Appearance of the device
Design and operating algorithm
The first passenger cars produced in the last century were not equipped with “vacuum seals”. To sharply slow down the car in case of emergency braking, the pedal had to be pressed with a force of about 80 kg. The device of the vacuum brake booster installed on modern vehicles makes it possible to reduce the mentioned force to a light press.
To diagnose malfunctions of this unit, you need to know its design and operating principle. The amplifier is a cylindrical metal housing, inside of which the following elements are located:
- a diaphragm pushed by a return spring;
- air valve with two channels - atmospheric and vacuum;
- in the center of the body there is a rod connected at one end to the brake pedal, the other to the main cylinder, and a diaphragm is attached to it;
- vacuum supply pipe from the engine intake manifold connected to the check valve.
In fact, the body of the “vacuum generator” is divided by a membrane into 2 separate chambers. The first is supplied with vacuum from the power unit, while in the second the air pressure is equal to atmospheric pressure. The chambers communicate with each other through the channels of the air valve, which alternately open when the driver presses and releases the pedal.
The classic vacuum brake booster works according to the following algorithm:
- Until the driver activates the brake system, both chambers communicate via a vacuum channel. Since the pressure in them is the same, the pusher and rod remain motionless.
- After pressing the pedal, the rod moves forward and the connection between the two chambers through the vacuum channel is interrupted. The valve opens another passage connecting the atmospheric chamber with outside air.
- Due to the pressure difference, the diaphragm bends towards the vacuum, thereby helping to put pressure on the pusher and the piston of the main hydraulic cylinder.
- When the driver takes his foot off the pedal, the valve produces the opposite effect - it closes the atmospheric channel and opens the vacuum channel. The pressure in the chambers is equalized, the spring pushes the membrane back to its original position.
How does he work
Before you begin to repair or replace a particular component or unit, you need to understand how it functions.
The vacuum booster works as follows:
- The driver presses the brake pedal all the way to the floor;
- At the same time, the piston and pusher move, opening the space between the two sections of the device;
- After this, a vacuum section moves into the formed space and takes all the air;
- The air presses on the damper between the parts of the amplifier, which causes a pressure difference in the two parts;
- The pressure difference causes the stem and valve to move;
- When the pedal is lowered, all elements return to their places, the system turns off.
A decision regarding repair or replacement of the vacuum booster can only be made on the basis of the inspection performed. It is quite possible to inspect the device yourself.
Operating principle
Golden rule: before you begin to restore or replace any unit or component, you should study its structure and operating principle.
The vacuum amplifier has the following operating principle:
- when the driver presses the pedal all the way, at that moment the piston and the pusher move, opening up free space between the two sections of the device;
- the vacuum section moves into the formed space, taking all the air;
- the air presses on the damper located between the elements of the amplifier, which provokes a pressure difference in the two parts;
- rod and valve - shift due to the resulting pressure difference;
- all elements return to their original positions when the pedal is lowered.
Any decision regarding plans to repair or replace an amplifier must be fully justified.
To do this, it is necessary to inspect the mechanism, which most car owners can do on their own.
Functionality check
This instruction will be relevant when checking the vacuum booster on VAZ models from 2113 to 2115. So the technique is clearly universal.
- Press the brake pedal all the way to the floor about 4-5 times. In this case, the engine should not be started. Due to these presses, you will create equal pressure in two sections of your vacuum booster. The valve will report problems as soon as you start pressing the pedal. If you hear squeaks while pressing, this indicates a serious malfunction.
- Once the pressure is even, start the engine while keeping the brake pedal to the floor. If the brake booster system is working properly, then the pedal will rise by itself after the engine is started. If this does not happen, then you will definitely have to face repair work.
- If the check shows problems with the amplifier, do not forget to additionally check the quality of the hose fastening and the condition of the flange. When the mount is abnormal, this may result in the brake pedal not lifting.
Sometimes poorly fixed fasteners cause quite expensive and actually unnecessary repairs or replacement of the vacuum booster. Conduct a preliminary check so as not to complicate your life.
When to change the amplifier
Brakes are a whole system that consists of many elements. Each of them must function correctly and efficiently.
In addition to checking the vacuum booster itself, you should inspect the condition of the brake fluid pipes, make sure there are no brake fluid leaks, and look at the current condition of the brake pedal.
If no faults were found in the braking system, you can think in more detail about the issue of replacing the vacuum booster.
There is no point in repairing the element. It's easier to start replacing right away. The functionality of the car and the power that your engine is capable of producing depend on the quality and timeliness of the work performed. Lack of power negatively affects the speed and comfort of movement around the city and beyond.
Replacement
To replace a vacuum booster you will need a certain set of tools and materials. It includes:
- Screwdriver Set;
- Pliers;
- Socket wrench for 13 and 17 millimeters;
- Special wrench for brake pipes;
- New plugs;
- New fittings.
Replacement procedure
Let's get down to work.
- Removing the vacuum booster can be difficult due to the brake cylinder. Therefore, we advise you to remove it first. Another option is to disconnect the pipes from the brake cylinder and move them to the side for a while. Here you decide for yourself what is more convenient for you.
- The cylinder is not the main problem. It is difficult to cope with the mounting of the vacuum booster. It's just not very convenient to do this. This is the design of the VAZ 2114.
- Start with the valve - remove the hose fasteners from it, remove the support bush, after which you can pull out the brake pin.
- Next, using a 13 mm wrench, all four fasteners of the vacuum booster are dismantled.
- After all the inconveniences of the work done, you can remove the element and get ready to install a new amplifier in its place.
- To do this, you will have to install a special mounting frame. The frame is tightened with a 17 mm wrench, after which the new component is installed inside the car.
- If you want to make your work as easy as possible, do not forget to first connect the brake pedal to the booster with your finger when reassembling it. After this, it is much easier to cope with putting the vacuum seal back into place.
Checking functionality
These instructions for checking the functionality of the vacuum booster will be relevant only for certain models of VAZ cars, ranging from VAZ 2113 to model 2115. Therefore, this technique, without exaggeration, is universal.
Check procedure:
- First, you need to press the brake pedal all the way, doing 4-5 repetitions. It is important that the internal combustion engine is not turned on. Through these presses, equal pressure is generated in two sections of the vacuum booster, so if there is any kind of malfunction, the valve will “tell” about them as soon as the driver presses the pedal. Creaks are the first symptom that confirms the presence of a problem.
- After creating uniform pressure, you need to start the engine, first holding the brake pedal (all the way!). If the brake pedal does not return to its original position after turning on the engine, this indicates a faulty amplifier. And vice versa - if the pedal rises after the internal combustion engine is started, then the amplification system is in perfect order.
- If the problem still occurs, you should check the condition of the flange and the quality of the hose fixation. If the hose fastening is slightly different from the norm, this may be the reason for the pedal not lifting.
The last (third) point is of no small importance, since often expensive and complex repairs to the amplifier may turn out to be pointless if the culprit of the problem is a poorly secured hose fastening.
Vacuum booster VAZ 2114: do-it-yourself replacement
The VAZ 2114 vacuum booster is exactly the same in design as the one used on early model cars - 2108, 2109. It is necessary to improve comfort when driving a car. You can remember the first kopecks, which did not have an amplifier - you had to press the pedal with great force to squeeze the cylinder rod. It is with the help of a vacuum that it is possible to increase the force applied to the rod several times. It is also worth mentioning that the effectiveness of emergency braking using VUT increases by approximately 200%. If without VUT you need to apply a force of 13 kg, then with it it is much less - only 7 kg.
In what cases is the amplifier replaced?
The brake system has a rather complex structure, since it includes a large number of elements. Each of which closely interacts with each other, creating a balanced mechanism.
In addition, you should examine in detail the condition of the brake pedal, check and eliminate possible leakage of brake fluid, and also check the current condition of the pipes.
If no problems with the listed elements were identified, then you should consider further actions that relate to replacing the faulty system. Since replacing the VAZ 2114 vacuum amplifier is the only reasonable solution, because there is no point in repairing it, as from a financial point of view and the quality of repair and restoration work.
It’s worth emphasizing right away that the characteristics of the car will depend on the quality of the work performed.
Symptoms of a problem
There are a lot of vacuum amplifiers on the market, and they all differ not only in manufacturer, but also in quality. In recent years, the market has been conquered by Chinese analogues, which are of relatively lousy quality, but due to their prices beat their competitors. But skimping on brake system components means exposing yourself to danger. An amplifier of normal quality will cost you about 1000 rubles. Vacuum amplifiers produced by Politekh-AVTO have good reviews. The warranty on them is only a year, but in reality they last at least five.
Your safety depends on the condition of the braking system. This must be taken into account primarily when carrying out repairs and diagnostics. Therefore, a careless attitude is unacceptable. Signs of malfunction characterizing the failure of the VUT:
- It is necessary to apply more force to the pedal when braking.
- Braking efficiency deteriorates (it feels like you are pressing the pedal with the same force, but the rod moves worse).
But these symptoms can also appear if pipes and lines are contaminated. Therefore, it is possible to judge the failure of the VUT only on the condition that the serviceability of the remaining components is not in doubt. To check the VUT, you need to stop the engine and press the pedal hard several times. Then press down so that it is under pressure and start the engine. If the vacuum brake booster of the VAZ 2114 is working properly, you will feel the pedal sink significantly. Well, if it fails, it will be in its original position.
The next step is to identify a specific breakdown:
- Check whether the connection between the pipe and the check valve is tight.
- Are the fixing flanges intact?
- Pay attention to the condition of the pipes themselves - they sometimes crack in bends. A characteristic feature of this malfunction is the presence of wet marks.
- Very often the shank is destroyed. It is necessary to check the cap that is located on the seal. Remove it and start the engine. If even after all these procedures a hissing sound is heard, then the fault is in the shank.
The nuances of adjusting the steering wheel position
If you are not satisfied with the position of the steering wheel or its height, this can be corrected by adjustment. To do this, it is necessary to grind the edges of the industrial shaft to the required dimensions or install gaskets between the device body and the plate. When making adjustments, you must remember that the EUR itself is automatically turned off when the vehicle speed exceeds 50 km/h.
Price issue
The cost of electric power steering for a VAZ 2114 car may vary, depending on the store where it is purchased, as well as the region of the country. On average, the price for a complete system set varies around 22-24 thousand rubles. On the Internet, you can search for stores where the EUR kit is sold on promotions - with a discount from the seller, you can purchase the unit for 20 thousand rubles.
Replacement of VUT VAZ 2114
After diagnostics, you can proceed with replacement. You will need the following set of tools:
- Pliers.
- Keys for “10”, “13”, “17” (open-end, socket heads, sockets).
- Screwdrivers, flat and Phillips.
Pay attention to the condition of the fittings, clamps, and pipes. Replace them if necessary. All do-it-yourself repairs can be carried out at home without any particular difficulties; there is no need to turn to the services of a service station.
Repair stages:
- Remove the rod connecting the VUT and the brake pedal. It is necessary to pry the plate with a knife or flat screwdriver, and then unscrew the bolt.
- Having opened the hood, disconnect the GTZ (brake master cylinder) and the vacuum pump of the VAZ 2114. Usually simple nuts are used for the connection. Further dismantling is carried out either by disconnecting all pipes from the GTZ, or “live”. In the first case, of course, it will be much more convenient, but after repairs it is imperative to bleed the entire system.
- Remove the hose connecting the amplifier to the manifold.
- Using a socket on “13”, unscrew the nuts from the interior that secure the amplifier to the body.
- Remove the amplifier.
That's all, at this point the dismantling process can be considered complete, assembly is carried out in the reverse order. Usually this device is not repaired, but is immediately thrown away. Its price is not very high, and its service life is significant. Therefore, it turns out to be easier (and safer) to install a new VUT.
Replacement process
Before you begin the replacement process, you need to prepare a set of tools and materials, which first of all includes:
- pliers;
- new fittings and plugs;
- a wrench designed for brake pipes;
- Screwdriver Set;
- socket wrench for 13 and 17 mm.
The replacement process consists of many stages, the implementation of which must be approached with all responsibility and professionalism:
- Looking ahead, it should be mentioned that the dismantling process can be seriously complicated due to the brake cylinder. To avoid this, this element must be removed in advance. You can go another way: disconnect the pipes from the brake cylinder, and then move them to the side for a while.
- Attaching the vacuum booster is another difficulty that will be encountered during the dismantling process. This is all due to the design costs of the VAZ 2114.
- We remove the hose fasteners from the amplifier, then take out the support sleeve, and then pull out the brake pin.
- We remove the 4 vacuum booster fasteners using a 13 mm wrench.
- We remove it and prepare to install a new amplifier.
- We install the mounting frame, tightening it with a 17 mm wrench, and only then install the amplifier.
- To make the work easier during reassembly, you should connect the brake pedal to the booster using your own finger.
Important! It is also necessary to replace the vacuum hose with a new one, since it tends to wear out.
The cost of the vacuum amplifier replacement service is not fixed and therefore depends on the specific region.