The effectiveness of your car's brakes is important - if the brake system does not work effectively, an accident may occur. To ensure precise brakes, a booster is installed on all modern cars; it ensures that the vehicle stops instantly when you press the pedal.
- 1 Repair of vacuum brake booster VAZ 2106, 2107, 2108, 2109, 2110
- 2 Removing the vacuum booster 2106-07
- 3 Disassembling the vacuum booster 2109
- 4 Repair of the UAZ vacuum brake booster
- 5 Replacement of VUT on UAZ vehicles
- 6 Features of repair of UAZ vacuum amplifiers
- 7 Adjusting the UAZ brake booster rod
Repair of the vacuum brake booster is necessary if the brakes become “wobbly” and you have to press the pedal with great force to brake.
Repair of vacuum brake booster VAZ 2106, 2107, 2108, 2109, 2110
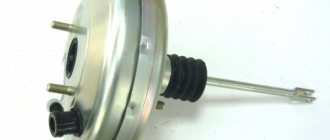
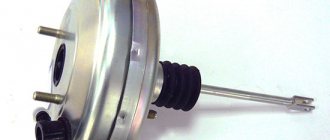
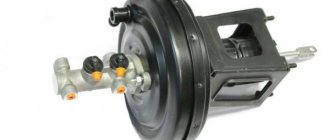
The vacuum brake booster (abbreviated as VUT) of VAZ vehicles makes the driver’s work easier - it enhances the effect of pressing the pedal in the braking system (TS). This unit consists of the following main parts:
- valve;
- metal case;
- diaphragms;
- piston;
- rod;
- powerful return spring;
- a pusher that connects to the brake pedal;
- protective cover;
- flange for installing a check valve.
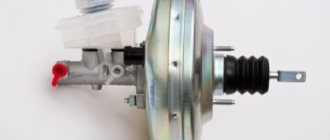
The body of the device is divided into two halves by a diaphragm, and the master brake cylinder is installed on the side where the vacuum is created. A vacuum (vacuum) is created by connecting this part of the housing to the intake manifold of the internal combustion engine, and when the engine is not running, the channel closes the check valve installed in the VUT flange. Air (vacuum) with the help of a rod and piston when pressing the brake enhances the braking effect, thereby making the driver’s work easier - there is no need to press the pedal with great force. After releasing the pedal, a powerful return spring allows the diaphragm inside the housing to return to its original position. When the engine is turned off, no vacuum is created in the system and the vacuum brake booster does not operate.
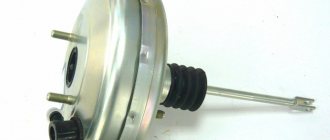
On VAZ-2106-07 and VAZ-2108-10 cars, brake boosters are installed that differ in appearance, but the principle of operation of the devices is the same. We check the serviceability of the VUT as follows: press the brake pedal and start the engine - if the pedal “falls” (lowers under the pressure of the foot), the VUT works.
The main problem with a vacuum booster is damage to the diaphragm. When the diaphragm is ruptured, air penetrates from the outer part of the housing into the vacuum cavity, and a vacuum is not created in the device. But the malfunction may not necessarily lie in the device itself - often the VUT does not work due to air leaks or for other reasons:
Related Posts
Preparing the car for summer
Proper running-in of a diesel engine after overhaul
Installing car speakers yourself
- the “vacuum” check valve is faulty;
- there is air leakage from the hose connecting the intake manifold to the brake booster;
- there is no compression in the internal combustion engine cylinder where the vacuum comes from.
It should be noted that the vacuum brake booster on VAZ 2106-10 vehicles is connected by a hose to the fourth cylinder of the engine.
Repair of the vacuum brake booster of VAZ 2106, 2107, 2108, 2109, 2110 should begin with the dismantling of this unit, then the VUT must be disassembled.
Bleeding the system
After carrying out any work related to the replacement or repair of brake system parts, the brakes should be bled. This will remove air from the line and equalize the pressure.
Tools and tools:
- jack and wheel wrench;
- key to "8";
- rubber or silicone hose with a diameter of 6 mm;
- a small, clean, dry container (preferably transparent);
- brake fluid (to top up).
In addition to all this, you will definitely need an assistant to bleed the system.
Work order:
- Place the car on a horizontally flat surface. Loosen the nuts securing the front right wheel.
- Raise the car body with a jack. Unscrew the nuts completely and remove the wheel.
- Remove the cap from the fitting of the working brake cylinder.
The bleeder fitting is closed with a cap. - We put one end of the hose on the fitting. We insert the second end into the container.
- We give the command to the assistant to sit in the passenger compartment and depress the brake pedal 4–6 times, and then hold it in the depressed position.
- When the pedal is depressed after a series of pressures, use a key set to “8” (in some modifications to “10”) and unscrew the fitting three-quarters of a turn. At this time, liquid will flow from the fitting into the hose and further into the container, and the brake pedal will lower. After the pedal hits the floor, you need to tighten the fitting and ask an assistant to release the pedal.
Pumping must be continued until liquid flows from the hose without air. - We pump until brake fluid without air begins to flow from the system. Then you can tighten the fitting, put the cap on it and install the wheel in place.
- By analogy, we bleed the brakes for the front left wheel.
- We pump the rear brakes according to the same scheme: first the right one, then the left one.
- Upon completion of pumping, add brake fluid to the level in the reservoir and check the brakes on a section of the road with low traffic.
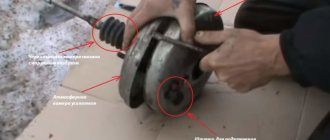
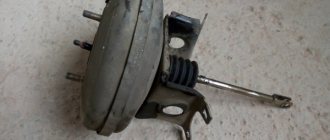
Removing the vacuum booster 2106-07
Removing the VUT on a VAZ classic car is quite simple, and if you have minimal plumbing skills, this work is not difficult to complete. We remove the unit as follows:
- we turn off the engine, disconnect the main brake cylinder (GTC) from the “vacuum chamber”, the cylinder is held on by two nuts. There is no need to disconnect the brake pipes and hoses from the turbocharger; we simply move the cylinder to the side;
- we pull the hose off the check valve, while holding the valve so as not to pull it out and break it;
- in the cabin, remove the fixing bracket on the brake pedal and release the VUT pusher;
- then in the cabin we unscrew the four nuts that hold the “vacuum unit”, dismantle the unit - it is removed in the engine compartment.
causes
The most common problem that causes a yellow BMW PARK light is the parking brake actuator.
- Parking brake drive. The gear inside the parking brake actuator may break. A common problem on BMWs with electronic brakes that causes the yellow PARK light to stay.
- Software problem. BMW parking brake problems can in some cases be resolved by updating the software at the dealer.
- Loose connector. Check the connector on the parking brake module actuator. A corroded wire can cause intermittent parking brake errors.
- Weak battery. A weak battery may prevent the parking brake from releasing. Chances are you have other electrical problems if your BMW won't hold a charge. Follow this guide to learn how to replace your BMW battery.
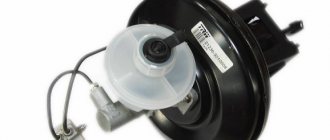
Disassembling vacuum booster 2109
It is not difficult to disassemble VUT 2108-2109, but for disassembly it is necessary to fix the device. We disassemble the node in the following order:
- clamp the “vacuum sealer” in a vice;
- using a screwdriver on the body, we bend the grooves with which the two halves are held together;
- when almost all the rivets are straightened, it is necessary to hold the outer part of the body - a spring is installed inside the device, and it can shoot. If the old diaphragm is put back into place, there is no need to push the screwdriver far inward, as the rubber seal may be damaged;
- remove the rubber covers from the fastenings (2 pcs.);
- dismantle the plastic casing together with the diaphragm and pusher assembly;
Typically, the repair kit for the VAZ-2109 vacuum amplifier contains a diaphragm, a cuff, a boot, covers (2 pcs.) and a valve. All parts should be changed so that you don’t have to redo the work later. When assembling a vacuum amplifier, it is better to immediately fix the diaphragm on a plastic casing, this will make it easier to mount the unit.
It doesn’t matter which side the spring is placed on, but when assembling the amplifier, you will have to make an effort to get the holes in the housing onto the studs.
Which vacuum cleaner to buy
Brakes are the most important system in a car. Repairs should be approached responsibly. The vacuum booster is an expensive unit. Therefore, the owner may have the idea of buying a used spare part. In this case, you can really save money. But, the old vacuum seal can fail at any minute, which means the money was wasted. In addition, disassembling the VAZ 2110 and then replacing the vacuum seal may be in vain.
Consumer choice
| Lucas | 9.4% |
| Iruna | 2% |
| TorgMash | 53.3% |
| Technomaster | 0.8% |
| ProSport | 2% |
| Sport | 2% |
| AT, Czech Republic | 0.8% |
| Factory VUT | 23.1% |
| Another VUT | 5.5% |
| Axiom | 1.2% |
| The leader of this competition was TorgMash, with 53.3% of the votes cast for it. | |
It is better for the car owner to fork out the cash and purchase a new VUT from such manufacturers as:
- LUCAS TRW – from 5,900 to 6,500 rubles (assembled: with reservoir, bracket and brake pedal);
- TorgMash – 2,320 rubles;
- DAAZ (2103-3510010) – from 1400 to 2250 rubles;
- Fenox (f-VB10001C3) – 1,560 rubles;
- TRIALLI (va551) – 1450 RUR;
- QUARTZ (qz2170351) – 1,050 rub.
A factory VUT, complete with pedal and TJ reservoir, will cost about 4,900 rubles. Among car owners, DAAZ and TorgMASH spare parts are especially respected. It is these manufacturers who become the leaders of voting on auto forums.
Repair of UAZ vacuum brake booster
Problems with the vacuum booster of UAZ vehicles can be identified by the following symptoms:
- the engine suffers, and since on UAZ engines the vacuum hose goes to the manifold of the first cylinder, if the VUT is faulty, this particular cylinder is not completed;
- a hissing is heard under the hood - the diaphragm is poisoning the air;
- the brake pedal is hard and does not press when starting the engine;
- There are wet leaks between the turbocharger and the amplifier (brake fluid is leaking).
If leaks of the brake fluid are detected in the area of the VUT, it is necessary to urgently change or repair the GTZ, but if the liquid has already entered the vacuum booster, most likely the VUT will also have to be repaired.
Another common malfunction in the brake system is failure of the check valve. This simple mechanism is very easy to check - you just need to blow into it. The valve should be blown freely in one direction (when rarefied air is supplied from the manifold), but air flows in the opposite direction with great difficulty. If the valve is faulty, it is blown freely in both directions.
Further troubleshooting
If none of the solutions mentioned above worked, the next step is to read the fault codes from the electronic parking module. A standard OBD2 scanner will not allow you to read parking brake related trouble codes.
You will need a special BMW scanner that can read the parking brake module/electromechanical.
Another common problem is a faulty ABS module. Read codes from ABS, DSC module or perform a full system scan.
Follow the instructions in this guide to learn how to read BMW trouble codes.
Replacing VUT on UAZ vehicles
The amplifier is removed on cars produced by the Ulyanovsk Automobile Plant according to the same principle as on VAZ cars. Let's consider replacing VUT using the example of a UAZ-31519 car:
- first of all, we unscrew the two fastenings of the GTZ to the “vacuum”, usually the cylinder is secured with nuts 17, without disconnecting the brake pipes, we move it to the side;
- under the hood, in the area of the windshield, unscrew the 2 bolts of the VUT amplifier bracket, the standard bolts are 14 mm turnkey;
- in the cabin, at the connection of the rod with the brake pedal, pull out the cotter pin; for this you will need pliers;
- remove the connecting pin;
the two lower nuts of the amplifier bracket are located in the car interior, they are turnkey 17, unscrew this fastener;
- pull off the hose from the fitting of the device, dismantle the VUT;
- disconnect the bracket from the “vacuum” - to do this, unscrew the four nuts (they are 17 mm);
- the check valve is not included with the part, so we move it from the old VUT to the new one;
- We connect the bracket to the new amplifier, carry out the assembly - we install all the parts in their places.
Signs of problems at work
Malfunctions of the vacuum amplifier and the components that ensure its operation are sure to manifest themselves, and quite clearly.
If the vacuum reservoir does not function, this will be accompanied by a “stiffness” in squeezing the pedal.
If this element completely fails, it is very difficult to press the brake pedal (to verify this, it is enough to press the pedal 4-5 times with the engine not running; on the last squeeze, the resistance will be very high).
Since the vacuum is taken from the intake manifold, the loss of tightness of the vacuum booster may be accompanied by a change in engine operation during braking (although this should not happen).
Moreover, in some cases, the speed of the power plant may drop when you press the brake pedal (even to the point of stopping the unit), while in others, the speed increases.
Everything is simple here - if there is a leak in the vacuum seal, air will leak into the manifold, which affects the proportions of the air-fuel mixture, hence the change in engine operating mode.
Another obvious sign is the appearance of hissing when the pedal is depressed. The appearance of such a sound indicates the appearance of air leaks.
As for vacuum pumps, mechanical ones can make knocking noises, and constantly (the drive rod is usually to blame for this), while in electric ones the operation noise increases, and strong heating is also possible when the motor is running (here the fault usually lies in the drive motor).
Features of repair of UAZ vacuum amplifiers
Unlike the vacuum amplifiers of VAZ cars, the VUT housing on UAZ cars is very durable, and it is not at all easy to halve it. You can bend the protrusions using a pry bar and a hammer, but this way the work is done in violation of the technology - according to the instructions, you need to rotate one half relative to the other. The biggest problem during disassembly is the “halving” of the body - sometimes these parts boil so much that it is impossible to disassemble the assembly. Car owners are advised not to press one body into another under any circumstances - then turning will definitely not work.
Another problem in repairing “vacuum units” is the low quality of spare parts in the repair kit; sometimes the installed parts are not enough for six months. Motorists advise not to do repairs, but to buy a new spare part, although there is another disadvantage - VUT for cars like UAZ-469 or UAZ-452 is not cheap, about 3 thousand rubles. As an option, you can pick up a “vacuum” from a foreign car at a car disassembly shop, whose mountings fit the main brake cylinder, and install it on the car by fitting it. The result is cheaper and more reliable - imported parts, even in used condition, last for several years without any complaints.
Choice
We will give some recommendations regarding the choice of a new vacuum amplifier.
Selection criterion
Required parameters
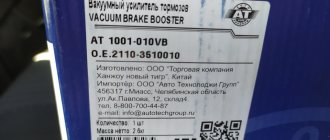
The cost of a good vacuum cleaner is now about 2.5 thousand rubles. These are not the most expensive, but not the cheapest Chinese options. Optimal for VAZ 2109
This packaging, used by a genuine manufacturer, is made of corrugated cardboard
The label should be clearly legible - the production batch number, the production date of the part and the name of the manufacturer itself
You should not buy from market traders. There are many good, trusted spare parts stores in any city. Don’t be shy to ask for certificates, documents for parts
Choosing wisely
Now there are a lot of fakes on the market. Such parts cost the same as the originals, but last much less.
Adjusting the rod of the vacuum brake booster UAZ
Often, after replacing the VUT, problems appear, and the car no longer brakes as well as it did before with a working “vacuum system” - the brake pedal takes off at the very end, or the system does not fully release the brakes. The whole point here is the rod that presses on the GTZ piston - it may not be adjusted from the factory. This rod has an adjusting screw, which is secured with a locknut. On UAZ cars (we don’t take the “Patriot” model into account), we check the rod adjustment as follows:
- push the rod all the way back;
- take a metal ruler or feeler gauge to adjust the valves and lay it along the body;
- We measure the protrusion above the body with a caliper - the rod should extend approximately 7.8-8.0 mm;
- if this distance does not correspond to the norm, loosen the lock nut and use the adjusting screw to increase or decrease the length of the rod;
- Having established the desired size, fix the screw with a lock nut.
Even on the UAZ Hunter, the pedal can “take” at the very end, and it has a large free play. It is necessary to pay attention to the position of the pedal - if it is too low from the floor in the cabin, it needs to be adjusted:
- unscrew the brake light mounting nuts on the brake pedal;
- disconnect the wires from the brake light sensor;
- Use two 19 mm nuts to raise the pedal, press the brake to check the free play, and if the pedal is adjusted normally, tighten the nuts.
What is a "check"
Its image may differ in different brands of cars.
Yellow, on the dashboard
If in your car, after starting the engine, the “check engine” light continues to light or flashes, it means that the control unit has detected a malfunction. The malfunction is recorded in the form of OBD-2 standard error codes. The list of main codes and their decoding is at the end of the article.
decoding standard codes
In order to read the control unit memory error codes, you need to use a diagnostic scanner (a laptop with a diagnostic program and an adapter for communicating with the car); it is best to contact a specialized service for computer diagnostics. Some older cars, before 2002–2006, support self-diagnosis mode.
Self-diagnosis, the process of indicating errors in the form of two-digit codes by the engine control unit using a “check” lamp. We will consider this mode at the end of the article.
The check light does not go out or blinks
This indicates that the fault is currently present. Even if the motor works without changes, there is a high probability of its breakdown. For example, a misfire error on an 8-cylinder engine will not be externally noticeable. However, unburnt fuel will burn out in the catalyst, which will lead to its failure after 100–200 kilometers. You can drive with the check light on or flashing only to the place of repair (at your responsibility). If a red light comes on on the dashboard, take the tow truck to the service station; if it’s yellow, you can try, at your own risk, to drive to the service station yourself.
Malfunction conditions and possible causes
- - while driving, during acceleration (misfire due to spark plugs, injectors, fuel)
- – the check light blinks or lights up and the engine stalls, the car does not pull, jerks, the speed fluctuates (misfires due to spark plugs, injectors, fuel)
- — after refueling (poor quality fuel)
- — when the ignition is turned on (malfunction of engine control system sensors)
- — after washing the car, washing the engine, rain (poor contact in the engine wiring)
- — Check lights up on a cold engine/after warming up the engine (malfunction of oxygen sensors)
- - at high speeds, at idle speed (fuel, spark plugs, injectors)
- — after replacing spark plugs (plugs of the wrong type, damage during installation of spark plugs, high-voltage wires)
- — after replacing the air filter (intake leak, flow meter connector not connected)
- — after replacing the timing belt (incorrect installation according to the marks, sensor connectors are not connected)
- — after installing the LPG (incorrect installation, mismatch between the engine control units and the LPG)
- — after installing the alarm system (incorrect connection, the removed connectors were not put back on)
- — after replacing the fuel filter (filter of the wrong type, fuel system leakage)
- - the check light came on and fuel consumption increased (not all cylinders are working - misfire, engine temperature sensor, flow meter, oxygen sensors are faulty)
- — the lamp blinks or lights up and the engine does not start (diesel, gasoline) (the crankshaft and camshaft position sensor, fuel pressure in the rail and the injection pump metering valve in the diesel engine are faulty).
- — the light is on when rising (insufficient quantity or quality of fuel, contamination of the fuel filter, injectors)
- — after replacing the ignition module, ignition coil (incorrect connection, malfunction or incorrect installation of the module itself)
- — the check light comes on at sub-zero temperatures (poor contact in the electrical wiring, faulty motor temperature sensors)
- - when you press the accelerator (not enough fuel - dirty fuel filter, injectors, poor sparking - coil, spark plugs)
- - when the heater is turned on (uneven engine operation when the load increases - misfires due to spark plugs, injectors, fuel)
- — the lamp is on and the speedometer does not work (speed sensor and its wiring)
- — the check light may be on due to oil (due to insufficient oil pressure, the VVT clutch installed on the camshaft may not work correctly. It begins to work when oil is supplied to it from the internal combustion engine lubrication system; if the pressure is insufficient, the engine control unit detects a malfunction).
- - the check light is on because of gasoline - the most common malfunction. When the quality of the fuel is low, the ignition of the fuel-air mixture deteriorates, various malfunctions are recorded - misfires, incorrect readings of oxygen sensors and flow meter. If the fuel is of very low quality, the car will not start.