One of the main systems that ensures safety when driving a car is the braking system. The most widespread are brake mechanisms that use the frictional force of different materials. Such mechanisms are installed on all cars, including VAZs belonging to the “Classic” family.
As an example of a classic VAZ, model 2107 will be used. The brake system of the VAZ-2107 includes working and parking systems. The task of the working component is to reduce the speed of movement of the car until it is completely immobilized.
It consists of two components: the first is the brake mechanisms, which act on the wheels, which is why their rotation decreases. The second component is the drive, through which the driver operates the mechanisms.
The parking component ensures that the wheels of one of the car's axles are locked, in the case of the VAZ-2107 - the rear axles, while the car is immobilized. The use of this brake prevents spontaneous movement of the car. This system uses a separate drive that acts on the rear axle mechanisms.
In more detail, what the brake system of the VAZ-2107 looks like is shown in the diagram:
Now let's take a closer look at the design of the VAZ-2107 brake system. First, let's go through the working component. Its drive is hydraulic and includes:
- Control pedal;
- Vacuum booster;
- Main cylinder;
- Tank for working fluid;
- High pressure pipelines;
- Rear axle bellows pressure regulator;
The use of liquid as a working element of the drive is due to a number of positive qualities: a complex system of levers for the drive is not required, the wiring of pipelines to the mechanisms is facilitated, the transmission of force from the driver’s foot is enhanced several times due to the vacuum booster.
Related link:
How to bleed brakes on VAZ cars
The working mechanisms on the VAZ-2107 are of two types: disc brakes are installed at the front, using calipers; drum-type mechanisms are used on the rear axle, which also includes a parking mechanism.
Now in more detail about the elements of this system. So, the pedal that the driver presses is located on the same axis as the clutch control pedal. To ensure that it can be returned to its original position, it is spring-loaded.
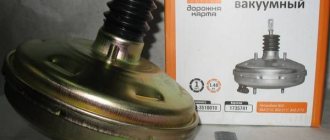
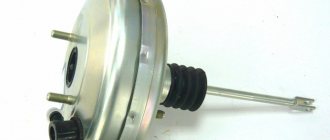
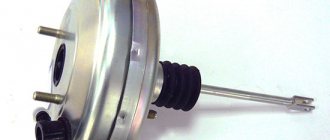
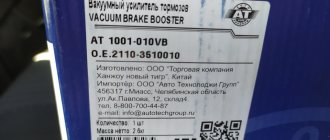
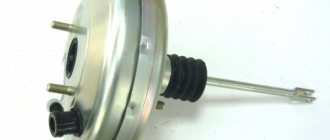
Vacuum brake booster
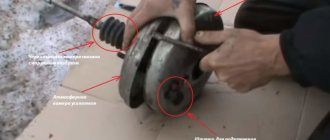
A rod connected to the amplifier is connected to the pedal. The design of the VAZ-2107 vacuum brake booster is quite interesting; it is shown in the figure:
The amplifier is a sealed container, internally divided into 2 chambers by means of a membrane. The chamber located closer to the pedal is called atmospheric, and the chamber separated from it by a membrane is called vacuum. The diaphragm itself is connected to the piston rod of the master cylinder.
The vacuum chamber is connected by a pipe to the intake manifold of the engine, where the vacuum comes from. The design also includes a follower valve controlled by the pedal rod, which does all the work.
When the pedal is released, this valve connects the chamber cavities through a channel, providing identical pressure. When the pedal is applied, the valve closes the channel connecting the chambers and opens the channel connecting the atmospheric chamber with the atmosphere. Since a vacuum is maintained in the second chamber, atmospheric pressure begins to put pressure on the membrane. Since it is connected to the piston rod of the master cylinder, due to the movement of the piston, fluid is displaced from the cylinder into the pipelines.
Symptoms and diagnostics
If the VUT malfunctions, the force on the pedals during braking may increase many times over. Driving under these circumstances is unsafe. All symptoms must be immediately diagnosed and the broken unit repaired.
Typically, the vacuum booster is not checked during routine maintenance, so it is important to watch for the following symptoms:
- The pedal became hard. The main indicator that the VUT is worn out or is not working correctly. This may happen gradually or happen suddenly. In addition, the pedal may be positioned higher than usual.
- The braking distance has lengthened. This occurs because it is impossible to obtain the force on the master cylinder rod necessary for the design speed of stopping the vehicle.
- The engine stalls when the brakes are applied. This occurs when the amplifier diaphragm has lost its seal and allows air to leak past the seals. In addition to reduced braking ability, engine stalling can cause major problems on the road.
- The brake system stops working. The failure may be due to a malfunction of the VUT valves.
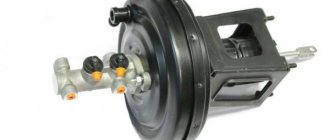
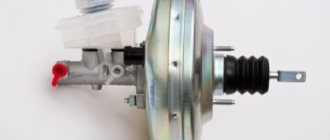
Brake master cylinder
The master cylinder is connected to the booster. This element is a housing to which the supply and return pipelines from the fluid reservoir are connected, and 3 pipelines leading to the brake mechanisms exit. There is one pipeline leading to the front brake mechanisms, and only one to the rear, leading to the regulator.
Inside this housing there are pistons that push the liquid into the pipelines. One of them is connected to the amplifier diaphragm rod. These are the main elements of the drive. The detailed design of the brake master cylinder is shown above.
Related link:
The main reasons for the lack of battery charging on the VAZ 2107
Caliper device
Let's move on. The front axle mechanisms are disk ones, consisting of calipers with the main brake elements - pads, and brake discs.
A caliper is a body with cylinders made in it for the pistons. This model has two of them, one for each block. The support structure is shown in the figure.
The caliper pistons have the form of a glass, which is placed in their cylinders, but they can move along it. To prevent fluid leakage, the pistons are equipped with o-rings.
Pads are small metal plates onto which linings made of friction material are glued.
The brake disc is made of metal for better adhesion to the surface of the pads; its side surfaces are well processed so that there are no protrusions or shells on them.
The VAZ 2107 brakes work like this: the fluid moves into the caliper cylinders, where it begins to push out the pistons. They come out of the cylinders, pressing the pads against the disc.
Replacing brake discs yourself
Replacing front discs
Replacing brake discs is necessary when its thickness is less than 9.5-11 millimeters. When the pads wear out, the pistons can come out of their seats and create misalignment. The second reason for replacement may be uneven wear and deep risks .
Large output on the VAZ 2107 disk
Such problems increase brake pad wear and reduce braking performance. In these cases, the disks must be replaced. Their timely replacement is the key to your safety.
Remove the wheel and caliper with brake pads. To do this, unscrew the two guide pins.
Guide pins VAZ 2107
Next, remove the intermediate ring and the worn disc.
Removing the VAZ 2107 disk
After this, the new disk is installed in the reverse order.
Polishing a car - a complete guide. You will learn how to start tuning in our article!
Choosing acoustics is always a difficult task. Even more so for cars. The link has information that will help you!
Rear axle brake mechanism
The brake system of the VAZ-2107 rear axle has a different device. All its elements are hidden inside the brake drum:
The working brake cylinder of the VAZ 2107 has the following device: there is a body, also known as a cylinder, with two pistons placed in it. When exposed to fluid pressure, they come out of the cylinder.
The pads are metal, made in the shape of crescents, with friction clutches glued to their upper edge. The pads installed on the hub form a ring.
In the lower part, the pads are installed in the seats made under them, and in the upper part - in the grooves made in the pistons. To prevent the pads from moving apart spontaneously, they are tightened with springs. The parking brake mechanism is also located there.
On top of all this there is a drum mounted on the hub shaft. When braking, the fluid pushes the pistons, and since the pads fit into their grooves, this movement of the pistons is accompanied by the divergence of the pads. At the same time, they are pressed towards the drum and the rotation slows down.
Related link:
Homemade pre-heater for a VAZ car engine
Troubleshooting
The first sign of loss of vacuum booster seal is not deterioration of the brakes, as many sources on the Internet describe the malfunction. When air just begins to leak through the leaky membrane, the VUT continues to function properly, since the motor manages to maintain a vacuum in the front chamber. The first symptom is changes in the operation of the engine itself:
If a car owner ignores the primary symptoms, the situation gets worse - the pedal becomes harder and requires more physical effort to slow down and stop the car. The car can be used further; a breakdown of the VUT does not lead to a complete failure of the brakes, but it significantly complicates driving, especially if you are not used to it. Emergency braking will become a problem.
How to make sure that the vacuum booster is leaking:
Whenever possible, I use the old “old-fashioned” method - I simply pinch the vacuum hose with pliers while the engine is running. If the third cylinder starts working and idle speed is restored, I proceed to checking the brake booster.
Parking system
Although it engages the mechanism of the rear axle wheels, it is in no way connected with the working mechanism. It uses a cable as a drive connected to the handbrake located inside the car.
Under the car, this cable is divided into two parts, going into the rear axle mechanisms. Inside, the ends of the cable are connected to the drive lever, which in turn is connected to a spacer bar. The drive lever is connected to one of the pads.
When the handbrake is engaged, the cable pulls the lever, and since it rests against the bar, the pads are released. The toothed sector of the handbrake fixes the position of the lever when the pads are spread apart.
Pressure regulator
It is installed in the rear wheel drive and not only distributes fluid to the mechanisms, it also prevents possible skidding due to different forces on the mechanisms. This is done by limiting the supply of pressure to the mechanisms, depending on the position of the car body relative to the bridge.
The regulator is driven by a rod, one end of which is fixed to the rear axle, while it itself is fixed to the body. As the load on the rear axle increases, the body changes position relative to the axle; as a result, the rod puts pressure on the regulator piston, which adjusts the pressure supplied to the mechanisms.
The principle of operation of the VAZ-2107 brake system
If it is necessary to reduce speed, the driver presses the pedal. Its force is transmitted to the amplifier valve, which opens the required channel to supply atmospheric pressure to the membrane. The membrane is connected to a rod connected to the piston of the main cylinder. This rod displaces fluid into the pipelines leading to the operating mechanisms. Since the liquid is not compressed, all force is completely transferred to the mechanisms.
The liquid presses on the pistons of the working cylinders, and as they move out, they unclench (on drum bellows) or press the pads (on disk bellows) to the disk or drum connected to the wheel hubs. Due to the friction of the pads on the discs (drums), the rotation slows down.
Related link:
Adjusting the valves of the VAZ “Classic”
Relative vehicle malfunctions
This list of faults does not apply to absolute (or categorical) faults. Their presence is associated with the convenience (or inconvenience) of driving.
Increased hydraulic pedal travel (as an option - a “soft” pedal)
The reasons for the “sinking” of the pedal are determined by the presence of air in the system; extreme wear of brake pads; failure of the main or wheel cylinders. The action plan for eliminating technical problems includes checking and repairing all components and assemblies of the system; and, if necessary, replacing failed ones and bleeding the system.
Shift towards the vehicle's trajectory when braking
The malfunction is due to either a failure of the working (wheel) cylinder or wear of the pads. Replacing them (or repairing them) will solve the problem.
Increased background noise, friction (grinding) in the brake mechanism
Deficiencies are localized mainly in the rear mechanisms and are determined by contamination of the mechanism, critical wear of the pads, breakage of spring elements, uneven wear of discs or drums. Fault repair involves washing and replacing mechanism parts.
Vibration when braking
This is a fairly common malfunction that is associated solely with critical or uneven wear of the discs or drums, and the repair will consist of replacing them. » alt=»»>
Types of maintenance work
Despite the fact that the system is not so complicated structurally, it requires periodic maintenance, including:
- Checking the fluid level in the system;
- Checking the degree of wear of friction clutches, pads, discs, drums;
- Bleeding the system to remove air;
- Checking the condition of the handbrake cables;
- Adjustment of cable tension;
- Adjusting the rear brake adjuster;
Before each trip, you must always check how much brake fluid is in the VAZ-2107 system. An insufficient amount of it can lead to the fact that the efficiency of the system can be significantly reduced due to air getting inside the pipelines. In addition, a decrease in level may indicate damage to pipelines and fluid leakage.
The elements of the mechanism should be checked every few months, this is especially true for the pads, since they wear out quite intensively. If necessary, worn elements are replaced.
If air gets inside the drive of the working system, pumping is performed, as a result of which the air is expelled from the system.
Loosening the tension of the parking brake cables can lead to its failure, so you need to periodically monitor it and, if necessary, restore the tension.
Installing the clutch master cylinder repair kit
It is not difficult to determine when it is necessary to repair the master cylinder; the main signs of its malfunction are:
- Insufficient clutch release (clutch drives)
- Any type of leakage, whether from under the nuts securing the hose and tubes, or from the end from under the rubber seals
- Master cylinder stuck in pressed position
In my situation, the main leak was due to a worn out sealing ring, in other words, fluid flowed down the clutch pedal into the passenger compartment.
I started the repair by dismantling the reservoir hose, unscrewed the clamp on the main cylinder and quickly removed it from the main cylinder, turned it up and pinched it behind the reservoir cap so that the liquid did not flow out of the reservoir. Next, I unscrewed the tube that goes to the working cylinder, I did this with a special key, it’s a pity there is no photo, but you can buy one without any problems at any auto store. All that remains is to unscrew the main one itself, it is secured with two 13 nuts and remove it from under the hood.
The boot was removed and it was noticeable that fluid was flowing from here.
Having picked up the boot with a screwdriver, I saw exactly where the liquid was flowing from; the assumption was absolutely correct.
Next, you need to wipe the cylinder, remove dirt and rust.
Attention. Do not use gasoline or similar liquids for washing, as they will very quickly ruin the new rubber bands. To flush the clutch and brake elements, use clean brake fluid.
After cleaning the dirt, you can begin disassembling. To do this you will need an awl or similar object.
Next, you need to carefully remove the insides, keeping in mind that the piston is under the action of a spring.
This is what it looks like
Next, you need to clean the master cylinder body, you cannot scrape the parts with a screwdriver, sandpaper, etc., this is just in case, I use a rag with brake fluid. In repair manuals, I often came across such expressions that if rips, scratches, etc. appeared on the parts, then it is unusable. But despite all this, practice shows that despite all the risks, provided that a high-quality repair kit is installed, the master cylinder works without problems. I used this kit:
Repair kit for clutch master cylinder VAZ
We remove the old rings, clean all the grooves and holes. There should be no dust or debris there.
The ring is removed, clean the piston, install a new one
Thanks for subscribing!
And by the way, here is the reason for the clutch cylinder leaking:
The ring is not worn evenly
After cleaning and replacing the rings, you can assemble the cylinder, below is a photo of what should be there and how:
Here is a photo not cleaned, I added it here to show the correct assembly
Having assembled the cylinder, install the corkscrew ring
Bleeding the clutch on a VAZ 2106
After the repair has been made, it is necessary to bleed the clutch. In all repair manuals you can find standard instructions for bleeding the clutch, but it may not always help.
- The first bleeding option is standard; it consists of filling the tank with liquid, unscrewing the bleeding fitting, putting a hose on the fitting, and lowering the other end into a container with clean liquid. Then, by pressing the pedal, we monitor when the air stops being released, and also do not forget to control the level in the tank.
- The second method is to use an assistant - one person presses the pedal 4-6 times and keeps it pressed to the floor. The second unscrews the bleeder fitting; air bubbles should come out of the fitting; as soon as they stop coming out, you need to screw the fitting in and then release the pedal. And so on until normal operation of the pedal is restored and air bubbles stop coming out.
- There is also the simplest method of pumping, but which does not always work - to implement it you just need to pour liquid into the reservoir and unscrew the fitting on the working cylinder. The liquid will flow by gravity through the entire system and when it begins to flow steadily out of the fitting, it can be closed and the pumping can be considered complete.
Features of the braking system
One of the features of the VAZ-2107 brake circuit is the presence of a dual-circuit system. The essence of a dual-circuit system is that the working drive is divided into two parts, each of which supplies fluid to only two mechanisms, while the circuits do not interact with each other.
The presence of two circuits ensures the operability of the brakes of at least two wheels in the event of depressurization of one of the circuits. That is, even if the pipelines of one circuit are punctured, the second will remain fully operational, which will ensure the functioning of the brakes.
In the VAZ-2107, the circuits are divided in such a way that the drive of the front axle mechanisms is separated from the drive of the rear mechanisms. This allows you not only to maintain the functionality of the system when one of the circuits fails, but also to pump each circuit separately. That is, if one of the circuits is airy, then it needs to be pumped, but it is not necessary to service the second one.
Related link:
How to start a VAZ engine in winter
This is only general information about how the VAZ-2107 brake system works, and does not include all the details on its maintenance and repair. In general, the brakes of this car work quite well, although some elements of it cause complaints from car owners.
Article on the topic - Bleeding VAZ brakes
Unit repair - diaphragm replacement
This operation is unpopular among Zhiguli owners; usually car enthusiasts prefer to change the entire amplifier. The reason is that the result does not correspond to the effort expended; it is easier to buy and install the VUT assembled. If you definitely decide to disassemble and repair the vacuum amplifier, prepare the following tools and consumables:
It is best to buy a repair kit from the Balakovo Rubber Products Plant. This company is a direct supplier of parts for AvtoVAZ and produces high-quality original spare parts.
To carry out repair work, the VUT must be removed from the vehicle, as described in the instructions above. Disassembly and replacement of parts is carried out in the following order:
After assembly, install the unit on the car, having adjusted the rod extension in advance (the procedure is described in the previous section). When finished, check the operation of the amplifier while running.