01/25/2022 2,453 Alarms
Author: Victor
Starline car alarms with auto start are represented by a variety of models, each of which is characterized by resistance to electronic hacking due to the use of dialogue coding mode. In addition to anti-theft functions, the installation of a security-telematics complex provides heating of the interior, starting the engine remotely, without the presence of the driver next to the car.
[Hide]
Starline alarm models with auto start
Starline signals that have the option to start an internal combustion engine are marked with the number 9 in their name.
These models include:
- B94;
- D94;
- A91 Dialog;
- A9;
- A93;
- E91;
- A6;
- A8;
- AT 6;
- E90;
- A94;
- A61;
- AT 9;
- A95;
- B95;
- E95.
The last three models have become the most popular among consumers, with the number 5 in the name indicating the presence of such characteristics as:
- Reduced current consumption when security mode is on. This parameter is no more than 15 mA.
- Increased operating time in protection mode without the need to recharge the battery. The manufacturer claims that this way the alarm will work for more than 5 months.
- High operating range of the main remote control. This parameter is 20% higher compared to other options due to the use of the upgraded W84R02 transceiver.
- These models use the developed AES128+CM encryption protocol. It is characterized by excellent security of data transmission channels.
- The signal has a high speed of information processing, as well as improved noise immunity.
Letter symbols in Starline models with auto start mean:
- E - signaling, belonging to the category of budget anti-theft systems.
- A - the security complex has the function of changing equipment settings in accordance with the characteristics of the vehicle.
- B - alarms with more extensive functionality. Models with index B allow you to additionally install GSM/GPS modules and provide a telematic communication option. You can also configure the system to work with the CAN interface.
- D - models belonging to the class of security and telematic complexes.
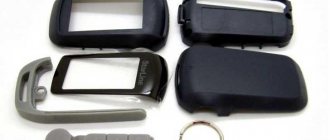
Photo gallery
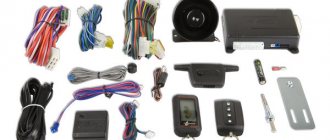
Control panel B94
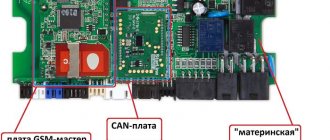
Communicator from model D94
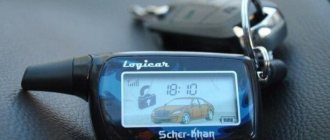
Pager from Starline A9 signaling
Key fob from the A95 system
Owner reviews
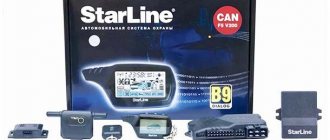
I drive a VAZ 2107. I chose the alarm based on price, as well as the presence of additional qualities. I don’t think that VAZs are being stolen from anyone now, so the main emphasis was on the convenience of the alarm. The choice fell on Starline B9, which, in addition to security functions (very good, by the way), can also boast additional autostart options and a decent price. The alarm has been on the car for a year now – no glitches and working properly, so I’m happy.
I’ll say right away - I bought it at the price of Starline B9. As for me, 4 thousand for a budget alarm system, but with good options, is quite good. It was recommended by a neighbor in the garage who uses it all the time, and especially praised the turbo timer, so I took it. It won't hurt me on diesel either. So far, the system has been working properly for six months, although I was a little afraid that I had screwed it up, because I installed it myself, and for me this was my first experience. But no complaints. The only drawback is poor sensitivity to the signal from the key fob. Already from the balcony of the 9th floor the car is not reachable, which is inconvenient. But the rest is all good.
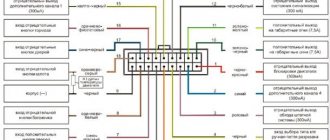
Alarm Starline a91 instructions functions installation
Preparation for installation
Before installing the alarm, you must:
- Decide on the location of installation of the central control unit: usually there is space for it behind the instrument panel. If it is installed there, then the control panel is dismantled (its fixation is carried out using self-tapping screws and clips).
- Disconnect the blocks with wires from the ignition switch and move them aside so that they do not short to ground.
- Under the control panel of the machine, you should not only install a microprocessor module, but also perform certain actions. To install the security system, it is necessary to connect the unit's outputs to the turning and side lights of the car. It is also advisable to connect them with a door opening indicator and an engine start control cable that goes to the starter.
If the car is equipped with an optitronic instrument panel, then the contacts of the microprocessor module are connected only to the turning lights.
All other signals will be transmitted electronically, and the connection procedure itself is carried out according to the following scheme:
- To connect to the turning lights, there are indicators on the back of the “tidy” that duplicate the activation of these headlights. Using a multimeter or voltmeter, you need to find the cable that supplies these lamps with voltage. When searching for a line, it is not recommended to use a test light. Its use will lead to damage to the generator relay, short circuit of the airbags and other problems.
- A search is carried out for the negative cable that goes to the door lock opening indicator. With the door unlocked, the tester should show 12 volts of voltage. If it is closed, then this parameter will be 0 V.
- In most vehicles, the tachometer is responsible for monitoring the remote start of the internal combustion engine. Therefore, to implement autostart, three conductors must be connected to it. One of them is positive, the second is negative, and the third carries out the transmission of negative pulse signals. The connection procedure is carried out with a contact, which is marked as IG on the lock.
- In the same way, the security system is connected to the light indicators for emergency pressure and battery charge.
Then you need to connect the system conductors to the central locking. To successfully complete this task, you will need a relay responsible for activating it. To detect it, you should use the method of opening and closing the lock. Subsequently, the connection procedure will be performed in the same way as in the case of contacts on the control panel.
How to install an alarm with auto start?
Installation and connection of the main alarm components:
- To ensure discreet installation of the system, attention should be paid to cable routing. It is recommended to minimally introduce non-standard wires into the standard electrical network. The conductors are laid from all installed elements to the microprocessor unit. After wiring, it is recommended to wrap the conductors with black electrical tape to simulate factory wiring and provide better insulation. It is also recommended to use insulating material when connecting the contacts of the security system with the on-board network of the machine.
- After the cables are arranged as required, the microprocessor module is connected. Then all the electrical harnesses are hidden under the interior trim.
- To connect, you will need a circuit diagram that is included with the alarm system. To ensure the connection of new cables with standard wiring, special clamps are used. It is permissible to use the joining method using a lighter and a knife.
- The siren is installed under the hood of the car, for this wire from the car interior to the engine compartment. The power wire is connected to the positive contact of the device, the second cable must be grounded, that is, connected to the ground of the vehicle. The siren is installed with the horn sideways or downwards to prevent possible accumulation of moisture inside. The siren must not be placed near the cylinder block of the internal combustion engine, otherwise high temperatures will damage it. The device body is mounted next to any standard threaded hole and secured with a screw.
- The limit switch is installed on a standard hood frame or on an additional panel. The positive contact goes to the conductor, through which 12-volt voltage is supplied when the key is turned in the lock.
- The shock sensor is installed inside the car, preferably in the central part of the body. You can choose a partition that separates the engine compartment of the car from the passenger compartment. There should be no spacers between the sensor and the surface on which it is placed. This will lead to incorrect operation of the device.
- The service key is located in a hidden place in the cabin. It is recommended to install it under the instrument panel and disguise it in a bundle with standard wiring, wrapping it with electrical tape. The driver must have access to the button from his seat.
- An antenna adapter with LEDs is installed on the inner surface of the windshield. Its installation is carried out using glue or double-sided tape. The surface of the windshield must first be washed and degreased.
To block the power unit, a cable is used that extends from the ignition switch. To find it, you need to ring the six-pin plug using a multimeter. There is no need to remove the ignition switch for this. To lock the power unit, you will need a live conductor when the key is turned to the ACC position. If you set it to Start mode, the current will disappear.
To block the internal combustion engine, you need to remove the block from the switch device and close the permanent positive contact using a jumper. Using a second paperclip or piece of wire, the starter mechanism is connected with a permanent plus. If the car engine starts, you must immediately remove the jumper - cut the wire and install the block back. As a result of the actions performed, the power unit should not start. Then the security system is connected to the lock, for which it is recommended to use a relay.
User Mos-olimp spoke in detail about the self-installation of the Starline A 94 anti-theft system with auto start on a Toyota Camry.
Setting the sensitivity of the shock sensor
The security system includes a sensor that determines the force of the impact on the body. The sensor is used to activate the alarm mode, perceiving a blow as an attempt of unauthorized access to the vehicle interior. The device is mounted inside the vehicle; the operating instructions recommend placing the product open to adjust the sensitivity. There are control diodes on the body that turn on when a blow to the car body is detected.
Vibrations that occur during engine operation are perceived by the sensor as attempts at burglary, which triggers the siren. To adjust the sensitivity, 2 potentiometers are used (warning zone and alarm level), which are rotated with the tip of a screwdriver. The regulator has 10 positions; when shipped from the factory, position 4 or 5 is set. Before starting, you need to reduce the sensitivity of the device by turning the regulators to a minimum.
Then you should start setting the warning level. To adjust, you need to open the car door, activate the security mode, and then turn the adjuster screw clockwise. Sensitivity is determined by light palm strikes applied to the body. Then the user can set the alarm level on Starline (by analogy). After completing the adjustment, it is recommended to set the security system to autostart and check the sensitivity of the sensor when the engine is running and when there are impacts on the body (by tapping the roof panel with your palm).
What buttons and how to enable and disable autorun?
The easiest option for turning on and off the remote start is from the key fob. In order for the consumer to be able to operate this function and adjust parameters, the engine blocker must first be disabled.
Before setting the option, it is recommended to prepare the car for autostart; to do this, you should perform the program neutral procedure.
The following actions are performed:
- The vehicle stops with the engine running. The handbrake lever is lifted.
- The transmission selector is set to neutral for manual transmissions. If the car is equipped with an automatic transmission, then the lever is placed in P - parking.
- The key is removed from the ignition switch. The power unit must remain running.
- The driver leaves the cabin and closes the doors. The key fob activates the protective mode by pressing the first button. The engine should stop and the warning light will blink once.
You can turn the engine on and off using a communicator command as follows:
- The first key is pressed for a few seconds, then button number 3 is briefly clicked. The car's side lights or warning lights will blink once. The permanent protection mode will be activated, the alarm status indicator will flash. The engine start symbol with the inscription “St” will appear on the communicator display.
- After pressing the keys, the anti-theft system will try to start the engine four times. If the attempts are unsuccessful, a message will be sent to the communicator and the display will show Sp. The key fob will also emit 4 beeps, and the lights on the car will blink four times.
- If the start is completed successfully, the remote control screen will display the engine operating time and the corresponding indicator. The interval for the operation of the power unit can be adjusted at your discretion.
- If you need to extend the operation of the internal combustion engine, you need to press the first button for a long time (for several seconds), and then the second one briefly. With each click, the engine warm-up time increases by five minutes. The corresponding information will be displayed on the communicator display.
- When the warm-up time of the power unit has expired, the internal combustion engine will stall. The protective mode will be automatically activated. The communicator will display the relevant information.
The AutoPulse channel showed how to remotely start a car engine.
Remote engine start
The Starline B9 alarm system offers several options for remote engine starting. For example, a car owner can perform this procedure directly from the key fob - all that is required is the manipulation of the keys, which are described below.
Also (if there is an optional GSM module), the owner has the opportunity to start the engine using a command sent from the phone or via SMS message. To do this, you will need to purchase an additional SIM card, which will be installed in the car. She must receive calls, decipher messages and issue appropriate commands to control mechanisms.
How to set up autorun?
The owner of the Starline alarm system has four options for setting up autostart:
- by alarm;
- by time;
- by temperature;
- using an application for a mobile gadget.
Auto start on alarm clock
Before using the auto-start function on an alarm clock, you need to correctly set the time on your communicator:
- Key number 3 is pressed and held until the key fob emits a melodic signal. Then one will be played, and after a pause - two more short pulses. The field where you can set the clock will blink on the communicator display.
- Adjustment of clock parameters is carried out using keys 1 and 2. They are used to increase and decrease values.
- When the clock is set, the third button is clicked, which will allow you to go to the minute settings menu. Adjustment of these parameters is performed in the same way - using the first and second keys of the remote control.
- The next step will be programming the alarm clock. To do this, you need to briefly click on the third button and go to the menu where you can activate or disable the option. The first key turns on the alarm, and the second key deactivates it. When the function is activated, the status symbol will light up on the communicator display.
If the alarm is turned on, you can start setting up autorun:
- The third key on the communicator is pressed and held for several seconds until the key fob beeps. The first one should be long, and the second one should be shorter.
- After this, the button is released, and the leftmost icon will activate and blink on the communicator display.
- The first button on the remote control is clicked, after which the car's side lights or warning lights should blink once. In confirmation, the communicator will emit a long melodic signal, and the alarm clock icon with a clock will light up on its display. The alarm activation time will appear on the device screen.
- To disable the option, you need to select the leftmost indicator with the cursor on the pager display, and then click on the second key. The side lights will flash twice. The communicator will emit a melodic signal.
User Alex Sila talked about the implementation of a remote start option in accordance with the alarm clock.
Autorun by timer
The activation procedure is performed as follows:
- On the communicator, click the third button, which is indicated in the form of an asterisk. The key is held down for three seconds until the communicator emits two melodic signals (one of them will be long, and the second will be shorter).
- The button is released, after which a clock-shaped icon will turn on on the device display in the bottom row of symbols (it should blink).
- By clicking on the third key, you need to move the cursor to the position of the indicator of the autostart system by timer. This symbol is designed as a fan icon.
- Then the first key of the communicator is pressed. The side lights or warning lights should blink once. The communicator will confirm the inclusion of the remote start option by playing a melodic signal. An indicator in the form of a fan will light up on its display. The launch frequency will also appear on the pager screen.
- The enabled function is demonstrated by the engine running indicator. On the communicator display this icon is indicated in the form of exhaust gases. The symbol should blink twice with a break.
- To disable the option, press the second pager key. As confirmation, the vehicle's external lights will blink twice and the pager will emit a melodic signal. The remote start indicator on the communicator display will go off.
When autostart is activated by timer, the power unit will start at the time intervals set by the car owner. Thanks to this, the consumer has the opportunity to keep the engine running in a warm state throughout the day.
The Stas World channel talked about the remote start of the power unit using the timer option.
To select a different startup frequency, follow these steps:
- By default, the manufacturer of anti-theft systems sets a time interval of two hours. You need to access the Valet service key and click on it six times.
- The key is turned in the lock to activate the ignition.
- The siren of the car should emit a six-time sound signal, which is accompanied by the blinking of the diode light bulb.
- Then, using the key fob, you need to use the buttons to select the required parameter to configure (it should switch on the screen instead of the clock). The number of clicks on the button corresponds to the selection of the mode number; to set the frequency, click three times.
- The parameter is being adjusted. A short click on the first button will increase the warm-up time by two hours, on the second button - by three hours, on the third - by four. To set a timer for 24 hours, you need to double-click on the first button. The first time - press for a few seconds, and the second - briefly.
- In confirmation, the communicator should emit a melodic signal. After this, the ignition is turned off.
Autostart based on temperature
In accordance with the temperature controller, you can configure the remote start using the following modes:
- at -5 degrees Celsius;
- at -10°C;
- -18°C;
- -25°C.
The startup procedure will be carried out when the air temperature drops to the configured parameter. The time interval for the operation of the internal combustion engine until a complete stop is configured separately. This indicator ranges from 10 minutes to infinity.
The option must be configured like this:
- The third key on the pager is clicked. It must be pressed for a few seconds, after which the key fob should emit two melodic signals.
- The button is then released. On the communicator display in the bottom row, the clock icon will be activated.
- By clicking on the third key, you need to move the cursor to the position of the automatic start indicator based on temperature. It is made in the form of a thermometer.
- Then the first key on the remote control is clicked. The vehicle's exterior lights should blink once. To confirm the successful activation of the option, the communicator will emit a melodic impulse. On its display in the bottom row the indicator in the form of a thermometer will light up without interruption. The temperature threshold for activating the remote start is shown on the screen.
- To check whether the function is enabled, you can use the anti-theft system LED indicator. The light bulb should emit three series of flashes at intervals.
- Deactivation of autostart mode based on temperature is carried out by pressing button 2. Deactivation will be indicated by a double flash of the vehicle’s lights (hazard warning lights or dimensions). The communicator should play a melodic signal. The remote start indicator will disappear from its display.
Using the Starline A91 model as an example, the “Cities and Their Views” channel talked about the implementation of remote starting of internal combustion engines in accordance with the temperature regime.
To change the temperature at which the internal combustion engine will be started remotely, the following combinations are used:
- a short click on the first button sets the mode to -5 degrees;
- when you briefly press the second key, the response threshold is reduced to -10°C;
- a short click on the third button will reduce the startup temperature to -18°C;
- When you press the first key twice (long and short), the temperature threshold will drop to -25°C.
To select the operating time of the internal combustion engine when starting by temperature, the following actions are performed (initially, the Starline alarms set the interval to 10 minutes):
- a short click on the first key - the threshold increases by 10 minutes;
- short press on the second button - for 20 minutes;
- short press on the third key - for 30 minutes;
- unlimited time can be set by double-clicking the first button, holding it once, and pressing it quickly a second time.
Autostart from phone application
To implement this function, the anti-theft system must be equipped with a GPS unit. A SIM card from a mobile operator is installed into it. As a result, the interaction between the block and the user with the mobile device is carried out at the dialogue level.
To use the function, you must download the Starline program to your smartphone. The mobile device must have an Android or iOS platform (Windows Phone-based gadgets do not work with the utility). The software is freely available on the Internet. After downloading it, you can configure Starline to autostart by command and other parameters. To do this, go to the “Engine” tab in the application.
Channel “Crossover 159” talked about using the Starline telematics function to control the alarm using a mobile device.
StarLine Twage A8 A9 A4 A6
StarLine A4 and A6 systems do not have the ability to start the engine.
Option 1 By pressing button 3 of the key fob, move the cursor to the “Start” icon and briefly press button 2 of the key fob.
Option 2 Press button 1 of the key fob for 3 seconds and release. If button 1 is unprogrammed or faulty, use the first option or program the first button.
User manual
According to the operating instructions given in the service manual, in order to use all functions of the system, you must first bind the key fob to the microprocessor unit.
Principle of operation
This function on cars works as follows:
- A remote start command is sent from a mobile device or remote control to the microprocessor module. If a pre-start heater is installed on the machine, this device is activated.
- Fuel begins to flow into the engine cylinders. If the vehicle is equipped with an immobilizer, then it must have a bypass unit installed. It receives a signal from the microprocessor module.
- The alarm control unit carries out a pre-start check of the machine's electrical network, as well as all electronic devices for operability.
- The ignition system is activated. A combustible mixture begins to form in the cylinders of the internal combustion engine, taking into account the proportions.
- Power is supplied to the starter mechanism. Its contacts are closed, as a result of which the power unit starts.
- If the engine does not start, the system will make several more startup attempts.
- When the startup procedure is completed successfully, a message about this will be sent to the car owner’s key fob.
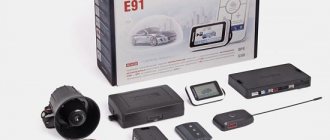
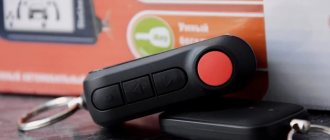
Purpose of the buttons
The designation of the buttons on the control key fob is shown in the photo:
Identification of pager controls
Key 1 of the communicator is intended for:
- activation of protective mode with sound signals - single click;
- turning on the security function without sound - successive key presses;
- activating or disabling the impact controller by levels by double-clicking “can”;
- closing the door locks when the ignition is activated is performed by pressing the “will” button once.
Key 2 is used for:
- disabling the protective function of the car with or without sound, in the first case the press should be single, and in the second - sequential;
- deactivating or enabling an additional controller by levels, for this use a double click;
- opening door locks with the ignition activated, pressing must be single;
- deactivating the anti-robbery mode, in this case the click must be double;
- interrupting the playback of alarm signals by the siren, also one click.
Key 3 is for:
- monitoring the state of the anti-theft system, as well as the temperature in the car interior, for this a single click is made;
- activating the search mode and monitoring the temperature level of the power unit (press the button twice);
- turning on an additional third channel, for this purpose a sequential click is made;
- other options, including auto start, engine blocking, service maintenance, turbo timer, automatic activation of security - options are selected by long pressing the cursor;
- enabling the function of setting time parameters, timer, alarm clock, as well as activating and deactivating these settings.
Consecutive button presses:
- if you click on the first and second keys, the silent protection function will be activated;
- the first and third keys will allow you to start the internal combustion engine or extend the operating time of a running power unit;
- successive clicks on the second and then the first keys will activate the protection of the car with the engine running;
- pressing the second and third buttons will stop the power unit;
- Clicking on the third and first keys will activate the additional first channel;
- buttons 3 and 2 - turn on the second additional channel.
Icon designation
Description of the icons on the pager screen:
- The function of remotely starting the car's power unit using an alarm clock is enabled.
- The remote start mode of the power unit by timer is activated.
- The option to remotely start the internal combustion engine in accordance with temperature indicators has been launched.
- The option for servicing the anti-theft complex using the Valet key is enabled.
- The turbo timer function of the power unit is activated.
- The automatic security mode is enabled.
- Engine immobilizer activated.
- The option to block the buttons on the pager to control the security system is enabled.
- A symbol that determines the temperature level of the car engine.
- Power supply charge indicator in the communicator. If one division remains on this symbol, the battery must be replaced.
- The car engine is started.
- The anti-robbery option is enabled when a car is forcibly seized.
- An auxiliary satellite unit Starline M20 or M30 is connected to the anti-theft complex.
- The trunk of the car is open.
- The indicator warns the car owner that one or more car door locks are not locked.
- A symbol indicating that the hood of a car is open.
- The anti-theft system informs the car owner that the sensitivity sensor, one of its levels, has been activated.
- Current time board.
- A timer option is included for remote engine start.
- The alarm is activated.
- The icon that determines the connection between the control panel and the main electronic unit of the system is made in the form of an antenna. If there is one line next to it, then the connection between the key fob and the module is weak. If there are no divisions, the remote control is out of range of the antenna control unit.
- If this icon is not lit, this indicates that the locks on the car doors are not locked.
- Closed car doors.
- The car protection function with sound is enabled.
- The vehicle's silent security mode is activated.
- With this indicator, the anti-theft system indicates that the parking brake lever is not raised. As a result, remote start of the power unit is impossible. This indicator may indicate that the brake pedal is depressed.
- This icon informs you about setting up a personal code to turn the alarm on and off. The password itself can contain from 1 to 3 characters.
- The indicator informs about the activation of the internal combustion engine remote start function on a car equipped with a manual transmission.
Arrangement of symbols on the communicator display
Channel “Crossover 159” talked about the functions of the Starline key fob, as well as the indicators on its display.
Why might it not start?
There are several reasons:
- The key fobs are not registered in the alarm memory. Typically, the procedure for programming remote controls is carried out immediately after installing the alarm. Perhaps the settings have gone wrong and the key fobs need to be written down again.
- Problems in the operation of the control unit. If the control module does not work correctly, the function of starting the engine from the key fob may not work. Diagnosing the unit at home without the use of specialized equipment is impossible. To check the device, you must take it to specialists.
- If the engine does not start based on temperature, the cause of the malfunction may be a faulty temperature controller that is installed on the engine. The system cannot determine the temperature conditions.
- The engine blocking relay is activated. It is necessary to check the condition of the device and change it if necessary.
- The sender's or recipient's mobile account balance is negative. The problem is solved by replenishing the account.
Advantages and disadvantages
Advantages characteristic of the power unit autostart option:
- Possibility to start driving in an already warmed-up car. The car owner can start the internal combustion engine remotely, while at home. By the time you start your trip, the engine will warm up.
- Save time. This advantage is especially noted by consumers who are late for work in the morning.
- The ability to operate the car even in severe frost. The presence of periodic starting will prevent the power unit from cooling to critically low temperatures. This helps reduce wear on the structural elements of the internal combustion engine, as well as increasing the service life of the engine as a whole.
Disadvantages of this option:
- High fuel consumption during autostart. When the power unit starts, part of the fuel flies into the pipe without benefit to the engine. If the power unit is started several times during the night, the consumption will be noticeable.
- There is a possibility of a dead battery. When the engine starts, the starter mechanism draws more battery current. This leads to its faster discharge. Therefore, before using the option, you must correctly configure the system. There is no need to set the engine running time to short; it should run for at least 10 minutes. 20 minutes. will be enough to replenish the battery charge.
- Adding to the complexity is that when starting the car, the car must be on the parking brake. You cannot leave the car at speed. In severe frost, especially if there was high humidity in the evening, the brake pads may freeze to the wheels. To prevent this, experienced car enthusiasts recommend pressing the brake pedal several times before using the parking lever.
- Lack of protection against theft when starting the internal combustion engine. To perform this task, the car owner needs to bypass the engine blocker. Therefore, it will be easier to steal a vehicle. Also, some alarm models disable the protective mode when autostart is activated. In the absence of security, an attacker can simply get behind the wheel and drive away.
Setting the sensitivity of the shock sensor
To adjust the sensitivity of the shock sensor of the Starline A91 system, you need to perform the following steps:
- disconnect the battery terminals (as an alternative, remove the fuse that controls the interior lighting);
- find the location where the shock sensor is attached (as a rule, it is located under the front panel, in the area of the steering column and pedals);
- disable the security mode, switch to programming mode and use the buttons on the remote control to make the necessary changes.
The sensitivity level has 10 values (0 – minimum, 10 – maximum). Factory settings assume 4-5 levels of protection. When adjusting the alarm sensitivity, you need to take into account the vehicle load level. The operation of the alarm should be considered correct if there are no false alarms.
After setting up the system, you need to wait 2-3 minutes, and then turn the alarm on and off several times to ensure its stable operation.
Video “Starline alarm system repair”
Using a Toyota Corolla as an example, user Gleb Severov showed how to independently restore the remote engine start function.
Do you have any questions? Specialists and readers of the AUTODVIG website will help you ask a question
Was this article helpful?
Thank you for your opinion!
The article was useful. Please share the information with your friends.
Yes (100.00%)
No
X
Please write what is wrong and leave recommendations on the article
Cancel reply
Rate this article: ( 1 vote(s), average: 5.00 out of 5)
Discuss the article: