Advanced security system with key fob Starline B9 (English article – Starline B9 Twage) not only protects the car from theft, but also has a large number of additional functions. So, the owner of this car alarm can set:
- silent security mode;
- activate the “anti-robbery” or “panic” command;
- install a turbo timer;
- set up automatic engine start based on temperature, alarm clock, timer, etc.
The set includes a complete set for installing the system, a main key fob with an LCD display, as well as a second remote control in case the main one is lost (without display). Additionally, you can install a GSM module, which makes it possible to control many functions from your phone. Programming and linking the key fob is a relatively easy procedure. You can learn about these capabilities, as well as the system setup procedure, from this article. About the Starline B9 alarm unit.
Functionality of key fobs
Main features and functions of the remote control of the Starline A91 Twage and Dialog key fob with auto start:
- Activation and deactivation of protective mode.
- Forced activation of alarm signals by a command from the communicator.
- Transferring information about an alarm from a microprocessor device to a pager equipped with a screen and capable of two-way communication.
- Anti-robbery option. If configured correctly, the car owner will be protected from car theft in the event of a violent seizure or robbery. The option is intelligent and is developed by Starline. When a car is forcibly seized, the anti-theft complex analyzes data coming from the sensors of the parking lever, brake pedal and ignition system. When the attacker leaves the crime scene with the car at a safe distance from the owner (usually after 40-60 seconds), the engine is blocked. This happens when the car speed decreases to 30 km/h. When braking, the system will warn other road users about the maneuver using lights.
- The communicator display shows an indication of the complex and activated security zones. There are nine in total.
- The system status is indicated by a diode lamp located on the screen.
- If, when the protective mode is turned on, one of the zones does not work, information about the problem is displayed on the device screen with a specific indication of the zone.
- Using the communicator, the car owner can turn on silent protection. When zones are triggered, the alarm will not sound; information about the problem will be sent to the communicator in the form of signals or vibration.
- Enabling the protective function on a machine with the power unit running. Before programming this function on a car, we recommend that you carefully study the service manual for operation and control.
- When the driver turns on the security system, the system performs automatic diagnostics of the main devices. This allows you to detect problem areas in a timely manner.
- Using the remote control, the driver can remotely deactivate the sensitivity controller by level.
- The Starline B9 car alarm communicator can be registered to control the standard central locking system.
- The remote control allows you to configure the comfort option. If adjusted correctly, activation of the protective mode will be accompanied by the closing of the electric sunroof and power windows, if they are installed in the car.
- Packet data between the communicator and the microprocessor device can be transmitted over four additional channels. They can be configured to implement auxiliary options.
- Using the remote control, you can enable the option to search for a car in the parking lot. When you press a certain combination of communicator buttons, the car's lights will blink, showing the car owner where it is located.
- Pager key lock. Will prevent accidental pressing of buttons in the pocket of the car owner.
- Thanks to feedback and the installation of sensors, the driver can use the data on the device display to learn about the temperature in the cabin and engine compartment.
- The pager is characterized by using an energy-saving mode. This helps prevent the battery from draining quickly. Only the main communicator has this mode.
- The ability to remotely record new communicators on the B9 Dialog alarm system, as well as delete old devices from the device’s memory.
- Option to quickly remove customized options to default values.
- Automatic start of the internal combustion engine upon a command sent by the owner.
- Current time. Correct setting of this parameter will ensure timely remote start of the internal combustion engine based on time and alarm clock.
What to do if StarLine B9 does not work
Sometimes the owner experiences problems with the alarm and needs to understand the existing problem. For example, the car does not see the feedback key fob or does not respond to the command. Accordingly, the owner cannot open the car, start the car or select the required security mode. In this case, you need to check the condition of the remote control power supply and replace the battery if necessary.
Moreover, if the car does not receive the remote control well, then the reason for this may be a poor signal from the transceiver located near metal parts that create interference. It needs to be moved to a more protected place.
There are also options when the car alarm constantly notifies the owner about hacking attempts, the key fob regularly vibrates, and the SP error is written on the display. The reason for this behavior is that the shock sensor is too sensitive. Both stages (impact and hacking) can be adjusted using a standard screwdriver, reaching the sensor itself (it has special controls).
If false alarms sometimes occur and additional software glitches appear, then it is best to reset to factory settings. After this, most of the problems should disappear, but if you can’t fix them, it’s better to take the car to a specialized service center, where qualified specialists will sort out the issue and fix all the problems.
Keychain Starline B94
Buttons and icons
In accordance with the information given in the instructions for the signaling, the communicators have the same button assignments. All of them are used to control alarm functions.
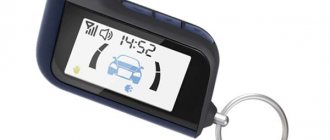
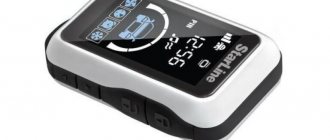
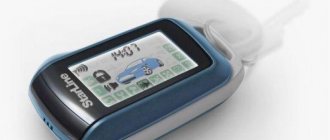
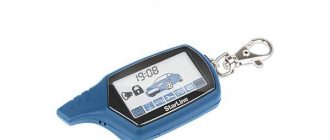
The photo shows the location of the buttons on the Starline 9 key fob
A detailed description of the indicators and icons on the device screen is given below.
Description of indicators
Decoding symbols
Price
The cost of the Starline B9 keychain may vary depending on whether it is an original or a Chinese spare part. Below is a table with approximate prices for two versions of the remote control in various cities of Russia.
| City | Cost, original (rubles) | Price, Chinese equivalent (rubles) |
| Moscow | 1800 | 999 |
| Saint Petersburg | 2000 | 700 |
| Volgograd | 1900 | 1000 |
| Ekaterinburg | 2100 | 1050 |
Key fob programming
Full use of all options of the anti-theft system is possible only after registration or firmware of the communicator.
To flash a new device, do the following:
- Do not turn the ignition on or turn the key to the Off position to turn it off. Find the installation location for the Valet key; it is usually mounted under the center console and disguised in one of the wiring harnesses. If you were not the one who installed the alarm, contact a specialist. The button must be pressed seven times.
- Set the key in the lock to the On position. The siren will play several signals, this indicates entering the firmware mode. Now you can reflash or link new communicators.
- Click on the first and second keys of the device. If the microprocessor module allows registration, one signal will be played.
- The same steps are performed to link other devices. If you are programming several devices at once, prepare them in advance so that the time interval between binding is no more than five seconds.
- Set the key in the lock to the Off position. The car's lights will blink five times, this indicates an exit from the binding mode.
If the recording is unsuccessful and the processor does not accept the codes sent from the key fob, this may be due to two reasons:
- The anti-theft complex and the registered communicator are incompatible with each other. Remember that the pager from Starline B9 will not be able to bind to the B9 Dialog alarm and vice versa.
- The key fob is not registered because it uses a dead battery. The problem is solved by replacing the battery in the device.
Leonid Akimtsev spoke about linking new communicators to the Starline B9 microprocessor module.
Video: binding an additional Starline B9 communicator
User Alexander Shkurevskikh made a video in which he described in detail the process of programming a new spare key fob for the Starline B9 alarm system.
Do you have any questions? Specialists and readers of the AUTODVIG website will help you ask a question
Was this article helpful?
Thank you for your opinion!
The article was useful. Please share the information with your friends.
Yes (100.00%)
No
X
Please write what is wrong and leave recommendations on the article
Cancel reply
Rate this article: ( 2 votes, average: 5.00 out of 5)
Discuss the article:
Setup instructions
Before you start setting up functions, you need to adjust the basic parameters of the device.
Setting the clock, alarm and timer
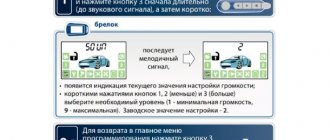
Adjusting timing parameters:
- Click on the third key of the communicator and hold it until the device emits four beeps of different lengths.
- To increase the clock settings, click on the first button; to decrease, use the second button.
- Pressing the third button moves the menu to the minute settings. Adjusting the parameters is done in the same way as with a watch.
- The third key is pressed to exit the setup menu. The device will emit a melodic signal.
Alarm setting:
- Hold down key number 3, the communicator should emit four beeps. Their presence confirms entry into the programming mode.
- Key three is clicked sequentially until the cursor is positioned on the bell-shaped indicator.
- The procedure for adjusting the alarm activation time is performed using the first and second keys. First, the user sets the hours and then the minutes for the function to trigger.
- When the parameter adjustment is completed, the third key is clicked to confirm the entered data.
- The option is activated by pressing the first button, deactivated by clicking the second button. To leave the settings menu, press button 3. The operation of the function is indicated by an indicator in the form of a bell on the device screen. When the function is activated, the pager will begin to play a melodic signal, which can be turned off by pressing the third button.
Timofey Shvets spoke about the features of using the key fob and alarm settings.
Timer setting:
- Enter the settings by holding down the third key.
- Having entered the menu, use the same button to move the cursor on the display to the position of the timer indicator, made in the form of an hourglass.
- Adjustment of the function parameters is performed using the first and second keys of the remote control. The user must first specify the hour and then the minutes of the timer. To move from one parameter to another, click the third key.
- When the parameters are set, the third button is clicked.
- Activation of the option is carried out by pressing the key number 1; the indicator labeled On will indicate its activation. Deactivation is done by clicking on the second button; an indicator with the word Off will appear on the display.
- Exiting the settings menu is done by holding down the third button. If the option works, an hourglass symbol will be displayed on the screen. When the timer goes off, the device will emit several long beeps.
The maximum time for setting the timer can be no more than 23:59.
Key fob batteries and their replacement
The devices use different batteries:
- AAA class sources with a power of 1.5 volts are installed in the main device;
- The spare communicator contains one three-volt CR2032 battery.
The service life of batteries depends on various factors:
- intensity of device use;
- frequency of activation of the communicator speaker;
- type of notification – with sound or vibration;
- type of power source used.
Depending on the battery manufacturer, its service life in the main device can range from six to nine months. In a spare communicator, the battery will last from 9 to 12 months. To increase the resource, it is recommended to use the power saving option; it turns on automatically two minutes after the protective mode is turned off. If the battery in the remote control is low, you can know this by the appearance of a battery icon on the screen.
GO FASTRELIABLE talked about replacing power supplies.
In the main communicator, the battery changes like this:
- The back cover is removed and the used battery is removed from the case.
- Taking into account the polarity, a new battery is installed. If you have any difficulties, look at the back of the cover.
- When the battery is replaced, the timing parameters must be re-adjusted.
To change the battery in the spare device on the back cover, use a screwdriver with a small tip to unscrew the bolt. The battery is removed and a new one is installed in its place, taking into account the polarity. After changing, the cover is put back in place and the screw is tightened.
Key Features
When using the system, the security complex protects the following areas:
- Car engine wiring. For this, a special car alarm relay is used.
- Electrical lines connected to the lock and other elements of the ignition system.
- Door, hood and trunk locks. To do this, you need to install and connect limit switches. The kit includes only one switch, for mounting on the hood. The luggage compartment and door lock devices must be purchased separately.
- Handbrake lever. A standard sensor is used for this.
- Salon. A sensitivity sensor is used.
Basic protective functions of the alarm:
- car protection when the engine is running;
- automatic activation of protection when receiving signals from sensors;
- warning the user about turning on the security system when using a communication channel with the remote control;
- the ability to operate the anti-theft system as an immobilizer;
- adjustable two-step disabling of the security mode;
- use of a service PIN code required to control and turn off the system in emergency mode;
- blocking motor electrical circuits and storing this information;
- maintaining engine blocking when power is turned off;
- silent activation of the protection mode;
- silent security option, in which the activation of the alarm mode is not accompanied by signals from the siren;
- floating encoding, characterized by increased protection in relation to scanners and code grabbers;
- limited number of sequential activations based on information received from sensors;
- disabling the alarm mode without turning off the vehicle security system.
For greater ease of use, the system includes additional service options:
- turning the security system on and off using the service button, without using a key fob;
- restoration of the protective function when the security system is turned off;
- programming the basic parameters and characteristics of sensors and door locks;
- option to control additional locking of door locks when using the ignition switch;
- use of additional four channels, which are necessary to control additional equipment and devices;
- car search function in the parking lot;
- the presence of a locking button on the remote control, which prevents accidental pressing;
- auto engine start and turbo timer;
- light indication of the reasons for turning on the security function;
- sound notification of the car owner about events that have occurred;
- the ability to detect problems when the security system is turned on - the alarm self-diagnosis function.
The consumer can expand the functionality of the alarm by installing additional GPS/GSM modules from the manufacturer Starline.
Satellite and mobile tracking devices will allow you to determine the coordinates of the car, which can be useful if it is stolen. Additional modules are controlled using mobile communications. To do this, the appropriate software must be installed on the user's phone in advance.
The AndreuAZTV channel spoke in detail about the main capabilities of this car alarm model.
Alarm management
The main options are controlled using different combinations of buttons.
Starting and disabling the security mode
Activation of the protective function is carried out on the car with the ignition turned off, the doors and hood locked, and the handbrake lever raised. Switching on is done by clicking on the first key of the device. The screen will display symbols in the form of a loudspeaker and a closed lock. The function is turned off using the second key.
Michael MNS talked about enabling and disabling the protective mode in Starline signaling.
Starting security mode without sound
Starting the protective function without audible confirmation is carried out under the same conditions. To do this, use the first button, only click on it twice.
Opening and closing doors with the engine running
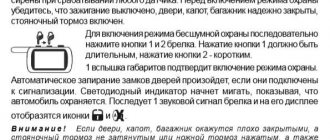
The procedure for executing this function is:
- Before activation, lift the handbrake lever, then open one of the doors. The LED light will blink.
- Click on the second key, the device will emit a melodic signal. An icon in the form of smoke from a muffler will appear on its screen. The time during which the motor will operate will appear; this parameter is configured in accordance with the instructions. The indicator will light continuously, the lights may blink, depending on the setting.
- The key is removed from the lock, after which the driver leaves the car and closes the doors. The power unit remains switched on.
- The first pager key is clicked. The security zones and sensitivity controller will be activated.
- To disable the option, click on the second button.
Remote engine start and stop
Remote start of the motor is performed by successively clicking on keys 1 and 3. Moreover, pressing the first button will be longer than pressing the third. If the engine starts, the car's lights will blink three times and the device will emit a melodic signal.
To turn off the motor remotely, similar actions are performed, only instead of the first button, the second is used. The car's lights will blink four times, and the indicator in the form of smoke from the muffler will disappear from the communicator display.
Warming up the engine at a given temperature
Features of using the option:
- Activation is performed by moving the cursor on the indicator display to the icon in the form of a thermometer, and the option is enabled. The lights will blink, the icon will continue to light on the screen, as well as the temperature value at which the internal combustion engine will be activated.
- Switching on is done by pressing the second key of the device. The lights will blink twice.
Stanislav Tarasov spoke about the features of the internal combustion engine autostart.
Automatic engine start according to schedule
Features of the function:
- Scheduled activation begins with checking the set time on the screen. The alarm clock is being set; a bell-shaped indicator will indicate its activation.
- If the current time is set correctly, keys 3 and 1 of the pager are clicked. The cursor on the screen moves to the clock-shaped indicator, and the function is activated.
- To disable the option, move the cursor to the clock symbol and click on the second key.
Activating the vehicle search function
Enabling the option is done by double-clicking on the third key for one second. The siren speaker will emit six signals, and the car's lights will blink the same number of times.
Triggering of alarm sensors
Alarm controllers turn on automatically when sensors are triggered. To turn them off, you need to click on the second key of the pager. This will turn off the signals, but the car will remain protected by the car alarm.
Valet mode
The service mode is controlled by pressing the third key and holding it until sound signals are played. Using the same button, the cursor moves to the indicator labeled Valet. To turn on the service mode, click the first button, the lights will blink once.
How to program
Programming allows you to flash a new control panel or exclude it from the system, as well as configure individual operating parameters. You can program the Starline B9 key fob to perform the following options:
- The operation of the motor after automatic switching on can be 10, 20, 30 minutes and is configured with 1, 2 and 3 keys, respectively. A long press of button No. 1 corresponds to the “no limit” value. The sequence of buttons is the same for settings of all subsequent functions. The default is 10 minutes.
- Programming the B9 key fob with auto-start by time allows you to set the interval to 2, 3.4 and 24 hours. The manufacturer set the interval to 2 hours.
- Automatic engine start based on temperature activates the start if the temperature is -5°C, -10°C, -18°C, -25°C. By default, the start is set to -5°C.
- The duration of the starter cranking is set to 0.8, 1.4, 2 and 3.6 seconds. According to factory settings - 0.8 seconds.
- Ignition support when the engine is running can be carried out automatically or from the key fob.
- The engine type is determined by petrol or diesel.
- The operating mode of the dimensions during engine operation is set in three options - flashes, constantly on or off.
In the same way, rules are set for enabling or disabling security, locking and unlocking doors.
How to register a new Starline B9 DIALOG key fob
The memory of the Starline anti-theft system can remember up to 4 control key fobs. Firmware may be required if the previous device breaks down, or if a spare set of keys is created. The standard B9 remote control is not compatible with the B9 DIALOG system. A key fob from the A91 model can become a full-fledged donor for signaling this model. This must be taken into account when purchasing a new device. You can register a new key fob for the B9 DIALOG alarm yourself, following a number of steps:
- the engine is turned off, the VALET service button is pressed 7 times;
- the ignition is activated and 7 sound and light signals appear;
- buttons No. 1 and No. 2 are simultaneously pressed until a single siren signal appears, which indicates successful flashing of the key fob;
- the previous paragraph is repeated as many times as there are key fobs to be entered into the system;
- At the end of the recording, the motor turns off, 5 size signals appear, which confirm the exit from the programming mode.
An important point: if the system does not accept the key fob within 10 seconds, the alarm will automatically exit the firmware mode. This will be indicated by light flashes of dimensions.
It should be remembered that when adding protection to a new device, it is necessary to overwrite the previous key fobs. Otherwise, this will cause them to be deleted from memory.
How to attach a key fob to a Starline B9 TWAGE alarm system
The Starline B9 TWAGE anti-theft system has a number of differences that affect the introduction of a new remote control into the control system. To link the key fob to the Starline B9 TWAGE series car alarm you need to:
- turn off the engine, press the service button 7 times;
- start the engine, turn the ignition key to the ac position, wait for the sound signal to sound seven times;
- on the key fob that needs to be activated in the system, the first 2 keys are pressed simultaneously until a single siren signal is played;
- the action is repeated for all inserted devices, the break between remote controls should be no more than 5 seconds;
- upon completion, the engine turns off, completion of programming is accompanied by a five-fold light signal.
Common key fob malfunctions and their solutions
Problems that the consumer will encounter:
- Power supply discharge. If this happens, you need to buy a new battery and install it in the device. When replacing, consider the battery standard.
- Negative effects of moisture and dust on the device. If the key fob “sinks” or becomes clogged (often occurs during prolonged use), its body must be disassembled and cleaned of dirt. And then dry it from moisture. The device should not be dried in close proximity to sources of high temperatures, as exposure to them will lead to failure of the board. If there is dirt inside the case, it can be removed with a soft brush.
- Mechanical damage. If the case or screen is cracked, these components must be replaced.
- Software faults. This can be solved by reflashing the device. It is better to entrust this procedure to professionals.