Below is how to set the time on the Starline key fob of various series. Even correctly set parameters can go wrong, and this can be caused by several factors. The first is the usual mechanical damage to the Starline key fob. Due to impact or heavy loads, the remote control may break, its screen may crack, and settings may be lost.
The second - and most common - is a weak or discharged key fob battery.
If the charge is weak, the clock setting can easily go wrong. A special charge indicator, which is equipped with almost all Starline alarm key fobs, will help you track the moment of timely replacement. After replacing the battery with a new one, you need to remember that all system parameters are reset. Therefore, you will need to re-set the time on the key fob. Also, changing parameters may be affected by a system or software failure of the remote control itself. In this case, it will need to be replaced or the help of a qualified service center specialist. But you can change the battery and reset the clock yourself. How to disable Starline A63.
How to correctly set the time on the Starline key fob
The Starline alarm key fob displays not only useful system information, but also the time, which can be manually adjusted.
Most car alarm key fobs that have a screen can also display the time. This is not only practical in terms of controlling your schedule and time awareness, but also convenient when implementing additional automatic start capabilities. Starline does not lag behind its competitors and also uses the watch function in its arsenal. Setting them up is not difficult; you need to know the main principles of controlling the alarm key fob.
Despite the fact that Starline has simplified the time setting procedure to the maximum, some issues related to unsuccessful installation attempts continue to arise.
Why is this needed and what will happen if you don’t set the clock
One of the functions of the Starline A93 car alarm is automatic start of the vehicle engine according to time. By setting the required value, the car will start itself, without requiring any action on the part of the owner.
To use the function, you must set the clock on the Starline A93 key fob. Otherwise, the alarm will start at the wrong time or you will have to adjust the alarm clock taking into account the lagging/hurried system clock.
Instructions for setting the time
The procedure for setting the time on the Starline key fob may differ depending on the alarm model.
How to set and set the time on the Starline model A91 remote control:
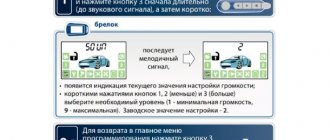
- Take the pager and hold down the key under the third number, it is used to adjust the alarm system clock parameters. Press and hold the key until the key fob speaker emits one melodic pulse. After this, another short beep will sound, and then two more short melodies will sound. This indicates successful entry into the clock programming mode. The indicator with a clock on the alarm key fob will blink. Using the key under the first number, the hour values are increased, and using the second button this parameter can be decreased.
- Then briefly press the third key to set the minutes. This will cause the minute indicator to blink on the display. Key 1 increases the minutes, and the second button decreases them.
- After this, click on key 3, this will cause the pager to enter the alarm clock parameters activation mode. When the corresponding indicator starts blinking, the first button increases the readings, and the button number two decreases them.
- Click on the key again to set the alarm minutes. The procedure for increasing and decreasing parameters is performed in a similar way.
- With a subsequent short click on key 3, you can activate or deactivate the alarm clock. Button 1 “alarm” turns on the function, and key number 2 turns it off.
- If you further press the key number 3, the alarm timer setting menu will open. When the option indicator starts blinking, the first and second keys decrease or increase the parameters. When you next briefly click the third key, the minute indicator will flash. The value is adjusted using similar buttons. After setting, pressing key number 3 will activate or disable the option.
- To leave the clock setting mode, you simply do not touch the buttons on the pager for five seconds.
Irina Belousova showed how to independently set the time on the Starline pager.
How to set the time on the Starline key fob in models E90, E91, B94:
- To enter the setup menu, you need to click and hold down key number 4. The button is held until the security system pager emits one long and then two short beeps.
- After this, you will hear another long and two short beeps. On the pager screen you can see the indication of the first option. Using the first and fourth keys, you select the required function. F1 is used to adjust time and date settings.
- Having selected an option, click on the fourth button and hold it until two short beeps sound.
- Specify the adjustment option. The pager allows you to set not only the minutes and hours, but also the day, month and year. To select the desired value, click on the fourth or first key.
- Once a parameter is selected, the values are adjusted by using the second and third buttons.
- When all the values have been set, you need to exit the setup mode. The alarm will automatically go off if you do not click on the pager buttons for eight seconds. You can exit the settings menu by holding down the first transmitter button. Exit from the mode will be indicated by two short-term pager signals.
Photo gallery of key fobs of various versions of the Starline alarm system
StarLine D64
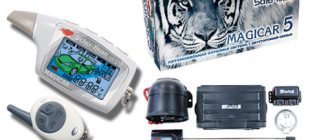
StarLine A93/A63
StarLine B64
StarLine A64
The video from the author Andrey Ambrosimov contains a detailed manual on how to set the time on the Starline model A93 key fob.
How to set the time for A series
To set the time on StarLine car alarm models A91, A92, A93, A94 and A61, you must perform the following algorithm:
- Press button 3. Do not remove your finger from the key until you hear: 1 short melody, 2 short beeps, 1 short beep.
- When the hour display flashes, use buttons 1 (increase) and 2 (decrease) to set the clock correctly.
- Briefly press button 3 and wait until the minute indicators flash. Adjust the minutes, also using keys 1 and 2.
- Quickly click on key 3 and wait for the key fob to enter alarm setting mode. Set the necessary parameters again using buttons 1 and 2.
- Press button 3 without holding for a long time to go to the timer setting function. Similarly, use keys 1 and 2 to set the correct values.
- To exit the menu, stop any actions with the key fob and after 10 seconds it will automatically hide the programming functions, saving all the entered parameters.
4. Programming operating modes using the cursor method
The Starline A61 key fob, like the key fobs of most other StarLine alarm systems, activate modes and functions using the cursor method. It is very simple and understandable. The cursor is a flashing highlight of one of the icons on the display. A function or mode that can be turned on or off at the moment is highlighted by the cursor.
To enter programming of operating modes using the cursor method, follow these steps:
- Press button 3 until one long and one short beep. After this, the first icon on the left at the bottom of the display should start flashing.
- Move the cursor to the icon of the function you want to turn on/off. This is done by short presses of key 3.
- Set the operating mode of the selected function: button 1 – enable, button 2 – disable.
What are the consequences of incorrectly setting the clock on the remote control?
Obviously, if the time on the Starline alarm remote control is incorrect, the system will remain operational and will still protect the car from burglary or theft. However, the user will be deprived of a number of advantages.
In critical cases, when it is late, you will have to start driving on “cold and viscous” oil, which does not provide proper lubricating properties. If repeated for a long time, this can even lead to engine damage. So, correctly setting the time on the Starline key fob not only allows you to take advantage of all the benefits of the system, but also take care of the proper operation and safety of the engine.
2. LCD display of key fob
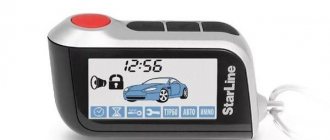
The liquid crystal display occupies the front panel of the Starline A61 key fob. The screen displays all the indications indicating the status of the car and the alarm. By the icons you can determine which settings are set and modes are activated. Notifications about triggered sensors also appear on the display.
To easily understand the information on the key fob, use the decoding of the icons presented in the pictures below. Labels with letter designations correspond to commands and operating modes of the alarm. The remaining icons display the status of the alarm and the vehicle itself.
Reasons for settings failure
During operation, settings 93 may fail. The problem can be caused by:
- The communicator battery is low. Its status indicator is displayed on the key fob, so you can avoid completely discharging the battery in a timely manner. When the battery is low, the clock may lag.
- Replacing the battery in the key fob. When replacing the power source, the previously set time parameters are reset. The only exception is if the alarm has been armed. Therefore, before replacing the power source, it is not recommended to set the clock on the Starline A93 alarm system.
- Incorrect operation of the communicator. If the battery is charged, problems with the remote control software may cause temporary settings to fail.
1. Control key fobs A61
The Starline A61 alarm system has two key fobs: the main one and the additional one. Each has its own characteristics and purpose:
- Basic. Equipped with a liquid crystal display and 3 buttons, it has a range of up to 800 m in transmitting mode and up to 2 km in receiving mode.
- Additional. It has 2 buttons (with an image of an open and closed lock) and LED indication, but is not equipped with a display or two-way communication. It is used as a replacement for the main key fob if for some reason it cannot be used: it is broken, lost, left at home, the battery is dead (enough for about 2 months). In terms of the degree of protection, the additional key fob does not differ from the main one - it uses the same dialog control code. The main difference is the lack of alert functions. The additional key fob is used only to control the security mode.
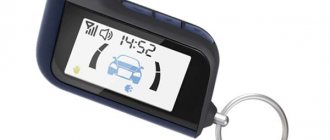
Information about the vehicle’s condition is transmitted to the main Starline A61 key fob with two-way communication: the screen backlight lights up, sound and vibration signals are triggered. The screen displays the current time, the activated alarm clock, and the temperature inside the car. Switching modes and functions on and off occurs using the cursor method. Each command corresponds to a specific icon that appears on the key fob screen.
For comfortable use of the alarm, it is important to distinguish between the methods of pressing the buttons of the main key fob. They differ in duration:
- Short press. The key is pressed for only 0.5 s.
- Long press. The button must be pressed and held a little longer - more than 0.5 s until a sound signal appears.
- Double tap. Represents 2 short presses of 0.5 s each.
- Consecutive pressing. The same or 2 different buttons are pressed first for a long time and then briefly.
How to set the time on a key fob
The Starline A93 alarm system is distinguished by its ease and simplicity of operation. All settings and control of the car are carried out using 4 buttons. Actions and alerts are visualized on the LCD screen.
The time setting is carried out as follows:
- Enter the “Functions Menu”. To do this, press and hold button 4 for several seconds. Upon entry, 1 long and 2 short beeps are heard. The clock on the screen begins to blink.
- To set the time, use buttons 2 and 3 - increase and decrease the value, respectively. First change the clock. Then press button 4 and set the minutes in the same way.
- The next press of button 4 takes you to the alarm time setting menu. Hours and minutes are configured similarly to step 3.
- After pressing button 4, they switch to the mode of turning on (ON) or turning off (OFF) the alarm clock. When turned on, the alarm will sound at the configured time.
- Then the autorun timer is set. The process is similar to adjusting the alarm clock: using button 4, you go to setting the hours and minutes, turning the function on and off.
When entering the menu, the user is given 8 seconds to set the clock on the key fob. If no action has been performed during the specified period, the device returns to its original position.
There is another way to set up a car engine to start using a timer. To do this, press and hold buttons 2 and 3 simultaneously until a long and short beep appears.
The alarm clock icon will flash at the bottom of the display. If you press button 1, the icon will be lit constantly. In this case, autorun will turn on according to the time set on the alarm clock.
If you press buttons 2 and 3, they switch to autorun mode using a timer, and an hourglass image appears. The machine will be turned on when the mode is activated and subsequently after a set time interval.
Functions of the Starline key fob
Several alarm options are tied directly under the clock. The main one is timed autostart. The owner can set the time when the engine will turn on and reach operating temperature before leaving the house. This is convenient because the interior is warmed up at the same time.
Starline can turn on a timer for the turbine. After active driving on turbocharged engines, some elements of the intake tract heat up to about 800 degrees Celsius. Cooling occurs due to engine oil circulating through the system. Therefore, turning off the turbo engine immediately after aggressive driving is not recommended. Starting the turbo timer is a useful function that depends on the clock.
You can set an alarm clock and auto-start on it. This setup will be one-time only. Setting an alarm clock is convenient if the owner is going to do unusual things after hours (pick someone up from the airport, meet someone, etc.). At the set hour, the Starline key fob will play the wake-up melody and give the command for auto-warming.
Setting the time: step-by-step instructions
In order to set the time on the Starline A91 key fob correctly, you must follow the following instructions step by step:
1. Button number 3 (star drawn) is held until 3 beeps sound. After completing the steps described above, the clock icon will start blinking. Now you can set the time using buttons 1 and 2. Button 1 increases the number of hours, and using button 2 the time value decreases accordingly.
2. After setting the clock, briefly press button 3 and set the minutes. By analogy with adjusting the clock, minutes are set by pressing buttons 1 and 2.
3. At the next stage, the alarm clock is adjusted. For this purpose, briefly press button 3. After the icon starts flashing, the indications for this mode can also be set by pressing buttons 1 and 2.
As you can see, there is nothing complicated in adjusting the time on the Starline A91 key fob, but when making settings you should be very careful not to confuse the modes. Flashing the corresponding icon on the display helps to configure the key fob correctly.
Reasons for frequent alarm settings being lost
If time adjustment has to be done quite often, then it is necessary to determine the reason for the unstable operation of the electronic system. The most common reasons for the temporary settings on the Starline A91 key fob being lost:
- Low battery charge.
- Lack of reliable contact between the battery and the terminals of the device.
- Factory defect or device software malfunction.
In the first case, the problem of frequently changing time settings is solved by replacing the battery. To carry out this operation, it is enough to disassemble the key fob, remove the dead battery and install a new battery.
The new battery must be completely identical to the element being replaced in terms of size and current ratings. If it is possible to purchase a more expensive battery, then this must be done. When using a high-quality battery, the frequency of replacement will be significantly reduced.
If the unstable operation of the key fob is caused by bending or destruction of the contacts, then this problem can also be solved on your own. In the first case, it is enough to straighten the elastic contacts to increase their pressure on the contact part of the battery. If the contact is broken, then this part can be soldered using a low-power soldering iron with a thin tip.
A key fob malfunction caused by a manufacturing defect must be corrected at the manufacturer's expense. If the functionality of the device is impaired due to the fault of the motorist, then repair or replacement of the device is carried out at personal expense.
If malfunctions occur that cannot be fixed by yourself, you should contact specialized workshops, where professionals will determine the exact cause of the device’s inoperability and carry out high-quality repairs or replacement of the Starline A91 car alarm key fob.
Trouble-shooting
Some problems with incorrect display of the clock parameter can be resolved yourself. If the reason is a faulty or discharged battery, then you can replace the part yourself. To do this, you just need to open the back cover and install a new battery.
It is also advisable to check the contacts when replacing. If there is a suspicion of their oxidation or lack of conjugation with the nutrient element, then they need to be cleaned and bent.
Mechanical damage in the form of cracks in the display or breakage of the key fob body is “treated” by replacing the part. The new remote control can easily be “linked” to the old car. If the time is periodically “reset” or displayed incorrectly, then this is a software failure. Service center specialists and programmers will help you here.
If after replacing the battery the key fob still does not work, then perhaps the cause of the failure was a more serious breakdown that requires repair.
What will you need?
To troubleshoot a StarLine car alarm key fob, you need to prepare the following tools, devices and items:
- small Phillips screwdriver;
- a brush with soft bristles;
- cotton buds;
- a bottle of medical alcohol;
- multimeter;
- soldering iron with a thin tip.
To eliminate the breakdown and restore all functions of the remote control you need:
- Remove the battery from the device.
- Using a Phillips screwdriver, unscrew the screw holding the two halves of the key fob body together.
- Take a soft brush and carefully clean the internal parts of the pager from dust and other contaminants.
- If there is stubborn dirt or liquid droplets inside the device, carefully remove them using a cotton swab dipped in undiluted rubbing alcohol.
- Using a multimeter, check the operation of the system board, transistor, diode and other important elements. If, according to the diagnostic results, any part turns out to be non-functional, it must be replaced with a working one. You can purchase components for an alarm key fob at a radio parts store or other specialized sales points.
- Using a soldering iron with a small tip, install the new part into the device. With the same device you can return the loose contact to its place.
- Assemble the pager body and tighten the screw with a screwdriver. Reinsert the battery.
StarLine keychain disassembled
Setting comfort modes Starine A91
The main 2 parameters by which autostart is activated are temperature and time indicators. The automatic engine start option is used when preheating the engine in the cold season. The turbo timer mode controls the shutdown of turbocharged engines.
Setting up autostart alarm Starline A91
The StarLine A91 car alarm option under consideration is configured subject to the following conditions: the StarLine A91 alarm package must include a temperature sensor in working condition.
The first option we will consider is setting up the engine to start automatically according to the programmed temperature. The option is activated:
- Long press the 3rd key fob button (marked “*”);
- Over time, single signals (long and short sounds) will appear;
- After releasing button 3, on the screen of the StarLine A91 car alarm key fob, the “icon” indicating the temperature will blink, located at the bottom left;
- After briefly pressing button 3, move the cursor to the thermometer icon. The LED in the car will turn on 3 times.
Having completed the preparation, press button 1 briefly, the required StarLine A91 alarm mode is activated.
The correctness of the actions is confirmed by a short-term one-time activation of the side lights. At the same time, the key fob notifies with signals: 2 short; 1st melodic. The selected option will be marked on the screen with an “icon”, with the temperature value at which the motor will start.
The startup mode is configured: by placing the cursor on the temperature “icon”; by pressing button 2 of the StarLine A91 car alarm key fob. The dimensions will flash 2 times. A melodic sound is heard, the “icon” disappears.
The minimum time when the next autostarts are possible is in the range of 1 hour. There are no restrictions on the number of starts.
Autostart time is configured as follows:
- Press and hold the key fob button “*” (3) for a long time;
- The StarLine A91 alarm key fob gives a short signal, after the next signal appears, the button is released;
- The leftmost “icon” will begin to blink;
- By pressing the “*” button, set the cursor to the “icon” depicting fan blades;
- A short press of button 1 (closed lock symbol) of the key fob causes a melodic sound to appear;
- A ten-second delay is required until the signal appears; the “icon” depicting the fan blades must be darkened.
In the mode – autostart by time, car alarm StarLine A91, activated by button 2 – “open lock”. The car will flash its headlights once, and the key fob will emit a melodic sound. The setup has been made, then the StarLine alarm will issue commands to start the engine at a strictly programmed time.
To turn off the configured startup option, you need to reposition the cursor on the “icon” with fan blades, press button 2 on the key fob - “open lock”. Switching off is signaled by two flashes of side signals, accompanied by a melodic signal from the key fob. The “icon” will disappear.
Setting up the Starline A91 alarm turbo timer
When the StarLine A91 alarm turbo timer is turned on, the hood position is checked. It must be closed. The gear shift knob is set to the neutral position, the motor is in working condition. The sequence of actions is as follows:
- The handbrake is applied.
- The key is removed from the ignition, the driver gets out of the car and closes the existing doors.
- In this case, the StarLine car alarm LED lights up continuously, the side lights blink once.
- The key fob will emit a melody sound, and the “icon” – TURBO – will be marked on the screen. Press button 1.
- The StarLine A91 alarm system will emit 1 signal. The side lights will flash 1 time. The ignition zone and sensors are turned off, the doors are locked, with the locks connected to the StarLine car alarm.
- The key fob emits a short signal. The screen “icons” symbolize the running engine and the security mode.
The turbo timer is programmed as follows:
- Press and hold button 3 of the key fob until 2 beeps sound (long and short).
- Release the button, the first “icon” on the left on the key fob screen is highlighted.
- The cursor moves with button 3 to the TURBO “icon”.
- Press button 1 on the remote control. The side lights will flash 1 time. The key fob will emit signals: short - 2 times; melody – 1. The TURBO “icon” is highlighted; while it is highlighted, the turbo timer option is activated in auto mode.
Disabling the described option is performed in the reverse order, until the TURBO “icon” darkens.
6. Programming the Starline A61 turbo timer mode
For proper and longer-lasting operation of your car's turbine, be sure to set up the turbo timer. To do this, do the following:
- Long press button 3.
- Move the cursor to the desired icon labeled “TURBO”.
- To turn on the turbo timer, press key 1. When the mode is turned on, the “TURBO” icon will be displayed on the screen - while it is on the display, the function will be activated automatically.
Reset to factory settings
Instructions for resetting the key fob to factory settings:
- Find the Valet button, which is usually located in hidden places in the car. Most often, the service key is installed under the dashboard, in the glove compartment, near the steering wheel, next to the gearshift lever or in the fuse hatch.
- Turn on the ignition and with the engine running, click on the service button 9 times (you need to press it briefly). Each press should last no more than half a second.
- Turn off the engine and wait until the system responds with 9 short beeps. They will indicate successful entry into factory reset mode.
- Press the service button once and wait for the siren to respond.
- Click on button 1 on the alarm key fob. The key fob will respond with a single sound signal, which notifies the car owner that all indicators have been reset to factory settings.
- To exit the reset mode, turn on the car engine. The system will respond with 5 light signals.
PIN code programming
Setting a key fob PIN code for emergency alarm deactivation is necessary, as it seriously increases the security of the system. In Starline E90, this code can consist of 1,2 or 3 digits from 1 to 6, that is, a total of 258 different options are available.
The factory default value of the pin code is 3, which is also set after resetting to factory settings. It is impossible to erase the PIN code separately on the E90.
To set a PIN code, you must first set its length in the alarm settings (see below), then with the ignition on, press the Valet service button four times. Then turn on the ignition and enter the first digit of the code:
| Code digit | Buttons |
| 1 | 1 |
| 2 | 2 |
| 3 | 3 |
| 4 | 1 long, then short |
| 5 | 2 long, then short |
| 6 | 3 long, then short |
If you selected a two- or three-digit PIN code in the settings, repeat these steps for subsequent digits.
Basic autorun settings
To use the Starline A91 autostart, the alarm system must be correctly connected and configured. Basic system settings are set as follows:
- With the ignition off and security disabled, quickly press the security system service button 6 times.
- Turn on the ignition without delay. The alarm should sound six times, indicating that it has successfully entered the second settings menu (autorun settings).
- By successively pressing the service button, select the desired function (from 1 to 12). After each press, the alarm system will use siren signals to confirm the number of the selected function, with a short siren signal meaning one, and a long one meaning five. That is, four short signals mean that function 4 is selected, a long and short signal means function 6, two long and two short signals mean function 12.
- The required value of the selected function is set by the buttons of the main remote control: a short press of buttons 1, 2 and 3 sets this function to the corresponding value by number, a long and then short press of button 1 sets the function to value 4.
- After setting all the necessary settings, exit the menu by turning off the ignition.
The following set of functions is relevant for the user (some of them are programmed in accordance with the connection diagram to a specific car, and changing these settings can cause autostart failure):
- function 2 sets the duration of engine operation after forced starting or starting according to an algorithm (alarm clock, timer, temperature). In function values 1, 2 and 3, the warm-up duration is 10, 20 and 30 minutes. In option 4, the engine will not be turned off automatically; it will need to be turned off each time from the key fob;
- function 3 allows you to set the warm-up on the Starline A91 on a timer for 2,3,4 and 24 hours;
- function 4 configures autostart based on the Starline A91 temperature. In options 1 to 4, the threshold, when the temperature drops below which the engine will start, is -5, -10, -18 and -25 degrees Celsius, respectively;
- function 6 determines the logic of the operation of the light indicators during engine warm-up (depending on the connection of the alarm system to a particular car, these may be turn signals or clearance lights). They can light up pulsed (option 1), constantly (option 2) or be turned off (3 and 4). Please note that when the alarm is connected not directly to the lamps, but to the hazard warning button, the turn signals in option 2 will also flash, since in fact, in this case, the “hazard warning lights” will be constantly on;
- function 9 sets the maximum duration of starter cranking: 0.8, 1.4, 2 or 6 seconds. Please note that this maximum duration is only relevant for indirectly determining the fact of a successful start (the alarm is not connected via a tacho signal). We recommend leaving it at the value that was set by the installer;
- function 10 sets the delay between turning on the ignition and cranking the starter: 2, 5, 10 or 20 seconds. For diesel engines with glow plugs in winter, it makes sense to set a longer delay;
- function 12 determines how the alarm will enter the ignition support mode, starting the autostart reservation algorithm. Since autostart reservation is only necessary for cars with a manual transmission (“software neutral” is needed to ensure that the car is not left in gear), for cars with an automatic transmission it is necessary to set function 12 to 4 (disabled). Setting this value to 4 on cars with manual transmission will block autostart; this can be used to completely disable autostart of the Starline A91. Reservation in option 1 occurs automatically when the hand brake is applied at the moment the ignition is turned off. Some cars may stall during the pause between turning off the ignition with the key and the activation of the autostart power relay, in which case the function must be set to value 3 (automatically when the handbrake is tightened). If you do not need automatic reservation, set the function to value 2 - reservation will occur if, with the engine running and the handbrake applied, you press button 2 on the key fob.