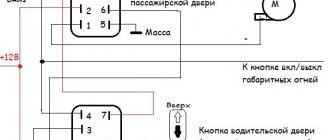
For greater convenience, the button for turning on the low beam headlights and the button for turning on the dimensions of the VAZ 2114 are made in pairs and are located on the car's European panel. Both are equipped with additional built-in LEDs (two for backlighting and one indicator for side lights).
As a rule, there are no problems with the operation of these buttons, but if necessary (for example, in case of breakdown), you should know how to replace them.
Everything is done in the following order:
- Remove the cover under manual control (removed simply by hand, without tools).
- Pull the buttons inward by pressing them from the inside.
- Gently pull the button, wiggling it slightly, and remove it from the shoe.
- Install the new button into the shoe.
- Place the buttons back into the panel.
As you can see, replacement can be done almost instantly, without much effort and without the use of special tools.
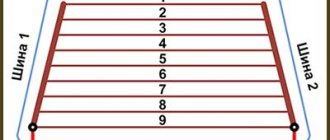
Another important point that should be highlighted is the pinout of the button to fit the dimensions of the VAZ 2114. It may be needed, for example, when replacing an old type button with a button for a Europanel.
You can see this more clearly in the following diagrams: for old style buttons
for new type buttons
All letters indicated in the diagram correspond to the output contacts of the buttons and have markings similar to them, and the colors of the wires are indicated by letter abbreviations.
In addition, the pinout of the VAZ 2114 light button can also help in troubleshooting problems related to the operation of the buttons themselves, for example, if the backlight of one of them does not work.
Please note that the contacts:
- 6-B or 5-B - are responsible for the operation of the low beam indicator;
- А-В — illumination of the low-beam headlight button;
- C-D—size inclusion indicator;
- ED — illumination of the button for turning on the size.
DIY installation and connection of fog lights on VAZ 2113, 2114, 2115
One of the most unpleasant and dangerous natural phenomena for road users is fog. In poor visibility conditions, the likelihood of vehicle collisions increases. Equipping your car with fog lights allows you to drive in any weather conditions. You can install and connect such lighting devices to a VAZ 2113, 2114, 2115 at a car service center, but doing it yourself will cost much less.
Headlight adjustment
Adjusting foglights is a responsible matter. If the headlights are not adjusted correctly, there is a risk of causing inconvenience to other road users and creating a safety hazard. Rough adjustment of the PTF can be done independently. To do this, select a horizontal area near a white vertical wall. The verticality of the wall can be checked by eye, but it is better to verify the horizontality of the site using tools. A two-meter building or water level is suitable for this. Having found a suitable place, place the front of the car against a white wall at a distance of 4-5 meters from it. It will be good if direct rays of bright sunlight do not fall on this wall. Measure the distance from the center of the headlight to the ground. Turn on the fog lights. Measure the distance from the center of the light spot to the ground. The center of the spot should be located 2-3 centimeters below the center of the headlight.
This adjustment is quite rough. For more accurate results, you need a specialized stand at a service station. If you order the installation of a PTF at a service station, the adjustment will be included in the price automatically and will be carried out without fail.
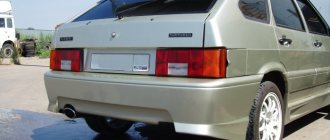
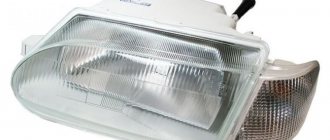
Appearance of fog lights on a VAZ 2109:
Installing fog lights on a VAZ 2109 is not difficult if you know how to read simple diagrams and have basic installation skills. The connection diagram is standard, and if you look closely, you will even see the wiring that lies in the engine compartment, goes to the button in the cabin and to the fuse box.
Why do you need PTF on VAZ 2113, 2114, 2115
The fog is located above the surface of the earth (road) at some distance and this gap remains transparent. Thanks to the fog lights (FTL), a beam of light is formed: wide in the horizontal plane and narrow in the vertical plane. It is directed parallel to the roadway. When the fog lights are on, the fog is illuminated from below, which improves road illumination. Thanks to the wide beam, side markings and the curb are clearly visible, thereby reducing the risk of leaving the roadway.
Installing PTF provides better illumination of the roadside and side markings, reducing the risk of leaving the road
Some motorists have the mistaken opinion that fog lights with high lighting efficiency can only be yellow. In fact, the road is illuminated quite well by devices with both white and yellow glasses. The designated colors, compared to green, red or any other, are characterized by maximum light energy in the spectrum. However, it should be taken into account that when installing even the highest quality PTFs, visibility will be no more than 10 m in heavy fog. But since in such weather conditions the speed of movement is low, these indicators are quite sufficient. Sometimes vehicles are equipped with rear fog lights, the purpose of which is to improve the vehicle's visibility when driving in fog.
PTF power button
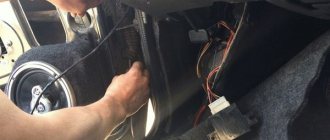
The choice of installation location for the fog lamp switch depends on whether your car has a high or low dashboard. If it’s high, you’re lucky, your option has a standard place for the PTF switch on the VAZ 2109. It is located to the left of the steering column between the rear fog lamp switch button and the rear window heating switch button. This place is closed with a plug. To install the button, remove the decorative panel covering the left speaker of the audio system and remove the speaker itself. This will give you access behind the dashboard necessary to install the button. Connect the PTF activation block and the indicator block for this activation, and then install the button in place.
If you have a low panel, it will be more difficult to install the button. There are two options. The first is that you can parallel the activation of the PTF with the activation of some other system, for example, rear fog lights. The second is to organize a special place for this button. Such a place could be a muffled socket under the central air duct of the ventilation system, next to the heated glass switch of the fifth door.
To install the button in the low tidy, you will have to dismantle the panel located between the central nozzle of the ventilation/heating system and the heater controls.
Methods for installing PTF on VAZ 2113, 2114, 2115
Installation of fog lights can be done in several ways. Which one to choose, each car owner decides for himself, based on his capabilities and preferences. Let's look at the most common installation options:
- Buying a front bumper with PTF. In this case, the headlights are sold already mounted in the front bumper. As a rule, a part can be purchased without any problems at a car tuning studio and immediately installed and connected. The disadvantages of this option include high financial costs.
Buying a bumper with PTF installed is the most expensive option for installing fog lights on a car.
When purchasing a bumper with holes for fog lights, you will need to purchase the lights themselves and all the necessary components for connection
The most common option for installing PTF is to purchase and then install a set of fog lights yourself.
PTF location diagram on a car
Before connecting the fog lights, it is important to install the devices correctly on the front of the car. This is done in accordance with certain rules, which clearly stipulate the location of the light source. On modern cars, the installation locations for fog lights are marked from the factory. Basically, such lighting elements are installed on more expensive car configurations. If the headlights were not installed from the factory, then the places for their installation are closed with plugs.
Fog lights on the front of the vehicle must be installed in accordance with established regulations
Is it possible to install xenon in PTF
Many car owners seek to install xenon in fog lights, arguing their actions by increasing lighting efficiency. Is this really true? Let's figure it out. First of all, when installing xenon in standard PTF housings, focusing is disrupted, which is due to a different operating principle in contrast to conventional lamps. Since standard fog lights are designed to operate with certain lamps, they simply cannot cope with xenon. The result of such changes will be too much reflection in the reflector, the rays are refracted, and the light becomes blurred. A well-known situation arises - the blinding of drivers of oncoming vehicles, which increases the risk of an accident. Installing xenon in PTF is far from the most successful solution and the effectiveness of such light is questionable, so it should be abandoned.
When installing xenon light in standard fog lights, focusing is disrupted, which leads to dazzling oncoming drivers
Video: how to choose fog lights
Installation and connection of front and rear PTFs on VAZ 2113, 2114, 2115
Before you begin installing fog lights, you will need to select a certain list of tools and additional elements. You can purchase a ready-made connection kit or select the necessary spare parts separately. When everything is prepared, you can mark on the front bumper a place for installing future headlights. The VAZ 2115 comes with standard holes from the factory, but in the case of the VAZ 2113 and VAZ 2114 you will need to work with a tool (a jigsaw or a drill). If you don’t want to damage the bumper, you can install the lighting fixtures on special brackets.
To install foglights in the front bumper, you need to make holes using a jigsaw or drill with drill bits, having previously completed the markings
Installation Tools
- file;
- drill and drill bits;
- electric jigsaw;
- roulette;
- marker.
Installation materials
As a rule, the kit for installing PTF on VAZ 2113, 2114, 2115 includes the following elements:
- headlights with bulbs;
- set of wires;
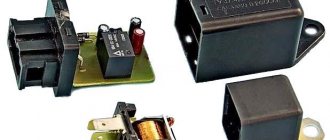
- electromagnetic relay;
- PTF power button;
- ties and clips for fixing wires;
- PTF connection diagram VAZ 2113, 2114, 2115.
The kit for connecting fog lights should include wires with terminals and connectors, a relay, a button
The installation of the lighting sources in question must be carried out using a button and an electromagnetic relay. The fact is that fog lights consume quite a lot of current and connecting directly to the ignition switch will lead to burning and subsequently burnout of the contacts. All this can contribute to damage to the wire insulation and the occurrence of a short circuit, which may result in failure of the electrical wiring.
Step-by-step installation and connection of PTF
To install fog lights, the following procedure must be followed:
- Installation of the headlight switch button in the cabin. You can choose any location for the element, as long as the driver can easily operate the key. Quite often, the part is installed instead of plugs on the dashboard.
The PTF activation key is usually located instead of one of the plugs located on the dashboard
The relay is fixed near the mounting block, for which it is necessary to unscrew the two fastening nuts
A wiring harness with four contacts, which is included in the kit, is laid to the mounting block
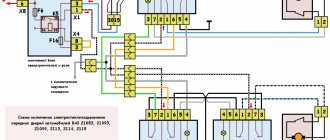
Diagram for switching on fog lights: 1 - fog lights; 2 — relay for turning on fog lights; 3 — mounting block; 4 — fog lamp switch with a control lamp (on the left) and a backlight lamp (on the right); 5 — external lighting switch (fragment); A - to power supplies; B - to the instrument lighting regulator
The ground is attached to the headlights, the positive wires are connected to pins 2 and 3 of block No. 8
As for the rear PTFs on VAZ 2113, 2114, 2115, on these modifications of the car such a light source is installed from the factory, i.e. another light bulb is used in the rear light. Control is also carried out from the passenger compartment using a button, but without fixing, since a slightly different relay design (electronic) is used. It’s worth knowing about this and not trying to install a latching key.
Video: installing PTF on a VAZ 2114
Checking the performance of PTF on VAZ 2113, 2114, 2115
After the lighting devices are installed and connected, you need to check how correctly everything works. To do this, just turn on the headlights and press the key that supplies voltage to the PTF relay, after which the headlamp lamps should light up. When the headlights are turned off, the PTF lamps should also go out, regardless of the position of the fog light button. After checking the functionality of the light source, you will need to adjust the light output so that oncoming drivers are not dazzled.
Installation and configuration instructions
Installing emergency lights on a VAZ 2101 is not a particularly difficult task; almost anyone can cope with it. To properly connect the emergency lights to a VAZ 2101 with your own hands, you need to prepare everything you may need to complete the task.
Set of tools and materials
So, what you need to prepare before starting the process:
- Locksmith tools, including wrenches, screwdrivers, pliers, etc.
- Insulating tape.
- Four-contact light signal relay from the “Six”.
- Six-pin button for activation.
- Five meters of installation wire (video by Alex Gordon).
https://www.youtube.com/watch?v=NoA5L2Z_WA0
Work execution algorithm
So, let's start the process:
- First you need to remove the center console. To do this, you need to unscrew the bolts that secure the trim to the steering column. You will also need to remove the side trims of the windshield pillars.
- Having done this, you can remove the instrument cluster. Be careful not to damage the device.
- Next, disconnect the wires from the light bulb that illuminates the glove compartment. Then unscrew the bolts that secure the sides of the glove compartment to the control panel, as well as the bolts that secure its lower part. After unscrewing all the screws, the glove compartment itself can be removed.
- Now you need to remove the screws that secure the bottom of the dash to the front cross member. Then the nuts of the upper fastening are unscrewed; it is best to reach them through the technological opening of the glove compartment.
- After completing these steps, you can remove the handles from the stove control panel. To do this, at the junction of the lever with the handle, use a screwdriver to bend the lower part of the upper handle, and at the lower handle, you need to bend the upper part.
- Next, you need to disconnect the connectors with wires from the control panel backlight switches, side lights, and also the stove. Then, using a wrench, you need to unscrew two more bolts that secure the fastenings of the stove control levers. After completing these steps, you will be able to dismantle the control panel.
- Now let's move on to installing and connecting the main elements. First, decide on the location of installation of the system power button. It should be installed on the center console so that the driver can reach it as quickly as possible if necessary. It’s still too early to install the button, but you need to decide on the installation location now, since this will determine how much wire you need. Now remove the old turn signal relay from the car and disconnect the three cables from it - usually they are colored black, gray-white and orange.
- Next, take a new six-wheel relay. The second contact of the relay must be connected to the wire that was removed from contact L on the turn signal relay, as well as to output 7 of the button.
- The first contact of the relay must be connected to the fourth contact on the button itself. The third contact is connected to the cable disconnected from contact P on the turn signal relay. Then you need to connect the cable from the fourth contact to ground, that is, the body of the vehicle - it is best to connect it to the relay fixing nut.
- The next step is to connect the button itself. The fourth contact of the button should be connected to the first contact of the relay used. Its second contact must be connected to the cable that was disconnected from the positive contact of the rotary relay. The seventh contact is connected to the second contact of the relay, and the first and third contacts are connected to the steering column turn signal switch; in this case, the order of connection does not matter.
- Now all you have to do is connect the eighth pin to any positive cable; alternatively, you can wedge it into the electrical circuit from the cigarette lighter. If you decide to connect the plus directly to the battery or generator unit, the circuit will need to be protected with a fuse.
- At this point, the installation procedure can be considered complete. All you have to do is securely fix the wiring to prevent chafing of the cables. Reinstall all previously removed interior trim elements, center console, glove compartment, etc.
1. Relay connection diagram
2. Diagram of a penny turn switch
Price issue
The cost of an emergency warning button for a Kopeyka ranges from 100 to 400 rubles on average. As for the relay, its cost varies around 200-400 rubles.
see also
Comments 29
I'll tell you which ones later
I connected the wires and they also get hot
Hello I have a VAZ 2112, I want to change the instrument panel From Priora I can’t find the exact connection diagram Please send the diagram Thank you in advance
It’s easier to take it to an electrician)) and it’s a molorik))!
I connected everything according to your diagram. But my front PTFs don’t work. I don’t know why. And when I rearranged the main wires (Fig. 1), I was left with green wire 56. It went along the old block to the front PTF. But on the new PTF button there is no longer room for this wire. Where did you connect it?
Having connected according to your diagram (low and side) I got this - when you turn on the side, the ignition and side turn on, there is no front... maybe I mixed something up... I can’t figure it out ((((
Look at contacts 58,X X-ignition is on 58-gabor 30-constant plus When the button is turned on, the ignition goes from 30 to 58 and the side light is ON When power comes to X, you can turn on the low beam and the power goes to 56, the low beam turns on
Having connected according to your diagram (low and side) I got this - when you turn on the side, the ignition and side turn on, there is no front... maybe I mixed something up... I can’t figure it out ((((
the problem was in contacts 5 and 6, I swapped them and everything worked
very useful information, I will try your scheme and connect over the weekend)
Guys, thank you very much for the information, the diagrams really saved me! I'm replacing the 2112 panel with a Euro one, using viburnum as the donor. The tidy is already connected, button crap with 10 is difficult to redo without pads
The circuits are real, I developed them myself for two weeks, by mistake and error, everything was connected in my previous car, everything worked like stock.
And were the button lighting illuminated when the dimensions and low/high beams were on?
Yeees! The backlight did not turn off after turning on the dimensions until the dimensions were turned off =)
Do your double button lights come on after ignition?
no, when you press the taillights button, all the interior lights and the parking lights in the front and rear come on.
Well, there’s a feature of these buttons - you turn on the ignition and the button icons of the double button are highlighted, that’s what pin 4 is there for
haha, what a feature in a Russian car)) it’s illumination of the buttons, as well as the instrument panel, heater and cigarette lighter flaps, as well as the inclusion of side lights in the front and rear headlights. And after turning the key, you turn on the ACC function - this is the fuel pump, there is a backlight on the route computer or computer, a light in the driver's compartment, the ability to lower and raise the windows.
There is no trick in a Russian car, just like in foreign cars, after turning the size button on the turn signal brush, we turn on the backlight.
But if everything suits you, then let it remain that way. It won’t make it any worse, you just won’t be able to turn on the backlight, for example, without a key, and you won’t be able to turn on the light in the trunk without a key.
And what’s even worse is that you feed all the elements, at night, in order to look at the instrument panel and illuminate it, you’ll be idling the gasoline, pumping it in and then sucking it out. and this can lead to the rapid death of the fuel pump)
In general, good luck to you, think for yourself.
Do your double button lights come on after ignition?
The white and black wire that came to the light bulb before, look at the black one, this is ground. and white comes from fuse F1, and to fuse F1 a plus comes from Relay K1 - a relay for monitoring the health of the lamps, but to K1 a constant plus comes from the battery
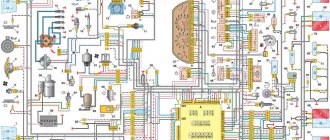
Detailed diagram of the VAZ Grant (dashboard)
The vehicle is supplied to the market with a 32-pin instrument panel as standard. The standard pinout of the Grant shield has only 26 pins involved. Residual connectors are provided for the possibility of adding equipment or custom modifications:
- 1 – to the low oil pressure sensor in the engine crankcase;
- 2 – to the handbrake indication switch;
- 3 – intended for service needs when diagnosing the instrument panel;
- 4 – to external lighting switches;
- 5/6 – similar for right and left turn signals, respectively;
- 7/8 – CAN L/H;
- 9 – indication of seat belt position;
- 10 – contact of the Reset button of the steering column lever;
- 11 – response of the brake fluid reservoir sensor;
- 12/13 – on the head optics, high/low beam position;
- 14/15 – foglight terminals front/rear, respectively;
- 16/18 – receiving immobilizer antenna signal;
- 17 – ground wire of the instrument panel;
- 19/21 – to terminal No. 30/15;
- 20 – for the drive of the electric power steering unit;
- 22 – for door closing sensors;
- 23/24 – MK buttons for forward and reverse, respectively;
- 25 – for an environmental thermometer;
- 26 – gas tank float indication.
What are fog lamps for?
The main task of the PTF is to illuminate the space in front of the car. Correctly adjusted “fog lights” can illuminate a section of road 10–15 meters long. This distance is quite enough for safe movement by car in poor visibility conditions. The switching on and off of such lighting devices must be fully controlled by the driver.
Adjustment of fog lights is carried out during their installation. The procedure does not take much time, but requires care and precision. You can install the rear and front PTFs yourself.
Grant relay diagram
Relay location in the main mounting block located in the engine compartment:
- 1 – drive of the cooler of the cooling system;
- 2 – central locking protection;
- 3 – secondary starter relay;
- 4 – additional part of the relay;
- 5 – turn signal and emergency signal breaker relay;
- 6 – wiper drive protection;
- 7/9 – insertion of high/low headlight modes;
- 8 – horn protection element;
- 10 – heated aft windshield;
- 11 – main relay block;
- 12 – fuel pump relay.
How can you install PTF on a VAZ 2113, 2114, 2115
Installation of fog lights on a car can be done in different ways. The car owner chooses a specific option based on his own capabilities, preferences and wishes. There are three main ways to install PTF:
- Purchasing a bumper with pre-installed fog lights. Similar parts are presented in a wide variety at tuning studios, where they can be purchased and installed immediately. Adjustment and connection are carried out by service specialists. The disadvantage of this method is that the cost of the work is too high.
One way to install foglights is to buy a bumper with already built-in PTFs
Front bumper VAZ 2115 with holes for fog lights
Installation diagram of fog lights
The connection of fog lights is carried out according to certain rules. They, first of all, relate to the placement of PTF on the car. The locations for installing headlights are strictly defined.
Layout of daytime running lights
Manufacturers of modern car models pre-mark the PTF installation locations on the bumpers. As a rule, such lighting elements are most often available in the luxury version of the car. If the headlights themselves are missing, then their installation sites are closed with special plugs.
Distance at which fog lights can be placed
How to install a PTF: necessary materials and tools
Installation of fog lights, regardless of the chosen installation method, requires the presence of certain parts and tools, without which it is impossible.
What are the button and relay for?
A special button and relay are a must - “fog lights” are very powerful equipment for car electrical wiring. The absence of such parts can provoke high current loads on the terminals and the ignition switch, which will cause burnout of contacts, damage and overheating of the insulation protection and short circuit with failure of the electrical network.
In order to install fog lights on a VAZ, you need to assemble certain parts in advance or purchase a ready-made kit. The cost of such a set rarely exceeds one thousand rubles.
The PTF kit includes:
- wires with blocks and terminals for a specific VAZ model. There are three of them as standard: one connects the headlights, the second goes to the relay from the switch, and the third goes from the relay to the fuse box;
Set of wires with terminals and blocks for installing PTF
Fog lamp relay for VAZ 2113, 2114, 2115
Button to turn on PTF on Lada
Plastic ties and clips that secure wires
PTF for VAZ 2115
Which PTFs should you prefer? The headlights themselves are chosen by the driver to his taste, but the main thing when choosing is not to make a mistake with the power, so as not to overload the generator and the car’s electrical wiring. It is better not to purchase headlights with xenon: the generator has a certain power reserve, but is not designed for too high loads. Regular light bulbs will be sufficient.
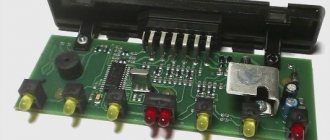
Pinout of on-board computer VAZ 2114
In standard drawings of electrical equipment, the BC block section is missing due to its uselessness. Initially, it is assumed that the motorist will not independently repair or maintain the complex control unit. But some users still take risks and install the system themselves. In older versions of cars, such a module is missing or insufficient for comfortable operation of the car in its modern form.
To connect wires to the module, you will need to buy a standard 9-pin header and connect the following wires to it:
- 1 – green wire comes from the fuel consumption sensor;
- 2 – the ignition cylinder is powered through an orange cable;
- 3 – power core from the battery, usually a red wire with a white stripe is supplied;
- 4 – grounding or ground, standard color – black;
- 5 – 6k line, usually a gray wire;
- 6 – Mute – green shell with a red line;
- 7 – the backlight in the standard pinout is output from the marker optics key;
- 8 – a sensor that displays the remaining fuel in the car’s gas tank can be connected directly.
How to prevent electrical equipment breakdowns?
In order for the VAZ 2114 pinout to be required as rarely as possible, the user is required to follow a number of simple rules and recommendations.
- Periodically treat all metal parts with special oil. In this case, it is first necessary to clean the copper patches from oxides and traces of corrosion. Such lesions provoke a deterioration in the transmission of signals, which can be perceived by the car as a breakdown.
- Every 20-30 thousand kilometers, check all equipment and plastic plugs for looseness or reduced fastening rigidity. With constant vibrations typical of vehicles, plastic clamps can fail and cause breakdown.
- Monitor the correct battery charge and the serviceability of the generator. Some machine devices do not work correctly when there is a strong voltage drop.
- Every 40,000 km, check the condition of the wires themselves. With constant use, the braids of the power cores may crack or dry out, which increases the likelihood of a short circuit in the on-board lines. This may also cause a fire.
How to connect fog lights with your own hands
Before directly installing the headlights, their location is determined. In the case of the VAZ 2115 car, the bumper already has standard holes for installing additional lighting fixtures. Similar ones can be cut in the bumpers of VAZ 2113 and VAZ 2114.
There is no need to spoil the appearance of the bumper - fog lights are easily installed on special brackets. Many PTF kits contain special decorative plugs that add attractiveness and neatness to the installed headlights and facilitate the installation process.
Installation and connection algorithm
- Installation of a power button in the car interior. In the case of the VAZ-2114, the place for the button is on the left side of the driver on the front panel. However, its placement can be arbitrary - the main thing is that it is convenient for the driver to drive the car. Often, PTF power buttons are installed instead of plugs on the control panel.
A PTF activation button is installed in the cabin in a place convenient for the driver.
The power button is connected, chips are connected to it
Under the hood there is a block to which the PTF relay will be connected
The wiring harness connects to the fuse box
The PTF relay is located in the engine compartment
PTF connection diagram
Wiring diagram for connectors and terminals of fog lights
The functionality of the entire connection can be checked by turning on the side lights - only then will the fog lights work.
Fog lights only function when the side lights are on
After completing the installation of the PTFs on the car, they only need to be adjusted correctly. The flow of light should not blind drivers in the oncoming lane.
Video: instructions for installing and connecting fog lights
Fog lights are essential lighting equipment on any car, making it easier to travel in conditions of minimal visibility. If there is no PTF on a certain car model, you can install them yourself. The installation procedure does not require special knowledge and can be carried out by the driver without the involvement of third parties.
How to install and connect PTF?
Installation and connection are carried out in 3 stages:
- We install the PTF in the bumper.
- We connect the wiring to the mounting block via a relay.
- Install a button in the panel.
Connection diagram
Well, I think everything is clear here! However, the diagram is not indicated in full: the mass of the PTFs themselves on the body, which must be done without fail, is not indicated. It needs to be secured in a safe place, on metal of course! Before fastening, be sure to clean the metal from dirt and tighten the mass well so that there is no loss of tension. Otherwise, the PTF will burn dimly and unevenly.
Bumper installation
As stated above, there are two options - either install a new bumper with ready-made cutouts for the PTF, or cut it yourself with a jigsaw. To do this, remove the element, mark the mounting holes, and cut it.
Next, we install the “glasses” - they cover the cutout on the outside of the bumper, they consist of two parts:
- Decorative - external.
- Internal - attaches glasses to the bumper using side latches and holds the PTF. (How to remove the bumper?)
Connecting wiring to the unit via a relay
- First of all, open the hood, find the required block and unscrew its two fastenings to the body on the sides, remove the cover.
- From the bottom of the mounting block, unfasten the two outer wire blocks marked “7” and “8”.
- Take the installation kit: put the wires from the kit on the relay.
- We add their other ends to the block of wires “7” and “8” according to the diagram.
- We stick the pads back into the mounting block and fasten it back to its original place
- Next, we attach the relay to the car body in any place you like: for example, next to the same block.
- We run long wires from the mounting block blocks (which we have already installed) to the fog lights and connect them. We also attach the PTF mass to the car body.
Fog lights on VAZ 2114: installation and connection diagram
Fog lights or simply PTF are an important element of the lighting system for a car. Alas, not all manufacturers equip their cars with these devices. AvtoVAZ with its model 2114 is no exception. PTFs for the fourteenth are available only for an additional fee and in the most expensive configuration.
Not everyone sees the point in buying the most complete version just to get PTF. An excellent solution is to install foglights yourself.
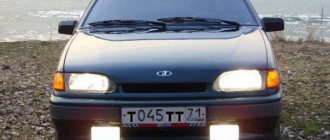
Beautiful and effective
Installation methods
There are several options to equip your car with a fog light system. The choice depends on your personal preferences and capabilities.
Way
Peculiarities
Buying a bumper with built-in PTF
Such bumpers are bought at a tuning studio, where everything will be connected and connected for you. The disadvantage of this option is the high cost
Buying a bumper from a VAZ 2115 and installing it yourself
To do this, you will have to buy a bumper from an older model, which has holes for fog lights. All that remains is to find a suitable set of PTFs and install them
Purchase of PTF and facing elements - glasses
Today this method is in greatest demand because it allows you to do the installation yourself for little money.
The standard PTF kit includes several elements:
- Headlights;
- Light bulbs;
- Switching relay;
- Set of wires;
- Connection diagram;
- Button to turn on/off PTF.
When choosing a set, pay attention to the fact that the headlights match the shape of the glasses, that is, the facing elements.
Standard kit
Today, for VAZ 2114 owners who want to install fog lights, it is recommended to choose rectangular kits from the Kirzhach company. It is used for factory installation of PTF on expensive versions of the model.
Xenon in PTF
Many car owners are thinking about installing xenon lamps in their fog lights. Is it good? Not really.
The thing is that when installing xenon in the PTF, focusing is disrupted. The operating principle of xenon is somewhat different compared to conventional Kirzhach type lamps.
Standard PTFs are designed for certain types of lamps, so they cannot cope with xenon. As a result, excessive reflection is observed in the reflector, rays are refracted, and the light is blurred. Where does this lead? To blind oncoming drivers.
The xenon option is not a practical or successful solution. Therefore, we recommend that you avoid it.
Another option is a combination of xenon and yellow fog lights. You will need H1 xenon bulbs, which are mounted in a bottle cap and only then placed in the headlight. This way the light beam has smoother boundaries, does not blind oncoming traffic, and better illuminates the roads in bad weather. Only after installing this combination lighting, be sure to make sure that your headlights really do not blind oncoming cars.
How to choose PTF
When choosing fog lights, you should pay attention to two parameters:
Color. PTF glasses should be either yellow or milky. Rays of this spectrum are most effective in foggy environments. Moreover, the traffic rules allow the installation of PTFs only in these colors, therefore, by installing blue or other “fog lights”, you can receive an administrative fine for violating the rules.
Advice: with PTF with yellow glasses, it is optimal to use white incandescent lamps. And, accordingly, yellow incandescent lamps are suitable for “foglights” with milky glass.
Marking. The presence of the letter “E” on the headlight (possibly with numbers) indicates that the headlights are certified in the EU. This should be followed by a Latin letter indicating the name and type of the lighting device. For PTF it should be the letter “B”. What is included in the PTF kit
The standard kit for installing fog lights includes:
- headlights with bulbs;
- set of wires;
- electromagnetic relay;
- PTF power button;
- VAZ 2114 PTF connection diagram.
Installation of PTF on VAZ 2114
There are three ways to install PTF on a car:
- Buy a new bumper with installed fog lights. This is the simplest, but most expensive solution. Such a bumper can be purchased at a tuning studio, where they will install it and connect the VAZ 2114 PTF.
- Buy a VAZ 2115 bumper, suitable fog lights and install and connect the parts yourself.
- Buy suitable PTFs with cladding, embed them into a standard bumper yourself and connect them to the on-board network.
To replace or modify a standard VAZ 2114 bumper, it must be removed from the car. The holes in the bumper should be marked using a stencil and then cut with a jigsaw or drilled. It is necessary to insert and secure the headlight trim (glasses) into the finished holes. The fastening must be done as reliably as possible, since poorly secured fog lights will vibrate when moving, which will shorten their service life. When the headlights are fixed in the bumper, and the bumper itself is installed in its original place, all that remains is to connect the VAZ 2114 PTF.
Installation
The PTF installation process can be divided into three main stages:
- Installation of headlights;
- Network connection;
- Functionality check.
So now we will talk about each stage separately.
Installing headlights
We will consider the option of installing PTF on a standard bumper. Therefore, it does not have holes for new optics. You will have to do them yourself.
To work you will need a certain set of tools and materials:
- File;
- Drill and drill bits;
- Electric jigsaw;
- Roulette;
- Marker.
Elements for connection
Now about the work itself.
- First of all, remove the bumper. Work is performed only if it is disconnected from the seat.
- Remove all dirt from the bumper.
- Make markings for the installation of future fog optics.
- It is best to mount the headlights slightly to the side of the lower air intake. Try to place the PTF strictly under the main optics of your car.
- For decorative glasses that have outer and inner halves, make markings. The outer half is decorative, and the inner half is designed to fix the outer part and headlights.
- The outer part of the glasses has a protrusion on the inside. With this mounting protrusion, the element should fit into the hole made in the bumper.
- To determine the optimal dimensions, you should measure the landing protrusion. This way you can make the appropriate markings on your bumper.
- Using an electric jigsaw, holes of the required size and location are cut.
- Use a file to file the cut areas.
- The outer part of the glasses should eventually fit tightly into the hole.
- Fog lights are mounted in the resulting holes. For this purpose, the kit includes special mounting bolts.
- Attach decorative glasses to the top of the headlights. The bumper can then be returned to its place.
Installation materials and requirements
So, first you need to stock up on the following tools and materials:
- Directly fog lights.
- About three meters of single-core wire (red) with a cross-section of 0.75 squares.
- Relay with normally open contacts, a metal plate for fastening and a block with wires.
- Button (most likely, it is already installed next to the heated rear window switch).
- At least five screws.
- Screwdriver, 10mm wrench, utility knife and pliers.
- Heat shrink insulation and electrical tape.
- 16 Amp fuse and socket for it.
Before you begin, you should decide on the mounting location for the VAZ 2109 fog lights themselves; pay attention to the lower part of the bumper. If you look closely, you will find places for fastening there.
There is just one drawback - on older cars it is sometimes difficult to install them in these places; you have to contrive and screw them directly to the bumper. You just need to take into account some of the requirements of GOST, which has been in force since 1975 to this day:
- The distance from the side surfaces of the car body to the nearest edge of the fog lamp should be a maximum of 40 cm.
- The height of the fog lights (from the ground surface to the bottom edge) is from 25 cm.
To avoid problems with law enforcement agencies (read traffic police inspectors), you need to adhere to these requirements. But the “attention” of inspectors is not so dangerous, much worse is the incorrect dispersion of light as a result of incorrect installation. Fog lights will either blind oncoming drivers or be ineffective in poor visibility conditions.
Connecting PTF via relay and button
During bad weather, the effectiveness of headlights noticeably decreases, which not only makes driving less comfortable, but also affects the safety of the trip.
The light beam of low and high beam headlights is reflected from raindrops and particles of water vapor during fog, forming a dense white veil.
A real salvation for the driver in such weather conditions will be fog lights (FTL), which provide a flat and wide horizontal beam of light.
It spreads over the road, illuminating the side of the road well, improving the visibility of the car itself for oncoming drivers.
Standard PTFs are rarely found in basic car models, but if desired, fog lights can always be purchased separately and installed independently. To do this, it is enough to have basic knowledge in the field of electrical engineering and electronics.
This is what the diagram for connecting the PTF button via a relay looks like:
Everything on it is extremely simple and clear.
- From the battery, the plus goes through the fuse to the relay contact (30) and then from the contact (85) it goes to one contact of the PTF on/off button.
- A minus signal is applied to the second contact of the button.
- Next, from the relay contact (87), the plus goes to the fog lamps.
- The minus is connected to contact (86).
Please note that each car model has its own characteristics, so the diagram can be adjusted.
Installation materials and requirements
So, first you need to stock up on the following tools and materials:
- Directly fog lights.
- About three meters of single-core wire (red) with a cross-section of 0.75 squares.
- Relay with normally open contacts, a metal plate for fastening and a block with wires.
- Button (most likely, it is already installed next to the heated rear window switch).
- At least five screws.
- Screwdriver, 10mm wrench, utility knife and pliers.
- Heat shrink insulation and electrical tape.
- 16 Amp fuse and socket for it.
Before you begin, you should decide on the mounting location for the VAZ 2109 fog lights themselves; pay attention to the lower part of the bumper. If you look closely, you will find places for fastening there.
There is just one drawback - on older cars it is sometimes difficult to install them in these places; you have to contrive and screw them directly to the bumper. You just need to take into account some of the requirements of GOST, which has been in force since 1975 to this day:
- The distance from the side surfaces of the car body to the nearest edge of the fog lamp should be a maximum of 40 cm.
- The height of the fog lights (from the ground surface to the bottom edge) is from 25 cm.
To avoid problems with law enforcement agencies (read traffic police inspectors), you need to adhere to these requirements. But the “attention” of inspectors is not so dangerous, much worse is the incorrect dispersion of light as a result of incorrect installation. Fog lights will either blind oncoming drivers or be ineffective in poor visibility conditions.
Instructions - how to connect fog lights via a relay and a button using the example of a Chevrolet Niva
As can be seen from the diagram above, to connect the fog lights you will need:
- PTF themselves;
- fog lamp relay;
- headlight on/off button;
- fuse 10 A;
- wires and connecting terminals.
You will also need some tools for the job: screwdrivers, a sharp wire stripper and electrical tape.
We carry out the work of installing and connecting fog lights via a relay and a button in the following sequence (let's look at the example of a Chevrolet Niva):- Determine the location of the relay. Since this component is small in size, it can be easily hidden behind the dashboard.
- Determine the location of the PTF on/off button ;
- We measure the length of wires required for connection;
- Next, we stretch the copper wire from pin 30 to the battery (+), after installing a 10 Amp fuse in a convenient place;
- We connect the fog lamp button to pin 85 and install it in the selected location. As a rule, the front PTF button is installed in place of the standard buttons, where the plug is located;
- Relay contact 86 is connected to ground in any convenient place;
- We install fog lights. Manufacturers have made sure that those owners who wish to install fog lights do not invent a “bicycle”. The front bumpers of the Chevrolet Niva have special niches for this purpose, which are closed with plugs. In order to remove them, you need to unscrew the screws on the inside of the bumper. We insert the headlights and look at the wire markings.
- We supply the positive wire to them from pin 87, the negative wire from the car body;
- We are testing.
VIDEO INSTRUCTIONS » alt=»»>
Useful rules - you need to know
When choosing the fog lights themselves and the location for their location, you should carefully read the accepted standards, which are strictly prescribed in the traffic rules.
Thus, in Russia, only factory-certified PTFs are allowed to be installed. This is confirmed by the E22 sign in a circle, which is applied to the PTF body.
- There should be two fog lights themselves - no more and no less.
- They should be installed at a distance of no more than 40 cm from the edge of the side marker diffuser and no lower than 25 cm from the level of the road surface. Most modern cars have standard places on the bumper for installing PTF.
- If fog lights are not included in this package, plugs are installed in their place, which are easily removed and PTFs are installed in their place.
Most fog lights on the market use a standard H1 category single filament bulb. The PTF should only turn on together with the side lights.
Improper installation of fog lights can lead to an accident or cause discomfort to drivers of oncoming cars. Follow all the rules and you will never get into an unpleasant situation.
Installation kit
To implement the project you will need:
- two fog lights with mounting brackets;
- normally open relay for connecting lighting devices;
- button for turning on fog lights;
- single-core wire with a cross-section of 1 sq. mm, approximately 4 meters long;
- fuse 16A;
- connection diagram;
- contact blocks - if they are not included in the kit with headlights and relays.
If you already have something from this set, purchase the rest. And if you have to buy everything, then consider purchasing the entire boxed set. It includes everything you need, and there are also detailed installation instructions.
Connecting fog lights on a VAZ 2109 will require certain tools. You will need a 10 mm wrench, a screwdriver, side cutters, a shoemaker's knife for stripping wires and electrical tape. This is the minimum set. It is sufficient if twisting technology is used to connect wires.
Another option for connecting PTF, which most experts recommend, is soldering all connections and using heat-shrinkable materials for insulation.