Damage to doors, especially their locks, not only causes discomfort to the driver, but also calls into question the safety of personal belongings, so replacing a VAZ 2114 door lock is not a procedure that should be postponed. Since the quality of workmanship and metal consumption of domestic door locks do not allow for great success, their breakdowns and malfunctions are quite common.
Trouble can await the driver at any moment when the driver’s door “suddenly” does not open and you have to exit through the passenger door. The situation is much worse when the door is left open and the car is left “unsecured” if the lock is broken.
Preventing door jams
The main reason for the breakdown: long-term operation, but the service life of the part is reduced if the driver does not carry out preventive maintenance. Basic moments:
- Cleaning of internal parts, treatment with special substances.
- Power loop lubrication.
- Removing adhered dirt. The procedure is carried out at least twice a year: in spring and autumn. Active ingredients for treatment: Liqui Moly Schnell-Reiniger cleaner, Liqui Moly Wartungs-Spray weiss dirt-repellent white lubricant.
- Lubrication of hinges, internal parts, rubber seals, door stops.
The procedure is especially relevant before the winter season, when the treatment prevents the mechanism from freezing when moisture enters. Spring prevention minimizes damage to the door mechanism from ultraviolet radiation.
Assembly basis and disassembly of the front door VAZ 2113-2114-2115
The basis of disassembling and assembling the front door in the correct sequence
Instructions for repairing and replacing body parts of the VAZ 2113 2115, stages of disassembling and removing the doors of the VAZ 2114, the procedure for assembling and installing the tailgate. Body elements for Lada 2113, body care for Lada 2115. Adjustment of doors, hood, bumper.
- Front door window regulator
- 1 – window lifter handle
- 2 – facing
- 3 – socket
- 4 – gasket
- 5 – window lift mechanism
- 6 – cable sheath
- 7 – roller
- 8 – glass
- 9 – seal
- 10 – external seal
- 11 – internal seal
- 12 – clip
- 13 – sliding glass fastening plate
- 14 – cable
Press out the socket 3 and slide the trim 2 of the handle 1 of the window lifter until it comes out completely. Remove the handle and the trim.
- Interior view of the front door
- 1 – lock release button
- 2 – door trim
- 3 – armrest handle
- 4 – inner door handle
- 5 – outside rear view mirror
- 6 – door fastening bolts
- 7 – door opening limiter
- 8 – power window switch
- 9 – door trim pocket
- 10 – reflector
- 11 – external door lock
After unscrewing the screws, remove the armrest handle 3 and the door trim pocket. Using a screwdriver, remove the lining of the inner door handle 4. Unscrew button 1 to turn off the lock.
Remove the adjustment knob for the external rear view mirror 5, the inner lining and, after unscrewing the fastening screws, remove the mirror.
Unscrew the fastening screws and remove down the guide grooves of the sliding glass, then disconnect the glass frame 12 from plate 13, unscrew the nuts securing the window regulator, remove it and take out the sliding glass through the top.
- Power window
- 1 – roller
- 2 – cable sheath
- 3 – window lift support
- 4 – window lift mechanism
- 5 – gear motor
- 6 – sliding glass fastening plate
- 7 – bracket for fastening the gear motor
- 8 – cable
Part of the Lada Samara 2 is equipped with electric windows.
The glass is raised by transmitting torque from the gearmotor 5 to the window lift mechanism 4 and then by vertically moving the cable 8 with the sliding glass mounting plate 6 attached to it.
Before disassembling the door of the VAZ 2113 and subsequent removal of the window regulator, it is necessary to disconnect switch 8 from the connector of the gearmotor 5. Remove the window regulator, unscrew the supports 3 and disconnect the gearmotor.
- Front right door lock
- 1 – key guide
- 2 – lock switch arm
- 3 – shutdown rod
- 4 – external drive rod
- 5 – key
- 6 – lock release button
- 7 – shutdown button rod
- 8 and 17 – shutdown levers
- 9 – outer door handle
- 10 – bracket for internal handle
- 11 – inner door handle
- 12 – lining of the inner handle
- 13 – internal drive rod
- 14 – internal lock body
- 15 – external drive lever
- 16 – intermediate lever
- 18 – external lock body
- 19 – lock drive finger
- 20 – dog
- 21 – lock retainer
- 22 – ratchet
- 23 – lock fastening screw
Disconnect rods 4, 7 and 13, outer 9 and inner 11 door handles from the lock. Unscrew the two fastening nuts and remove the outer door handle of the VAZ 2114.
- Attaching front door locks and handles
- 1 – inner door handle
- 2 – front door
- 3 – internal drive rod
- 4 – button
- 5 – outer door handle
- 6 – handle key
- 7 – lock cylinder
- 8 – handle seal
- 9 – button pull
- 10 – external drive rod
- 11 – lock switch handle
- 12 – lock switch arm rod
- 13 – lock lock pin
- 14 – lock retainer body
- 15 – external lock
- 16 – internal lock
- 17 – gearmotor thrust
- 18 – door lock locking motor
If equipped with electric door locks, after removing the door trim, disconnect the gearmotor connector 18 and rod 17.
Unscrew the screws and remove the lock 8. Remove the inner door handle assembly with bracket 10, having first unscrewed the fastening screws.
Reassemble the door in reverse order. For reliable fastening, lubricate the threads of the lock and retainer screws with sealant type UG-9. Before installing the door trim, check the condition of the holders.
- Attaching rear door locks and handles
- 1 – lever
- 2 – button pull
- 3 – button
- 4 – lock drive rod
- 5 – internal drive rod
- 6 – door panel
- 7 – pen key
- 8 – door handle body
- 9 – key guide
- 10 – handle seal
- 11 – traction
- 12 – external lock
- 13 – lock lock pin
- 14 – lock retainer body
- 15 – internal lock
- 16 – gearmotor thrust
- 17 – door lock locking motor
- 18 – inner door handle
Dismantling and assembling the rear door of the Lada Samara 2 is carried out in the same way as the front door.
How to connect a button?
The driver and passenger door buttons are connected to each other, as well as to the ESP motor and power cable. Correct pinout of the power window button:
- Pin 1 on the driver's door is connected to pin 6 on the passenger side. Contact 1 on the passenger door is connected to the negative terminal of the ESP motor.
- Pin 2 on both buttons is connected to power.
- Pin 3 is the ground on the driver's side and the positive wire on the passenger's side.
- Contact 4 in both cases goes to the headlight switch.
- Contact 5 is ground in all cases.
- The positive wire of the ESP motor corresponds to pin 7 of the passenger door button.
Recommendations
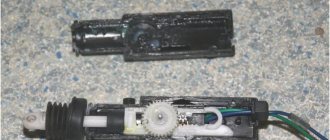
Reassembling and lubricating individual parts will not work if the fragments are heavily worn. It is better to remove the cylinder from the core and install a new one. Recommendations for replacing the VAZ 2114 door lock:
- Partial repairs or lubrication will only temporarily restore life to the closing mechanism. If problems arise, it is better to replace the entire cylinder.
- After installation, it is necessary to periodically lubricate the mechanism. Experienced motorists use silicone substances for this.
- The repair procedure is carried out in a well-lit room at a comfortable temperature.
- To change the element, you will need a set of screwdrivers, pliers and lubricant.
- Sometimes the springs have to be replaced along with the cylinder. They are purchased separately.
The cylinder fragment is sold as a set. The price depends on the manufacturer. If you buy a cheap Chinese version, it will cost about 150 rubles. It is better to give preference to VAZ spare parts. The cost of such a kit is 400-500 rubles.
Withdrawal procedure
Depending on the reason, a complete or partial replacement is performed. It is not recommended for the average person to engage in reassembly, since there are too many nuances in this process, but almost anyone can replace the mechanism. Step-by-step instruction:
- Three screws are unscrewed. They are located on the inside of the handle. To do this, use a Phillips screwdriver to remove the cover.
- The front trigger glass position switch is removed along with the wiring harness block. To do this, the wires are first disconnected.
- The plug on the armrest handle is removed, the element is picked up with a thin corner of a screwdriver.
- Unscrew the 2 screws on the handle that hold the inner panel.
- The plastic clips are pressed out to remove the lining.
- 6 pistons are removed to remove the door card.
- The external fastenings are removed, the nuts are unscrewed with an 8mm wrench.
How to remove cravings
To remove this piece, you will need an impact screwdriver and a size 8 wrench. The piece is attached to the internal locking mechanism and the lock switch. Algorithm of actions:
- The internal lock of the outer handle rod is completely disconnected.
- The handle is removed along with the rods.
- The pin is removed from the end of the rods.
- The plastic tip is removed from the core of the cylinder device.
- The return spring is removed. The old larva is being removed.
Installing a new part
The removal and assembly algorithm is the same, although the instructions for installing the cylinder mechanism have its own nuances. Before inserting a new cylinder into the core, the part is lubricated with a silicone substance and only then inserted into the handle. Further algorithm of actions:
- The return spring is inserted next to the cylinder.
- The functionality of the key is checked. It should turn easily in all positions.
- A pin is installed on the tip of the rotary rod. Connection is being made.
- The inner and outer panels are screwed on, the handles are fixed, and the plug is returned to its place.
- The main three screws are tightened from the inside.
Recommendations from experienced car mechanics
There are several tips that you need to follow when handling the VAZ lock cylinder and when replacing it. Experts recommend:
- If the lock is jammed and has problems opening, you need to choose the time to replace it. Lubricating the mechanism or repairing it are only temporary measures that can delay the failure of the locking device for several months.
- To avoid having to replace it again after a year, it is necessary to lubricate regularly. To do this, you need to use silicone-based products.
- Along with the cylinder, you will have to change the springs. Please note that they must be purchased separately.
- Before removing the lock cylinder from the packaging (new) or before dismantling it, you must insert the key into it. This will help hold the pins in place. If this is not done, they will fall out, and the work contractor will have to collect them from the floor of the box for a long time.
- The service life of the lock depends on the user. If you carry out preventive maintenance in a timely manner and work with it carefully, the mechanism will last longer.
To replace the lock, you will need to have a set of screwdrivers, pliers, and silicone grease on hand. But the most important thing is to purchase a complete cylinder kit.
Try to choose high-quality spare parts, since cheap locks from China (about 150 rubles each) usually do not survive the winter season. It is best to purchase domestically produced kits (AvtoVAZ or DAAZ), which are more expensive, but will also perform their functions for several years.
Replacement of the internal door handle of VAZ 2114, 2115
If a VAZ 2114, 2115 car has a broken or torn off inner door handle, replace the handle. The procedure is quite simple, but only if all steps are performed correctly.
Why do handles break?
Practice shows that the door handle inside the VAZ models 2114 and 2115 most often fails for the following reasons:
- Too much force applied by a person when opening the door. Despite the fact that the part has a good margin of safety, it will not be able to withstand the efforts of any person.
- Accident. Perhaps the main reason for failure. If the door is damaged, the handle will have to be replaced.
- Failure of the external door opening manipulator. Because of this, again, passengers have to make great efforts to open.
- Wear. The plastic part breaks or a break appears as a result of constant opening.
On a VAZ 2109, selecting a new door handle is very easy. The design has a single scheme, so it is enough to use the standard article number of the manufacturer.
What should I do to replace it?
Before you start working on the interior door handle, watch the video below for replacement. The wizard not only shows the sequence of work, but also gives valuable advice that can save you from wasting time and effort.
So, if there is a broken door handle inside the car, a complete replacement must be performed in the following sequence.
- Remove the handle lining by carefully using a regular screwdriver.
- Remove the door card.
- There is a wire rod in the handle - it must be disconnected.
- Remove the handle, first removing the fastener.
- Install the new part in its original place.
Having managed to replace it with a new internal handle, you can proceed to assembly. The procedure is performed in reverse order, it is not complicated. In some cases, you can simultaneously begin dismantling and replacing the external “opener” if the old one is not satisfactory for certain reasons.
Again, if you do not fully understand where certain parts are located, watch the video on replacing the internal door handle of a VAZ 2114, 2115. If necessary, rewind it several times to fully understand all the intricacies. Although in most cases, viewers only need to see the entire procedure once to begin the replacement themselves.
As in the case of the internal and external handles, dismantling will not require a lot of effort. All you need to do is first read the technical documentation or open our videos.
How to open a jammed door on a VAZ 21115
How to open a jammed door
at 21115 from the inside.
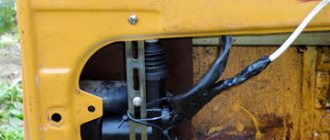
When the decorative panel is removed, the locking mechanism is accessible from the inside, although it is difficult to reach. Immediately check whether the rod going from the handle to the lock has disappeared. This is a fairly common malfunction that can be fixed with low blood pressure. Re-establish the connection and open the door.
If there are no visible reasons for the breakdown, simply try to open the door from the inside, acting on the mechanism using different tools. If necessary, have an assistant either push or pull the door from the outside. Experience has shown that these procedures for opening jammed doors can take a long time, so you will have to be patient.
Causes of problems opening the door
If incorrect operation of the VAZ 2115 design is noticed and the rear door does not open from the outside, then the reason lies in the locking mechanism or poor adjustment of the door fragment. The following factors indicate the need for repairs:
- the door slams loudly when closing;
- an unpleasant creak appeared;
- there is a rebound from the car rim;
- the door leaf has shifted;
- an increased gap appeared between the body and the door rim;
- subsidence, sagging, movement of the door pillar to the side;
- when closing there is a sharp kickback because the backlash is set incorrectly;
- the door closes only after a strong push;
- the lock is broken or blocked, the handle (external, internal) does not work;
- There was a crackling noise in the door panel while the vehicle was moving.
Special attention is required to the gaps, hinges, internal filling of the door, lock and handle. The exterior of the vehicle is inspected in a closed and open state. It is also determined whether there is any distortion or other changes in the body shape. The doors should be at the same level, the diameter of the gaps should be no more than 1–2 cm. Having examined the condition of the hinges, a search for mechanical damage is carried out, the functionality of the opening mechanism and the operation of the lock cylinder are checked.
Removing and installing the outer door handle on VAZ 2113, 2114 and 2115
The first step is to remove the door trim. After this, access to the lock mechanism and its rods from the inside opens.
Now unscrew one nut securing the handle from the inside, as shown in the photo below.
The second nut is located on the outside:
From the outside, move the handle slightly to the side, as shown clearly:
And then it is necessary to disconnect the two rods from the handle mechanism of the VAZ 2114-2115 from the inside. This can be done using a flat screwdriver, and the shorter it is, the more convenient it all is.
The rods are hinged, so you will have to apply moderate force to disconnect them from the lock mechanism. After which you can finally remove the handle and replace it with a new one.
It is worth noting that the price of a new factory handle for the front doors is around 300 rubles, but the rear ones can be bought a little cheaper - from 200 rubles apiece. Installation occurs in the reverse order of removal.
Replacing the door on a VAZ 2113, VAZ 2114, VAZ 2115
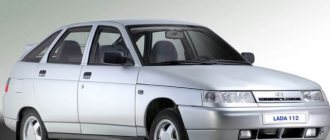
In case of a side impact, the main door of the car suffers, but besides this, the fender and bumper of the car can also be damaged, but you can still drive with a broken bumper or fender, but if the driver’s door is very dented, it will no longer be comfortable, because when turning sideways, it will constantly rest against a person, therefore a very deformed door must be replaced immediately, especially since if it is knocked on a second time, then the possibility of getting a more serious injury increases.
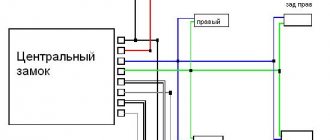
Central lock designs
Advanced car central locking configurations include:
- Control block;
- electrical supply cables;
- input sensors;
- remote controls;
- actuators (actuators);
- additional devices (window closers, electric sunroof, electric trunk locks, fuel hatch lock).
In basic configurations, the central locking control unit, after turning the key, removes the locks from the locks of all doors, activating the actuators.
The same functions are performed by the car alarm control unit, which is devoid of actuators, so harmonizing two systems built on different principles becomes the main task of the installer.
The basic diagram of connecting electrical circuits is the same for all types of central locks, car alarms, only the design of the control unit, actuators, and the number of pins for connecting additional devices change.
Central locking connection diagram.
Important elements of the central lock, in addition to the control unit, are door limit switches (“limit switches”) and microswitches that fix the position of the key and locking mechanisms. These elements must be connected to interior lighting and car alarms.
Differences in designs of actuator drives (electric, pneumatic), types of control (negative, positive pulse, variable polarity) are important for understanding the theory. In practical work, the car enthusiast focuses on a specific model of central locking.
How to remove the internal door lock
Replacing the internal door lock cylinder of VAZ-2114 and 2113 can be done quickly and efficiently even outside the service station. Those who decided to replace the device with the 2115 model should take into account that the body of the “tag” is slightly different from the 14 and 13 models.
To work you will need:
- Anti-corrosion aerosol WD-40.
- Open-end wrench set to "8".
- Phillips and flathead screwdrivers.
- A set of new cylinders and springs (sold separately).
Before changing the part, you will have to disassemble the door to remove the old mechanism.
Anti-corrosion spray WD-40
Experienced car enthusiasts recommend recording the entire process on your phone. It makes sense to take step-by-step photographs of disassembling the door: this will help you quickly and without loss put it back together when the new cylinder is installed.
Disassembly process:
- You need to unscrew the three screws located at the bottom of the door trim. A Phillips screwdriver will help.
Unscrew the screws at the bottom of the door trim
- After removing the cover, you need to remove the trigger glass switch, remove the wire block and disconnect them from the switch.
- Next, use a screwdriver to remove the plug from the armrest handle.
Remove the plug from the armrest handle
- Using a Phillips screwdriver, you need to unscrew the two screws that are installed in the handle mount, and then remove the door trim.
Unscrew the screws securing the handle
- There is a panel installed in the door card, from which 6 pistons need to be removed.
- The external mount, located in the handle, has a pair of nuts. They need to be unscrewed using the “8” key.
Nuts for fastening the outer handle of the lock
- The release mechanism is connected to the inner rod lock and the outer handle lock switch - it must be disconnected from them.
We disconnect the release mechanism from the internal rod lock and the outer handle lock switch.
- Next, you need to remove the entire outer handle of the device and pull out the pin from the end of the rod.
- Now you need to remove the plastic rod end located in the cylinder.
- Remove the retaining spring.
Removing the locking spring
- Remove the old lock cylinder with the key installed in it.
Causes of failures
There are several types of faults that prevent the VAZ-2109 doors from opening from the outside or from both sides:
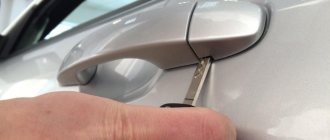
- The external key, made of silumin, was torn. This happens when you try to open a door in extreme cold using a lot of force. Breakage is not considered a big problem because the sheet can be opened using the handle inside.
- Broken silumin pusher, triggered by the opening button. The reasons are the same: low temperature outside and a strong shock. In this situation, the door can also be unlocked from inside the car.
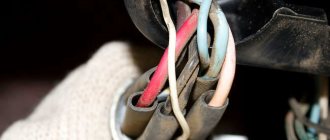
- The pull has disappeared, which connects the handles with the locking mechanism. The door cannot be unlocked from any direction.
- Worn parts of the locking device.
- The screws for securing the lock are loose and it is hanging freely inside the door card
. It is impossible to open the door using the handles.
The last malfunction sometimes occurs due to the fault of the car owner himself, who decided to change or repair the door lock. By inserting it into place and not completely screwing it in, the owner of the VAZ-2109 accidentally slams the door, after which it cannot be opened with the handle.
Adjustment
The door of the VAZ 2109 is hanging
To adjust the doors on the “nine” you need to have only two tools with you:
Front doors
On the “nine” the front doors are adjusted as follows:
- The position of the latch changes;
- Before carrying out this procedure, you need to carefully outline the contours of the latch on the stand;
- If the front door of the “nine” closes too tightly, then you need to loosen the bolts of the clamp, move it a little outward, and then tighten the screws thoroughly;
- If the front door closes poorly, then the latch must be pushed inward.
- If the door drops below the level when closing, then the latch must be raised;
- If the door rises when closing, but sags in the open position, the latch must be lowered.
- If you need to adjust the inner handle of the lock, you should move the bracket under the fastening screws. There are oval holes on the inner panel of the door that will help in this matter;
- If the internal handle does not cope with its duties and the door does not open well, then the bracket bolts are loosened, the handle is moved to the desired position, and the screws are tightened.
Rear doors
Adjusting the door on a VAZ 2109
The rear doors are adjusted as follows:
The bolts securing the hinges are loosened, the gaps between the body and the door (see Malfunctions of VAZ 2109 doors: how to fix them) are adjusted taking into account the draft and the screws are properly tightened.
Hood
Adjusting the door of a VAZ 2109
The procedure for adjusting the hood cover is as follows:
- The height of the pin changes in relation to the front surfaces of the front wings and radiator trim. A pin and springs secure the hood in the closed position. The pin itself is screwed into the hood and locked with a lock nut. There are cups installed on it with a spring between them;
- To adjust the hood cover, you need to loosen the hinge bolts, move the hood so that the gaps between it and the body are as they should be, and then tighten the screws thoroughly;
- If the hood lid does not close well, then you need to loosen the fastening of the pin, move it until it matches the lock socket, and then tighten the lock nut thoroughly;
- If the problem with closing the hood is in the lock, then with the hood open, you need to outline the contours of the lock body, and then move it to the desired position. After that, tighten the bolts and check how the lid closes.
Adjusting the tailgate lock.
- We unscrew the lock lock so that it can be moved with light force.
- Now you need to close the door and look through the glass to ensure that the lock spike is opposite the latch socket.
- After this, we move the latch all the way back and slam the door. This will ensure the lock lock is in the optimal position.
- Open the door and tighten the bolts securing the clamp in the position in which it was installed.
- It is also necessary to check that the door closes. If the door does not close tightly. then you need to remove the adjusting plate from under the clamp.
- If the door closes too tightly, on the contrary, you need to add a plate under the latch.
You can make the adjustment plates yourself from tin or sheet iron.
How to install euro handles on a VAZ 2109, 2114.
To install the Euro handle on a VAZ 2109, 2114, we squeeze it out and try to insert it into the socket. The fit is a little tight. After installing the handle in the technological hole, you need to push it a little in the direction of travel of the car and the handle completely sits in place. Now you can screw it on
Door opening rods are included with the Euro handles. Two short ones go to the rear doors, two long ones to the front ones. We put on the required rod and adjust it by unscrewing or screwing the plastic attachment onto the rod. We try to open and close the door. If the door does not open, then unscrew the plastic cap a few turns; if the door does not close, then tighten it.
All! Euro pen installed! Now all that remains is to assemble the door card. It is assembled in the reverse order of disassembly.
How to install Euro handles on a VAZ 2109, 2114 is no longer a secret for you!
Common causes of breakdowns of VAZ 2114 door locks
- The door lock button does not lock and/or the lock cannot be locked with the key. This breakdown is typical when the upper end of the external drive lever is blocked, for example, on the shoulder of the handle.
- It is impossible to open the doors with the outside handle. Occurs as a result of an increase in the flange gap between the outer door handle and the lever in the lock drive.
- The central locking spring or the external drive lever has broken, as a result of which the door does not close.
- When closing the door, the lever tooth does not engage with the ratchet mechanism; this occurs due to the weakening of the rivets on the lever axis.
- The door does not lock because the lock lever is jammed or grease and dust are pressed into the lock.
- The door does not open completely with the inside handle.
The position of the internal door lock lever is out of order, as a result the drive lever does not make full travel. Often, most breakdowns associated with door locks can be fixed with your own hands without having to replace them.
Installation of silent locks on VAZ 2114
As standard, basic VAZ 2114 models are equipped with conventional locking devices, factory marked 2108-6105012/13 for the front doors.
Silent locks VAZ 2114
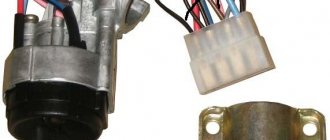
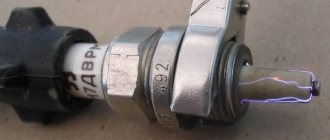
When they talk about a VAZ door lock as a single whole, they are making a serious mistake. In fact, it consists of several independent, structurally speaking, parts, each of which has its own functional purpose:
Internal door lock VAZ 2114. This is the main control mechanism.
— A cylinder is inserted into it, which is an element of the locking device, which has individual characteristics corresponding to the unlocking key of the car owner.
— It is controlled by pressing a button on the car door, locking or opening the lock through a mechanical rod.
— Mechanical opening rods are attached to it using an internal or external handle, and it is also possible to activate the central locking with a gear motor when installing an alarm system.
“He uses a special finger to control the external locking device.
- External door lock for VAZ 2114. According to catalogs, it is listed as a door lock latch. Essentially, it is the actuator of the door locking mechanism, which, based on a mechanical signal, closes or opens the latch.
- VAZ 2114 lock retainer. It is attached to the car body and holds the latch of the external locking device when it is closed.
This design of the locking mechanism and the metal parts from which all its main parts are made lead to the fact that a fairly loud metallic clang is heard when the doors are closed. The main noise is created by the bow, which penetrates the loop at the moment of closing. Until recently, owners of domestic cars could only look with envy at the owners of foreign cars closing their cars with a quiet rustle, and constantly adjust the doors in order to get closer to the ideal.
Now domestic silent locks for the VAZ 2114 have appeared on sale. The principle of their operation is quite simple. The metal latch and locking pin are covered with a special noise-insulating coating. This is usually plastic or rubber. The plastic coating is more wear-resistant and therefore more durable. Rubber creates better sound insulation, but wears out faster. In addition, parts of the locking device are treated with a special silicone lubricant, which does not freeze in the cold, retains elasticity and noise-insulating properties.
In general, when they talk about silent locks, they mean the external locking mechanism and the locking pin. Because only the latch of the external lock and the same locking pin are covered with a noise-insulating layer of plastic or rubber. The price for silent locks in this design is low - from 230 rubles per piece and rarely exceeds 1,400 rubles for a complete set.
Stores often offer a simplified version of a silent shutter. As a softening device, only the retainer finger covered with plastic is offered. This is, of course, cheaper, but does not completely solve the problem.
Installing silent locks on the VAZ 2114 is quite simple. To do this you need:
- prepare a set of ennobled locks with pins, a hammer and an impact screwdriver;
- open and lock the desired door;
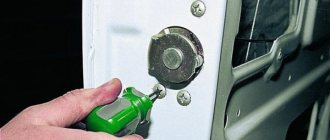
- Unscrew the two bolts holding the outer lock. To do this, place an impact screwdriver on the top bolt and apply two gentle blows. If the bolt does not come out, repeat the procedure.
Locking pins
Lightly unscrew the upper bolt and in the same way, using an impact screwdriver and a hammer, remove the lower bolt completely. Rotate the outer lock body on the loosened upper fastening and screw the bolt into the freed lower hole. The internal lock is secured and the top bolt can be unscrewed;
- remove the body of the external locking device and install a silent lock instead, screwing in the fasteners one by one;
- Unscrew the bare finger of the latch, replacing it with a silent one.
It takes 20 minutes of working time to replace four locks.
Trunk lock repair
As a rule, the trunk lock on VAZ cars lasts longer than door locks, which is caused by fewer openings/closings in an equal period of time. But, due to complete wear and tear (or loss of the keys), it still has to be replaced. In most cases, the lock mechanism itself, as well as its body, remains fully operational - only the cylinder into which the keys are directly inserted wears out. It will then need to be replaced with a new one.
To do this you will need:
- crosshead screwdriver;
- slotted screwdriver;
- a set of keys.
The trunk lock cylinder of a VAZ 2114 is replaced as follows:
- Open the trunk.
- Remove the plastic rivets (“hedgehogs”) holding the plastic socket around the lock by picking them up with a slotted screwdriver or a special extractor.
- Remove the panel.
- Unscrew the fasteners holding the lock.
- Remove the lock.
- Unscrew the fastening screws holding the cylinder in the lock and remove it.
- Install a new cylinder inside the lock.
Reassembling the lock and installing it in place is performed in exactly the same order, but in reverse order.
New lock cylinders are sold with keys inserted into the keyhole. You should not remove them before the cylinder is installed inside the lock, since this threatens its individual elements falling out, which will be extremely difficult to install in place.
After the VAZ 2114 lock cylinder has been replaced and the lock itself has been installed in place, you should carefully inspect its counterpart, called the latch (the lock tongue goes behind it when the trunk is locked). In most cases, there is no need to replace the retainer because it has no moving parts and has a very long service life.
Replacement may only be necessary if a crack appears on the body of the clamp (it is made of silumin). The replacement process itself is simple and consists of unscrewing the old fastener and installing a new device.
The only thing you will need to pay attention to is the correct setting of the lock. To check its quality, you just need to close the trunk lid and see how it locks. If locking does not occur, it is too tight, or, on the contrary, a noticeable play is felt, then the lock is not adjusted.
To configure, you need:
- loosen a pair of fastening bolts of the clamp;
- close the trunk (at this moment the latch itself will adjust to the location of the lock tongue);
- open the trunk;
- tighten the retainer mounting bolts.
If after the adjustment procedure the trunk begins to lock even worse, then most likely the mating part of the locking element is skewed. It is enough to unscrew the fasteners, place it straight without moving the lock itself, tighten the bolts - and the trunk will be easy to lock.
Silent locks and their installation
Silent locks for "nine"
Adjusting the doors also means upgrading the locks, which do not make a very pleasant sound. It's not even a sound, but a loud, unpleasant metallic clang. It turns out that it's all about the design of the door locks. So, on the “Nine” and other cars of the AvtoVAZ family of previous years, the lock is fixed on the outside of the door. As a result, all parts that come into contact with the lock are bare metal, which makes such unpleasant sounds.
To eliminate this mistake of manufacturers and modernize the doors, you need to purchase domestically produced silent locks.
- We arm ourselves with an impact screwdriver, since a regular one will definitely not be able to remove the bolts, which are tightened very powerfully. You'll have to tinker, but the result is worth it;
- In place of the unscrewed bolt (one for now), you need to insert a pin. This is done so that the inside of the lock does not fall inside the door;
- We remove the old lock and install a new silent one in its place. The bolts will need to be tightened with maximum force, and then be sure to tighten them with an impact screwdriver.
Installation of silent locks
After such a modernization, you must remember to adjust the doors properly, according to the instructions (detailed above). While working with your own hands, it won’t hurt to watch a thematic video review, photos, materials and diagrams. The cost of an independent procedure will be absolutely minimal, because you will only need to buy silent locks.
Replacement
The replacement process will take you no more than 10 minutes; the most difficult thing will be to unscrew the bolts securing the lock to the door. There is no need to adjust the lock after replacement, since the adjustment is made only on the hinge, and during operation the hinge will not unscrew and, therefore, will not change its position.
Tool
The only tool you need is a ratchet (driver) with a TORX T40 bit or a T40 wrench.
Step-by-step instruction
Attention: Under no circumstances unscrew both bolts at the same time; if you unscrew two bolts at once, the inner part of the lock (drive) will fall into the door and then you will have to remove the door trim to get it out.
- Unscrew one bolt and remove it
- Then unscrew the second bolt, but not all the way, pull the lock towards you and turn it to the side, or use a pin as shown in the picture.
- We screw the previously unscrewed bolt into an empty space and then unscrew the bolt securing the lock. This will prevent the lock drive from falling into the door.
We install the new lock in the reverse order, avoiding unscrewing both bolts at the same time.
How to change and replace the door handle on a VAZ-2114: photos and videos
VAZ-2114 owners have repeatedly faced the problem of replacing a door handle. This process is quite simple, but people often get confused with it and, out of ignorance, damage the element itself or a neighboring one. The article will tell you how to replace a door handle from the outside without much effort.
Video about replacing the inside rear door handle (carefully mat):
The process of replacing the internal door handle on a VAZ-2114
One of the simplest operations is replacing the door handle from the inside. So, motorists often figure out what needs to be done.
Broken interior door handle.
But, nevertheless, we will describe the complete technical replacement process:
- By prying and pulling with a screwdriver, we remove the door handle trim. We remove all elements including the handle trim.
- The next step is to dismantle the door card. Without this operation, replacement will not be possible, especially when the handle is broken. We remove the door card.
- Disconnect the wire rod of the handle. Disconnect the drive rods from the handle.
- We dismantle the handle, removing the fastening, and install a new one. We install a new handle and attach the rods.
- We reassemble. We install the handle lining into the card.
Exterior door handle replacement process
Many car enthusiasts think for a long time about how to approach the replacement process, but everything is much simpler than it seems at first glance. To determine the fastening method, just look at the technical documentation, where you can clearly see that the door handle is attached inside.
Based on this, one can logically guess that in order to remove the outer door handle, it is necessary to dismantle the door trim. Next, the process will follow the same pattern:
- When the casing is dismantled, remove the thrust rods from the handle lock. Remove the door handle thrust rods from the frame
- Remove the screws securing the outer handle and pull it out. Unscrew the screws securing the rods
- It is worth remembering that it is also necessary to remove the rubber seals that are located under the handle. Unscrew the fasteners and remove the handle
- Assembly is carried out in the reverse order.
Handle selection
General view of external door handles
Choosing a pen is quite simple, if you don’t take Euro pens. All spare parts of this nature are produced only by the manufacturer, or rather AvtoVAZ. So, let's look at the articles:
- 2109-6105180 – original catalog number of the internal door handle.
- 2108-6105177 – article number of the outer door handle.
Causes of malfunction
There can be several reasons for a door handle malfunction. So, the motorist himself can damage the element during operation, or outsiders can do it. Let's consider the main reasons why the product will have to be removed:
- Road accident. This is perhaps the most common reason. So, damage to the door will be a reason to remove the door handle. Also, damage to the external element can lead to such actions.
- Handle breakage due to wear. Usually, this is a breakdown of the plastic part, a break due to frequent opening or excessive pressure using brute force.
- Actions of third parties that led to the breakdown of the element.
conclusions
Removing the door handle on a VAZ-2114 is quite simple, both internal and external. Many motorists are puzzling over how to do this correctly, but just look at the technical documentation or open the Internet.
Replacing the front passenger door handle
Photo of replacing the door handle hook, I numbered the photos just in case, in case someone changes the thread, it might come in handy:
Installation of a new larva
To install a new lock cylinder, you will need to follow a few simple steps:
- Unpack the new kit, prepared for replacement, and lubricate the internal moving parts.
- Install a new return spring. Usually it is not included in the standard replacement kit and is purchased separately. When installed correctly, the key should rotate freely back when in the hole.
Installing a new return spring
- Install the pin in the end of the swivel rod.
- Reassemble the door in the reverse order as described in the previous section.
https://youtube.com/watch?v=cFcsEhNbr3Q
Troubleshooting
If a key or silumin rod breaks, you should not immediately buy a new block with a handle. On sale you can find special repair kits for VAZ 2108-099 door handles, which contain these parts in 2 copies.
This way you will save money and easily change the key yourself by removing the handle using the following sequence of actions:
- Remove the decorative panel.
- Disconnect the rod connecting it to the locking device from the handle mechanism.
- With the glass fully up, unscrew the 2 fastenings of the handle to the door card.
- Remove the handle, replace the parts and put it back.
If the rod is disconnected, then you need to remove the inner lining and put it in place, as described above. Using the moment when the facing panel is removed, check what caused the disconnection of this rod so that history does not repeat itself when the door is slammed.
Malfunctions of the locking mechanism can only be eliminated by removing it. In a situation where the device has a lot of wear, as happens on the driver and front passenger doors, it is recommended to replace the lock with a new one.
If you find an error, please select a piece of text and press Ctrl+Enter.
Installing euro handles on a VAZ 2114
Locking mechanisms, handles and other elements of VAZ 2114 cars, to put it mildly, do not have a very attractive design. One such example is standard door handles. Fortunately, on the market for spare parts and auto accessories you can select and purchase Euro handles for the VAZ 2114.
How are they different from the original ones, you ask? There are differences, here are some of them - smooth operation of the product, excellent appearance and more convenient design. In addition, it is worth noting the higher quality of the materials from which the modified handles are made.
As a result, they will last much longer than stock ones.
Varieties
Today, the most popular products on the auto goods market are: - Euro handles Lynx VAZ 2114. Products from this manufacturer are in greatest demand in Russia. Great demand is due to their stylish design, quality of materials used, trouble-free operation and proven durability of use;
— Prosport. They are slightly inferior to the previous brand, but in terms of quality they are significantly ahead of stock products from AvtoVAZ.
How to open and repair a jammed door of a VAZ 2109?
The question of how to open a jammed door of a VAZ-2109 arises among motorists quite rarely. Many of them do not encounter such a problem during the entire life of the car. The reason is that the locking mechanisms on the doors of the VAZ of the “ninth” family are quite reliable and rarely fail. But sometimes they also malfunction, causing the door to jam and making it difficult to open. There are several ways to do this without resorting to extreme measures in the form of an angle grinder, so that you can then fix the problem without consequences.