Progress does not stand still; new technical solutions and developments appear every day. In the world of automotive electronics, there are already a lot of instruments and devices that can make life easier for the driver.
On foreign cars, even older ones, you can find not only an alarm system with central locking, but also heated side mirrors, an electric sunroof, heated seats and other electronic gadgets. You can only dream about this in a Zhiguli, so in this article we will tell you how to independently install a central lock on a VAZ 2101-2107, which will be controlled using an alarm system.
Central locking is a central locking system that allows you to simultaneously close or open all car doors. The system can be remote controlled and belongs to the category of vehicle auxiliary systems.
I would like to warn you right away that the article does not claim to be the best instructions or installation method. Personal experience is described here, so you always have the opportunity to do something better, more beautiful, more convenient, and so on.
What is required to install central locking on 2 doors?
- A working and installed car alarm system with power outputs for controlling door locks.
- Activators, actuators, actuators, solenoids, electric drives or, finally, just central locks - 2 pcs.
- The wires are two-core, copper. The diameter or cross-section of each wire must be at least 0.75 square. Length about 3-4 meters.
- Plastic clamps - 10 pieces, maybe more, “in reserve.”
- Other: electrical tape, heat shrink tubing, wire cutters, screwdriver, soldering iron, solder, multimeter, drill, drill bits, electrical extension cord, etc.
Before we begin directly installing central locks, we will analyze each point above in order, in more detail.
1) In this article we will not talk about how to install an alarm yourself, but we will assume that it is already installed. The cheapest option (about 1,300 rubles) is a simple alarm without feedback.
Which model to choose, how to connect correctly, how much it costs and other questions about car alarms will be discussed in another article. Just a few important points to keep in mind.
Firstly, the main alarm unit must have a connector (usually 6-pin) with power outputs for connecting door locks. Secondly, before purchasing, decide in advance whether you need an additional alarm channel. It can be used to open the trunk or, for example, implement the “light path” function and other similar functions. It all depends on your imagination and ideas, so it’s up to you. 2)
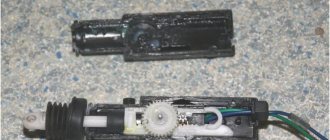
Lock activators are not called by any name, so don’t be surprised by so many names. We will stick to this term. The central locking solenoid most likely refers to an electromagnet, which is most often installed to open the trunk. In terms of power (traction force) it is much stronger than plastic activators, but it is also more expensive.
The approximate price for a regular central locking activator with 2 outputs (two-wire electric lock) is 100-120 rubles. a piece. For 2 doors you will need two activators, the total cost is about 250 rubles. The kit for each activator includes a special strip for attaching the central lock and self-tapping screws, as well as a rod, screws and a metal retaining plate.
3) To save insulating tape, copper wires in general insulation around the insulated conductors, but you can also buy them separately (single-core). The cross-section of the conductor must be at least 0.75 square. The current consumption of a conventional electric central locking drive can reach 5A at its peak.
In auto stores you can choose wires of various diameters, colors and lengths. Some are sold in ready-made installation kits or kits. Individually or “by meter,” most often, single (single) wires are found.
We recommend going to a regular electrical supply store and purchasing a two-conductor copper cable (the individual wire of which has a stranded conductor). For example, a PVS 2×0.75 cable (with a polyvinyl chloride sheath) or a PVS 2×1 mm cable is suitable. These wires are used to connect various electrical appliances, power tools and other machines and devices. The cost is about 12-15 rubles per 1 meter.
You can look for special automotive PGVA wires, which are intended for automotive equipment and instruments. They also have polyvinyl chloride insulation and are undoubtedly suitable for connecting central locks.
For reference: PGVA wires are designed for flexible connection of electrical equipment and devices with a low rated voltage (up to 48 V) in temperate, tropical and cold climates. PGVA wire is resistant to vibration loads, cracking, gasoline and oils. When laid alone, it does not spread fire.
When installing additional devices and using a second alarm channel, carefully study the table with permissible current loads. Most likely, to install a powerful solenoid that will open the trunk lock, an additional unloading relay will be required.
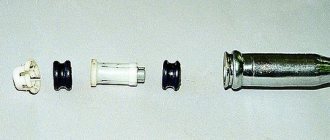
Plastic tape clamps will be needed to secure the wires. Purchase at will, 10 pieces will be enough.
A set of 100 pieces measuring 2.5×100 costs about 50 rubles.
5) Other tools, devices and materials that may be needed during installation.
Installation and connection of central locks
Installing the central locking activator in the front door
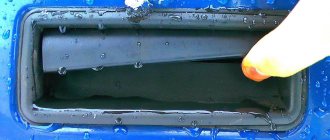
Installation of the central lock should begin by removing the door trims and other elements that may interfere with installation. Then holes are drilled in each door to install a metal strip on which the door lock activator will be attached.
Having secured and adjusted the plastic activator, we move on to connecting and laying the wires. The task is to bring the wires into the car interior and connect them to the alarm unit.
In order to avoid moisture getting on the wires and further failure of activators and other devices (power windows, door lights), consider laying the wires along the door in advance.
Avoid placing wires at the bottom of the door, as this is where water tends to accumulate.
Central locking activator wire routing
When laying the wire, also pay attention to the most “problem” area, namely the place where the wires bend in the opening between the door and the body.
Door wiring protection tube
The best option is to use a rubber tube through the pipe. This corrugation will protect the wiring from chafing and kinks.
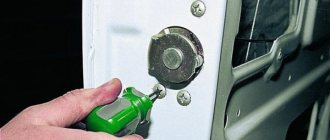
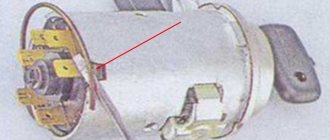
For a competent approach to the matter, as well as in order to be able to easily identify and find the necessary wires (+12 Volts, ground, control outputs from the alarm unit), it is better to remove the instrument panel (dashboard) completely. Thus, you will not only simplify your work on laying wires, but you will also be able to connect, solder and insulate them without much difficulty.
On a VAZ 2106 car, the instrument panel can be removed quite simply (four self-tapping screws and four nuts).
Twist or solder wires?
We recommend purchasing female and male terminals, as well as a special tool for crimping wires. If the activator fails, you can easily replace it with a new one. To do this, you just need to disconnect the terminals, dismantle the old one and connect a working activator.
Twisting the wires and wrapping them with electrical tape is not a reliable option; in this case, it is better to “twist” + “soldering” + “heat-shrink tube”.
How to connect the central locking to the alarm system?
Since the VAZ 2101-2107 car is not initially equipped with a central locking or electric door lock drives, you can install additional electric drives and connect them to the system as follows.
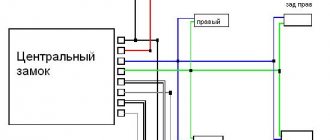
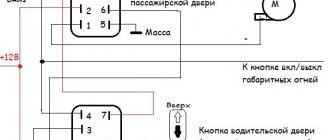
Central locking connection diagram
The blue-white and orange wires of the 6-pin connector of the main unit of the alarm system are connected through 15A fuses to +12 V DC. Green and blue wires to the vehicle ground or, in other words, “ground”.
The white wire is to the blue door lock activator unlock wire, and the yellow wire is to the green power lock wire.
Most Chinese car alarms, especially inexpensive models (APS 2600 SHERIFF, Pantera CLK 355), have blocks similar in structure. Sometimes it seems that Chinese manufacturers only change the label, but the “filling” remains the same. At least, the 6-pin connector itself with power outputs for locks, as well as the colors of the wires, differ quite rarely.
Having familiarized yourself with the central locking connection diagram, feel free to start connecting the wires and checking the operation of the activators. After successful tests, all that remains is to assemble all the removed parts in place and then carry out a “control” check.
Job done, congratulations! The approximate cost is about 500 rubles, excluding the cost of the alarm system.
Step-by-step instruction
Defense System Kit
Due to the extra time spent, car owners often refuse to install activators in the rear doors of their vehicle. However, this procedure is not complicated. Initially, you will need to remove the retaining spring. You can do this in 2 ways:
- removing the lock,
- using a thin, slightly bent screwdriver without removing the lock.
Otherwise, due to the tight movement of the rod, the activator will not be able to cope with the load placed on it. The electrical wire must be installed in the area of the mechanical lock. To do this, you will need to make a hole to fix the back of this installation and 2 holes for the plate. The electric drive can be positioned in the opposite direction. In this case, installing an alarm system on a VAZ 2107 with your own hands involves the use of 2 plates.
The activator rod is fixed to the rod using bolts. As for laying the wire itself, this will require making a hole in the rear doors, the diameter of which will coincide with that of the rubber bushing. This should be done 95-100 mm lower than the lower part of the upper hinge of the rear door. You will also need to make a coaxial hole in it.
Next, install the wires under the hood. They need to be laid through a seal. To do this, a hole is made in the place where the headlight hydraulic corrector tube passes. The siren and limit switch are mounted on a slightly bent mounting plate.
The luggage compartment limit switch provides for sawing off the mounting plate and the electric drive for opening the trunk itself. When attaching the limit switch, it is not recommended to completely unscrew the nut. Otherwise, it will be difficult to lock the spring back. To install it, a slot is made in the trunk lock. The electric drive should be secured to the trunk lid. A flexible cable can be used as a connecting element.
Conclusions, purchasing a central locking system with remote control and other useful information
In order to install a central lock that will close all doors when turning the key, you should purchase a separate central locking unit (small “black box”), as well as a special master activator (5 pins) for the driver’s door, or also for the front passenger door (where there is a lock cylinder and the ability to open the door with a key).
In this case, there is no need to install an alarm, and the process of installing and connecting the actuators is similar to the example above. The only differences are that you will have to lay additional wires for the driver’s door electric lock, and also “figure out” the connection diagram for the central locking control unit.
Central locking with remote control for 4 doors
You can also buy a separate remote control central locking kit . This set already includes a central locking control unit, 4 activators, wires, fasteners and 2 key fobs. A universal kit will cost about 1000 rubles.
Where can I buy? You will not find such a kit in retail stores at the price mentioned above. To do this, use sites that sell electronics and other devices directly from China. Try not to deal with intermediaries, but order directly.
We recommend Aliexpress.com, but be careful with sellers and look at customer reviews. As an example, Universal Car Central Locking System.
The site is entirely in English, so if you do not speak it well, use Google Translator or another similar one to translate into Russian.
If you have any questions about installing central locking, or would like to learn more about how to buy on this or similar sites, write to us using the “contact” form (at the bottom of the page). We will try to answer.
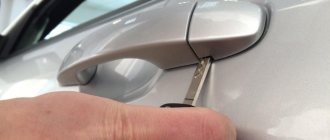
Opening the door with a “button” using an electric drive...
I took the basis from here: www.drive2.ru/cars/lada/2...4062246863888382312/#post ... But it was decided (for now) to leave the standard (7th) locks. In principle, there is nothing complicated. Everything is installed easily. The only 2 problems I encountered.
1. 7 locks are very “hard”... for example, if on a 9 they open literally by pressing a finger, then you need to apply some force to them... Since I used the cheapest (simple) electric drive, it (naturally) did not have enough power... And then an idea came from outside...they suggested to me that I could try a regular spring...no sooner said than done... Since the right size could not be found, 2 springs of the same (short) sizes were purchased... All this was immediately put together... the installation process began... Lever cleans up neatly. The rod that was attached to it is cut off. I left 10 centimeters (by eye) and attached a rod from the electric drive to it (the fastenings were all assembled). I extended the power... I connected everything... I adjusted it... by the way. The only thing is that I drilled another hole , for fastening the “drive”
And here comes the most interesting...
2. Here the 2nd problem arose... adjusting all this to the “door lock button”. If there were no problems with the passenger door, then I’m still struggling with the driver’s door... (it sticks a little when locking)... so I think I got a weak spring ...it would be necessary to change it...but I changed it...and that’s it...no problem...Finally it WORKED... To be honest, I didn’t even believe that it would work...but...it’s for the better...For the future...we need to install electric window regulators...And by the way...No I managed to install the button in the handles on the door... (they are plastic). So I had to make it a little to the left... but... those who have already ridden with me say that it is convenient...
And most of all I like the faces of people who are looking for a “lever” and it’s not there... they look at me and ask “HOW?” and I - “Press the button, it will open”... then questions are asked. What and how... damn... it’s even nice... Thank you for your attention. I just wanted to share my joy...) p\s. It took me about 5-7 hours to do all this... in total... it took the longest to adjust it all later...
Source
FakeHeader
Comments 17
Heavy hehehehe. The corrugation is not for this car, you need to install rubber tubes that are specially designed for classics.
The actuator connector had to be cut off, twisted, ideally, soldered again... And the rods had to be wrapped with foam rubber so as not to rattle)...
PS: So I understand, the car is not yours, let the owner deal with this... For a couple of seconds. could have been done, of course, for an additional fee. fee).
The power of the actuators is not enough because the bimetal wiring is laid with a real cross-section of less than 0.7. This is called hack work. These wires are not even tinned. It's been like a year. I have already replaced the wiring for myself and my friends to 1.5 kV. The actuators fire even on a dead battery. Previously there were constant problems. Including periodic failures of actuators in different doors
I will not argue. Perhaps the wiring is bad, but this problem occurs even in cars with factory central locking (VAZ 2110 and modifications). And all problems were solved by removing the springs.
The exact definition of this action is “crutches”. By the way, I don’t have them either, since at one time I solved the problem along the path of least resistance. In the end, I had to do it for myself once and for all
It is better to install corrugations straight. These S-ki quickly dry out and crack, and they are compressed when the door is closed. Now just a classic in the works. True, I had to install two rubber bands, there are a lot of wires (activator, ESP, heated mirrors, speaker).
Basically, all rubber bands dry out and crack.
Corrugations are faster because they work in torsion all the time
It is better to install corrugations straight. These S-ki quickly dry out and crack, and they are compressed when the door is closed. Now just a classic in the works. True, I had to install two rubber bands, there are a lot of wires (activator, ESP, heated mirrors, speaker).
What exactly are these rubber bands called?
Strange ! Alarm? Are they being stolen? According to my Classic Wazen Tazen from Kopeyka to Semerka, Alarms and locks are no longer needed at all!
Well, I don’t know... for me, locks are a convenience, a way to automatically heat up and find out the temperature outside, and protection from dirty tricks.))
So the Center-Lock is separate, and the Alarm is also separate. You can install just a Center-Lock without an Alarm. I asked why the Old Lady had an alarm system.
Well, I wrote - the locks are there for convenience - so that in the cabin you don’t have to poke the flag on each door - but just press the button and all the doors are closed.))
I removed the entire signaling system and threw it away. I bought Center-Zamok (Vympel) and its remote controls are very beautiful. Everything seems to be working well! True, only a couple of weeks. I bought a new one, fortunately they were not expensive. Well, there are no problems with installation, two wires plus and ground. The second one worked longer for a couple of months and also went out. I spat, and now I use the key. It’s not summer, I don’t want to climb in the cold. So it turns out that now the problem is not with the cars, but with spare parts.
Opening the front doors with a button VAZ classic
In the previous post, I said that the next entry would be about nutrition, but there were some minor hiccups, so there will be a nutrition plan somehow. After