The VAZ-2112 engine is developed on the basis of the VAZ 2110 engine, but has many modified and changed parts.
Units with 16 valves have the following modifications:
- engine 21120 volume 1.5 l (GLI luxury version);
- engine 21124 volume 1.6 l (years of production from 2004 to 2008);
- unit 21128 with a volume of 1.8 liters (100 hp, luxury version of the car from Super-auto JSC).
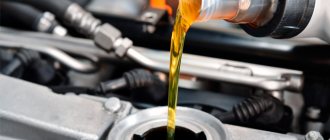
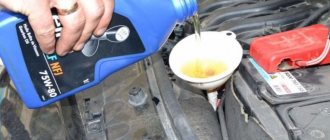
Using the example of a classic 21120 engine with a volume of 1.5 liters on a VAZ 2112, we will show how the most common maintenance procedure is performed - changing the oil.
Check frequency
Every car owner knows about the importance of changing engine oil. When determining the frequency, the manufacturer’s recommendations and personal experience are taken into account. Some drivers change the lubricant every 5,000 km, while others wait until the last minute and carry out the work every 20,000 km.
The average is 8,000 - 10,000 km or once a year. This option is optimal in terms of the price of motor oil and its ability to perform its functions.
You need to check the oil level in the engine crankcase:
- Immediately after replacing it.
- At least 2 times a month (by the time the sensors notify you of the problem, it will be too late).
- After a certain mileage, depending on the make of the car and the engine installed on it, on average every 1000 km.
- When signs of malfunctions appear: black, bluish, white smoke from the exhaust pipe, loss of power, leaks from under seals and gaskets, etc.
Many people check the oil level every day before leaving, and this is also correct, especially if the car has high mileage.
What will happen if you don't change?
Failure to promptly change the oil in the gearbox significantly reduces the life of the unit. Transmission oils contain a whole range of additives that effectively remove corrosion products on steel gearbox parts and facilitate the operation of bronze synchronizers. Over time, these additives lose their properties and wear of parts increases with old oil. In addition, the oil serves to remove heat from gearbox components; the older the lubricant, the worse it provides heat removal. Metal particles generated during operation of the box will also have a negative effect. They will get into the bearings and contact spots of the gears, increasing their wear.
How do you currently check the engine oil level?
Despite the fact that cars produced nowadays are stuffed with modern electronics, the oil level in their engine is still checked using a conventional dipstick.
The latter is located in a sealed hole in the cylinder block and there is always easy access to it.
Of course, someday the situation will change and data on the amount of oil in the engine crankcase will be displayed in front of the driver on the display.
Such cars are already appearing on the market, but they are mostly premium, for example Mercedes w211 or Volvo XC60, and they do not have direct access to information about the amount of lubricating fluid in the engine; for this you need to activate the electronic dipstick function, but more on that below.
In any case, it is important to know how to properly check the oil level and why it is needed.
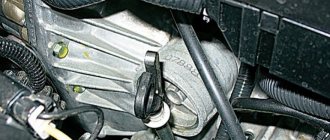
Necessary tool
"VAZ-2110" has a somewhat non-standard arrangement of the box, this applies to both the injector and the carburetor. If the drain hole is located at the bottom of the box and access to it is easier from an inspection hole or a lift, then it will not be possible to simply get to the filler plug or neck. To replace you will need:
- socket wrench 17;
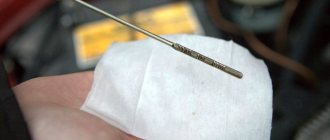
- dry clean cloth;
- hard thin wire;
- empty container with a volume of 4 - 5 liters;
- oil syringe or funnel;
- long soft hose (25 - 30 cm);
- 4 - 5 liters of fresh oil.
Before starting the replacement, warm up the car and drive for 5 - 7 kilometers so that the transmission in the gearbox warms up and becomes less viscous.
Consequences of incorrect oil level
There is an opinion among inexperienced drivers that the more oil is poured into the engine, the better, since there is no need to check it often.
But it is important to understand that if the lubricating fluid is above the upper mark of the dipstick, then its excess will enter the crankcase ventilation system, and this is dangerous for the catalyst.
This can also lead to an increase in pressure in the lubrication system, and this, in turn, can adversely affect the condition of the gaskets and seals and subsequently lead to their extrusion.
Due to the low level of working fluid, air is sucked into the oil pump, i.e. some engine parts will run dry, and this will reduce the interval until the unit is overhauled.
Also, during the measurement, you can check the condition of the lubricant and replace it in time, and this is also important.
Oil leaks through the dipstick if the crankcase ventilation system is not working properly
The design of the system allows exhaust gases to be removed from the crankcase through an oil separator and an air filter element. The first is necessary to separate oil particles that penetrate the system along with gases. The separated lubricant returns to the crankcase through the oil separator tube. A decrease in the throughput of the ventilation system can be caused by a clogged oil separator tube or suction ventilation manifold, as well as contamination of the filter element.
To return to its former capacity, it is necessary to replace the filter element or clean the oil separator tube. This can be done either with the help of specialists or independently. But it is worth mentioning that such measures are effective only if the technical condition of the piston group is satisfactory. If, after servicing the ventilation system, oil still presses through the dipstick, then the problem must be looked for in the piston group.
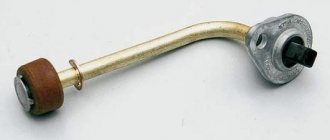
How the dipstick works
There is no point in considering the design of the probe itself, everything is clear here, let's talk about the marks, because you need to navigate by them when taking measurements.
Most car brands follow one principle: the lower mark L is the minimum level, the upper mark F is the maximum. The designations “MIN” and “MAX” may also be found.
Also on some dipsticks there are marks for measuring the oil level at cold and hot.
But that’s not all; in order to measure readings correctly, you need to adhere to certain rules and conditions, which we will talk about below.
Part device
The design of the product itself is elementary. It is a normally open sealed contact (reed switch) connected to the on-board control system warning lamp.
The contact is located inside a curved tube, outside of which the float slides freely. There is a magnetic washer inside the float, the field of which is capable of closing the reed switch contact. When the sensor tube is immersed in oil, the float floats and the electrical circuit opens. But if there is no lubricant in the crankcase, the float drops to the lower position and the magnet acts on the reed switch contact, closing the circuit. The sensor connection is single-wire, the second wire is the engine ground.
Features of checking the oil level on a cold and hot engine
There are so-called two castes of drivers, some claim that it is best to check the oil level on a cold engine, others, on the contrary, on a hot one. But the truth, as often happens, is in the middle.
IMPORTANT: The situation described below is when the dipstick does not have the “cold” and “hot” check marks.
As we know from physics and chemistry, any substance contracts in the cold and expands at high temperatures. This also applies to motor oil.
Let's imagine a situation where measurements are carried out on a cold engine at a temperature of minus 100C. The oil is compressed and its level on the dipstick has moved down. They topped it up as stated in the car's operating manual and warmed up the engine.
As a result, the working fluid warmed up, expanded and occupied a larger volume. Those. the level has become elevated (the consequences of this are described above).
If you take level measurements immediately after stopping the engine, the oil will not have time to drain into the crankcase and the readings will be incorrect. You need to wait a few minutes until the still heated and not very viscous liquid drains into the crankcase.
At the same time, it will cool down a little, but this will not greatly affect the accuracy of the measurement results. And what’s important is that this method can be safely used both in winter and summer.
Also keep in mind that non-original (fake) oils “behave” differently - they can harden like jelly even in hot summer weather.
Required volume
Before buying motor oil, you need to decide on the volume. The best option is to purchase a 4-liter canister, which will last for a long time. This is convenient, because you can add the remaining liquid as the liquid is consumed, without worrying about buying a new one every time.
Well, now specifically about the one-time filling volume. The engine model plays an important role here. The VAZ 2110 used two engine variations. This is an 8-valve and 16-valve engine. In the first case, the volume of the oil sump is 3.2 liters, and in the second - 3.5 liters.
Requirements for carrying out repair and maintenance work on VAG series vehicles
Many car owners do not bother checking their engine oil. As noted above, the machine is placed on a flat surface, and after a few minutes of standing, the dipstick is taken out and the level is checked.
Information on this subject is provided on the Internet based on the experience of car owners. It is difficult to find official data on this issue.
As an example, you can take information from ELSA - documentation that sets out the requirements for carrying out repair and maintenance work on VAG series vehicles.
Level check
At the first stage, you need to find out where the oil is located, and here everything depends on the part of the scale:
- A - no refilling is needed.
- B - it is permissible to add a little lubricant.
- C - topping up is required.
Conditions
An important point is the conditions that must be observed when performing work.
General instructions, except for V6 diesel and V8 gasoline engines:
- oil temperature - not less than 60 degrees Celsius;
- the waiting time after turning off the motor is several minutes, which is enough for the lubricant to drain into the pan;
- horizontal position of the car.
For V6 diesel engines the following requirements apply:
- oil temperature 90 degrees Celsius (warming up to this level is required);
- wait 2 minutes for the oil to drain into the pan;
- horizontal position of transport.
V8 gasoline engines are tested taking into account the following requirements:
- lubricant temperature - 90 degrees Celsius;
- Idle for 60 seconds;
- turn off the engine and pause for 5 minutes to allow the oil to drain (the process is slower);
- level control for 60 seconds;
- the car is horizontal.
Verification algorithm
Now let's look at the inspection instructions on VAG series cars.
Do the following:
- Remove the dipstick and wipe it with a clean cloth.
- Insert it into place until it stops and remove it again.
- Look at the oil level on the scale.
- Assess the situation and decide whether refilling is necessary.
The approach discussed above, as a rule, corresponds to the generally accepted algorithm. At the same time, experienced drivers recommend keeping the level between the Min and Max marks, and checking it in the morning before starting the engine.
VAG experts recommend a slightly different approach, focused on checking with heated oil.
What is the difference between the original and the analogue?
When buying a VAZ 2110-2112 dipstick (with 16-valve engine), it is important to choose a manufacturer, since all parts can be divided into originals and analogues. Original spare parts are produced by a plant with which a supply contract has been signed for the production line of a car plant. The list of original manufacturers may change from time to time, depending on contractual relations, but in any case, strict selection conditions and unified approved technologies apply. Original spare parts are branded with brand markings, packed in the brand's original packaging indicating the catalog number, which coincides with what is indicated in the official catalog of the car plant. For repairs or maintenance at a service center, when using original spare parts, a warranty is provided from the manufacturer.
Original spare parts ensure full compatibility with all vehicle systems, this promises maximum safety. If you need to carry out complex repairs on a unit that affects many neighboring systems, it is better to buy original spare parts. In order not to void the vehicle warranty, only original parts are used during repairs or maintenance. Non-original spare parts, hereinafter analogues, are produced by third-party factories using personal production technologies. Analogues are completely legal, have a quality certificate and are sold under the manufacturer’s trademark. The price of an analogue is usually half the price of original spare parts, this is due to the lack of advertising and other marketing costs. Analogues are not used during assembly at the car factory, they are also not sold in official service centers, you can only buy them in online stores. A large number of factories producing analogues produce high-class goods, so the correct choice of a similar part is accompanied by a long service life, no less than the period specified by the manufacturer of the original spare parts.
How our system works
Using a pre-known or defined catalog number of a product, for example, 21121009045 from the manufacturer VAZ, the system will generate a list of offers from our suppliers who currently have the required product in stock: Dipstick VAZ 2110-2112 (with 16-valve engine). Information about product offers is current from warehouses around the world. If necessary, click on the “Show all offers” link. To buy the item you are interested in, select the best offer, since each supplier has a certain set of parameters for delivery time, price and shipment statistics. When purchasing 21121009045 Dipstick VAZ 2110-2112 (with 16-valve engine), you can take into account the following criteria: • quality of the supplier; • cost of goods; • quantity of positions available; • delivery times to our central warehouse; • choice between the original manufacturer and its analogue. The relevance of information for each item 21121009045 VAZ 2110-2112 dipstick (with 16-valve engine) is updated in real time so that our customers rely only on current data. If you need further clarification, please use the contacts provided. More information about the VAZ manufacturer can be obtained by clicking on the link with its name. In the process of cooperation with our suppliers, customers are provided with special discounts. Each supplier who places product offers is checked against documents to exclude the fact of selling counterfeits. If next to the warehouse number there is the inscription “OD” (official dealer), you can make a purchase with confidence. Manufacturers' warehouses and official dealers from manufacturers are marked with this mark. When placing an order from the warehouses of official dealers, you are guaranteed 100% quality of the product.
More or less experienced drivers can determine that it is the sensor that is causing confusion in the car’s operation, since there are no noticeable signs of oil leakage. Therefore, the first priority is to check the condition of the device that monitors the lubricant level.
The check is performed as follows:
- The car is placed on an overpass or inspection hole;
- The motor protection is removed. It can be put aside for a while;
- Now find the oil level sensor in the underbody space;
- Turn on the car's ignition. This way you can supply power to a device that may have failed;
- Disconnect the wires going to the sensor;
- Using a voltmeter, connect the probes to ground and the connecting block;
- If the voltmeter shows 12 volts, then the sensor is working normally.
But in the absence of tension, we can talk about one of three reasons for such a situation:
- The display unit is broken;
- There are defects on the contacts;
- There is a break in the wiring in the sensor circuit.
Therefore, if the wiring is in good condition and the contacts are clean, then further actions will consist of replacing the fuel level sensor on your VAZ 2110.
- 07/06/2019
The full range of LIQUI MOLY products is in stock in Yekaterinburg.
more details 06/17/2019
New catalogs for selecting spare parts on the PlentyCar.ru website.
more details 06/11/2019
Congratulations on the holiday June 12, 2022 and office work schedule. more details
In the Plenty Car online store you can buy auto parts for Japanese cars (Toyota, Mazda, Honda, Isuzu, Lexus, Mitsubishi, Nissan, Subaru, Suzuki), European cars (Ford, BMW, Citroen, Peugeot, Alpha, Lancia, Fiat, Land Rover, Mercedes, Opel, Renault, Rover, Volkswagen, Audi, Skoda, Seat, Volvo, Saab, Jaguar), American cars (Chevrolet, GM, Chrysler, Cadillac, Hummer, Infiniti, Jeep, Pontiac) and Korean cars (Daewoo, Hyundai, Kia, SsangYong). If you were unable to find spare parts for your car yourself, contact our specialists. All information on the site is for reference only and is not a public offer as defined by Article 437 of the Civil Code of the Russian Federation.
Pay for goods by credit card, using QIWI, Yandex.Money or WebMoney and save on your purchase from 4%, avoiding postal and bank commissions
This product was chosen by 1 customer
The original oil dipstick seal for VAZ 2110, 2111, 2112 is intended to replace a failed standard one.
Weight, kg: 0.05 Dimensions, cm: 2 x 2 x 2 Volume, m3: 0.00001
Checking the oil level in the Lada Granta engine
The algorithm of actions is the same (see above). But when measuring the oil level in a Lada Granta, there is one feature that many people do not know about.
The crankcase pan is structurally equipped with an antifoam plate, which is located parallel to the bottom of the pan.
It serves to calm and prevent foaming of the liquid and for normal operation of the oil pump.
This plate has two holes, the main one for the oil intake and the second for the dipstick.
In the Lada Granta, this hole is slightly offset, so when measuring the oil level, the dipstick rests against the edge of this hole and does not go in completely.
Those who know about this get used to it and no problems arise, but those who don’t know how to bend the feeler gauge.
But this is not the only problem. When removing the probe, it touches the edge of the hole in the defoamer plate, which is at the level of the top mark when the probe is inserted.
As a result, the oil film moves smoothly along the dipstick from mark F to L, which misleads the driver. Therefore, here you need to adhere to the rule - the level is checked not at the edge of the oil on the dipstick, but in a dry place. The probe needs to be rotated, viewed and analyzed.
Other VAZ cars
Let's look at how to check the oil level on VAZ series cars using the example of the VAZ 2112 and Lada Priora 16 valves.
Level measurements on these vehicles are carried out only on a warm engine. The probes here have a special appearance - a corrugated area with marks along the edges without letters.
Therefore, if the engine is cold, you will have to start it and warm it up until the fan turns on.
Then turn off the engine, wait 3-5 minutes until the oil drains into the crankcase and take measurements, see the algorithm above.
Since the dipstick itself between the marks has a corrugated shape, this causes a problem for many drivers.
Everything is simple here - the working fluid must be in the grooved zone, then the level is considered normal. But where this place should be, opinions differ.
Experienced drivers recommend proceeding from the operating conditions of the vehicle.
If the VAZ 2112 and Lada Priora are operated under normal conditions on flat terrain, then it is considered normal if the oil level is in the middle in the corrugated zone.
If cars are driven on moderately rough terrain, then the normal level may be 2/3 from the bottom mark in the corrugated zone, and if in mountainous terrain, then 3/4.
Also, many experienced car owners rely on the number of engine revolutions.
If during driving the number of crankshaft revolutions does not exceed 3000 rpm, then the oil level can be kept in the middle, if more than 4000 - at 3/4 of the lower mark. Filling 1 liter means raising the level from the lower to the upper marks.
When should you change?
According to the factory instructions, the service life of the oil in the VAZ 2110 gearbox is 75 thousand km. As practice shows, if a car is used in conditions of sudden temperature changes and in city traffic jams, then the frequency of oil changes should be reduced to 35-40 thousand km.
In addition to the scheduled oil change, there may be situations when the fluid should be changed immediately. A signal for an urgent oil change is the presence of metal dust or particles in the oil on the dipstick rod or noticeable thickening of the oil, not associated with its low temperature.
Toyota RAV 4, Corolla, Camry
The oil level in Toyota RAV 4, Corolla and Camry cars is checked using the algorithm described above.
Since these models do not have o and “hot” on the probes, the engine warms up, waits 5 minutes and measurements are taken. You need to focus on all the same indicators - 0.5 (middle of the probe), 2/3 and 3/4.
On Toyota RAV 4, depending on the engine model, the dipstick may be corrugated on one side or smooth on all sides. There may also be different designations - Max and Min or F and L.
The Toyota Corolla dipstick is smooth without any letter designations, there are only lower and upper marks. Measurements are carried out the same way.
On a Toyota Camry, depending on the engine model, the dipsticks can also be different, one may have the letters F and L, the other may simply have marks.
But this does not change anything; the oil level on the Toyota Camry is checked in the same way as indicated above.
Differences in replacement for engine “21124”
On the VAZ-21124 engine everything looks simpler than on its younger brother:
- The plastic cover is always attached with rubber bands;
- The oil filter can be found in one second (near the catalyst on the right).
Oil filter housing on a VAZ-21124 engine
Follow all the steps we have listed above.
Receiver VAZ-21124 is a work of art
The oil dipstick is located between the second and third receiver tubes.
Mercedes w211
The peculiarity of checking the oil level in a Mercedes w211 car is that you won’t find a dipstick there, it simply isn’t there, so don’t waste your time searching.
The w211 only provides an electronic probe, which is located in the form of a float in the engine crankcase. By the way, the w210 e280 has a probe and electronics, which is much more convenient.
In order to measure the amount of mass in the crankcase, you need to activate the electronic probe. The data will be displayed on the instrument panel.
The car must be on a horizontal platform. Insert the key into the ignition and turn it to the right once. Go to the menu and find the speed.
Press the reset button 3 times.
The battery voltage will be displayed.
Now, to find the electronic probe, press the arrow button shown in the photo 1 time.
A menu will appear.
Turn on the ignition by turning the key to the right one more step. After a few seconds, the display will show the engine oil level in liters. In our case it is 6.1 liter, which is the norm.
The following indication may appear on the display:
Thermal sensors
It is the thermal level gauge that is most often found in the design of modern car engines. At the heart of the sensor is a heating element. The control unit alternates heating phases, briefly warming up the element to a temperature higher than the actual temperature of the oil in the engine, and cooling. It is the duration of the period of reduction in the temperature of the heating element to the temperature of the engine oil in which it is immersed that allows us to calculate the actual level.
The operating principle of this type of level gauge is determined by the presence of an oil temperature sensor. This is exactly the design and operating principle of the G266 sensor, which is installed on many Volkswagen, Skoda, and Audi cars. Both elements are combined in the level sensor housing, which is located in the engine oil pan.
Electrothermal level gauges
Electrothermal oil level sensors can be called a subtype of thermal level gauges. The sensor is based on a heating element (wire) with a high temperature coefficient of resistance. The total resistance of the heating element depends on the heating temperature. Accordingly, the deeper the sensor is immersed in the cooling lubricant, the better the heat removal from the heating element and the lower its resistance. The oil level is calculated by the control unit based on the actual voltage value at the sensor terminals.
Ultrasonic meters
The operating principle is based on the use of ultrasound - sound vibrations, the frequency of which exceeds the frequency range accessible to human organs of perception. The degree of reflection of sound waves depends on the density of the material towards which the source of sound vibrations is directed. Since the densities of the air and engine oil differ, sound waves are reflected at the boundary of the oil level in the pan. The reflected vibrations are picked up by the receiver, and the time interval between the transmitted and reflected signal is used to calculate the engine oil level.
G266 sensor device used in the design of VAG-Group cars.
A PTC resistor is also included in the housing, which allows you to measure the oil temperature. In addition to the measuring element, the device includes an electronic measuring unit that processes ultrasonic signals and signals from a PTC resistor. From the digital logic module, signals converted into a language understandable for control units - a PWM signal - are sent through the engine ECU to the dashboard.
Advantages over thermal elements
- Low current consumption.
- Speed of signal transmission.
- Possibility of implementing a graphical indication of the actual oil level in the engine.
Measurement algorithms
- Static control. The engine has been stopped for more than 60 seconds and the vehicle is stationary (the parking brake must be applied). To level out the measurement error, the possible inclined position of the car body is taken into account. So that the owner does not wait for data after turning on the ignition, the level is measured immediately after opening the driver's door.
- Dynamic level control. Activated when the vehicle is in motion. This takes into account: crankshaft speed, longitudinal and lateral acceleration, engine temperature, and the position of the hood limit switch. In this case, the movement cycle since the last activation of the hood must be more than 50 km.
The role of the hood switch
VAG in VW, Audi, Seat, Skoda cars uses a rather interesting scheme for connecting the engine oil level sensor. If the low level indicator lights up, then 2 conditions must be met for it to go out:
- activation of the hood switch (it is logical that without opening the hood it is impossible to add oil);
- level replenished.
If, after the low level light came on, you opened the hood but did not make up for the deficiency, the indication will go out and light up again only after 100 km. If the amount of coolant reaches a critical level, the low oil pressure light on the instrument panel will light up.
If the hood switch on a car is faulty, the light will not go out, even if the level is normal. This feature of the connection diagram must be taken into account when diagnosing the system.
Light indication modes
The simplest device for controlling the amount of liquid involves only lighting a light bulb (oil can) on the dashboard. More advanced systems, including those used by VW, have several modes of light indication of low lubricant level in the engine.
On vehicles with graphical display, the amount of oil can be estimated using a scale projected onto the screen.
(1 rating, average 4 out of 5)
Ford Focus 2
The car is also placed on a flat surface, the engine is turned off and wait 5 - 10 minutes until the oil drains into the crankcase.
The measurement algorithm is no different from that described above. Everything is also checked the second time.
The Ford Focus 2 dipstick has only risks, there are no letter designations. There are also no indicators for “cold” and “hot”, so we take measurements only on a warm engine.
Allowed oil level readings are 0.5 (the middle between the marks), 2/3 and 3/4 of the distance from the bottom mark.
Above the top line, drain off the excess; below the bottom line, add more.
Articles
- 2108-1012005, -07, -08 or 2105-1012005 – filter for engines 21124 and 21120;
- 2112-1009146 – neck cover (until 2003);
- 1119-1009146 – neck cover (from 01.2003);
- 2101-1009140 – cover gasket;
- 2108-1009156 – conical plug M22x1.5 (all internal combustion engines 2110-2112);
- 2112-1009045 – oil dipstick (21120 and 21124);
- 2112-1104252, -03 – O-ring for the dipstick.
Analogs (oil filter)
- PATRON PF4050 or PF4047
- BOSCH 0 451 103 274
- KITTO C0065 or C0024
- WIX FILTERS WL7168
- MEYLE 714 322 0001
- STELLOX 20-50023-SX
- MASTER-SPORT 914/2-OF-PCS-MS
- LYNXauto LC-1030
- MECAFILTER ELH4081
- FORTECH FO014
- CHAMPION C102 or C130 or C030
- BM FO2108
- GOODWILL OG 401 LUX or OG 411 or OG 218
- BIGFILTER GB102M
- CLEAN FILTERS DO 886 or DO 227
- DYNAMAX PW9142
- FILTRON OP520/1 or OP568
- FORD 5024424 or 5012035 or 5013146
- TSN 9228 or 927
- HOLA SL144
- FRAM PH16
- DEXTRIM DX30094W
- FINWHALE LF105
- MAHLE/KNECHT OC384
- MANN/HUMMEL W 914/2
- HENGST FILTER H12W01 or H12W05
- MFILTER TF 57
- ALCO SP806 or SP845
- KLAXCAR FRANCE FH007Z
- Nevsky filter NF-1005
Volkswagen Polo sedan
The dipstick for measuring the oil level in the Volkswagen Polo sedan engine has two marks, lower and upper, in the grooved area. Do not confuse with marks further down and up the dipstick.
Measuring the level is no different from the previous ones, just place the car on a flat surface, turn off the engine and wait 5 - 10 minutes.
The check is also carried out the second time. The oil level should be midway between the marks in the grooved area or 2/3 and 3/4 of the distance from the bottom mark.
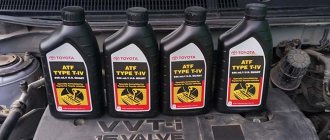
Materials and replacement regulations
For all 16-valve engines on 2112 hatchbacks, the volume of the lubrication system is no different. It is 3.6 liters. When replacing, pour 3.3, and if the filter is changed, then 3.4 liters (plus another 100 ml into the filter itself). The choice of material does not depend on the engine type.
| Brand | Viscosity | API quality class |
| LIQUI MOLY OPTIMAL | 10W40 | SL/CF |
| LUKOIL-SUPER | 5W40, 10W40, 15W40 | SG/CD |
| LADA SUPER | 5W40, 10W40, 15W40 | SG/CD |
| ESSO ULTRA | 10W40 | SL, SJ/CF |
| MOBIL SUPER S | 10W40 | SL, SJ/CF |
| SHELL HELIX PLUS | 10W40 | SL/CF |
| HAVOLINE EXTRA | 10W40 | SL/CF |
| ZIC A PLUS | 5W30, 10W30, 10W40 | SL |
| MANNOL RACING | 15W40 | SL/CF |
| NOVOIL-SINT | 5W30, 5W40 | SG/CD |
| NOVOIL-SUPER | 5W30, 5W40, 10W30, 10W40, 15W30, 15W40, 20W50 | SG/CD |
| UTEC NAVIGATOR | 5W40, 10W30, 10W40, 15W40, 20W40 | SG/CD |
| MANNOL ELITE | 5W40 | SL/CF |
| ESSO UNIFLO | 10W40, 15W40 | SL, SJ/CF |
| TNK SUPER | 5W40, 10W40, 15W40 | SL, SJ/CF |
| SHELL HELIX SUPER | 5W40, 10W40 | SL/CF |
| MOBIL 1 | 0W40 | SL, SJ/CF |
| MOBIL SUPER M | 10W40, 15W40 | SL, SJ/CF |
| VALVOLINE DURABLEND | 10W40 | SL/CF |
| MANNOL CLASSIC | 10W40 | SL/CF |
| VISCO 2000/3000/5000 | 10W40 or 15W40 or 5W40 | SL/CF |
| LUKOIL-LUX | 5W40, 10W40, 15W40 | SJ/CD |
| MANNOL EXTREME | 5W40 | SL/CF |
Volvo XC60
Volvo XC60 cars are equipped with D3, D4, D5 engines, which can be equipped with either two types of probes at the same time, electronic and conventional, or only electronic.
For example, on the Volvo XC60 D5 205 and 2.4D 175 there are two types of dipsticks, but the usual dipstick is very small and is located at the very bottom of the engine and is difficult to reach. You need to either lift the car or drive it into a pit.
Therefore, they mainly check the oil level on the Volvo XC60 electronically and for this:
- Get into the car and close the door;
- Insert the key into the ignition;
- Press and hold the START-STOP button for a few seconds;
- The on-board computer will go into “ON” mode;
- We look under the steering switch until the oil gauge appears;
- We activate the mode and see the computer readings;
- This completes the check.
Audi Q5
On the AUDI Q5, the oil level is also checked with an electronic dipstick, but here the manufacturer has gone overboard with this matter. Why? You will understand further.
Algorithm of actions:
- Turn on the ignition;
- Simultaneously activate and hold the “SETUP” and “CAR” buttons;
- Release the buttons when the hidden menu appears;
- Go to “CAR” - “Carextdevicelist” - “Oil level gauge” and activate the latter;
- Next, go to “Carmenuoperation” - “Oil level” and set the value to “5”;
- Press and hold the "Return" and "CAR" buttons to close the hidden menu;
- To reboot the system, click the buttons shown below;
- After reboot, go to “Oil level”;
- If the oil level is normal, the message “Engine oil level OK” will be displayed. It will also be visible where the level is between the MIN and MAX marks.