It becomes extremely inconvenient to operate a car if the fuel level indicator on the dashboard is lying or not working. To avoid getting into a hopeless situation with an empty tank, the driver has to record the odometer readings and calculate the approximate mileage based on fuel consumption. Another option is to constantly carry a spare canister filled with gasoline or diesel fuel in the trunk. Getting rid of these inconveniences is a trip to a car service center or self-diagnosis and troubleshooting.
Fuel level sensor for VAZ 2114 - 15 product review and installation
Hello dear car owners and visitors to the online store Avtoall.ru
This review will primarily be useful to those car owners who own a front-wheel drive VAZ and repair it themselves. I had this problem: the fuel level sensor stopped showing the correct parameters. I think I'm not the only one and many people have the same problem. The cause of this problem is the fuel level sensor, which is designed for a maximum of 100 thousand mileage, after which it usually stops working completely or simply begins to show incorrect fuel level indicators in the tank. I tried to clean it and bend it and came to the conclusion that it was beyond repair and required replacement. I had to order the sensor several times because they are all different and I need to buy exactly the one that is on the car. Therefore, before ordering, I recommend looking at which module is installed on your car. In my case, the car is a VAZ 21154 i 1.6L manufactured in 2110 and module 21101 was installed on it from the factory; this marking is located on the top of the module in the form of a sticker. You may have a different marking and therefore you need to buy a sensor with the same marking as yours. Different fuel level sensors have differences, for example, the bend of the float or different connection pads, and they are also attached differently. I think the differences are now clear. Now I ordered a sensor on 01/04/20 for my purchase and picked it up on 01/07/20 at the point of delivery. Everything arrived in excellent packaging and within the stated time frame I have no complaints about the product or delivery. See below for photos of my item.
Friends who are interested can watch the video review of the product below
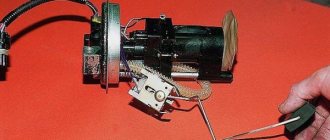
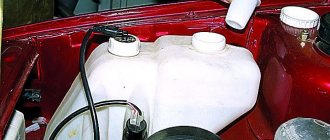
Now directly to installing the sensor on the car. The module is located under the rear seat; it needs to be raised to a vertical position so that there is free access to the module itself. You need to lift a piece of sound insulation and unscrew the two screws that hold the hatch and remove it. Next, disconnect the block and two gasoline fittings. Before removing the fittings, the car must stand so that the pressure in the system is released; gasoline may splash out under pressure and get into your eyes; be careful when removing the fittings. Then unscrew the nuts and remove the iron ring and take out the module. If anyone doesn’t understand the process of removing the module, I have a detailed video on my channel, you can watch it and you’ll understand, nothing complicated. Below is a photo of the module.
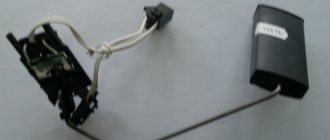
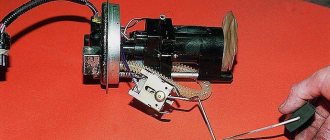
Below is a photo of installing the sensor on the module.
Watch a detailed video on installing the sensor on the module if you don’t know how to change it.
I also recommend immediately changing the fuel pump filter; it was very dirty and it’s not clear how it passed gasoline to the fuel pump at all. I bought it here, too, got the simplest and most inexpensive one and it worked perfectly. Photo of the filter below.
After installation, everything works great and shows the correct fuel level in the tank. Now you can conclude the sensor is 510 rubles. and filter 55 rub. Only 565 rubles + delivery, I think it’s much more profitable than buying a pre-assembled module. You can change everything yourself; there’s nothing complicated about it. I wish car owners fewer breakdowns and good luck on the roads. Special thanks to manager Nikolay Suchkov for the prompt processing of my order.
Source
Fuel level sensor VAZ.
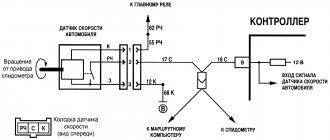
The fuel level sensor (FLS) as part of the fuel system is used to determine the fuel level and is installed directly in the fuel tank. The FLS is used in conjunction with a fuel level indicator, which in turn is located on the dashboard. The fuel level indicator sensor is based on the operating principle of changing the voltage (pulse height, frequency) at the sensor output when the fuel level in the tank changes.
Structurally, the fuel supply sensor is nothing more than a rheostat with nichrome resistance. The movement of the movable adjustable contact is carried out through a float lever, the console of which is equipped with an additional contact point. This additional contact, being in a specific position, closes the control circuit, thereby indicating the need to use the fuel volume of the reserve group, which includes a volume from 4 to 6.5 liters. gasoline.
FLS is a device of low reliability. Sometimes it becomes necessary to buy a fuel sensor, because after a certain period of operation, the indicators of this device begin to “jump”, that is, produce incorrect parameters. This is due to the fact that the main disadvantage of such a device is the thinning of the track of the contact group under the influence of the friction force of the runner.
In some cases, you can repair the device by slightly bending the so-called. “rocker arm” (bending) of the runner, thereby placing its working contact surface slightly above the wear area of the contact track. If wear exceeds acceptable limits, the sensor must be replaced with a new product.
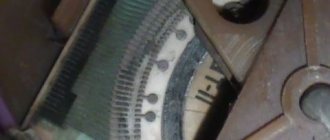
An example of a resistive element of a car fuel level sensor:
In the case when the fuel tank is half full and the fuel flow sensor shows a zero tank fill value, the following measures must be taken: - test the technical conditions of the contact group on the rear of the instrument panel and, if necessary, tighten the electrical wiring fasteners; — check the smooth movement of the float spoke, focusing on eliminating unauthorized stops in intermediate positions.
Due to low-quality gasoline and additives, the internal electrical mechanisms in the electric gasoline pump are corroded.
Example of markings and designations, use of FLS:
Select a fuel level sensor based on resistance If you don’t know which fuel level sensor to choose, then you can select a fuel sensor based on its parameters. You need to create a resistance in place of the sensor, and then measure it with a tester and find out the resistance. To do this, you will need a 1 kOhm variable resistor, which should be connected instead of the FLS. Full tank - resistance 6-7 Ohm. By adjusting the indicator to the empty tank position, we measure the resistance. The data obtained serves as the basis for searching for a new sensor with the same resistance. The main thing is that the resistance of the new sensor matches the pointer.
What is a fuel sensor
✔ This small device is a rheostat with a resistor, which is assembled from nichrome components.
The changing part of the rheostat in contact with the liquid moves using a lever with a float. ✔ At the opposite end of the lever there is another contact, which, when in a specific position, closes a circuit that controls the start of production of spare fuel. The reserve balance ranges from 4 to 6.5 liters.
✔ Sadly, this device (see photos at the beginning) is considered one of the elements that often fails. In some cases, replacing the fuel sensor may not be necessary, you just need to perform minor maintenance.
Fuel level sensor for VAZ 2114 injector: all the secrets and subtleties
Probably every owner of a domestic car has encountered a situation where the information on the dashboard about the fuel level in the tank did not correspond to reality. This is a fairly common and unpleasant phenomenon, characteristic mainly of older machines.
The VAZ-2114 fuel level sensor with an injector performs one simple but extremely useful task - it informs the driver about the remaining fuel in the gas tank. During the operation of the car, the contacts of the mechanism oxidize, and the sensor itself begins to function incorrectly.
On what principle does the device work and how to replace it if necessary?
Replacement allowance
How to change the fuel level sensor of a VAZ 2110 injector at home?
Detailed instructions are presented below:
- First of all, you should disconnect the electrical circuit of the car. To do this, you need to disconnect the negative terminal from the battery.
- Next, open the rear doors and remove the rear seat with the lock. Carefully remove the seat from the car and set it aside. Using a Phillips head screwdriver, you will need to unscrew the bolts that secure the special hatch. Once done, you can remove the cover.
- Next, you need to disconnect and disconnect the wiring that goes to the connector - just remove the plug.
- Using a 17mm wrench, you need to unscrew all the hoses, after which the lines through which gasoline is transmitted must be turned to the sides. These steps will allow you to remove the fuel pump with greater comfort.
- Having done this, you can unscrew the nuts that secure the clamping ring. There is nothing complicated about this - you only need a 7 key. It happens that the fuel pump has not been removed for a long time, so the mounting nuts may rust. If this is the case, then treat them with WD-40 - it will remove the rust and unscrew the nuts without any problems. When the mount is dismantled, you need to carefully pry up the ring and remove the fuel pump from the gas tank, along with it the lever and the float should come out. At this stage you need to act as carefully as possible, otherwise you risk damaging the unit.
- The next step is to unscrew the bolts that secure the controller itself to the assembly. By unscrewing them, you can remove the electrical plug from the regulator. Next, you need to remove all the guides from the fuel pump casing, and do not forget about the fasteners - they can be bent using a screwdriver.
- After completing these steps, unscrew the screws that are on the pump cover, making sure that the nut does not rotate. To do this, you can fix it with a key number 5. Remove the cover itself, so you can see the controller. Inspect it carefully - you need to understand the principle of operation in order to make a verdict - whether the sensor is working or not. If faults are found during diagnostics, the device will need to be replaced. Further assembly is carried out in the reverse order, just do not forget to treat the contact area between the pressure ring and the gasket with sealant.
What does the fuel level sensor consist of and how does it work?
The fuel level sensor can work properly for a long time. The mechanism itself is not one of the most painful areas of the VAZ-2114, but, like all other devices, sooner or later it fails. Its breakdown is most often due to the fact that the FLS is in unfavorable conditions.
The device body is quite fragile, which often leads to the sensor breaking due to mechanical damage. Among other things, constant temperature changes significantly reduce its service life. The fuel sensor of the VAZ-2114 is especially painful during the frosty season.
The main purpose of the fuel level sensor is to determine the fuel level in the gas tank and transmit the received data to the indicator, which informs the driver.
In a VAZ-2114 car you can most often find a sensor of the BM-150 type. Regardless of the design feature, the operation of each fuel controller is based on a measuring float made of lightweight material. The operating principle of the device is as follows: a unique signal corresponds to a certain amount of gasoline in the tank. The design also includes a lever and a resistor element.
Taken together, all the parts of the device make it possible to measure resistance, which has different indicators depending on the level of gasoline. Using a sliding contact, it is possible to turn on and off a special indicator on the dashboard.
A full tank has a resistance of 20 ohms, an empty tank has a resistance of 300 ohms.
Malfunctions
For what reasons may the fuel level indicator not work:
- lack of good contact on any part of the circuit (breaking off wires, oxidation at the junctions of connectors, cracks at soldering points);
- malfunction of the instrument panel indicator (for example, broken solder joints);
- disconnecting the float from the sliding contact;
- fuse burned out;
- lack of contact between the resistive track and the sliding contact. The reason may be the formation of oxides and deposits on surfaces, weakening of the pressure of the sliding contact on the resistive layer, and abrasion of the tracks of the resistive layer.
The pointer is lying and works intermittently
Reasons why the gauge incorrectly shows the fuel level in the tank:
- the presence of additional resistance in the circuit (oxidation at the connectors, poor ground contact, formation of oxides, deposits on the resistive layer and sliding contact);
- Float casting defect, causing it to fill with fuel. Failure is extremely rare, but still possible, as is bending of the float rod due to mechanical impact during unqualified repairs;
- formation of deposits on the guide post (typical only for tubular type sensors). In this case, the movement of the float will be difficult.
The arrow always shows a full tank if the system has:
- the float has separated from the sliding contact (in this case, the slider will always be in the extreme position);
- the wire going to the indicator has a short to ground somewhere, which causes the resistance in the circuit to decrease.
A twitching arrow of the UUT indicates partial abrasion of the resistive track of the potentiometer. This will also cause interruptions in the operation of the pointer. Since the car is most often used with a fuel tank filled to 40-60%, it is in this range that abrasion of the resistive layer occurs most quickly. Therefore, the pointer can only work properly when the position of the sliding contact falls on an intact resistive layer.
Common FLS malfunctions
Often, the driver can observe the following situation: while driving on a flat road, the instrument panel displays information about a full tank, and after driving off-road, about an empty one. The readings jump, which is clear evidence of a malfunction of the VAZ-2114 FLS. This disease often manifests itself due to wear on the contact tracks.
In some cases, the situation can be corrected quite easily - bend the slider so that it is located above the worn-out place in the diagram. But such a solution to the problem is not always appropriate. Sometimes you have to replace the entire regulator.
Other malfunctions of the mechanism include:
- The pointer is at zero - most likely the problem is related to the limited travel of the float.
- The low fuel light does not light up - there may be a problem with the potentiometer.
- When starting the engine, the indicator does not light up - there is a problem with the electronics.
- Incorrectness of the data displayed on the instrument panel - you should check the tightness of the float.
Replacing the FLS on a VAZ-2114
Even a novice driver can repair the sensor with his own hands. Of course, the breakdown should not be serious, then replacing the failed element will not be difficult and will not take much time. For example, if a float breaks, you can always purchase a new copy on the automobile market. The old float is easily removed from the holder and a new one is installed in its place.
Oxidized wires are also often replaced with new ones if stripping them is impossible. The price of a new sensor is relatively low, so most often drivers prefer to simply purchase a new mechanism.
The process of replacing the FLS on a VAZ-2114 includes the following procedure:
- Remove the lower part of the rear seat and remove the upholstery, since the sensor is a structural part of the fuel pump. It is impossible to get to the mechanism without going through the module.
- Using a key number 7, release the two screws securing the gas tank cap.
- Then you need to unscrew eight more screws securing the edge of the lid.
- After these steps, the cover can be easily moved forward.
When access to the fuel pump is ensured, it is necessary to remove part of the wire block. Don't forget to unscrew the line nuts. Before the cap is completely released, it must be turned once, this way the pressure in the system will be reduced.
It is necessary to carefully and carefully release the fuel pump so as not to damage the float; it should first be lifted, and then turned clockwise and tilted. Once you have the fuel pump in your hands, you can start looking for the sensor itself.
The procedure is as follows:
- use a screwdriver to move the locking ring;
- remove the module cover;
- remove the sensor terminals and release the fastenings from the cover;
- disconnect the block;
- Release the fuel sensor clamps and remove the mechanism.
At this point, the work of replacing the sensor is considered complete. It is necessary to install the new mechanism in place and assemble the module in the reverse order. As you can see, there is nothing difficult in performing this work; you just need to arm yourself with the necessary equipment: screwdrivers and a set of keys.
Checking the device with an ohmmeter
It is not always necessary to immediately replace the sensor with a new one. It happens that the problem lies in a completely different component of the car, for example, an injector. Also, if the meter is faulty, it may be possible to repair it. Before replacing, check the sensor:
- To test the device, connect a resistance meter to its terminals. This indicator must be measured when the lever and float are in extreme positions or in the middle.
- In the lower position, meaning zero fuel level, the resistance should be 285–385 Ohms.
- In the central position, which means the tank is half full, the ohmmeter should show 100-135 ohms.
- The highest position is a 100 percent filled tank. The ohmmeter should read 7–25 ohms.
If in at least one position the readings obtained diverge from normal, repair or replace the sensor. After installing the new meter, make sure that the installation arrow on the module cover is directed towards the trunk. Otherwise, you will need to dismantle the system again and repeat the replacement.