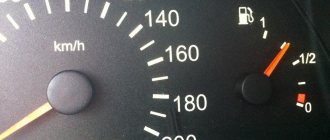
Probably every owner of a domestic car has encountered a situation where the information on the dashboard about the fuel level in the tank did not correspond to reality. This is a fairly common and unpleasant phenomenon, characteristic mainly of older machines.
The VAZ-2114 fuel level sensor with an injector performs one simple but extremely useful task - it informs the driver about the remaining fuel in the gas tank. During the operation of the car, the contacts of the mechanism oxidize, and the sensor itself begins to function incorrectly.
On what principle does the device work and how to replace it if necessary?
General information about the sensor
First, let's look at the main features of the FLS:
- In the first year or several years, the device works normally and can perform all the functions assigned to it. But since the VAZ 2115 fuel level controller itself has a rather fragile body, regular temperature changes, especially in winter, help reduce its service life.
- The car owner must periodically diagnose the regulator, since over time its tightness begins to deteriorate. Accordingly, at a minimum, it is necessary to clean the contacts from oxidation from time to time. If the contacts begin to fray, you can simply replace them.
- The choice of a new fuel level regulator for a VAZ is carried out taking into account the markings marked on the body.
- Original devices have an analog output to the control panel. Compared to digital devices, such options are less advanced.
- If the fuel consumption regulator fails, the on-board computer will signal this to the driver.
Four-cylinder fuel pump with built-in FLS
Where is?
If you are reading this article, you will probably be wondering where the controller is located. In VAZ 2114 cars, the device is located in the same module with the fuel pump. So if the device is lying and you want to replace it, you will have to dismantle the entire module.
Design and principle of operation
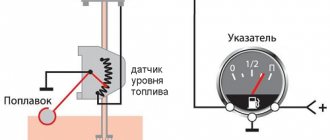
As you might guess, the purpose of the gasoline level controller is to determine the fuel level in the gas tank and then transmit this data to the control panel.
The design of the device consists of:
- resistor element;
- float with lever;
- a special sliding contact for turning off and turning on the diode indicator of the fuel level status on the dashboard.
As for the principle of operation, the fuel regulator on the VAZ 2114 functions as a result of the float moving as the volume of fuel in the gas tank is measured:
- The resistance value on the variable resistor element changes, as a result of which the resistance parameter in the circuit as a whole changes.
- As a result of one or another level of resistance, the parameters for the volume of gasoline on the control panel are determined.
It should also be noted that domestic vehicles are equipped with BM-150 devices - this information will be useful to you if you decide to replace the device yourself (the author of the video is Sergey L).
Common faults
There can be several options for a regulator malfunction:
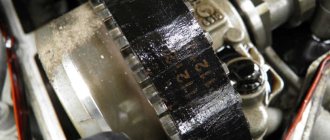
- The device readings are jumping. As a rule, this is due to wear on the contact tracks on the circuit, which occurs as a result of the constant impact of the design runner. To get rid of such a malfunction, you can try to bend the slider so that it is slightly higher than the place erased on the diagram. But if a large area is worn out, then most likely the regulator will need to be replaced completely.
- The device can lie if it is not adjusted, that is, the problem can be solved by normal adjustment.
- Sometimes it happens that the device freezes at “0”. In this case, you will have to dismantle the instrument control panel and find the indicator itself; in particular, you will need the contacts. The nuts on which they are fixed will need to be unscrewed, and the contacts themselves will need to be cleaned. In addition, attention should be paid to the contacts on the ground, that is, on the body. In some cases, the reason lies in the fact that the controller is simply jammed, but it may also be that it has failed.
Common FLS malfunctions
Often, the driver can observe the following situation: while driving on a flat road, the instrument panel displays information about a full tank, and after driving off-road, about an empty one. The readings jump, which is clear evidence of a malfunction of the VAZ-2114 FLS. This disease often manifests itself due to wear on the contact tracks.
In some cases, the situation can be corrected quite easily - bend the slider so that it is located above the worn-out place in the diagram. But such a solution to the problem is not always appropriate. Sometimes you have to replace the entire regulator.
Other malfunctions of the mechanism include:
- The pointer is at zero - most likely the problem is related to the limited travel of the float.
- The low fuel light does not light up - there may be a problem with the potentiometer.
- When starting the engine, the indicator does not light up - there is a problem with the electronics.
- Incorrectness of the data displayed on the instrument panel - you should check the tightness of the float.
If such symptoms of a device malfunction appear, experts also recommend checking all the wires securing the nut sensor. The fastening elements clamp the mass, so if they are not tightened well, the contact will appear and disappear. If the sensor does not show the fuel level of the VAZ-2114, then the contacts need to be cleaned, and if this cannot be done, then they can be completely replaced.
Replacement allowance
If you notice that the regulator no longer works, you will need to replace it. This procedure can be done at home.
Tools and materials
Before you begin the process, prepare:
- new regulator;
- Screwdriver Set;
- a set of keys.
Stages
So, the replacement procedure is performed as follows:
- Since the controller is part of the fuel pump structure, it will not be possible to dismantle it without touching the module as a whole. To gain access to this structure, it is necessary to dismantle the lower part of the rear seat, and then remove the luggage compartment upholstery.
- Using a 7mm wrench, you need to unscrew the screws on the right and left sides, in particular, we are talking about the gas tank cap latches. These screws also secure the upholstery to the sides.
- Having done this, you will see 8 more screws that secure the edge of the cover; they also need to be unscrewed.
- The next step is to remove the entire fuel tank cap, this can be done by moving it forward a little.
- After these steps, you will see the upper part of the pump; you need to dismantle the wire block that is connected to the device; for this you may need a 17-mm wrench. You will also need to unscrew the nut of the fuel supply line from the fitting. In this case, there is no need to rush, it is better to wait a little, but do everything carefully and correctly. Before completely unscrewing the cap, make one small turn - this will allow you to get rid of the pressure that has built up in the system.
- Next, along the diameter of the cover you can see 8 more small nuts, you need to unscrew them, for this you use a wrench, but it will be more convenient to do this with a ratchet.
- When dismantling the fuel pump, it should be lifted up, then turned slightly clockwise, and then tilted. Such actions will prevent damage to the device's float.
- After dismantling the module, we begin to disassemble it. Using a slotted screwdriver, you need to move the locking ring located directly on the module. After this, you can remove the cover itself from the structure. You need to remove the wire from the pressure sensor terminal, after which the fasteners are pressed directly from the cover and the blocks with wiring from the fuel pump are disconnected.
- The controller latches are detached, after which the device itself slides along the grooves of the case. The regulator is dismantled and replaced with a new one.
Checking the device with an ohmmeter
It is not always necessary to immediately replace the sensor with a new one. It happens that the problem lies in a completely different component of the car, for example, an injector. Also, if the meter is faulty, it may be possible to repair it. Before replacing, check the sensor:
- To test the device, connect a resistance meter to its terminals. This indicator must be measured when the lever and float are in extreme positions or in the middle.
- In the lower position, meaning zero fuel level, the resistance should be 285–385 Ohms.
- In the central position, which means the tank is half full, the ohmmeter should show 100-135 ohms.
- The highest position is a 100 percent filled tank. The ohmmeter should read 7–25 ohms.
If in at least one position the readings obtained diverge from normal, repair or replace the sensor. After installing the new meter, make sure that the installation arrow on the module cover is directed towards the trunk. Otherwise, you will need to dismantle the system again and repeat the replacement.
Video “Instructions for cleaning the fuel pump mesh and replacing the FLS”
Find out how to clean the pump mesh and change the FLS with your own hands from the video below (the author of the video is In Sandro’s garage).
A fuel level sensor (FLS) is installed on a car so that the driver can see data on the amount of gasoline in the tank and, if it is minimal, take timely measures to fill it. The lack of real fuel data causes anxiety for the driver and also leads to the threat of stopping halfway on the road where there are no gas stations. If the VAZ 2110, 2114, Kalina sensor fails, adjustment and replacement of the device for determining the fuel level is carried out easily, without significant financial expenses and does not take a lot of time.
The lack of real fuel data causes anxiety for the driver and also leads to the threat of stopping halfway on the road where there are no gas stations.
Purpose, principle of operation of the fuel sensor
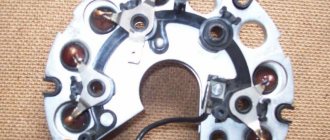
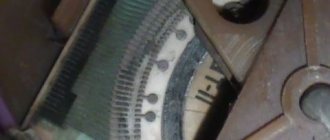
Fuel level sensor resistor
On the VAZ 2114, 2110, as well as Kalina, the fuel level sensor is a potentiometer in the form of a resistor, on the plane of which lines are drawn from a nichrome conductor. The device has a lever that, on one side, contacts and moves along a plane with the stripes, and on the other side there is a float, which ensures its movement depending on the level of flammable liquid in the gas tank. The fuel sensor works by creating a different resistance in a resistor as an electric current passes through its circuit. When the fuel level in the gas tank is at a minimum, the lever comes into contact with a special contact, which ensures that the warning light on the instrument panel in the cabin lights up. Thus, the driver is warned that there are 4...6 liters of gasoline remaining.
The hatch under which the fuel module is installed
Causes of problems
The functioning of the device is disrupted for the following reasons:
- There is no normal contact in any part of the circuit (wires have broken off, areas where connectors are connected are oxidized, solder joints are cracked).
- The indicator on the instrument panel is faulty.
- The float has become detached from the sliding contact.
- The fuse has blown.
- There is no contact between the resistive track and the sliding contact. This happens if oxides appear on the sensor, the contact pressure on the resistive layer weakens, and the tracks wear out.
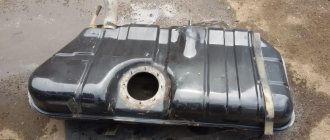
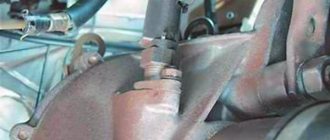
Fuel sensor location
On VAZ Kalina, 2114, 2110 cars, fuel level sensors are placed together with the pump, in order to save space, in the upper part of the gas tank. If you need to service, adjust, repair or replace it, you can find the fuel sensor in the rear of the car. To do this, you need to remove the seat, under which there is a small hatch secured to the tank body with screws.
When the fuel level in the gas tank is at a minimum, the lever comes into contact with a special contact, which ensures that the warning light on the instrument panel in the cabin lights up. Thus, the driver is warned that there are 4...6 liters of gasoline remaining.
Why does the sensor give incorrect readings?
The fuel level sensor of a VAZ 2114 car may not work correctly, giving false readings, for the following reasons:
- There is additional resistance in the circuit - the connectors have oxidized, deposits have appeared on the resistive layer and the sliding contact.
- The float casting was deformed, causing the float to fill with fuel. This cause of malfunction occurs infrequently.
- A coating has formed on the guide, making it difficult to move the float.
The fuel gauge indicator always shows that the tank is completely full if the float has come off the sliding contact. In addition, such a malfunction may be due to the fact that the wire that goes to the instrument panel has a short, causing the resistance in the circuit to decrease.
Preliminary operations for replacing the FLS on a VAZ 2110
Replacing a fuel level sensor is an easy, elementary process that anyone can handle, even without special skills and knowledge. Just read the procedure for removing, disassembling, assembling and installing the device to determine the level in the fuel tank. To get to the sensor we are interested in, we must first remove the fuel pump and ensure that there is a minimum of fuel in the gas tank, or at least no more than half the capacity. To carry out dismantling and installation work you will need the following set of tools:
- hammer;
- Phillips and flathead screwdrivers;
- set with wrenches.
On Kalina VAZ 2114, 2110 cars, sensors are replaced in almost the same order; for this, preliminary work is carried out:
- the horizontal part of the seat is removed;
- the protective mat rises, as well as sound insulation, if any;
- dust and dirt are carefully removed around and on the hatch cover;
- using a Phillips screwdriver, unscrew the screws securing the cover and remove it;
- the fuel module is cleaned of dust and dirt accumulated on its surface so that it does not enter the tank;
- remove the connectors with wires, first releasing the latches;
- the car starts to relieve pressure in the fuel system, after running out of gasoline, the engine turns off on its own, after which the ignition is turned off;
- The machine is de-energized by removing the ground terminal from the battery (indicated by a minus sign).
Dismantling and assembling FLS in VAZ 2110
Replacing the fuel sensor is carried out as follows:
- using a 17 key, the fuel pipes for supply and return are disconnected and moved to the side;
- the pressure ring is released using a socket head 7. If the nuts are coked or rusted, it is recommended to use WD-40 or a similar product, and you can loosen the tightening by lightly hitting the side of the nut with the sharp part of a hammer;
- The removed ring is removed with a screwdriver. The fuel module is removed carefully, tilting it so as not to bend it;
- Use a Phillips screwdriver to unscrew the fuel level sensor from the module;
- the removed FLS is replaced, adjusted or, if possible, restored.
Dismantling and assembling FLS in VAZ Kalina
Replacing the fuel sensor on Kalina is done in the following order:
- the tips of the fuel pipes are removed and secured with spring clips;
- using a bit and a hammer, unscrew the pressure ring, moving it in the direction opposite to the clockwise rotation;
- pry it off with a screwdriver and remove it from the hatch;
- is taken out carefully, tilting the structure slightly so as not to damage the sensor lever. Near the pump, the guide clamps are retracted and the module cover is moved to the side;
Defective fuel level sensor
The removed device is inspected and, if necessary, repaired and adjusted. If restoration cannot be achieved, the FLS is replaced with a new one. Assembly is done in reverse order. A carefully assembled block is inserted into the gas tank so as not to bend the lever with the float part. It is installed in such a way that the arrow shown on the cover is directed in the opposite direction of the vehicle’s movement, and the fixing part fits into a special groove on the opening of the fuel tank. The pressure ring is installed, having previously been treated with petrol-resistant sealant, then scrolled clockwise. When the module is securely fastened, the pipelines and connector with electrical wiring are connected. To check the tightness of the system, start the car and perform a visual inspection. If there are no leaks, and the correct readings of the presence of gasoline in the tank are recorded on the instrument panel, it means that the replacement of the fuel level sensor was carried out successfully. We screw the hatch cover and install the seat in its regular place. Despite the simplicity of the procedure for disassembling and installing a device for measuring the amount of gasoline in a gas tank, this work requires care and adherence to basic safety rules. Careless, careless handling of them can lead to a fire, since gasoline ignites quickly.
In appearance, the VAZ family cars to some extent correspond to European automotive trends. But domestic cars have many technical shortcomings that do not allow them to compete with global brands.
An example is the performance of the fuel level sensor. Many car owners have had to deal with a situation where the device showed unreliable data. Sometimes the needle points to zero, although there is still a lot of gasoline in the tank. In some cases, the opposite situation is observed. This usually applies to older cars, but there are exceptions. Such signs indicate that the device is failing and needs to be replaced. The work can be done with your own hands, without the involvement of specialists.
Diagnostics and repair methods
To check and identify a malfunction, perform a number of preparatory work:
- Find a service hatch in the car that gives access to the electric fuel pump and float mechanism unit. Usually located under the rear sofa, where the fuel tank is installed.
- Unscrew the pressure flange and pull the assembly out through the hole. Clean all contacts and the rheostat plate, reinstall the unit.
- Prepare a “control” with a light bulb and a multimeter.
The first step is to accurately determine the “culprit” - check the sensor and pointer separately. The performance of the device is diagnosed as follows:
- Turn on the ignition and connect one terminal of the multimeter or test light to the ground of the car.
- Connect the second contact to the positive terminal of the wire going into the technological opening. The meter should show the voltage of the on-board network.
- Remove the positive terminal and short it to ground. If the instrument on the panel is working properly, the arrow will show a full tank. This means the fuel level sensor is not working.
- If there are 2 wires coming to the gas tank, connect them alternately to the vehicle ground. From one the control lamp should light up, from the second the pointer should move to maximum. If the listed symptoms are observed, change the sensor.
In the case when there is a voltage of 12 volts on the wires, but after a short to ground the pointer indicator does not respond, you will have to disassemble the dashboard and remove the device. Similar actions are taken when the minimum gasoline remaining indicator is not working.
It is somewhat more difficult to independently check the updated system installed in cars of recent years; simply shorting the terminals will not do anything. Using a multimeter, make sure that there is supply voltage on the wires, and then you need to connect another, working sensor to them. If the arrow on the instrument panel reacts when the float moves, the element should be replaced.
Thorough cleaning of the slider and rheostat turns helps in cases where the fuel level sensor simply lies. The moving contact can be carefully bent so that it passes along the unworn part of the turns. Clean the current-carrying strips of the potentiometer with a soft cloth soaked in alcohol to avoid damaging the surface of the element.
Some gasoline sensor malfunctions can be eliminated in a garage:
- a “sunken” float with a crack is replaced as an assembly with a lever or separately (depending on the make of the car);
- the torn conductors are connected using a conventional soldering iron;
- the damaged rheostat plate is replaced with a new one, provided that the spare part for your car is on sale.
At the moment, repairing the fuel level sensor is becoming irrelevant. Considering the cost of a new element, it is easier and more reliable to replace a non-working part.
If the indicator and the gas remaining meter are working properly, but the arrow of the device is lying, try making adjustments. Carefully bend the float rod in the desired direction and check the readings again. To achieve maximum accuracy, the operation will probably have to be repeated several times.
The constant presence of a small canister of gasoline in the car or the car owner voting on the highway with a request to refuel, all this is a consequence of the fact that the fuel sensor in the car does not work. The breakdown of this sensor does not affect the operation of the main mechanisms of the iron horse, but it significantly affects the comfort of using the car, since there is always a need to calculate how much the car has traveled since the last refueling and how many more kilometers can be driven without stopping at a gas station.
Author of the article: mudriy_lev Specialization: repair of auto generators and servos in cars. Place of work: service center. Experience: 2 years. Education: higher education - electrical engineer, secondary specialized education - mechanical assembly mechanic.
Let's look at the main reasons.
Features of the fuel level sensor
For several years, the device has demonstrated stable operation and fulfilled its functions. After this, the sensor fails. The reason is temperature changes, increased humidity levels and insufficiently durable housing. During operation, the seal of the housing is broken. This leads to oxidation of the contacts, and the device ceases to perform its intended tasks.
To solve the problem with the fuel sensor, the owners of the fourteenth model found a solution - regular maintenance. The device is periodically dismantled and cleaned, and if necessary, the contacts are changed. Sometimes, as a result of a leak in the seal of the device, a complete replacement is required.
The main thing is to know the device markings. In the absence of this information, finding a suitable analogue will be extremely difficult. Usually, to solve the problem, motorists turn to a service center or a specialized online store. When contacting specialists, it is recommended to have the old sensor with you. The modern parts market is overcrowded. Therefore, it will not be difficult for a car owner to find analogues of a fuel sensor. But practice shows that the quality of analogues leaves much to be desired. The most effective way to solve the problem is to contact a service center and purchase factory components. It is much more profitable to buy a quality device by paying a little more money. In return, the car owner will receive quality and no headaches.
Few people know that the standard device of the VAZ-2114 is analog. In terms of its performance characteristics, it is significantly inferior to a digital sensor. You can purchase a digital device at any online store. It is believed that an electronic device is much more efficient because it is connected to a computer. In addition, it provides the driver with accurate data on the amount of fuel in the tank.
The principle of operation of the VAZ-2114 fuel level sensor
The purpose of the device is to accurately determine the amount of fuel in the tank and inform the driver about this via the dashboard. Device elements:
- lever and float;
- resistor element;
- a contact designed to turn on and off the control diode.
As a result of changes in the amount of fuel in the tank, the float moves. This leads to a change in the resistance of the resistor. The relevant information is sent to the dashboard. Typically, the BM 150 FLS is installed on the fourteenth model.
Nuances when working with the fuel level sensor on the VAZ-2114
If the fuel level indicator on a car shows unreliable data, then most inexperienced car owners immediately dismantle the module, buy a sensor and carry out repairs. But first of all, it is necessary to check the fastening of the contacts. We are talking about two black wires, which are located next to the handbrake handle.
System malfunctions often occur precisely because contacts are missing as a result of contamination. The wires are located directly next to the parking brake. The motorist needs to clean the surface of the contacts and then tighten the fasteners. Sometimes such actions are quite enough to restore functionality to the fuel level sensor.
Obviously, dismantling and replacing the fuel level indicator on a VAZ-2114 does not require professional skills from the motorist. If you have free time, you can refuse the services of car service employees. This way you can save money and get the job done to a fairly high standard. It is recommended to pay special attention to safety, as well as the use of high-quality elements.
The fuel sensor on the 14 VAZ model is a rather capricious element. During the first years of using the car, it works properly. Then the motorist needs to prepare for repairs and replacements, and our recommendations will help get the job done quickly, efficiently and without much effort.
The float is not informative
Problems when the fuel gauge does not work are often related to the float. There are 2 types of floats installed on cars:
- hollow (plastic, plastic, metal)
- made of lightweight porous material
The first type of float faces the problem of mechanical damage. As a result, the indicator needle gradually does not reach the maximum when the tank is full more and more. The float fills with gasoline and the gasoline sensor shows the wrong level more and more every day. Repair in this case is carried out by replacing the float.
The second reason why the fuel sensor is lying is encountered by both types of float. As a result of mechanical damage to the gas tank, the float becomes jammed. In this case, the indicator will show either a single value or work only in a small range. Elimination of this breakdown is possible only by replacing the gas tank.