The operating principle of internal combustion engines is based on the combustion of a fuel-air mixture. Engines that use diesel and gasoline have become widespread. It is important for a car driver to understand how much fuel is in the tank, how quickly it is consumed in a particular driving mode, and how many kilometers the car can still travel before refueling. To inform the driver about the fuel level, there is a corresponding scale on the instrument panel. Data is transmitted to it by a sensor located in the gas tank. Like any other element of the car, it has typical malfunctions, and the driver needs to know: how to diagnose them, fix them, or, in extreme cases, replace the fuel level sensor.
How is the fuel level in a car measured?
The interaction between the fuel gauge and the fuel sensor is based on the transmission of a signal, which can be analog or digital. Depending on the type of signal transmitted, fuel level sensors differ.
In modern cars, digital sensors are most widespread, which are much more accurate than analog variations. The digital sensor receives analog information about the fuel level, which is converted into a signal and then transmitted to the indicator. In this case, the value that comes from the sensor is calculated based on the geometric parameters of the fuel tank and taking into account the correction for uneven distribution of fuel throughout the tank.
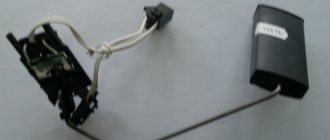
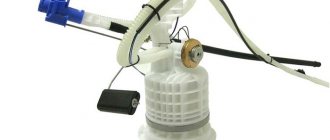
The float, which is a digital potentiometric device, is directly responsible for measuring the fuel level in car tanks. It is made of light materials (plastic, foam, light metals) in order to be constantly on the surface of the fuel, thereby transmitting readings to the sensor. Such a system for measuring the fuel level in a tank is simple, reliable and inexpensive, which is important for mass production of cars.
Float sensors can be divided into two types:
- Lever. In these types of sensors, the float is connected to the rheostat through a metal lever. Accordingly, when the fuel level increases or decreases, the float begins to move, the lever turns behind it, the movement is transmitted to the rheostat and its resistance changes. Information about this resistance, taking into account various factors, is transmitted as a digital signal to the fuel level indicator.
- Tubular. The float in such fuel level sensors is installed inside a special tube, which is mounted in the fuel tank. The float in the tube is fixed in such a way that its movement is possible only along the vertical axis. At the bottom of the tube there is a hole into which fuel flows. When fuel arrives, the float rises, and when its quantity decreases, it lowers. Parallel to the movement of the float, slip rings are placed on the wires, the closure of which records information about the fuel level transmitted to the indicator.
Tubular fuel level sensors are considered more accurate than lever ones. The advantages of the tubular design are especially evident when the car is moving uphill, downhill or on turns, when the fuel level in the tank fluctuates and the lever system can read incompletely reliable indicators. At the same time, a tubular fuel level sensor is more expensive than a lever one, and it may not be installed in all fuel tanks due to geometric shape limitations.
Malfunctions in the fuel level indicator
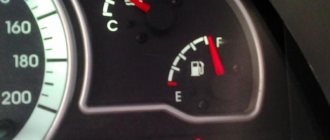
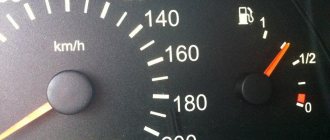
The main symptom of problems with a car's fuel level sensor is false data entering the indicator. Based on the “behavior” of the pointer, we can draw some conclusions about the malfunction that has occurred:
- The fuel gauge is at zero, regardless of the fuel level in the tank. Most likely, the problem is related to the float limiter;
- The fuel gauge moves, but constantly drops to zero. It is necessary to pay attention to the condition of the potentiometer winding and the reliability of contact of the current collector with the potentiometer;
- Fuel gauge fluctuations. Such a malfunction indicates severe wear of the contacts;
- When starting the engine, the fuel gauge does not move away from zero. The malfunction is related to the vehicle's electronics. It is necessary to check the wires for breaks and reliability of connection, and also make sure that the fuse is intact;
- The low fuel light does not come on. The problem may be related to the failure of the potentiometer;
- Incorrect fuel level readings. In such a situation, you should check the float for leaks.
According to traffic regulations, operating a vehicle with a faulty fuel level indicator is prohibited. Based on this, the problem should be corrected, and most often this is done by replacing the sensor.
Article: 9P5.139., additional articles: DUT-K
Order code: 116283
- Buy with this product
- show more
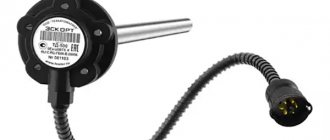
Fuel level sensor 9P5.139.031 (DUT-K)
The fuel level sensor (FLS) is used as part of the electric fuel pump module and is designed to determine the fuel level and signal the minimum fuel level in the car’s gas tank.
- Operating ambient temperature: −40°C…+80°C
- Working environment, motor gasoline: Premium-95 GOST R51105 or AI-95 GOST 2084
- Float movement cycles with full amplitude: 2·10 6
- Supply voltage (constant) of the sensor through the fuel level indicator, nominal: 13.5 V
- Supply voltage (constant) of the sensor through the fuel level indicator, operating: 6…15 V
- EBN module: 1118-1139009-10
- Applicability: VAZ "Kalina" for pump 1118-1139009-10
Information used: JSC "Utes"
- There are no reviews for this product yet.
The series of articles “Crystal VAZs, or typical breakdowns of domestic cars” talks about typical problems and malfunctions of cars produced by the Volzhsky Automobile Plant. Today we will talk about the front-wheel drive Samara family, as well as its modern analogues.
The operation of the fuel sensor does not directly affect the safe operation of the vehicle. However, its incorrect readings can indirectly contribute to the creation of not only unpleasant moments on the road, but even an emergency situation. A faulty sensor must be replaced.
How to remove the fuel level sensor
Depending on the car model, the process for removing the fuel level sensor may vary slightly. In this case, we can highlight the main points that you need to pay attention to in order to remove the fuel level sensor:
- Before proceeding with dismantling the sensor, it is necessary to reset the negative terminal from the car battery;
- Next, you need to provide access to the sensor. Depending on where it is located, it will be necessary to remove the trunk trim or dismantle the rear seat;
- Most sensors are fixed on top with a safety plate, to remove which you will need to unscrew the fastening bolts;
- Be sure to clean the sensor itself, as well as the fuel tank around it, from dirt and dust, so that contaminants do not end up inside the fuel tank;
- After this, the wires and mounting bolts are removed from the sensor.
When all the manipulations described above have been completed, the fuel level sensor can be removed. This must be done as carefully as possible so as not to damage its structure.
Removing or replacing the fuel sensor on Lada Kalina
Dismantling the fuel module and removing the FLS from it on the Lada Kalina:
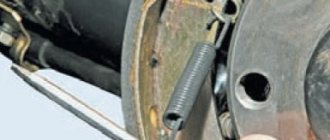
- By squeezing the spring clamps of the fuel line tips, we disconnect the gasoline supply and return pipes from the module, and then move them to the side.
- Applying light blows with a hammer to the bit attached to the module’s pressure ring, we turn the latter counterclockwise.
- Using a screwdriver, pry the pressure ring out of the hatch.
- We remove the module by carefully removing the FLS float from the hole in the gas tank, being careful not to bend the sensor lever. To do this, the module is tilted slightly.
- We bend the clamps of the two tubular guides from the pump side, and then slide the module cover.
- We disconnect the wires going to the pump from the output contacts of the gasoline pressure regulator, which is installed in the module cover (remove their tips).
- Having released the connector lock installed on the module cover, disconnect the block with wires.
- Using a slotted screwdriver on the connector of the fuel pump protruding from the module body, release the retainer securing the wire block.
- Carefully disconnect the block with wires from the pump.
- At the FLS located on the side of the module body, we release 2 clamps for its fastening.
- We move the FLS along the grooves of its seat on the module and remove it.
The dismantled Lada Kalina FLS is immediately replaced or inspected and repaired in case of repairable defects. We install a repaired or new FLS and assemble the module in the reverse order. Carefully insert the lever with the float into the hole in the gas tank, put the fuel module in place and orient it so that the arrow marked on the module cover points backward (along the direction of the car), and the fixing protrusion of the cover fits into the groove of the flange of the tank hole.
We install the pressure ring, and then turn it clockwise all the way. After making sure that the module is securely fastened, we connect the connector with wires and fuel pipes. We connect the battery ground. Turn on the ignition for 5 seconds to check the tightness of the fuel line connection. Reinstall the hatch cover, and then the lower part of the rear seat.
How to install and check the fuel level sensor
Installation of the fuel level sensor is carried out in the reverse order of removal. It is important to remember some basic recommendations for installing and checking it:
- Before installing the sensor, it is necessary to clean the seat, including traces of old sealant, if it has been applied;
- Install a new gasket into the seat, having previously lubricated it with sealant, if required;
- Check the operation of the fuel level indicator. To do this, after installing a new fuel level sensor, you should not immediately block access to it. After driving about 50 kilometers, you will need to inspect the fuel sensor and make sure there are no leaks.
Correct readings from the fuel level sensor allow drivers to plan their route, which is especially important for long trips.
It becomes extremely inconvenient to operate a car if the fuel level indicator on the dashboard is lying or not working. To avoid getting into a hopeless situation with an empty tank, the driver has to record the odometer readings and calculate the approximate mileage based on fuel consumption. Another option is to constantly carry a spare canister filled with gasoline or diesel fuel in the trunk. Getting rid of these inconveniences is a trip to a car service center or self-diagnosis and troubleshooting.
Replacing the FLS on a VAZ-2114
Even a novice driver can repair the sensor with his own hands. Of course, the breakdown should not be serious, then replacing the failed element will not be difficult and will not take much time. For example, if a float breaks, you can always purchase a new copy on the automobile market. The old float is easily removed from the holder and a new one is installed in its place.
Oxidized wires are also often replaced with new ones if stripping them is impossible. The price of a new sensor is relatively low, so most often drivers prefer to simply purchase a new mechanism.
The process of replacing the FLS on a VAZ-2114 includes the following procedure:
- Remove the lower part of the rear seat and remove the upholstery, since the sensor is a structural part of the fuel pump. It is impossible to get to the mechanism without going through the module.
- Using a key number 7, release the two screws securing the gas tank cap.
- Then you need to unscrew eight more screws securing the edge of the lid.
- After these steps, the cover can be easily moved forward.
When access to the fuel pump is ensured, it is necessary to remove part of the wire block. Don't forget to unscrew the line nuts. Before the cap is completely released, it must be turned once, this way the pressure in the system will be reduced.
It is necessary to carefully and carefully release the fuel pump so as not to damage the float; it should first be lifted, and then turned clockwise and tilted. Once you have the fuel pump in your hands, you can start looking for the sensor itself.
The procedure is as follows:
- use a screwdriver to move the locking ring;
- remove the module cover;
- remove the sensor terminals and release the fastenings from the cover;
- disconnect the block;
- Release the fuel sensor clamps and remove the mechanism.
At this point, the work of replacing the sensor is considered complete. It is necessary to install the new mechanism in place and assemble the module in the reverse order. As you can see, there is nothing difficult in performing this work; you just need to arm yourself with the necessary equipment: screwdrivers and a set of keys.
How does the device work?
To understand the problem yourself, you need to understand how the fuel level is measured and information is transmitted to the device indicator. The circuit implemented in most vehicles includes the following main elements:
- a float made of lightweight polymer is immersed in the gas tank and is often combined with the pump block;
- gasoline sensor – lever-type potentiometer (otherwise known as rheostat);
- pointer arrow with scale;
- connecting wires.
In many modern cars, an electronic control unit is connected to the system.
The classic rheostat is an open coil of high resistance wire. A lever equipped with a contact and attached to the float rises or falls with the level of fuel in the tank, and the contact moves along the turns of the winding. The classic scheme works simply:
- The rheostat and the pointer device are connected in series in the circuit, both are powered from the vehicle's on-board network.
- When moving the float with the lever, the resistance of the potentiometer changes.
- A change in resistance causes an increase or decrease in the current in the circuit, to which the indicator arrow reacts. The scale is graduated according to the resistance values corresponding to the filling of the gas tank.
The updated version of the system works with the participation of a controller. The fuel level arrow receives a processed digital signal from the electronic unit that supplies power to the potentiometer. The principle of operation does not change, but the circuit allows you to obtain more accurate readings.
Common problems
The fuel volume control system in the gas tank is susceptible to the following malfunctions:
- the pointer indicator lies at zero regardless of the amount of fuel remaining in the tank;
- the device does not display the fuel level correctly - it is lying up or down;
- the needle “jumps” or changes readings in a short period of time;
- The yellow minimum fuel indicator indicator does not light up.
Reference. In some domestic car models, the fuel sensor is lying from the factory. An example is the Chevrolet Niva SUV of the first releases, where the device greatly underestimates the actual level of gasoline. The driver, guided by the sign, pulled into a gas station, only to discover that the tank was full to the top.
There are several reasons why the needle drops to zero:
- Sticking or jamming of the lever.
- The float lost its seal and sank to the bottom.
- An electrical circuit is broken due to oxidized contacts or a wiring problem.
- Failure of the indicator itself or the lever sensor - potentiometer.
Diagnostics and repair methods
To check and identify a malfunction, perform a number of preparatory work:
- Find a service hatch in the car that gives access to the electric fuel pump and float mechanism unit. Usually located under the rear sofa, where the fuel tank is installed.
- Unscrew the pressure flange and pull the assembly out through the hole. Clean all contacts and the rheostat plate, reinstall the unit.
- Prepare a “control” with a light bulb and a multimeter.
The first step is to accurately determine the “culprit” - check the sensor and pointer separately. The performance of the device is diagnosed as follows:
- Turn on the ignition and connect one terminal of the multimeter or test light to the ground of the car.
- Connect the second contact to the positive terminal of the wire going into the technological opening. The meter should show the voltage of the on-board network.
- Remove the positive terminal and short it to ground. If the instrument on the panel is working properly, the arrow will show a full tank. This means the fuel level sensor is not working.
- If there are 2 wires coming to the gas tank, connect them alternately to the vehicle ground. From one the control lamp should light up, from the second the pointer should move to maximum. If the listed symptoms are observed, change the sensor.
In the case when there is a voltage of 12 volts on the wires, but after a short to ground the pointer indicator does not respond, you will have to disassemble the dashboard and remove the device. Similar actions are taken when the minimum gasoline remaining indicator is not working.
It is somewhat more difficult to independently check the updated system installed in cars of recent years; simply shorting the terminals will not do anything. Using a multimeter, make sure that there is supply voltage on the wires, and then you need to connect another, working sensor to them. If the arrow on the instrument panel reacts when the float moves, the element should be replaced.
Thorough cleaning of the slider and rheostat turns helps in cases where the fuel level sensor simply lies. The moving contact can be carefully bent so that it passes along the unworn part of the turns. Clean the current-carrying strips of the potentiometer with a soft cloth soaked in alcohol to avoid damaging the surface of the element.
Some gasoline sensor malfunctions can be eliminated in a garage:
- a “sunken” float with a crack is replaced as an assembly with a lever or separately (depending on the make of the car);
- the torn conductors are connected using a conventional soldering iron;
- the damaged rheostat plate is replaced with a new one, provided that the spare part for your car is on sale.
At the moment, repairing the fuel level sensor is becoming irrelevant. Considering the cost of a new element, it is easier and more reliable to replace a non-working part.
If the indicator and the gas remaining meter are working properly, but the arrow of the device is lying, try making adjustments. Carefully bend the float rod in the desired direction and check the readings again. To achieve maximum accuracy, the operation will probably have to be repeated several times.
A fuel level meter in a tank is a fairly simple mechanism that any car enthusiast with a basic level of technical knowledge can understand. Let's look at why the fuel level sensor does not work, as well as ways to eliminate all possible breakdowns (the needle twitches, "lies", shows only a full or empty tank).
Feasibility of repair
p, blockquote 39,0,0,0,0 —>
Repair of fuel level sensors is performed only in exceptional situations. It is almost impossible to completely restore contact zones. There are restoration methods using resistive glue and spot soldering. All methods are short-lived, and most importantly, after repair, the sensor data is not entirely correct. Depending on the number of repaired zones, its accuracy is lost by 20-50%.
p, blockquote 40,0,0,0,0 —>
Video - repairing the fuel sensor in the tank of a Toyota Haice 3L: 0.11
p, blockquote 41,0,0,1,0 —>
p, blockquote 42,0,0,0,0 —>
It is advisable to replace the sensor with a similar new one or a used one from another car of the same brand. It is important that it completely matches the parameters of the “native” sensor. This can be checked even without the help of a multimeter, without installing the sensor. Just put the connector on it and turn on the ignition. Next, tilt the lever to the upper position. The indicator on the dashboard should show a full tank. This way you can select a sensor from another car brand.
p, blockquote 43,0,0,0,0 —>
Warning: All operations with the fuel level sensor removed and the gas tank shaft open should be performed in a well-ventilated area, preferably in the open air, with the car doors open. The tank space should be insulated with a plastic bag to localize fuel vapors.
p, blockquote 44,0,0,0,0 —>
p, blockquote 45,0,0,0,0 —>
p, blockquote 46,0,0,0,0 —>
Conditions for correct operation
If you have not previously encountered electrical devices and do not know how the fuel level indicating system works, familiarize yourself with the following concepts:
- variable resistance (rheostat) is a device with which you can adjust the value of resistance. The greater the resistance in the circuit, the less current flows in it;
- Fuel level indicator (FLU) is an element of the instrument panel that indicates the amount of fuel in the tank. Can be analog or electronic;
- Fuel level sensor (FLS) is a meter located in the tank.
Most systems for indicating the fuel level in a tank operate on the same principle. There is a float in the tank, on the counterpart of which there is a sliding contact. The sliding contact moves along a plate with contacts (resistive substance), rigidly fixed to the meter body. Moving the sliding contact changes the resistance value, thereby increasing or decreasing the amount of current passing in the circuit. The lower the resistance, the more current flows in the circuit and the more the fuel level indicator needle deviates.
Purpose and location of FLS
The FLS is located in the fuel module, which also includes a fuel pump and fuel filter.
Its main purpose is to monitor the fuel level in the gas tank.
The design of the device includes:
- float;
- dielectric plate with a located rheostat;
- the rod on which the contact slider is located.
Malfunctions
For what reasons may the fuel level indicator not work:
- lack of good contact on any part of the circuit (breaking off wires, oxidation at the junctions of connectors, cracks at soldering points);
- malfunction of the instrument panel indicator (for example, broken solder joints);
- disconnecting the float from the sliding contact;
- fuse burned out;
- lack of contact between the resistive track and the sliding contact. The reason may be the formation of oxides and deposits on surfaces, weakening of the pressure of the sliding contact on the resistive layer, and abrasion of the tracks of the resistive layer.
The pointer is lying and works intermittently
Reasons why the gauge incorrectly shows the fuel level in the tank:
- the presence of additional resistance in the circuit (oxidation at the connectors, poor ground contact, formation of oxides, deposits on the resistive layer and sliding contact);
- Float casting defect, causing it to fill with fuel. Failure is extremely rare, but still possible, as is bending of the float rod due to mechanical impact during unqualified repairs;
- formation of deposits on the guide post (typical only for tubular type sensors). In this case, the movement of the float will be difficult.
The arrow always shows a full tank if the system has:
- the float has separated from the sliding contact (in this case, the slider will always be in the extreme position);
- the wire going to the indicator has a short to ground somewhere, which causes the resistance in the circuit to decrease.
A twitching arrow of the UUT indicates partial abrasion of the resistive track of the potentiometer. This will also cause interruptions in the operation of the pointer. Since the car is most often used with a fuel tank filled to 40-60%, it is in this range that abrasion of the resistive layer occurs most quickly. Therefore, the pointer can only work properly when the position of the sliding contact falls on an intact resistive layer.
DIY diagnostics
To find the reason why the fuel level sensor does not work, you will need a multimeter (we recommend reading how to use a multimeter) and a tester. The first step is to determine whether the cause of the breakdown is in the sensor located in the tank or in the indicator. To do this, remove the connector connected to the fuel section (located at the gas tank flap, which in most cases is accessible from the passenger compartment). Using the wiring diagram of your car model, determine which wire goes to the dashboard indicator. Turn on the ignition, then apply negative potential to the corresponding pin of the connector through the test lamp. If the pointer arrow quickly points upward, then the problem is in the sensor. For further diagnostics it is necessary to remove the fuel section. A multimeter will measure the resistance of the potentiometer.
If there is no reaction, the problem is in the wiring going to the dashboard, or in the indicator itself inside the dashboard. A broken wire can be checked by measuring the resistance of the wire with a multimeter. But you can check the contacts for “stray” resistance only when checking the wire under load. If you still cannot understand the principle of operation of the sensor, the essence of diagnostic methods and troubleshooting, we recommend entrusting the work to a professional auto electrician. For a visual representation, we recommend watching the videos attached to the article, which show methods for diagnosing the main faults of the fuel level sensor.