Print this article Font size 16
Every motorist knows that the fuel level sensor on the injection VAZ 2110 plays its irreplaceable role on the dashboard. How else will you determine how much fuel you have left in the tank?!
Fuel level sensor
When it comes to driving around the city, you don’t have to pay much attention to this, since there is always some gas station nearby. Traveling outside the city, where gas stations occur every few tens or even hundreds of kilometers, is a very risky activity in the case when the measuring element does not work.
How to change the fuel sensor on a VAZ tenth model yourself?
The fuel level sensor VAZ 2110 injector is a device designed to control the volume of fuel in the gas tank. This element is very important for the fuel system, because without it the driver will not be able to find out how much fuel is left, and accordingly, a problem may occur when the gasoline simply runs out. You can learn more about the design of the controller, its malfunctions and replacement from this material.
Choosing something new
Purchasing a fuel sensor for a VAZ 2110 is not at all a problem if you have already removed the old element from your car.
It is not recommended to just go out and buy the first one you come across, even if it is high-quality, since it may simply not be suitable.
There are two ways to solve this issue.
General information about the sensor
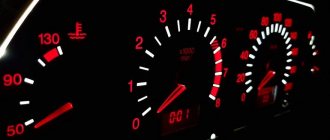
On the VAZ 2110, the fuel consumption sensor displays information on the dashboard, where the corresponding controller is located. The controller itself is a scale with an arrow that shows the level of remaining gasoline in the tank. Many car owners confuse this regulator with the VAZ 2110 fuel pressure controller, but this is not at all true, because these are different devices.
Where is?
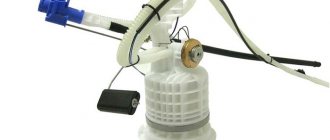
In domestic “tens”, the fuel sensor (FLS) is located directly in the fuel tank, and in order to save space, the engineers of the automobile concern decided to install it in the same design with the fuel pump . Accordingly, if the fuel level sensor does not work, then in order to diagnose and replace it, you will need to completely remove the pump. If you need to get to the device, you will have to remove the back seat and open the hatch, which we will discuss below.
Fuel pump "tens" assembled with FLS
Design and principle of operation
By its design, this controller is a rheostat with nichrome resistance. The adjustable contact of the device moves as a result of the action of a float lever equipped with an additional contact. It should be noted that this contact, when placed in a certain position, can complete a control circuit. As a result, this demonstrates the need to use a reserve volume of gasoline - depending on the design features of the car, the reserve can range from 4 to 6.5 liters of fuel. As mentioned above, warning drivers about a lack of fuel is carried out on the dashboard using arrows.
The fuel level controller on the VAZ 2110 itself is a device that cannot boast of great reliability. After the unit has completed a certain service life, its readings may be incorrect. This is usually due to the main drawback of the device - the track of its contact group is ground off as a result of the friction force of the slider. So if you are interested in the question - why the sensor does not work - then first of all you need to check the track (author - alehtrikus channel).
Common faults
Depending on the design, the device can be repaired by slightly bending the bend of the slider, that is, making sure that its working surface is slightly higher. If the wear is too great, then the only solution is to replace the VAZ fuel sensor. It often happens that the VAZ 2110 fuel level sensor does not display correctly; adjusting the device can solve the problem. It will be necessary to dismantle and change the position of the lever from one boundary to another. In this case, you need to carefully monitor the correct installation of the indicator needle on the device.
In addition, the device can be repaired if the car has an empty gas tank, and the arrow indicates the presence of fuel in the system. Or if the tank is full and the needle is somewhere in the middle of the scale. In this case, it will be necessary to restore the correct values by bending the tongue. This way you can increase the useful stroke of the spoke.
There is another way to change the device parameters; it involves positionally adjusting the arrow on the device. This method will take a long time to implement because the control panel will have to be removed.
If you are sure that your car’s tank is at least half full, but the arrow on the dashboard shows zero, you need to do the following:
- First, diagnose the technical condition of the group of contacts on the rear part of the control panel. If necessary, you will also need to tighten the fastening of the plug with the wire.
- You also need to check the smooth movement of the spoke with the float. Please note that it should not stop at intermediate positions.
- It would not be superfluous to diagnose the regulator for functionality as a whole.
- As an option, you can also take control of the quality of the contact of the wiring coming from the battery, as well as the section of the circuit that runs under the handbrake (the author of the video is the Auto Electrician HF channel).
Crankshaft regulator
New crankshaft controller for the “ten” Depending on the type of car, on a 16- and 8-valve engine, the location of all controllers may be different.
However, all of these devices combine into one functioning system, and the crankshaft adjuster is no exception. Thanks to this controller, the electronic engine management system of the “tens” can independently determine at what point to supply gasoline and a spark through the spark plugs in order to ignite the combustible mixture. In fact, the design of the device is a magnet, as well as a coil of thin wire. The crankshaft sensor has certain advantages:
- As practice shows, at “tens” this regulator can work for quite a long time. Its service life does not decrease even as a result of using the vehicle’s power unit under increased loads.
- The crankshaft adjuster works in conjunction with the crankshaft pulley.
- If the device fails, the engine may not be able to start. Or, if the regulator breaks down, the speed parameters will be reduced to 3.5 thousand per minute.
This controller is installed on the oil pump, actually at the very top of the shaft teeth. Or rather, one millimeter from the cloves. You can learn more about how to replace this controller yourself from the video below (the author of the video is the channel In Sandro’s Garage).
Replacement allowance
How to change the fuel level sensor of a VAZ 2110 injector at home?
Detailed instructions are presented below:
- First of all, you should disconnect the electrical circuit of the car. To do this, you need to disconnect the negative terminal from the battery.
- Next, open the rear doors and remove the rear seat with the lock. Carefully remove the seat from the car and set it aside. Using a Phillips head screwdriver, you will need to unscrew the bolts that secure the special hatch. Once done, you can remove the cover.
- Next, you need to disconnect and disconnect the wiring that goes to the connector - just remove the plug.
- Using a 17mm wrench, you need to unscrew all the hoses, after which the lines through which gasoline is transmitted must be turned to the sides. These steps will allow you to remove the fuel pump with greater comfort.
- Having done this, you can unscrew the nuts that secure the clamping ring. There is nothing complicated about this - you only need a 7 key. It happens that the fuel pump has not been removed for a long time, so the mounting nuts may rust. If this is the case, then treat them with WD-40 - it will remove the rust and unscrew the nuts without any problems. When the mount is dismantled, you need to carefully pry up the ring and remove the fuel pump from the gas tank, along with it the lever and the float should come out. At this stage you need to act as carefully as possible, otherwise you risk damaging the unit.
- The next step is to unscrew the bolts that secure the controller itself to the assembly. By unscrewing them, you can remove the electrical plug from the regulator. Next, you need to remove all the guides from the fuel pump casing, and do not forget about the fasteners - they can be bent using a screwdriver.
- After completing these steps, unscrew the screws that are on the pump cover, making sure that the nut does not rotate. To do this, you can fix it with a key number 5. Remove the cover itself, so you can see the controller. Inspect it carefully - you need to understand the principle of operation in order to make a verdict - whether the sensor is working or not. If faults are found during diagnostics, the device will need to be replaced. Further assembly is carried out in the reverse order, just do not forget to treat the contact area between the pressure ring and the gasket with sealant.
How to check the operation of the fuel pump?
First, you should check the fuse. To do this, check the instructions for its location. Next, you should check the voltage at the pump. Before doing this, be sure to check if everything is in order with the battery. The voltage at the fuel pump terminal must be checked using a multimeter or tester. The instruction manual always indicates the required voltage.
Using a tester, check the voltage supply to the fuse. Often this is where the electrical circuit breaks.
If the search does not yield results, then the voltage should be checked on the contacts themselves. All contacts must be in place and connected to ground. A broken contact or its oxidation leads to failure of the fuel pump system. If no broken contacts are detected, but the voltage drops by more than 1 volt, then the problem is in the wiring or oxidation of the contacts. There should be no short circuit in the wiring.
If, after checking the voltage, contacts and fuse, you do not find any problems, then the problem lies in the fuel pump itself. In this case, the fuel pump will most likely require replacement. In practice, it most often turns out that replacement is a last resort. First, you should try to restore and test the fuel pump again.
Before you check the fuel pump, you need to remember that, as mentioned above, pressure is the most important characteristic of the fuel pump, so it is worth measuring its level.
How to check the pressure in the fuel rail?
You will need a pressure gauge that measures pressure in the range from 7 to 10 atmospheres. If you choose a pressure gauge with a large margin, you risk getting less accurate measurement results. Specialized stores sell a kit for measuring pressure, but you can also design your own device.
If you want to assemble the device yourself, you will also need a hose with an internal diameter of 9 millimeters. You will also need plumbing tow, with which you can seal the connection between the pressure gauge and the tube. All parts are connected and tightened using a clamp. You will also need a car spool. Next you need to perform a series of actions:
- Place the car on a level surface that is prevented from rolling, turn off the ignition and open the hood.
- Check that the injection nozzles have access to the fuel rail.
- Find the fuel pressure plug and remove it. Then you should unscrew the nipple using the spool.
- Prepare an empty container (a regular bucket will do) and a clean rag. This is necessary to collect residual fuel, which under pressure can splash out in different directions. Therefore, take care of the safety of your skin (especially your face and eyes).
- Connect the device to the fitting and begin checking the mechanism.
Checking the pressure in the fuel rail should occur in four operating modes of the power unit:
- when the ignition is on;
- at idle engine speed;
- code the fuel pressure regulator tube is reset;
- when the drain tube is compressed.
Fuel rail pressure measurement results
The results may vary slightly for different car models, but in general they should be as follows:
- when the ignition is turned on, the pressure must be at least 3 atmospheres,
- at idle engine speed - at least 2.5 atmospheres,
- when the pressure regulator tube is reset - at least 3.3 atmospheres,
- when squeezing the drain tube - at least 7 atmospheres.
Fuel rail pressure fluctuates slightly during preparation. When you press the pedal, it suddenly takes on a value of 3 atmospheres; when you release the pedal, it drops to 2.5 atmospheres. When fuel enters the fuel system, turn off the ignition and begin observing the pressure gauge. The pressure in this case should drop to 0.7 bar and remain unchanged.
If the pressure drops to zero, there may be a problem with the fuel pressure regulator. In this case, the regulator must be replaced immediately. The cause could also be the fuel pump check valve.
It is necessary to observe the behavior of the pressure gauge even at 3,000 engine speeds. A drop in pressure will indicate a faulty fuel pump. Sometimes the fuel pump cannot reach the required pressure for a long time. In this case, the problem lies in a clogged fuel filter, which needs to be replaced, or in a dirty fuel pump mesh (read more about where the fuel filter is located).
If the above methods do not reveal a malfunction of the fuel pump, you will have to diagnose other units (DPZD, IAC, mass air flow sensor, compression in the engine and some other indicators and parts).
Repair of fuel level sensor (FLS) VAZ 2110, 2111, 2112
This whole epic lasted for almost two summer months. It all started with periodic cases of chaotic fuel level readings after turning on the ignition.
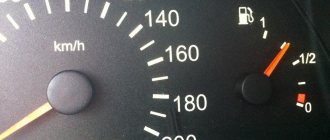
Testing indications. The ignition is on. Reliably - half a tank of gasoline. The difference between the photos is the distance traveled is 20 meters.
What's up? The ignition is on. Half a tank of gasoline. The difference between the photos is the distance traveled is 20 meters. After another 50m the needle rose as expected. The warning lamp on the VDO devices lights up when the device itself reads a certain resistance on the FLS. Then, if the FLS was not working properly (arrow at zero), then the lamp should not light up in the 2nd photo. Unclear…
Messages 9
1 Topic by drummer04 2015-04-14 10:42:54
- drummer04
- New member
- Inactive
- From: St. Petersburg
- Registration: 2015-01-03
- Messages: 78 Thanks : 5
- Car: VAZ 2110 8 valves (2004)
Topic: How to choose the right fuel level sensor for a VAZ 2110?
Hello everyone, the gasoline needle has started to lie, and I want to replace the FLS, but I heard that there are already 8 varieties, and I don’t know which one to buy. They say that you can buy it by the number of the device, I have a device, Automatic Device (AP) with one window Article: 2110-3801010-04, has anyone come across this?
2 Reply from Daniil.Smit 2015-04-14 10:49:18
- Daniel Smith
- New member
- Inactive
- From: Donskoy
- Registration: 2014-12-03
- Messages: 108 Thanks : 6
- Car: VAZ 2111
Re: How to choose the right fuel level sensor for a VAZ 2110?
Take off yours and see what air you have on it and buy the same one, profit
Added: 2015-04-14 11:48:42
It should be written there
Added: 2015-04-14 11:48:59
Added: 2015-04-14 11:49:18
019395.jpeg
45.6 kb, 18 downloads since 2015-04-14
You don't have the permssions to download the attachments of this post.
3 Reply from drummer04 2015-04-14 10:52:01
- drummer04
- New member
- Inactive
- From: St. Petersburg
- Registration: 2015-01-03
- Messages: 78 Thanks : 5
- Car: VAZ 2110 8 valves (2004)
Re: How to choose the right fuel level sensor for a VAZ 2110?
Take off yours and see what air you have on it and buy the same one, profit
Added: 2015-04-14 11:48:42
It should be written there
I thought about it too, but it never changed. and maybe everything there is erased.
Added: 2015-04-14 10:51:02
what is written, where is it written. the picture is only of the FLS
Added: 2015-04-14 10:52:01
aaaaaaaaaaaaaaaa got it all. I didn't notice at first))))
4 Reply from Daniil.Smit 2015-04-14 11:24:40
- Daniel Smith
- New member
- Inactive
- From: Donskoy
- Registration: 2014-12-03
- Messages: 108 Thanks : 6
- Car: VAZ 2111
Re: How to choose the right fuel level sensor for a VAZ 2110?
Yes, I think it is held on by two bolts, you take out the pump and look at the FLS like this
5 Reply from drummer04 2015-04-14 11:29:13
- drummer04
- New member
- Inactive
- From: St. Petersburg
- Registration: 2015-01-03
- Messages: 78 Thanks : 5
- Car: VAZ 2110 8 valves (2004)
Re: How to choose the right fuel level sensor for a VAZ 2110?
yes everything is simple)
6 Reply from Andrey.Lazarev 2016-12-15 23:45:06
- Andrey.Lazarev
- New member
- Inactive
- Registration: 2016-12-15
- Messages: 3 Thanks : 0
- Car: VAZ 21103 1.5 16v
Re: How to choose the right fuel level sensor for a VAZ 2110?
drummer04 , hi, please tell me what blower you installed, I also have a tidy 2110-3801010-04, the arrow jumps either down or up, it’s tortured.
Added: 2016-12-15 23:45:06
I've searched all over Google and there is not a single clear piece of advice on what to install for this or that device.
7 Reply from Dmitriy.Isaev 2016-12-18 15:15:58
- Dmitriy.Isaev
- New member
- Inactive
- Registration: 2016-12-13
- Messages: 3 Thanks : 2
Re: How to choose the right fuel level sensor for a VAZ 2110?
It depends on the type of tidy, if the tidy is from 10 then DUT 1-01, DUT 1-02, DUT 1-03 will do. If the tidy is from Samar (2114,2115) then FLS 2-01.
8 Reply from Andrey.Lazarev 2016-12-19 15:47:56
- Andrey.Lazarev
- New member
- Inactive
- Registration: 2016-12-15
- Messages: 3 Thanks : 0
- Car: VAZ 21103 1.5 16v
Re: How to choose the right fuel level sensor for a VAZ 2110?
Dmitriy.Isaev , thank you
9 Reply from vl_f 2016-12-24 22:11:41 (2016-12-24 22:12:36 edited by vl_f)
- vl_f
- New member
- Inactive
- Registration: 2016-11-22
- Messages: 2 Thanks : 1
- Auto: 2110
Re: How to choose the right fuel level sensor for a VAZ 2110?
I changed the FLS like this: I pulled out the fuel pump and removed the FLS. I looked all over and couldn't find any markings.
I went to the store. The seller turned the FLS in her hands and said: “02.” 02 so 02, especially since there have never been any problems with returning or replacing goods in this store. I installed it on the car - exactly 02: the lower and upper positions of the sensor correspond to the extreme positions of the indicator arrow. Later, out of curiosity, I disassembled the old sensor. It turned out that the “02” marking was hidden under the metal sensor cover. By the way, the old and new sensors differ in appearance (progress does not stand still), the main thing is that the seats match and they work correctly
Changing the fuel level sensor on a VAZ-2110 with your own hands
There should always be enough fuel in the tank. Regardless of how much gasoline costs, whether you like it or not, you have to go. And if in the city the distance between gas stations is a maximum of 500–800 meters, then outside the city you may not calculate the consumption and dry up the tank halfway. To prevent this from happening, we always monitor the condition of the fuel level sensor.
Temperature and fuel gauge glitches
Car : VAZ-2112. Asks : Petrov Viktor. The essence of the question : It incorrectly shows the fuel level in the gas tank or does not show anything at all, it sits at zero.
Hello! I have a problem that the arrow does not correctly show the level of fuel that is in the gas tank. It happens that the arrow either increases or decreases the actual availability of gasoline, and recently it even started pointing to an empty tank, although I know for sure that there is still more than half there. What to do?
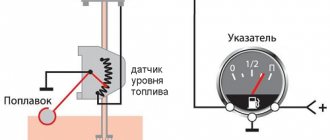
The principle of operation of the level sensor on the VAZ-2110
Operating principle of the fuel level sensor.
The vast majority of fuel level sensors in inexpensive cars have a similar design. The operation of the device is based on the principle of measuring the resistance of a simple rheostat .
VAZ fuel pump devices.
The stationary part of the device consists of nichrome contact tracks, and the moving part is a contact that cuts off part of the track, thereby changing the output resistance. As a result, we have a system that converts the sensor resistance into the amount of fuel indicated on the instrument panel. A spoke and a float are attached to the movable contact, which moves depending on the amount of gasoline in the tank.
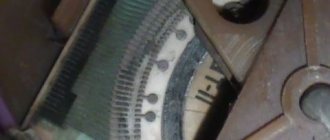
The photo shows the scale of the fuel level sensor.
On the tenth VAZ family, the sensor is mounted in the same block with the fuel pump, fuel module. The sensor is capable of signaling a low fuel level (4–6 l), giving the unwary driver a chance to make it to the gas station.
The reserve should be enough for 80–100 km, depending on conditions and driving style.
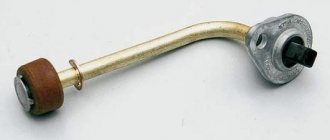
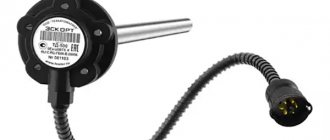
To replace the fuel level sensor, they try to find original spare parts with article number 21101–3827010 , 21102–3827010 or 2112–3827010 . The price of a sensor assembled with a spoke and a float ranges from 350 rubles (Tochmash enterprise) to 420 (SEPO, Cartronic, Motorika).
It is better not to purchase spare parts of dubious origin. In any case, the new device must be compared with the old sensor.
Repair VAZ 2108 2109 21099
Tuesday, September 22nd, 2015
The most important thing you need to know about the temperature sensor of the VAZ 2110 is that there is not one. VAZ 2110 has two temperature sensors: - Coolant indicator temperature sensor
This is a sensor designed to display information about engine temperature on the instrument panel. It doesn’t affect anything else, it’s not connected anywhere - it only affects the temperature indicator on the panel. — Coolant temperature sensor connected to the ECU. This sensor radically affects the operation of the car engine. It is from this that the control program knows the engine temperature and sets the injection duration to the injectors. It is precisely this sensor that is used by the ECU to turn on the fan of the VAZ 2110 engine cooling system. Therefore, with high fuel consumption, a boiling engine, or a non-working fan, it is this sensor that needs to be checked.
Temperature sensor VAZ 2110
The temperature sensor is a thermal resistance, that is, a resistance that changes depending on the engine temperature. The sensor is installed in the exhaust pipe of the cylinder head near the thermostat. It twists inside the pipe and its sensitive part interacts directly with the coolant. The sensor connected to the injector has two contacts, and the temperature indicator has only one contact.
Location of temperature sensors VAZ 2110
As a rule, checking the VAZ 2110 temperature sensor comes down to measuring its resistance at different temperatures. The sensor has two contacts - the resistance between them must be measured with a multimeter. Checking the temperature sensor of the VAZ 2110: 1) When the engine is cold, remove the connector from the sensor and check whether it is oxidized. Then use a multimeter to measure the resistance. We put the connector in place. 2) Start the engine and warm it up. If the temperature indicator works correctly from its temperature sensor, then it will show us the correct temperature. 3) Turn off the engine, remove the connector again and measure the resistance of the temperature sensor. It should become less than it was on a cold engine. On a cold engine at a temperature of about 0 degrees, the sensor resistance should be about 10 kOhm. At a temperature of 90 degrees, the sensor resistance will be 240 Ohms. 4) When the resistance of the temperature sensor is less than 240 Ohms, the ECU should start the cooling system fan. To check this, you need to take a 100 Ohm resistor and connect it to the contacts of the temperature sensor connector. When the resistance of the connector contacts closes, the fan will begin to rotate; when it opens, it will turn off. 5) If the resistance of the sensor does not change depending on the engine temperature, then the sensor is faulty and needs to be replaced. 6) If the cooling system fan does not turn on even on a hot car and closing the contacts of the sensor connector with a resistance of 100 Ohms, the fan also does not start, then you need to check the fuse, the fan relay on the block to the left of the passenger seat under the glove compartment. Where the ECU is installed. 7) Anyone interested can drain the antifreeze, unscrew the sensor and take it home. Place it in boiling water and measure the resistance - it should be 100-200 Ohms. Although the same thing can be done on a car. The coolant temperature indicator sensor does not spoil life much, but it should still be in working order. Checking it is similar to the method described above - measuring the resistance at different temperatures of the VAZ 2110 coolant.
Temperature indicator VAZ 2110
Replacing the temperature sensor of a VAZ 2110: 1) We replace the temperature sensor on a cold engine. Unscrew the cap of the expansion tank and drain the antifreeze to the level of the temperature sensor. 2) Unscrew the sensor with a 19 mm wrench. Screw in a working sensor in its place. 3) Add antifreeze to the previous level, put the connector on the sensor, and close the expansion tank with a lid. 4) Start the engine and see if antifreeze is leaking through the temperature sensor
What to pay attention to: There is no need to confuse the temperature sensors of the VAZ 2110 with each other. The sensor that is connected to the ECU is installed higher, on the exhaust pipe
The temperature gauge sensor is below, screwed into the engine housing in the area of the cylinder head. To check the temperature indicator, you can use resistors of various values. By connecting it to the sensor contacts, the arrow on the panel should show different temperatures. 10 kOhm - 0 degrees, 240 Ohm - 90 degrees, 100 Ohm - 130 degrees.
Replacing the fuel level sensor (detailed test)
As we already know, the sensor is mounted in the fuel module, which, in addition to the sensor, includes a fuel pump and filters. To dismantle we do the following :
- Remove the negative terminal of the battery.
- Remove the rear seat cushion.
It's better to vacuum everything.
We disconnect the terminal block and take up the vacuum cleaner again - as a rule, there is enough dust here.
The pressure washer is fixed with small diameter pins. Try not to strip the threads both when unscrewing and when installing parts in place.
We take out the fuel pump and carry out an external inspection.
We unclip the sensor connectors with a thin screwdriver, and with a Phillips screwdriver we unscrew the fastening screws.
This is what the fuel pump looks like without a fuel level indicator.
Now you can test the sensor in more detail. The working device must have a resistance of 270 to 320 Ohms at the lowest point (the float hangs). At the highest point, the sensor resistance should be in the range 7–19 Ohms . We take this data using a multimeter in resistance measurement mode.
If, when moving the float, the resistance value does not change or changes abruptly, the sensor must be replaced.
When the level of gasoline in the tank is equal to half its volume, the resistance should be about 118 Ohms.
Assembling the fuel module with a new sensor is carried out in the reverse order. During assembly, it is advisable to lubricate the sealing ring of the pressure washer with petrol-resistant sealant.
Of course, we must remember that we work in close proximity to gasoline fumes, so there should be no hint of a spark, open fire or electrical appliances plugged into the network.
Fuel level sensor for VAZ 2110 replacement and repair
On the dashboard of each car there are a large number of sensors that provide various information. Data on how much fuel remains in the tank is considered more significant. Within the boundaries of a metropolis this is not so significant. However, as soon as you go onto the highway, you immediately realize that, without knowing how much fuel is left, you can end up in an “open field” and wait for a long time until someone borrows some fuel in order to get to the nearest gas station. For this reason, the health of the sensor must be monitored. We will tell you what this element is, how its breakdown manifests itself, and how to replace the fuel level sensor on a VAZ 2110.
VESKO-TRANS.RU
Why doesn't the fuel gauge work? Common Causes and Repair Methods
Probably, many had to face the question: why does the fuel level sensor not work? And here is the situation: after starting the engine, the sensor shows that the tank is empty, and while driving, the value on the sensor reaches the desired level. Also, the needle hangs at zero, but in fact the other half of the tank or the values on the dashboard are constantly changing.
Without a working sensor this is very difficult, especially for long trips. You should always remember the time of your last fill-up and its volume, and also keep a can of fuel in the trunk, just in case.
Due to the large number of inconveniences caused by one sensor, we will address the problem in the article.
Why doesn't the fuel gauge work? What is the cause of the accident? In this article we will try to describe possible options for a sensor malfunction, as well as the reasons for the malfunction in the readings. The most common sensor. potentiometric. This prevalence is due to the simplicity rather than the high cost and clarity of the resulting values.
However, it also wears out quickly and marks may become oxidized. Due to the high prevalence of this type of sensor, his example will address potential failure issues.
What is a fuel sensor
✔ This small device is a rheostat with a resistor, which is assembled from nichrome components.
The changing part of the rheostat in contact with the liquid moves using a lever with a float. ✔ At the opposite end of the lever there is another contact, which, when in a specific position, closes a circuit that controls the start of production of spare fuel. The reserve balance ranges from 4 to 6.5 liters.
✔ Sadly, this device (see photos at the beginning) is considered one of the elements that often fails. In some cases, replacing the fuel sensor may not be necessary, you just need to perform minor maintenance.
Possible malfunctions and ways to eliminate them
Sensor readings jump
Tip: The most common malfunction of the gasoline level controller is associated with operational wear of the contact parts of its rheostat. You can verify this by measuring its resistance with an ohmmeter, smoothly moving the lever with the float on it from the left extreme position to the right (or vice versa). A faulty controller must be replaced
The cause of this problem lies in the erased tracks on the sensor rheostat board. They wear out under the influence of the runner. Sometimes bending the runner helps for a while; it becomes slightly higher than the worn parts of the tracks. If the abrasions are too great, then replacement is recommended.
Frequent malfunctions of the fuel sensor on the VAZ 2110
In principle, a fuel level sensor can present drivers with many unpleasant surprises, which are very confusing on the road:
- The fuel level readings start to fluctuate. In such a modification, the device can show anything - either the highest or the lowest fuel level. Understanding such a situation becomes absolutely unrealistic. The root cause of this phenomenon may be damage to roads on the board of the control body. Sooner or later they may wear out due to the continuous impact of the runner. If a similar symptom is found in your car, you can try to bend the slider, that is, move it to a significant area of the board. However, this can only help when the roads are not yet very worn out. Otherwise, the sensor needs to be replaced.
- The fuel level sensor constantly shows incorrect information. There may be a number of reasons for this phenomenon: ✔ If the level readings are constantly increased or decreased, in this case you can adjust the fuel gauge. ✔ The fuel level cursor indicates the fullness of the tank. In fact, you clearly know that the tank is only partially filled.
How to repair a fuel sensor on a VAZ 2110
Check the quality of drawing of absolutely all contact connections on the device panel harnesses (for this you will need to remove it). Pay special attention to the small nuts that are pressed against the indicators and make the main contact.
Make sure the device panel is working properly. It often happens that the old type of equipment is used, which quickly fails. In such a situation, repair or replacement is needed.
The fuel level needle may be out of position. In this case, press the daily mileage button and turn on the ignition.
Often, the root cause of a breakdown is a float getting stuck in the tank or a failure of the FLS.
Malfunctions in vehicle operation with a faulty FLS
- Let's say you see that your fuel level is changing rapidly. The reason for this phenomenon may be the contact path worn out under the influence of the slider.
- If there is slight wear, you can try to get out of this situation in this way: bend the runner mount a little more than the problem area. If the track wear is enormous, you will need to change the VAZ 2110 fuel level sensor.
- There is another difficulty that often arises: the device deceives - its indicator indicator shows the level of remaining fuel with a significant error. The device probably just needs to be configured.
- In this case, it is disassembled and the pointer is moved manually from the left extreme position “1” to the right position “0”, monitoring the accuracy of the readings. If the pointer does not reach the extreme positions, tighten the adjusting tab - this will increase the stroke of the arrow.
- There is also a similar picture: you have half a tank of fuel, but the device indicates that there is nothing there. In this case, it is necessary to check all contacts of the meter. First, those that are on the device panel - it is probably necessary to tighten the nuts that secure the wires.
- Everything is fine with the wires on the panel - check if the lever is jammed in transition positions. To establish the general functionality of the fuel gauge, it is necessary to check the connections of the ground wires and the handbrake handle.
Important! You have done the prevention, but there is no effect - this means that the VAZ 2110 fuel level sensor needs to be replaced.
Before purchasing a new device, check its labeling. For this purpose, there is a proper annotation in the machine’s operating manual. There are approximately 10 types of meters, differing in resistance levels. This coefficient is personal for any device.
Typical faults
Alas, despite the importance of a fuel level meter, its quality is far from perfect, which is why car owners often have to deal with sensor malfunctions.
Typical breakdowns
Definition of marking
- The fuel level indicator suddenly changes its values. Most likely, the contact track has worn out due to the slider. If the wear is not severe, it is enough to simply bend the fasteners of the slider so that it is slightly above the problem area. But when wear is severe, the contact track changes completely.
- The indicator arrow is at a level that is not true. For example, it shows an empty tank even though you just filled up. This will require some adjustment. Disconnect the sensor from the gasoline tank and adjust the indicator. It is enough to move the arrow from the value at which it is stuck to zero. Most often, this measure helps.
- The arrow barely moves and cannot reach the desired position. In such a situation, the tongue bends slightly, which allows you to increase the range of the pointer arrow. It is possible that the contacts on the pointers have broken or come loose. To do this, look under the dashboard and check the condition of the wiring.
- It is possible that the fasteners securing the wires have become loose. They need to be tightened up. If the instrument panel is in good condition, examine the entire wiring path. A short circuit often occurs, causing the measuring device to stop working.
If all the measures taken have not yielded any result, the sensor continues to show complete inoperability, you will have to replace it.