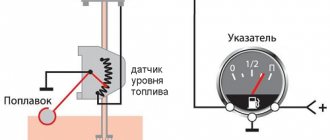
It is always important for the driver to know how much mileage the remaining fuel in the tank will last him. The calculation of specific values of instantaneous or average mileage, the number of liters of fuel in the tank, and reserve kilometers is carried out by the on-board computer, but the initial information is supplied to it by the fuel level sensor (FLS).
Since the shape of the tank is unchanged, the volume has a known functional dependence on the level.
The purpose of the fuel level indicator in a car
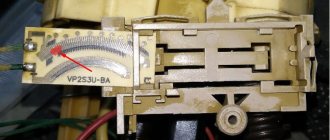
It is necessary to distinguish between a pointer and a sensor. The first is located on the dashboard and is a dial or digital indicator.
The numbers are in any case duplicated by an analog scale, no matter in the form of a display section or a separate device with a magnetoelectric drive of the needle. This is more of a tribute to tradition than a necessity, but it is accepted.
The pointer is connected to the sensor, and the electrical characteristics of both devices are selected in such a way that the error is minimally acceptable at any point on the scale.
This is interesting: Why is the diesel fuel system airy?
It is not at all necessary to have a linear characteristic of the indicator and FLS. Moreover, they are almost always nonlinear. But when two characteristics are superimposed on one another, and an additional nonlinearity of the scale is added to them, then the displayed information can be trusted.
In the case of computer processing of the sensor signal, you don’t have to worry about the reliability of the readings. The software controller is capable of implementing any most intricate function, even one that cannot be expressed analytically. It is enough to calibrate the readings, which is what is done during development.
The most complex shape of the tank, where, depending on the position of the fuel level, the movement of the sensor’s setting element is influenced by greatly different amounts of liquid in units of volume, is set in the device’s memory in the form of a table.
Moreover, the owner can always enter his own correction factors during the customization procedure for an even more accurate reading. This is how universal on-board computers installed as additional equipment usually work.
Device location
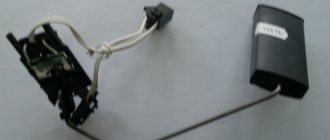
The FLS is always located directly in the fuel tank. Its design is resistant to gasoline or diesel fumes, and access is through a flange at the top of the tank, usually combined with a service port for the fuel pump.
The sensor itself is also often included in a single module with it.
Location
To begin repairs, you need to become familiar with the wiring diagram of automobile fuel level sensors, as well as their location and types.
The first question is simple but important. This is where the required fuel level sensor in the car should be located. Everything is simple here. It is located directly inside the fuel tank. The only difference is in the design of the controller itself.
Also, sometimes the sensor is built into the design of the fuel module, that is, it is a single integral device. It consists of the following components:
- current level display sensor;
- check valve;
- filter;
- sediment for pumping fuel.
Or it can be installed separately. Somewhere on the side or in the middle of the tank. This scheme can be used on diesel and gasoline engines.
Types of fuel level sensors
There are many principles for converting position into an electrical signal.
Some record exactly the position of the liquid level, that is, the boundaries between substances of different densities, but it is quite possible to measure the volume directly. There is no particular need for this, and the devices will be more complex and expensive.
There are several basic principles:
- electromechanical;
- electromagnetic;
- capacitive;
- ultrasonic.
There may also be differences in the method of communication with the pointer:
- analog;
- frequency;
- pulse;
- encoded directly from the data bus algorithm.
The simpler the device, the larger volumes it is produced; the price is almost decisive. But there are also special applications, such as commercial or sports, where accuracy and stability are more important.
Replacing the FLS on a VAZ-2114
Even a novice driver can repair the sensor with his own hands. Of course, the breakdown should not be serious, so replacing a failed element will not be difficult and will not take much time. For example, if a float breaks, you can always buy a new one on the automobile market. The old float is easily removed from the holder, and a new one is installed in its place.
Even oxidized threads are often replaced with new ones if they cannot be torn off. The price of a new sensor is relatively low, so very often drivers simply prefer to buy a new mechanism.
The process of replacing the FLS on a VAZ-2114 includes the following procedure:
- Disassemble the lower part of the rear seat and remove the trim, since the sensor is a structural part of the fuel pump. You cannot access the mechanism without filling out the form.
- Using a 7 mm wrench, unscrew the two screws that secure the gas tank cap.
- Then you need to unscrew eight more screws that secure the edge of the lid.
- After these steps, the cover can be easily moved forward.
When access to the fuel pump is ensured, it is necessary to remove part of the lock cable. Don't forget to unscrew the nuts securing the fishing line. Before the cap is fully opened, it must be turned once to relieve pressure in the system.
You need to release the fuel pump carefully and carefully, so as not to damage the float, you must first lift it, then turn it clockwise and tilt it. Once you have the fuel pump in your hands, you can start looking for the sensor itself.
The procedure is as follows:
- disable the lock;
- remove the sensor terminals and unhook the fasteners from the cover;
- remove the module cover;
- use a screwdriver to move the retaining ring;
- release the fuel sensor clamps and disassemble the mechanism.
This completes the work of replacing the sensor. You need to install the new mechanism in place and reassemble the module in reverse order. As you can see, there is nothing complicated in carrying out this work, you just need to arm yourself with the necessary equipment - screwdrivers and a set of keys.
Design and principle of operation
Most often, control of the surface is carried out using a float. It can connect to the converter in different ways.
Float
The simplest thing is to connect the float to the measuring potentiometer using a lever. Moving the position of the current collector causes the resistance of the variable resistor to change.
It can be in the simplest wire design or in the form of a set of resistors with taps and contact pads along which a slider moves, connected to the float through a lever.
Such devices are the cheapest, but also the most inaccurate. When connecting a computer, they have to be calibrated using test fills with known volumes of fuel.
Magnetic
You can get rid of the lever by connecting the potentiometer to the float using a magnet. A permanent magnet connected to the float moves along the system of contact pads with taps from film resistors of a calibrated value. Above the platforms there are steel flexible plates.
Depending on the position of the magnet, one of them is attracted to it, closing on the corresponding pad. The total resistance of a set of resistors changes according to a known law.
Electronic
The presence of electronic components in the sensor allows a wide variety of devices to be classified in this category. For example, a capacitive sensor, where two capacitor plates are located vertically in a tank.
Causes
Now you need to find out why this sensor on your car does not display the current fuel level correctly and what is causing this.
There are several potential reasons. Therefore, each of them needs to be considered in detail.
- Violation of the tightness of the installed float. It is found on sensors where the float is made in the form of a ball made of fragile plastic. With mechanical shocks, as well as under the influence of extreme cold, the material is destroyed. If the seal is broken, the float simply remains on the surface of the liquid or sinks. As a result, the controller shows that there is no fuel. For repairs, it is necessary to replace the float separately, or the entire sensor. Much less often, the float part is disconnected from the lever and begins to move independently inside the container.
- Lever damage. Due to its deformation, the float loses mobility or transmits information incorrectly. The cause of the problem is long driving. Moreover, on uneven and bad roads. Or in violation of the rules for dismantling the fuel unit from the tank. You can try to restore the lever. But more often repairs are carried out by replacing it.
- Deformation of the controller body. Because of this, the installed resistive elements give incorrect readings, or the lever is damaged and does not record data correctly. The reason is the filling of low-quality flammable liquid, or mechanical stress.
- Breakage of resistive elements. A common reason why the FLS stops working correctly. It occurs due to natural causes. That is, resistors wear out from a long service life. The contact between the elements disappears, and the arrow ends up at zero, or simply twitches.
- There is no contact on the electrical circuit section. This happens on those contacts that can simply oxidize over time due to exposure to moisture or the fuel itself. Wires are damaged, the integrity of the insulation is compromised, breaks occur, etc. Sometimes the reason lies in the electrical connectors.
- FLS wire shorted to ground. This occurs precisely with the signal wire, which begins to short to ground. As a result, the FLS indicators become incorrect, and the resistance tends to zero. No matter how much fuel is filled, the sensor will show a fictitious full tank.
- Burnt fuse. The car has a sensor that is responsible for the FLS. The specific fuse number should be found in the owner's manual for your specific vehicle.
- Failure of the fastening on the housing inside the fuel tank itself. As a result, the sensor fell into the tank or was distorted. Usually accompanied by the spread of fuel odors into the cabin.
- Break on the signal wire side. Found on tubular sensors. Then the arrow constantly indicates that the fluid tank for operating the internal combustion engine is empty.
- Plaque formation. Another characteristic feature of tubular type controllers. Plaque accumulates on the guide post. This interferes with the normal and free movement of the installed float. The deposit appears due to the filling of low quality fuel. The arrow stops in one static position.
- Damage to the magnetic sensor, wires. Relevant for contactless fuel level monitoring devices. Some FLS models of this type have control and control boards. Problems happen to them too. Then the sensor completely fails, and the correct fuel level is not displayed.
Practice shows that most often problems are observed from the resistive elements, as well as the float. They wear out over time and can no longer display and transmit data correctly.
Don't immediately blame the sensor. There is a possibility that the arrow of the device is broken, or there are faults on the side of the wires connecting the elements.
Common problems
FLS failures are recorded based on noticeably erroneous readings or their complete absence. In the most common case of a mechanical connection with a float and an analog potentiometer, the indicator needle begins to twitch, increasing or decreasing the readings. This is almost always associated with mechanical wear of the contact group of the variable resistor.
The second common case is a change in the density of the float due to degradation of the material or filling it with fuel. Up to complete drowning and constant zero readings.
If electronic sensors malfunction, they simply stop giving readings. Sometimes this is due to wiring, which is less protected from external influences. Indicators fail much less often.
How to check with a multimeter
If the FLS does not show or is lying in its readings, it can be removed and checked with a multimeter. The procedure must be carried out by placing the device in ohmmeter mode. With its help you can determine the cause of the malfunction.
The resistor changes resistance over time, resulting in incorrect readings. In order to check the resistance, the tank must be empty, completely filled or 50% full. The resistance must be within the normal range; if it deviates, the sensor will have to be replaced. After installing a new element, you should measure the resistance again: it should be within the normal range if the device was selected correctly. Sometimes the driver makes a mistake and purchases a visually similar device that fits in a standard place, but its resistance rating may be different. Before purchasing, check what parameters the spare part has that is suitable specifically for your car model.
Methods for repairing the fuel level indicator
Modern FLS cannot be repaired and must be replaced as an assembly. After checking the wiring and testing the resistance at the connector, the sensor is removed from the tank along with the pump and float on the lever.
This will require access to the top of the tank, usually located under the rear seat cushion or in the trunk. The sensor is removed from the pump module and replaced with a new one.
An exception may be observed breaks in the wiring. Soldering and insulation of break points is carried out. But usually the cause of failure is wear of the friction surfaces in the potentiometer.
Restoring it is theoretically possible, but impractical; a repaired device is unreliable, and a new one is inexpensive.
Troubleshooting
Now you need to understand why the fuel level sensor does not work on your car and how to do it correctly.
You should always start by checking the power supply to the controller through the installed fuse. If there are problems with open access to the device in a particular vehicle, then use the electrical diagram. The tester leads are connected to the corresponding connectors of the blocks. To do this, take pieces of wire.
If access is open, then the chip is disconnected from the sensor and diagnostics are carried out using a conventional multimeter or tester. Usually, to get to the FLS, you need to climb into it through the luggage compartment, or remove the rear row seat in the car.
Now let’s talk about how to properly check the fuel level sensor in your car. It is important to understand which contacts the connection is being made to. To do this, you can’t do without a wiring diagram. But owners of cars with a conventional resistive controller are in luck. Here, look at the cross-sectional dimensions of the wires used, going directly to the block. The fuel pump always has a thicker wire than the sensor.