01/26/2022 7,815 VAZ 2107
Author: Ivan Baranov
Previously, a cigarette lighter was used in cars to light a cigarette. Now this is a kind of 12 V outlet into which you can connect various devices. Therefore, if the cigarette lighter of a VAZ 2107 does not work, this is sometimes a big problem. What the device is, what the main malfunctions are, how to replace and repair the cigarette lighter, is discussed in this article.
[Hide]
Cigarette lighter VAZ 2106
For many car enthusiasts, a cigarette lighter is a necessary device, because a cigarette lighter in a car is needed not only as a lighter - in addition to using it for these purposes, it is through the cigarette lighter socket that a portable car refrigerator, compressor, TV, travel razor or coffee maker, and mobile phone charger are connected to the power supply. If the cigarette lighter breaks down, it must be disassembled and repaired. If the cigarette lighter completely fails, it needs to be replaced. Let's talk about how to change the cigarette lighter.
Does not work
screwdrivers;
soldering iron; tweezers; cotton gloves. Open the hood and then remove the negative terminal from the battery. This will de-energize the machine and significantly reduce the risk of a short circuit.
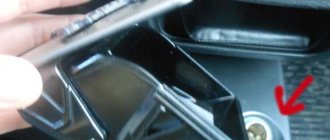
Then move the driver's seat as far as possible to gain access to the cigarette lighter, most often located on the center console.
Now take a bright flashlight and inspect the inside of your cigarette lighter. There should not be any foreign debris or objects there. If they are still present, you need to carefully remove them using tweezers with rubberized ends or 2 matches.
Check the fuse responsible for the operation of the cigarette lighter. In the event of a short circuit due to a device connected to the cigarette lighter, the fuse blows and no current is supplied. To restore its supply, you must install a new working fuse. An instruction book should help here, which will tell you which fuse needs to be replaced. In addition, a table of all fuses can be found on the back of the fuse box.
If the above methods are useless and the cigarette lighter does not work, remove it from the socket. To do this, gently pull the metal rim with pliers. Moreover, it is necessary to place a cloth under the teeth of the pliers so that marks do not remain on the rim.
Try to remove the cigarette lighter from its socket. If the body gives in tightly, try pulling on each side in turn. However, do not pull too hard to avoid breaking the wires.
Inspect the removed cigarette lighter. It is worth paying attention to the presence of dark carbon deposits. Also check the reliability of the soldering and the integrity of the wire insulation. A loose wire is often the reason for the lack of current in a car cigarette lighter. Then carefully solder this wire into place.
Install a new cigarette lighter head if there is current and the coil is cold. Due to frequent use, the heating element burns out quite quickly. Always buy a socket designed specifically for your cigarette lighter.
How to change the lock on the door using the link.
How to connect
It is best to make 5 V sources independent of the cigarette lighter for each additional device and power them from the ignition circuit (after the ignition switch). Then both the recorder and the navigator will be connected only when the engine is running (for the recorder this is doubly beneficial, it has an automatic on-off function when external power is available)
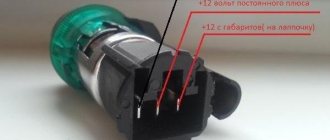
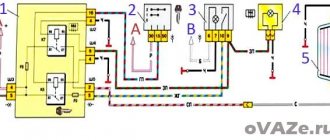
Connection diagram
There are slight differences depending on which model of center console is installed in the car.
If a replacement has been made and you have a “five console”, the connection diagram is as follows:
The color of the food is blue-red, paired, while the color of the minus “mass” is paired, black and white. The ground is fixed near the ignition relay. One branch powers the light in the glove compartment.
Native console (central) VAZ 2107, the connection principle is as follows:
“Ground” is black, the wires going to the lighting are white, there are two of them. The circuit provides that one wire illuminates the panel.
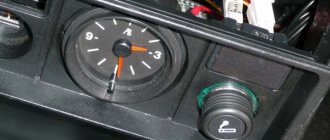
The power supply wire is blue and red, paired, one part fits and powers the on-board clock.
It is also important to know that in addition to wires, the circuit contains:
A 10 ampere fuse marked F 6, which is located in the mounting block.
Backlight
Replace the light bulb with the engine turned off and the battery disconnected.
Remove the plastic panel located under the dashboard. In addition to the cigarette lighter, the hazard warning button and light and fan switches are attached to it. To do this, pry the console from the side with a screwdriver and carefully press in the latch holding it.
Use a marker to mark the wires that go to the cigarette lighter, or draw a diagram of their connection.
The cigarette lighter body is held in place by a large nut - unscrew it.
Remove the cartridge with socket from the cigarette lighter housing.
The lamp housing is attached to the cigarette lighter body - disconnect it by pressing the latches that hold it.
Use a screwdriver to slightly open the lamp housing.
Remove the socket from it along with the lamp inserted into it.
Replace the lamp and reassemble the cigarette lighter in reverse order
If replacing the lamp and fuse did not help, then in order to restore normal operation of the cigarette lighter, it is necessary to change it completely.
Source
Where is the plus and where is the minus in the cigarette lighter?
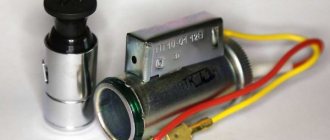
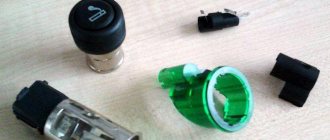
To understand how the cigarette lighter works, where the plus and where the minus are, it is enough to examine its key components.
The plus point about the cigarette lighter is its handle. When you press the button, the electrical circuit is closed, and the nichrome spiral is heated. When wondering where the minus is on the cigarette lighter, you should pay attention to the side walls of the metal cylinder.
Using the polarity information as a guide, you can begin to repair the damaged part. To restore a failed element you need to:
- Unscrew the nut on the back side and remove the device.
- Find the semiconductor wafer and remove it (if it caused the breakdown).
- Make a small cut on the body and begin assembling the device.
- Strip the wires and crimp the terminals.
- Remove the center console in the car and turn off the backlight.
- Remove the block.
- Connect the wires using connecting clips, observing the diagram and polarity.
- Pull the wires down and connect them to the socket.
- Put the accessory in place.
- Turn on the backlight.
Plug
The plug is designed to transmit 12V/24V voltage through the cigarette lighter socket. Its body is made of plastic and has wires for screws. An 8A fuse is located inside the device, protecting the equipment from power surges.
The technical specifications of the plug are as follows:
- Input voltage indicators - 12V/24V.
- The maximum diameter of the wires used is 7 mm.
- Plug length - 83 mm.
- The current throughput is 8 A.
Nest
Experienced drivers know where the plus is on the cigarette lighter. It is supplied to the central contact of the socket and the clamping feet of the plug. The nominal voltage in the connector of modern machines is 12 V.
The diameter of Soviet nests differed from foreign ones. Therefore, when trying to insert a short plug into such a connector, it did not reach the central contact, and the external device refused to work.
VAZ-2106 diagram
The VAZ-2106 car was produced from 1976 to 2008. This guide provides color-coded wiring diagrams (for the injector and carburetor) with a description of all elements for various modifications. The information is intended for self-repair of the six. Electrical circuits are divided into several blocks for ease of viewing via a computer or phone; there are also circuits in the form of a single picture with a description of each element - for printing on a printer. All electrical equipment of a car can be divided into the following components:
- engine starting system;
- battery charge elements;
- fuel mixture ignition system;
- elements of external and interior lighting;
- sensor system on the instrument panel;
- sound notification elements;
- fuse block.
Electrical circuit of the device
To successfully repair an AP, you must have at least basic knowledge of electrical engineering and know how the electrical circuit of the device works: where is the plus and where is the minus.
You can use a multimeter to find plus and minus.
Photo gallery “Cigarette lighter and its circuits”
In a car cigarette lighter, the plus is a handle-button that the user presses. When you press the button, the electrical circuit closes and the coil begins to heat up. The downside is the sides of the metal casing of the AP.
Knowing the polarity of the device, it will not be difficult to repair the car cigarette lighter.
To do this you need to do the following:
- Unscrew the nut on the back side of the AP.
- Next, we disassemble the device.
- At the bottom of the device is a semiconductor wafer. This may be the cause of the malfunction. In this case, it must be removed.
- On the body you need to cut off the protrusion using a file.
- Now the device needs to be assembled.
- Next, you should strip the wires not 7 mm in order to then connect them. In addition, you need to press the terminals on them.
- In the cabin, it is necessary to dismantle the center console and turn off the backlight.
- We take out the block and connect the wires using special clips. We connect the white-brown wire to the wire from the backlight. All that remains is to connect the yellow and black wires to the AP wires.
- Then the wires are laid down and connected to the plug from the car cigarette lighter.
- Next, the cigarette lighter is returned to its place, and the backlight is connected.
Electrical diagram of VAZ-2106 (old)
General diagram of the electrical equipment of VAZ 2106 / 21061 / 21063 / 21065 produced in 1976 - 1987.
1 – front lights; 2 – side direction indicators; 3 – battery; 4 – battery charge indicator relay; 5 – relay for turning on low beam headlights; 6 – relay for turning on the high beam headlights; 7 – starter; 8 – generator; 9 – external headlights; 10 – internal headlights; 11 – sound signals; 12 – electric motor of the engine cooling system fan; 13 – fan motor activation sensor; 14 – ignition coil; 15 – ignition distributor; 16 – spark plugs; 17 – carburetor solenoid valve; 18 – coolant temperature indicator sensor; 19 – engine compartment lamp; 20 – reverse light switch; 21 – oil pressure indicator sensor; 22 – sensor for low oil pressure indicator; 23 – indicator sensor for insufficient brake fluid level; 24 – windshield wiper gearmotor; 25 – windshield washer electric motor; 26 – relay for turning on sound signals; 27 – relay for turning on the fan motor; 28 – voltage regulator; 29 – windshield wiper relay; 30 – additional fuse block; 31 – main fuse block; 32 – relay-breaker for alarm and direction indicators; 33 – brake signal switch; 34 – plug socket for a portable lamp; 35 – heater electric motor; 36 – additional resistor of the heater electric motor; 37 – hours; 38 – heater motor switch; 39 – glove box lighting lamp; 40 – cigarette lighter; 41 – alarm switch; 42 – instrument lighting switch; 43 – warning lamp for insufficient brake fluid level; 44 – three-lever switch; 45 – ignition switch; 46 – rear fog lamp switch*; 47 – external lighting switch; 48 – lamp switches located in the front door pillars; 49 – switches for warning lights of open front doors; 50 – alarm lights for open front doors; 51 – lamp switches located in the rear door pillars; 52 – parking brake warning switch; 53 – interior lamps; 54 – fuel level indicator with reserve indicator; 55 – coolant temperature indicator; 56 – oil pressure gauge with low pressure indicator; 57 – tachometer; 58 – parking brake warning lamp; 59 – battery charge indicator lamp; 60 – carburetor air damper indicator lamp; 61 – side light indicator lamp; 62 – turn signal lamp; 63 – headlight high beam indicator lamp; 64 – speedometer; 65 – carburetor air damper warning switch; 66 – parking brake warning relay; 67 – rear lights; 68 – license plate lights; 69 – sensor for level indicator and fuel reserve; 70 – trunk lighting lamp; 71 – rear fog lamp*.
The order of conditional numbering of plugs in blocks:
a – windshield wiper and windshield wiper breaker relay; b – hazard warning and direction indicator breaker relay; c – three-lever switch.
Wiring diagram VAZ-2106 carburetor - full view:
Where is the cigarette lighter fuse located?
A burnt-out protective element may be the result of connecting one powerful device or several devices to the socket. Because of this, the current strength in the wires exceeds a critical value, as a result of which the fuse melts. This may happen because the owner has confused where the plus and where the minus is in the cigarette lighter. This malfunction is treated by removing the burnt out element and installing a new one.
Replacing the cigarette lighter fuse
To carry out the procedure, you should have instructions for a specific car. Each machine has its own mounting block location and fuse assignment. You need to know where the plus and minus are.
On most cars, the box is located directly behind the front panel. However, on classics, fuse No. 6 is responsible for the operation of the cigarette lighter, and on some other models - the turn relay. Therefore, when making repairs, you should know which element we plan to change and where it is located. It is necessary to buy a fuse with the resistance recommended by the manufacturer.
Electrical diagram of VAZ-2106 (new)
General diagram of the electrical equipment of VAZ 2106 / 21061 / 21063 / 21065, produced 1988 - 2001.
1 – front lights; 2 – side direction indicators; 3 – battery; 4 – battery charge indicator lamp relay; 5 – relay for turning on low beam headlights; 6 – relay for turning on the high beam headlights; 7 – starter; 8 – generator; 9 – external headlights; 10 – internal headlights; 11 – fan motor activation sensor; 12 – electric motor of the engine cooling system fan; 13 – sound signal; 14 – ignition coil; 15 – ignition distributor; 16 – spark plugs; 17 – carburetor solenoid valve; 18 – coolant temperature indicator sensor; 19 – engine compartment lamp; 20 – reverse light switch; 21 – oil pressure indicator sensor; 22 – low oil pressure indicator sensor; 23 – indicator sensor for insufficient brake fluid level; 24 – windshield wiper gearmotor; 25 – switch*; 26 – electric motor for windshield washer; 27 – fan motor activation relay**; 28 – voltage regulator; 29 – windshield wiper relay; 30 – additional fuse block; 31 – main fuse block; 32 – relay-interrupter for alarm and direction indicators; 33 – relay for turning on the heated rear window***; 34 – brake light switch; 35 – plug socket for a portable lamp****; 36 – additional resistor of the heater electric motor; 37 – heater electric motor; 38 – heater motor switch; 39 – hours; 40 – glove box lighting lamp; 41 – cigarette lighter; 42 – alarm switch; 43 – instrument lighting regulator; 44 – brake fluid level indicator lamp; 45 – three-lever switch; 46 – ignition switch; 47 – rear window heating switch***; 48 – rear fog lamp switch; 49 – external lighting switch; 50 – lamp switches located in the front door pillars; 51 – gearmotors for electric windows of the front doors***; 52 – lamp switches located in the rear door pillars; 53 – parking brake warning lamp switch; 54 – interior lamps; 55 – fuel level indicator with reserve indicator; 56 – coolant temperature indicator; 57 – oil pressure indicator with low pressure indicator; 58 – tachometer; 59 – parking brake warning lamp; 60 – battery charge indicator lamp; 61 – carburetor air damper indicator lamp; 62 – side light indicator lamp; 63 – turn signal lamp; 64 – headlight high beam indicator lamp; 65 – speedometer VAZ-2106; 66 – carburetor air damper warning switch; 67 – power window switch for the left front door***; 68 – relay for turning on the electric windows of the front doors***; 69 – power window switch for the right front door***; 70 – rear lights; 71 – license plate lights; 72 – sensor for level indicator and fuel reserve; 73 – pads connected to the rear window heating element***; 74 – trunk lighting lamp; 75 – rear fog lamp.
Advantages and disadvantages of car cigarette lighters
The most important advantage of a cigarette lighter is the ability to connect a huge number of electrical appliances to it, making life easier on the road. However, due to switching such large amounts of current, the design of this device is unreliable. In addition, we must not overlook the fact that every time we connect gadgets to the cigarette lighter, we create a mechanical load on its elements. Ideally, car manufacturers would consider increasing the strength by adding more presser feet. Then the plug would stay in the cigarette lighter more “confidently”.
Alas, so far most forks are equipped with only a spring-loaded contact and a pair of presser feet. During a trip and the natural vibration of the car, the contact between the socket and the plug is broken, as a result of which the cigarette lighter begins to spark, and sometimes even causes a short circuit and fire.
If this element fails, you can repair it yourself, the main thing is to maintain the polarity of the car's cigarette lighter.
Wiring diagram VAZ 2106 (injector)
1 controller 2 electric fan of the cooling system 3 ignition system harness connector to the left mudguard harness 4 ignition system harness connector to the right mudguard harness 5 fuel level indicator 6 fuel level harness connector to the fuel level sensor harness 7 oxygen sensor 8 fuel level sensor harness connector to the system harness ignition 9 electric fuel pump 10 speed sensor 11 idle speed control 12 throttle position sensor 13 coolant temperature sensor 14 mass air flow sensor 15 diagnostic block 16 crankshaft position sensor 17 canister purge solenoid valve 18 ignition coil 19 spark plugs 20 VAZ-2106 injectors 21 ignition system harness block to instrument panel harness 22 electric fan relay 23 controller power supply circuit fuse 24 ignition relay 25 ignition relay fuse 26 electric fuel pump power circuit fuse 27 electric fuel pump relay 28 ignition system harness block to injector harness 29 injector harness block to ignition system harness 30 block g guta instrument panel to the ignition system harness 31 ignition switch 32 instrument cluster 33 engine anti-toxic system display
Cigarette lighter circuit
If your car does not have a cigarette lighter or it is broken, then it is not necessary to contact a car mechanic. It is enough to understand how an electrical circuit works.
So, the plus in the cigarette lighter is the button itself. When you press it, the circuit closes and the coil begins to heat up. If we talk about where the minus is in the cigarette lighter, then there is nothing complicated here either - these are the side walls of the metal cylinder itself.
Knowing this parameter, you can easily install and repair a damaged cigarette lighter in a car. For this:
- Unscrew the nut on the back of the device.
- Disassemble the cigarette lighter.
- Find the semiconductor wafer in its lower part and remove it if it caused the breakdown.
- Cut off the protrusion on the device body.
- Assemble the cigarette lighter.
- Strip the wires for connecting the device (7 mm); you also need to crimp the terminals on them.
- Remove the center console in your car and disconnect the lights.
- Remove the block.
- Connect the wires using special connecting clips. The first wire (white-brown) must be routed to the wire from the backlight. Connect the remaining two wires (yellow and black) to the cigarette lighter wires.
- Pull the wires down and connect them to the cigarette lighter socket.
- Reinstall the cigarette lighter.
- Install the backlight.
Injection engine control unit diagram
Electrical connection diagram for the injection engine control system:
1. — Controller connector. 2. — Mass air flow sensor. 3. — Coolant temperature sensor. 4. — Crankshaft position sensor. 5. — Throttle position sensor. 6. — Oxygen concentration sensor. 7. — Speed sensor. 8. — Ignition module. 9. — Electromagnetic valve for purge of the adsorber. 10. — Electric fan relay. 11. — Electric fuel pump relay. 12. — Main relay. 13. — Fuse protecting the power circuit of the electric fuel pump relay. 14. — Fuse protecting the power circuits of the main relay. 15. — Fuse link. 16 - Fuse protecting the constant power supply circuit of the controller. 17. — Diode. 18. — Idle speed regulator. 19. — Injectors. X1. — Diagnostic block. X2. — Connection block to the vehicle electrical system.
Car cigarette lighter polarity
Sometimes an element fails. Frequent malfunctions are as follows.
- Blown fuse. A special protective element is installed on the electrical circuit, designed for a current of 10 Amps. When a malfunction or short circuit occurs, it burns out to keep the cigarette lighter, wires and instruments working. This element is responsible for several more devices. If the cigarette lighter and the clock do not work, then you should get to the mounting block and replace the fuse.
- Oxidized contacts. Over time or from connecting powerful devices to the cigarette lighter (such as a compressor or car charger), the metal connectors can oxidize. Before replacing, it is advisable to remove the cartridge and inspect the antennae for the appearance of oxides. If there are such moments, they should be cleaned and bent for a better connection. Before carrying out the procedure, it is recommended to remove the negative terminal from the car battery. This will prevent a short circuit. You need to know where the plus and minus are.
- Waste car cigarette lighter incandescent element. The nichrome spiral located inside the cartridge can also burn out. This will entail installing a new cigarette lighter.
- Short circuit or broken wiring. Cables may fray or melt as a result of shortening. You can determine such a malfunction of the car cigarette lighter using a multitester. It is necessary to check the integrity of the wires.
Schemes of individual six units
Generator connection diagram
1 — battery VAZ-2106; 2 — “six” generator set; 3 - regulatory device designed to control the operating voltage parameter; 4 - lock; 5 — plastic module with safety elements; 6 - control light indicator that determines the battery charge; 7 - relay that protects the power line of the battery charge indicator light.
Starter wiring diagram
1 — car starter device; 2 - battery; 3 - generator set; 4 - ignition switch.
Electrical circuits of the contact ignition system
1 — spark plugs; 2 - distributor; 3 — ignition switch; 4 - coil; 5 - switch; 6 - generator; 7 - battery.
Carburetor valve control circuit
1 - limit switching device of the carburetor unit; 2 - the engine valve itself; 3 - module used to control the carburetor unit; 4 — ignition coil; 5 - switching device; 6 - ignition switch, is a lock.
Wiring diagram of direction indicators and signaling
1 — lighting devices for turning lights installed in the front optical devices; 2 — battery VAZ-2106; 3 - car generator unit; 4 — side turning lights located on the front fenders; 5 — main mounting module with safety elements; 6 - auxiliary control unit with safety devices; 7 — ignition switch; 8 - device for turning off and activating the light signal, mounted in the car interior on the center console; 9 - switching device for activating and disabling turning lights; 10 - interrupting device used for blinking turning lights and light signals; 11 — speedometer, equipped with a control light indicator for activation of turning lights; 12 — light devices for direction indicators in the rear optics.
Pros or cons of multiple cigarette lighters
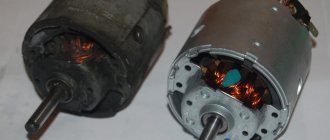
Old cars, for example, the classic VAZ, have a different device design. There is a long cigarette lighter with its pros and cons. This device has been developed for a long time, so it has a number of technological shortcomings. The disadvantages include:
- Inability to connect multiple devices to the cigarette lighter.
- Weak contacts. Over time, due to age or frequent driving on rough roads, the antennae of the cigarette lighter itself may become loose. This disrupts the operation of the device and can lead to its failure.
- The disadvantages include the appearance of the old cigarette lighter, which is much worse. The light bulb does not shine as brightly or often burns out.
New car models are equipped with a modern European cigarette lighter with a large seat. To install it on a classic, you will need to drill out the socket, purchase a special three-pin connection plug and solder the wires.
But this modification of the cigarette lighter has a number of advantages.
- Reliable contacts. The European cigarette lighter holds well in the socket, and the fixing nut does not unscrew.
- Plus - the appearance, the backlight is prettier.
- A modern car cigarette lighter allows you to connect several devices at the same time.
Therefore, when purchasing a device for a car, it is better to choose the second option.
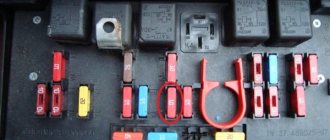
VAZ2107 fuse and relay diagram
The electrical wiring of the machine is protected by fuses, which are mainly installed in the central and additional units, located at the bottom of the instrument panel on the left side next to the steering column. The circuit from the battery to the terminals and connections is closed when the car ignition is turned on.
F1(16A) Klaxon, lamp socket, cigarette lighter, brake lamps, clock and interior lights (plafonds) F2(8A) Windshield wiper relay, heater and wiper motors, windshield washer F3(8A) Left headlight high beam and warning lamp on high beam F4(8A) High beam of the right headlight F5(8A) Low beam fuse of the left headlight F6(8A) Low beam of the right headlight and rear fog lamp F7(8A) This fuse in the VAZ 2106 block is responsible for the side light (left sidelight, right rear light), trunk light, license plate light right light bulb, instrument lighting lamps and cigarette lighter light F8(8A) Side light (right sidelight, left rear light), license plate light left light bulb, engine compartment lamp and side light warning light F9(8A) Oil pressure gauge with warning lamp, coolant temperature and fuel level indicator, battery charge warning lamp, direction indicators, carburetor choke indicator, rear window heating F10(8A) Voltage regulator and generator excitation winding F11(8A) Reserve F12(8 ) Reserve F13(8A) Reserve F14(16A) rear window heating F15(16A) Cooling system fan electric motor F16(8A) Turn indicators in hazard warning mode
Owners of 2106 should be aware that the old design of fuses has long become obsolete, since each time they operate they overheat, which affects the density of the cells. Lack of tight contact between the fuse and the connectors leads to their burning. Therefore, replacement of the fuse blocks is necessary. To avoid unnecessary problems with the electrical wiring, you should inspect the safety devices every six months. If the contact part burns, it is necessary to replace the fuses and clean the sockets. Today, many VAZ 2106 owners are modernizing classic blocks, replacing them with modern blade fuses.
Cigarette lighter connection diagram
The exact connection diagram for a car cigarette lighter depends on its design and the characteristics of the vehicle. However, there are generally accepted rules and conditions that must be observed when installing the part.
The standard arrangement of parts is as follows:
- Battery
- Safety unit.
- Switch.
- Relay.
- Cigarette lighter.
Do not connect the accessory directly to the ignition switch, as the system will not be able to withstand the increased load. After laying the cable under the hood, you need to connect it to the positive contact, and then connect the fuse and attach it to the terminal. If you cannot do this, connect the wire to the starter and attach it to the positive terminal of the relay.
The end of the wire needs to be stripped 1 cm, and then installed on the terminal and clamped with pliers. Next, you should secure the wire to prevent it from loosening. For this purpose, you can use a soldering iron or a suitable terminal. A switch and fuse are installed near the cigarette lighter. Such details will increase the safety of operation of the device.
The switch must withstand operation with a current of 1.5 times the maximum load. If it is missing, you need to install a relay nearby with the appropriate current value. Some drivers place the switch and relay near the ignition switch. The switch is connected to the control contact of the relay, and the cigarette lighter is connected to the power contact.
Before turning on the device, you should make sure the connection is correct. The splitter and relay must be tightly fixed to the housing. Next, you need to make sure that the ignition circuit is turned off and begin testing the device. Using a tester, you can estimate the voltage on an unconnected battery. Next, you should put the minus terminal on the battery terminal and measure the voltage again. If there are no changes, then the connection diagram has been followed.