For modern car enthusiasts, this device has much more functionality than the name suggests. After all, many devices are connected to the cigarette lighter socket. The most common:
- charger or power bank for mobile phones, tablets or other electronic devices;
- a navigator showing the way through city traffic jams;
- DVR recording traffic conditions;
- fan;
- compressor for inflating wheels.
Therefore, when the Lancer 9 cigarette lighter stops working and needs to be replaced, this is unpleasant news. Making repairs yourself is not difficult. You can learn from this material how to find out the cause of the malfunction, check weak points, and repair the device.
Why does the Lancer 9 cigarette lighter not work?
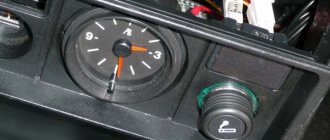
The device is located on the front panel of the car. The operating principle of the Mitsubishi cigarette lighter is simple. Inside the metal cartridge there is a nichrome thread, which heats up when the contacts close. When you press the cigarette lighter button, the contacts automatically close and the coil begins to heat up. When the maximum temperature is reached, the thermal relay gives a command to release the cartridge.
Over time, the device may break down and the fuse will trip. The Mitsubishi model 10 or 9 cigarette lighter does not work due to various reasons. Main sources of malfunction.
- Blown fuse. Especially for network safety, there is a safety element that burns out when the current exceeds 15 amperes. If one or more powerful devices are connected to the cigarette lighter socket, the current rating exceeds the resistance of the fuse, causing it to blow. This can be solved by replacing the element with a new one.
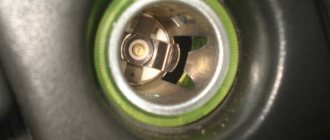
- The cigarette lighter may stop working due to poor cartridge contact or the appearance of oxides. Over time, the nest becomes loose, and rust or oxides appear on the antennae. Repairing such a device is simple - just remove the cigarette lighter, bend the contacts, and process them with a file or sandpaper for better contact.
- Broken wire or short circuit. If the fuses burn frequently or the cigarette lighter does not work completely, then you should look for an open circuit. To do this, you will need a multitester, which must be set to resistance and check the integrity of each wire connected to the cigarette lighter.
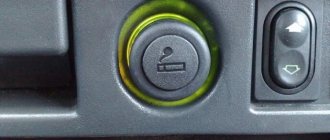
- Burnt out backlight bulb. There is a special lighting ring around the cigarette lighter. The lamp inside may burn out. It must be replaced with a new element. In the event of a breakdown, you should check fuse number 21 in the block located under the hood of the car. He is responsible for lighting the device.
Cigarette lighter fuse Mitsubishi Lancer 9
If the device fails, this element should be checked. The Mitsubishi Lancer 9 mounting block is located in the cabin on the left side of the steering column. There is a drawer for small items here.
- We open the cover and then remove it, overcoming the resistance of the latches.
- On the back cover of the box there are tweezers to make it easier to pull out fuses, as well as two spare elements rated 20/30 amps.
- We are interested in element number 22 (see photo). It is he who is responsible for the car's cigarette lighter.
- To restore the device's functionality, it is necessary to replace the blown fuse with a new one. It is prohibited to install coins or metal jumpers. Fuses with a rating greater than 15 amps are not suitable. This may result in a short circuit or fire.
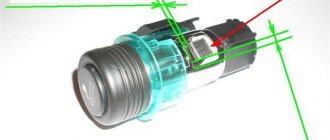
Design and principle of operation
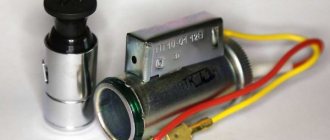
To find the reason why the cigarette lighter does not work, you need to understand its structure and principle of operation. The small device is made in a plastic case, inside of which there is a metal spiral. The functions of the heating element are performed by nichrome or other material with increased resistivity. The product is connected to the corresponding socket on the dashboard, and the positive contact is connected to the heater.
When heated, the nichrome spiral turns red. The system is equipped with a thermal relay that turns off the power supply when the permissible temperature threshold is exceeded.
The cigarette lighter socket is illuminated, so finding it in poor lighting conditions is quite easy. There is also a 10 A fuse in the socket.
Before turning to specialists with the question of why the cigarette lighter stopped working, you should consider the main reasons for this incident.
Wiring and terminals
If the fuse is intact, then the cause of the malfunction is elsewhere. To repair the Lancer 9 cigarette lighter, you will need to test the integrity of the wiring. To do this, you need to get a multitester and remember the pinout of the device. In total, three wires come to the device - two positive and one negative.
- Red, positive – connected to the battery. The circuit current is no more than 15 amperes, and if this parameter is exceeded, the fuse blows.
- Yellow. The positive wire is responsible for the backlight bulb.
- Black, minus. It comes to the body of the device, and the other end is a mass powered through the body of the car.
The main causes of cigarette lighter failure and their solutions
If the immediate first function of this device is important to you, try replacing the cigarette lighter head. This is the first and simplest action that should be performed in this situation. With intensive use, the heating coil burns out and stops performing its tasks. But this process should be carried out carefully - buy only the head that fits your car model.
If this process does not help, you should look for the cause of the problem directly in the electrical network that connects the cigarette lighter. To do this, you need to check all connections and make sure there are no burnt wires or connections. The main factors that are worth checking in this aspect are the following:
- the functionality of the fuse that is responsible for the operation of the cigarette lighter;
- integrity of all electrical connections of the equipment itself, wires on the cigarette lighter body;
- absence of carbon deposits and foreign particles in the cigarette lighter socket and on the contacts;
- serviceability of the plug when connecting certain devices to the cigarette lighter;
- absence of overloads on this unit during its operation.
These tests will help you identify the faulty unit. The easiest check is related to the fuse box. Check your car's owner's manual to see which fuse controls the cigarette lighter. Then replace it with a known working element of the electrical system and check the operation of the device.
To check for oxidation of contacts or the presence of foreign objects in the socket, it is enough to visually examine the equipment, and if there are blockages, remove them using non-metallic objects. In all other cases, you will have to remove the cigarette lighter from its installation location and check the electrical connections.
Lancer 9 cigarette lighter repair
Sometimes replacement is not necessary. In some situations, you can carry out repairs yourself. Inside the car cigarette lighter itself there is a small mica plate. This is a semiconductor that often fails. It needs to be removed. After this, it is worth assembling the device and then checking its serviceability. Often you just need to treat oxidized contacts or solder fallen wires.
How to remove the cigarette lighter on a Lancer
Before removing the device, you should stock up on the necessary tools. During the work you will need:
- minus screwdriver;
- protective gloves;
- wire cutters;
- soldering iron and solder (in case of broken wires);
- multitester;
- insulating tape.
The process of removing the cigarette lighter is as follows.
- Open the hood and remove the negative terminal from the battery. This will help avoid short circuits during work.
- We take out the ashtray located near the cigarette lighter from its seats.
- We disconnect the gear shift lever, gaining access to the trim.
- We lift it, and then disconnect the contact chip from the cigarette lighter itself.
- Turn the overlay over. Under it there is a 7 nut that secures two plates. Unscrew it and remove the plates.
- We disconnect the tin wire, unbend the contacts and pull out the old wire.
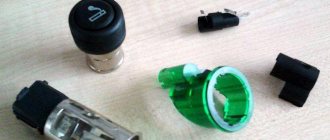
- Now the device is completely disassembled and you can repair or replace the cigarette lighter. Assembly is carried out in the reverse order to that described.
A detailed video on how to remove the cigarette lighter of a Mitsubishi Lancer 9 and repair it is located below.
Connecting an additional cigarette lighter
Some car owners install another socket. You will need:
- drill or screwdriver with a set of metal drills;
- a crown for cutting out a hole, the diameter must match the diameter of the car cigarette lighter;
- file;
- soldering iron with solder;
- wire cutters;
- screwdrivers;
- multitester;
- heat-shrink tubing;
- wire of suitable cross-section;
- fuse that can withstand the current recommended by the manufacturer - 25 amperes.
- We turn off the power to the car and choose a place to connect an additional cigarette lighter. It is desirable that it be a flat surface.
- We drill a hole of a suitable diameter and clean the edges with a file.
- We connect to the wiring, observing the polarity and passing them through the fuse.
- We check the functionality of the model and carry out assembly.
The process of replacing the cigarette lighter on a Mitsubishi Lancer 9
Options from different companies are available for sale. If repairing the cigarette lighter is impractical, it can be replaced with a new device. The price of the device for lancer x and other models is 500 – 1000 rubles, depending on the company or country of manufacture.
If you need to replace the cigarette lighter on Lancer 9, when choosing, you should avoid spare parts that are too cheap. Most likely, low-quality materials were used in their manufacture, so such a part will not last long. It is best to choose original cigarette lighters. The part must be carefully packaged, and inside there is a certificate of conformity src=»https://daciaclubmd.ru/wp-content/uploads/2018/07/lanser-04.jpg» class=»aligncenter» width=»600″ height= "426″[/img]
Engine compartment fuses
The fuses under the hood of the car are located in the location indicated by position 7.
The fuse box opens as shown in the figure:
Fuse layout diagram in the engine compartment of Mitsubishi Lancer 9.
The explanation of the fuses is given in the table:
| Number | Purpose, denomination |
| 1 | Fog lights, 15 Amp |
| 2 | Sound signal, 10 Amps |
| 3 | Fog light relay (optional) |
| 4 | Flow meter, recirculation valve, crankshaft sensor, ECU, XX regulator, canister purge, 20 Amps |
| 5 | A/C Compressor, 10 Amp |
| 6 | Signal relay |
| 7 | ABS, ECU, additional stops, 15 Amperes |
| 8 | Reserve |
| 9 | Additional devices, 15 Amps |
| 10 | Reserve |
| 11 | Generator circuit, 7.5 Amps |
| 12 | Reserve |
| 13 | ETAKCS, turn signals, 10 Amp |
| 14 | Automatic transmission chains, 20 Ampere |
| 15 | Fuel pump, 15 Amp |
| 16 | Reserve |
| 17 | Ignition switch, 40 Amp |
| 18 | Window regulators, 30 Amp |
| 19 | Steering Console Switch, Instrument Panel, 10 Amp |
| 20 | Clock, radio, 10 Amp |
| 21 | Climate control control unit, console lighting, rear lights, 7.5 Ampere |
| 22 | License Plate Light, Instrument Panel, 7.5 Amp |
| 23 | Right headlight, 10 Amp |
| 24 | Left headlight, luminous flux corrector, 10 Ampere |
| 25 | Light control |
| 26 | Fan relay |
| 27 | ABS, 60 Ampere |
| 28 | Fan control, 50 Amp |
| 29 | Left headlight, 10 amp |
| 30 | Right headlight, 10 Amp |
| 31 | Battery charging, 60 Amps |
| 32 | Fog lights, 15 Amp |
The additional relay block under the hood is located as shown in the figure:
Relay layout diagram.
The purpose of the relay is given in the table:
| Number | Purpose |
| 1 | Crankshaft indicator connector |
| 2 | Reserve |
| 3 | Reserve |
| 4 | reserve |
| 5 | Ignition relay |
| 6 | Automatic transmission relay |
| 7 | Main relay |
| 8 | Air conditioner relay |
Removing the cigarette lighter Lancer 10
On next-generation cars, repairs are carried out differently. The set of tools remains the same. In order to remove the cigarette lighter on the Lancer 10 model, you need to follow the steps.
- Open the hood and remove the negative terminal from the battery. This will help avoid short circuits during work.
- We unscrew the two bolts securing the trim located directly in the front armrest.
- We pull the trim up, gaining access to the button for turning on the seat heating.
- We disconnect it, and then easily remove the plastic lining of the center console.
- Unscrew the two screws near the gearbox lever.
- We take out the Lancer cigarette lighter block.
- Disconnect the contact chip.
- Now you can remove and repair the cigarette lighter itself.
- Reassembling the device is carried out in reverse order.
Sometimes it is possible to repair a Lancer device directly on site, with your own hands. To do this, you need to examine the back of the device. Often the wire coming into the structure burns out and the fuse trips. “Swelling” of the insulation will help detect this malfunction. Using a key, we disassemble the back part, remove the burnt wires and insert a new copper wire into the holes. Then we assemble the part in reverse order and diagnose its serviceability.
Changing the cigarette lighter light bulb
Sometimes the backlight of the device burns out and the fuse trips. This will require dismantling the filter and replacing the light bulb. It’s easy to do work on a VAZ 2110.
- Remove the terminal from the car battery.
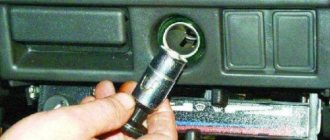
- We take out the metal cylinder.
- We bend the fixing antennae and remove the device from the hole.
- Disconnect the wire block.
- Remove the filter ring.
- We squeeze the lamp screen so that the legs come out of the slots.
- Remove the light bulb by turning it 90 degrees.
- We install a new element, and then assemble the device, following the reverse procedure.
Where is the cigarette lighter fuse located?
The location of the mounting block on the model is identical to the design of its predecessor.
To the left of the steering column there is a compartment for small items, the lid of which must be opened and then pulled out, overcoming the resistance of the latches. On the inside of the cover there are special tweezers that will help you remove the fuse, as well as a diagram of the location of the protective elements. We are interested in the 13th fuse. It is responsible for the car cigarette lighter itself and the 12-volt power outlet. A faulty fuse should be replaced with a new one rated 15 amps. Installing a part with a high value may result in a short circuit or fire.
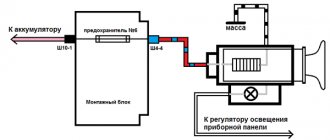
VAZ 2107 cigarette lighter connection diagram
Three wires are connected to the cigarette lighter of the VAZ 2107:
- the red wire goes to the battery plus and supplies voltage to the clock;
- the yellow wire goes to the battery plus and supplies voltage to the backlight;
- The black wire is responsible for connecting the ground.
In addition to the cigarette lighter itself, its connection diagram includes a fuse marked F6 installed in the mounting block.
Replacing fuses Mitsubishi Lancer X
No. Power supply circuit Name Rated load (A) Housing color Load circuit
1 Fusible link No. 37 Fusible link 30 Pink Fan motor and power transistor
2 Fuse No. 34 Fuse 15 Blue ETACS-ECU, high brake light, rear combination lamp (left, right) and range selector assembly <CVT>
3 Fusible jumper No. 37 10 Red Rear fog lamp
4 ETACS-ECU (ACC relay 3) 30 Green ETACS-ECU, washer motor and windshield wiper motor
5 Fusible jumper No. 34 10 Red Diagnostic connector
6 Fusible link No. 37 20 Yellow ETACS-ECU, front door lock actuator (left, right), trunk lid lock and rear door lock actuator (left, right)
7 Fusible jumper No. 30 15 Blue Center panel assembly and radio/CD player
8 7.5 Brown A/C ECU, Steering Wheel Switch, Combination Panel, ETACS-ECU, Key Reminder Sensor, KOS-ECU, Light Control Sensor, Power Window Relay and WCM
9 15 Blue Combination panel and key reminder sensor
10 Fusible link No. 34 15 Blue ETACS-ECU
11 ETACS-ECU (relay 3 ACC) Fuse 15 Blue -
12 ETACS-ECU (IG1 relay) 7.5 Brown A/C control panel, A/C ECU, ABS-ECU, ASC-ECU, center panel unit, steering column switch, combination panel, corner/rear sensor ECU, CVT control relay, control system ECU automatic headlight leveling, seat heater relay, KOS-ECU, rear window defroster relay, range selector assembly, radar switch, SRS-ECU, steering angle sensor, sunroof motor assembly and WCM
13 ETACS-ECU (relay 2 ACC) 15 Blue Socket for connecting additional equipment (front floor console) and cigarette lighter
14 Fusible link No. 34 10 Red Ignition switch circuit
15 20 Yellow Sunroof Motor Assembly
16 ETACS-ECU (ACC relay 2) 10 Red Outside mirror assembly (left, right) and radio/CD player
17 Fusible link No. 34 10 Red ASC-ECU
18 ETACS-ECU (IG1 relay) 7.5 Brown Reversing light, corner/rear sensor ECU, CVT ECU and SRS-ECU
19 Fusible jumper No. 37 15 Blue Socket for connecting additional equipment (rear floor console)
20 Fusible link No. 34 Fusible connection 30 Pink Front power window motor (Left, Right), front power window auxiliary switch, power window main switch, rear power window motor (Left, Right), and rear power window auxiliary switch (Left, Right)
21 Fuse No. 37 30 Pink Fuse No. 22 in the passenger compartment and rear window defroster
22 Rear window defroster relay Fuse 7.5 Brown Outside mirror assembly (left, right)
23 Fusible link No. 34 — — —
24 — — —
Sequence of detecting a faulty fuse and replacing it
How to remove and replace the cigarette lighter on a VAZ 2110, 2111, 2112, 2114, 2115, etc.
During the operation of the vehicle, if a malfunction occurs in an individual device or unit of the Mitsubishi Lancer 9, using the tables and figures above, it is necessary to determine the installation location of the fuse(s) serving this device or the system as a whole. Next, with the ignition off, remove this fuse from the connector cell. This is easier to do with the help of special pliers, which are placed in the cover of the removable panel of the interior fuse box. Next, the fuse is checked. This can be done visually. This method is not 100% accurate, so it is better to check the health of the fuse using a multimeter.
If a fuse fails, you must replace it with a known good one of the same rating. Do not install a fuse with an unknown or different rating. It is allowed to temporarily install a fuse that exceeds the nominal value by no more than 25%, for example, 15 Amps instead of 10. Further operation of the vehicle is possible only after replacing it with a standard fuse. Under no circumstances, even temporarily, should a so-called “bug” be used. The consequence of this ill-considered action may be ignition of the electrical wiring.
If, after installing a new fuse and turning on the ignition or subsequent operation of the car, it fails again (burns out), it is necessary to begin examining the electrical equipment of the car and checking the devices that the fuse serves. The constant blowing of one of the fuses is evidence of a faulty wiring, one of the devices that the fuse serves.
As a result of long-term operation of the Mitsubishi Lancer 9 or a traffic accident, there may be cases of failure of the fuse and relay blocks, both in the interior and under the hood. In this case, it is necessary to dismantle and replace them.
If the problem is in the cigarette lighter itself
If the protective element does not show signs of damage, repair or replacement of the device itself is required.
How to remove the cigarette lighter
The block is dismantled as follows:
- Gain access to the engine compartment. Remove the negative terminal of the battery located here. This will prevent the electrical circuit from failing during repairs.
- Take out the ashtray, which is located on the center console. Disconnect the gearbox handle, making it possible to remove the lining.
- Raise the decorative strip. Disconnect the contacts from the cigarette lighter. Turn the overlay over. Then you need to find the nut holding the 2 plates. It is unscrewed and the metal elements are dismantled.
- Disconnect the wire, unbend the clamps, and remove the cigarette lighter from its seat.
Repair
After disassembling the device, the integrity of the wiring and its other elements is assessed. Often the cable supplying the structure is damaged or burns out. If such a breakdown is suspected, the rear part is disassembled. Remove the burnt wire and insert a new copper cable into the technological hole. Reassemble the device by performing all steps in reverse order.
Replacing a part with a new one
If repair is impossible, the unit is completely replaced. It is not necessary to use the original device. There are several options for parts for Lancer, the cost of which is 500-1000 rubles.
You should avoid buying a spare part that is too cheap.
Cheap materials are used in manufacturing, which reduce the service life of the product. The part must be properly packaged to prevent damage during transportation.
Connection diagram
p, blockquote 1,0,0,0,0 —>
p, blockquote 2,0,0,0,0 —>
The number of elements in the blocks of your Mitsubishi Lancer 10 may differ from those presented and depends on the year of manufacture, level of equipment and region of delivery.
p, blockquote 3,0,0,0,0 —>
Originals and analogues
Original filters provide proper protection of the car engine from debris that gets into the fuel. Car owners often refuse to purchase branded filters, since their cost is much higher than their analogues. When purchasing non-original spare parts, the entire risk is transferred to the car owner. The table below shows the price and article number for original and similar spare parts.
| Name | Original/Analog | Price, rub | vendor code |
| Misubishi filter | original | 2800-4000 | MR552781 |
| Fine fuel filter NIPPARTS | analogue | 800-1000 | N1335069 |
| Mesh filter for KRAUF fuel pump | analogue | 300-550 | 770B244 |
| Misubishi gasket | original | 120-160 | MN139931 |
| Mazda coarse filter | analogue | 400-900 | CY01-13-ZE1 |
| Fuel filter link recommended for mitsubishi sportback x | analogue | 900-1200 | 1770A053 |
MOUNTING BLOCKS
Always carry a set of spare fuses with you - one of each rating.
Do not skimp when purchasing fuses: lately, low-quality fuses are often found on sale, the electrical parameters of which do not correspond to the declared ones. Remember that fuses are designed to prevent electrical fires and your life, not to mention the cost of car repairs, may depend on their quality under certain circumstances.
Rice. 10.1.
Mounting block located in the engine compartment
FUSE AND RELAY LOCATION
Most fuses and relays are located in a separate block located in the engine compartment of the car (Fig. 10.1).
Auxiliary relays are located in an additional mounting block (Fig. 10.2), located next to the main one. Some of the fuses and relays are located in a block located under the instrument panel on the left side of the steering column (Fig. 10.3).
The mounting block (see Fig. 10.1), located in the engine compartment, contains the following relays and fuses:
1–15 A fuse (circuit of the front fog lights, their turn-on indicator and the fog light turn-on relay);
2–10 A fuse (horn circuit and relay for its activation);
3rd place for the front fog lamp relay;
4 – fuse 20 A (circuits of the mass air flow sensor, crankshaft position sensor, recirculation valve, electronic engine control unit, engine control system relay, electric fan relay, idle speed control, ignition coil relay, electronic immobilizer control unit, injectors, concentration sensor oxygen and canister purge valve);
5–10 A fuse (air conditioning compressor circuit);
6–relay for turning on sound signals;
7–15 A fuse (circuits of the ABS electronic control unit, electronic engine control unit, additional brake light and rear lights);
8 – reserve place for relay;
9–15 A fuse (connector for additional electrical devices);
10 – reserve space for relay;
11–7.5 A fuse (generator excitation winding circuit);
12 – reserve space for relay;
13–10 A fuse (circuits of the electronic control unit of the ETACS system and direction indicators);
14–20 A fuse (automatic solenoid control unit circuit
15–15 A fuse (fuel pump circuit);
17–fuse link 40 A (ignition switch circuit);
18-fuse link 30 A (power window circuit);
19–10 A fuse (circuits of the instrument cluster, steering column switch, electronic control unit of the ETACS system, front electronic control unit);
20–10 A fuse (clock circuit, ETACS electronic control unit, radio);
21 – fuse 7.5 A (circuits of the electronic air conditioning control unit, ashtray illumination, cigarette lighter illumination, instrument cluster,
switch for fog lights, direction indicators, air recirculation control unit, rear lights, connector for radio);
22–7.5 A fuse (instrument cluster circuits, side lights and license plate lights);
23–10 A fuse (right headlight circuit);
24–10 A fuse (circuit of the left headlight and electric headlight corrector);
25-electronic lighting control unit;
26 – relay for turning on the fan electric motor;
27 – fuse link 60 A (ABS electronic control unit);
28-fuse link 50 A (fan controller circuit);
29–10 A fuse (circuit of the left headlight and the high-beam headlight signal lamp);
30 – 10 A fuse (right headlight circuit);
31–fuse link 60 A (battery charging circuit);
32 – 15 A fuse (circuits of front fog lights, warning lamp and relay for turning them on).
Fuses of different ratings are painted in different colors; In addition, the fuse is marked with a numerical value of the current for which it is designed (rated value).
COLOR OF THE FUSE CASE AND ITS COMPLIANCE WITH THE RATING
**The fuse is larger than the others.
Rice. 10.2.
Additional mounting block located in the engine compartment
Rice. 10.3.
Mounting block located inside the car
Table 10.1 FUSES OF THE INSTALLATION BLOCK
LOCATED IN THE VEHICLE PASSENGER