01/26/2022 7 104 VAZ 2109
Author: Ivan Baranov
A cigarette lighter is found in every car, but it is not always used for its intended purpose. Over time, this device may function unstably or fail altogether, resulting in the car owner needing to replace it. For what reasons does the VAZ 2109 cigarette lighter not work, and how to replace it yourself? You will find the answers below.
[Hide]
What to do if the cigarette lighter does not work in a VAZ 2109
Very often, owners of a domestic VAZ 2109 car are faced with a situation when the cigarette lighter fails. But this device is useful not only for those car owners who smoke. Often, many electrical devices are connected to it, for example, a charger for a mobile phone. Conclusion: this connector is very necessary.
Rules for using the cigarette lighter in the VAZ 2109
- Do not connect a compressor designed to inflate tires to the cigarette lighter. It is better to connect it directly to the battery. The thing is that this device will put a large load on the electrical wiring, and it may melt, or the fuse may burn out.
- Do not put devices that do not fit into the slot.
- Do not put iron objects into it. In addition, it is better to refuse to purchase electrical equipment for a car that has various kinds of metal rings on the body. Often they fly out of their place, resulting in a short circuit. And this, in turn, will quickly drain the battery.
If the cigarette lighter does not work in your VAZ 2109
First, check the condition of the fuses. If there is a burnt one, replace it. But sometimes even after replacing the fuse, voltage still does not appear. In such cases, you have to disassemble the cigarette lighter itself. But how can you check this?
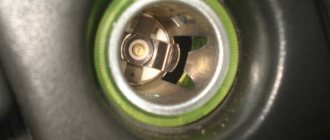
Pull out the cigarette lighter completely. Connect a light bulb to the socket on the back and turn on the ignition. If the light comes on, then we proceed to disassemble the cigarette lighter, since the reason lies precisely in it. To do this you will need pliers and a small file.
Before unscrewing the nut from the back and starting disassembly, remember the position of the contacts (or better yet, take a photo of them). This will save you from additional difficulties during assembly. Now the actual disassembly: unscrew the nut, bend the metal part from the plastic element, disconnect the hardware. You will see a mica plate, it is a semiconductor. Remove it.
Then begin assembly: use a file to remove excess metal that interferes with the fit, and install the cigarette lighter in its place in the VAZ 2109 interior.
In addition to the listed problems, a simple breakdown may occur as a result of poor contacts. After all, over time, the connecting points oxidize, or the terminal may fall out, and as a result, loss of performance. In this case, remove the cigarette lighter from the socket and inspect its rear part (the terminals should be well secured and the contacts should remain tight).
You can even ring the wires to check their integrity. If after all this your cigarette lighter does not work, then perhaps some point was missed. Take the time to disassemble the nest again and repeat all the steps again. And do not forget, when replacing the element, to disconnect the negative terminal of the battery. And only after that start connecting the wiring.
Operating rules
If at some point the cigarette lighter stops working, what will happen? All your additional equipment will no longer receive power. As a result, you will be left without a media center, navigator, will not be able to charge your phone, and so on.
There are several important rules that are recommended to be followed when operating your VAZ 2109 equipped with a cigarette lighter.
- It is not recommended to connect compressors directly through the cigarette lighter, which many people use today to pump up their tires on the road. It is better to connect it directly through the battery. Such devices consume a lot of energy and create an impressive load on the vehicle's electrical wiring. At some point it may melt or a fuse may blow.
- Do not try to insert devices whose connectors are larger than the size of the cigarette lighter into the cigarette lighter socket.
- Do not connect metal objects. Also, when connecting the device, do not use equipment that has metal rings on the body. They often fly out, resulting in a short circuit. At best, your battery will quickly run out.
Repair work
To begin with, we advise you to make room for yourself near the car so that you can open the doors without any problems, nothing prevents them from always being in the open position, and you have the opportunity to approach and move away from the car without overcoming multiple obstacles.
If in summer you can simply drive your car outside, then in winter you will have to limit yourself to the available space of a closed garage.
You are ready? Then you can start repairing.
Dedicated place where the cigarette lighter fuse is located on the VAZ 2114
The first situation is that the fuse for the VAZ 2114 cigarette lighter has failed. A popular problem that is not so difficult to solve. The primary task is to determine where the cigarette lighter fuse is located on the VAZ 2114. It's simple. Open the hatch where the entire fuse box is located. The element you are looking for is located to the left of the steering column. This is a 20-amp fuse, which has a special marking - F4. It is difficult to confuse it with others, so finding the fuse is not a problem at all. Take a tester and check its functionality. If it works, we continue to look for the problem. If the fuse fails, you can simply purchase a new one. It’s cheap, so there shouldn’t be any problems finding and purchasing it.
Since the old fuse has burned out, you won’t be able to simply take a new one, put it in place and supposedly complete the repair.
It is extremely important to understand exactly why the old fuse blew. Figuring out how to remove the cigarette lighter on a VAZ 2114 is quite simple. Be sure to check the quality of the contacts in the blocks when leaving the mounting block
It is designated X1. This block has connections from the cigarette lighter located in the passenger compartment. If the reason is in the contacts, tighten them
Be sure to check the quality of the contacts in the blocks when leaving the mounting block. It is designated X1. This block has connections from the cigarette lighter located in the passenger compartment. If the reason is in the contacts, tighten them.
The most popular problem with a cigarette lighter malfunction is the car owner’s own mistakes during operation. When connecting external devices to the device, there is no need to unscrew the plugs in different directions. Because of this, the plates short out and the cigarette lighter simply stops working.
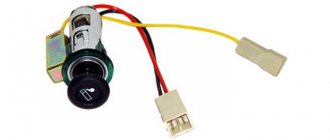
Another fairly common problem is a burnt-out backlight bulb. It is quite simple to replace, but to do this, our device must first be removed from its socket.
Pay attention to the moving core of your cigarette lighter. Examine it externally, check the quality and integrity of the spring coils. If there is damage, you will have to replace this element
The problem is that the core is not sold separately; auto parts stores offer only a prefabricated design. The only search option is all kinds of car flea markets, where grandfathers sell spare parts from their old cars. Despite the apparent absurdity, in such places you can often find excellent parts for cars such as the VAZ 2114.
Installing an additional cigarette lighter in a VAZ-2115
Let's summarize
Obviously, the procedure for replacing the cigarette lighter is quite simple, even a beginner can do it. But you need to understand that the cigarette lighter will have to be changed often if the current consumption increases above 25 amperes. Once this value is reached, the entire procedure described above will have to be performed again, since the node will inevitably fail. The most common reason for this is connecting multiple devices at the same time. You should not use tees, and you should always know exactly how much the device you want to connect to the cigarette lighter consumes. This will extend the life of both the unit itself and the fuses.
Why is a cigarette lighter used in a car?
Nowadays, its nest is increasingly being used for other purposes than its intended purpose. Almost forty years ago, when AvtoVAZ designers conceived the first cars of the Samara family, which included the VAZ 2109, they could not imagine how else this unit would be used.
DVRs had not yet been invented, and the question of where to turn on the recorder was not raised in principle. In the same way, there was no task to connect satellite navigation equipment to the on-board network - there was no such equipment at all. And there was no need to even charge cell phones due to the lack of such in nature. Now it’s all there and is powered by the cigarette lighter.
Such abnormal operation leads to an increase in the load on its nest. This may lead to its failure. Particularly dangerous in this sense is a portable electric compressor, which has become widely used by motorists today. On long and even short trips, drivers often have with them such a compressor, which allows them to drive for quite a long time on a punctured tubeless tire, periodically pumping it up and leaving the question of repairing the wheel until the tire shop.
Care should be taken when making such swaps
Instructions for replacing the cigarette lighter of a VAZ 2110
On a VAZ 2110 car, replacing the cigarette lighter will not take you much time, and there is nothing complicated here; even a novice car owner can handle it.
Proceed in the following sequence:
1. Discard the negative cable from the battery.
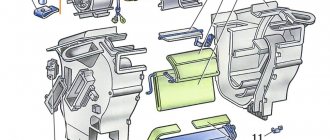
2. Remove the tunnel lining. For this:
- Unscrew the two screws located on both sides of the tunnel and remove the lining on the left and right sides;
- separate the cigarette lighter lighting terminals;
- remove the trim under the “handbrake” (this is easy to do using a flat-head screwdriver);
- remove the gear knob;
- unscrew the fastening screw under the handle casing;
- unscrew the screws from the sides of the tunnel, alternately moving the seats forward and backward;
- remove the top part of the case.
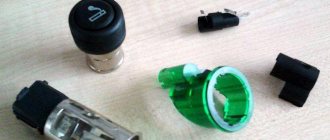
3. Remove the cartridge from the socket.
4. Remove the screen from the lamp (this is easy to do - just press on the screen of the device so that the locking “claws” disengage).
5. Using a thin screwdriver, press down on the latch until it disengages.
6. Remove the cigarette lighter socket.
7. Adjust the contact group for correct operation of the new cigarette lighter. The normal heating time for the device should be 20 seconds.
8. Install a new cigarette lighter and return all equipment to its place in the reverse order.
Required Tools
Before dismantling the cigarette lighter on a VAZ 2110, repairing it or installing a new device, or replacing a fuse, you will need to stock up on suitable devices. To work you will need:
- Phillips and standard screwdriver;
- protective gloves.
To fix a broken cigarette lighter or fuse, the following will be useful:
- multitester;
- blowtorch with solder;
- heat shrink tubes, electrical tape;
- wire cutters;
- needle file
The cigarette lighter on the VAZ 2109 does not work
Every modern car has this device. Even non-smoking drivers use it. A lot of electronic devices are connected to the cigarette lighter socket. The connector is used for:
- direct purpose (lighting cigarettes);
- connecting a GPS navigator that plots the route;
- a video recorder that records the current traffic situation;
- an electric compressor that inflates tires;
- fan;
- additional batteries or chargers for a mobile phone, laptop or tablet.
Failure of the device is fraught with additional problems and inconveniences. Information on how to remove the cigarette lighter and repair it with your own hands on the VAZ 2109 model will help car owners.
Order of Operations
Before removing the cigarette lighter of a VAZ 2110, 2111 or 2112, you need to de-energize the circuit; to do this, remove the negative terminal from the battery. Now you can start working directly:
- It is necessary to remove the plates on each side of the instrument tunnel; to do this, unscrew two bolts from each. On the right side, disconnect the backlight and cigarette lighter connector.
To replace the cigarette lighter of a VAZ 2110, 2111, 2112 with your own hands without disassembling the tunnel, watch the video:
The standard cigarette lighter of the VAZ 2110, 2111, 2112 does not allow the use of all devices existing on the market, so owners often replace it with a European-style unit. How to do this, watch the video:
Removal instructions
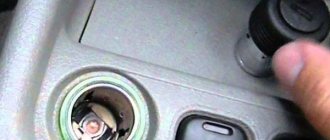
Armed with the tools, you can begin the repair. Before removing the cigarette lighter of the VAZ 2109, you must open the hood and remove the negative terminal from the battery. This will eliminate the possibility of a short circuit during removal.
- Unscrew the two fastening screws on each side of the decorative panel.
- Disconnect the wires of the control buttons.
- We remember where the plus of the contact chip is and take it out.
- We remove the cigarette lighter from its seat for subsequent repair or replacement.
The device should be connected in the reverse order to that described. If you don’t have a backlight bulb, you can add one to the design. Before starting, you should check the battery voltage with the ignition off. Then turn it on and try it again. If there is a drawdown of more than 0.5 Volts, then there is a short circuit.
Fuse burned out
One of the most common causes of car cigarette lighter failure is failure of the protective element. The current strength of this section of the circuit should not exceed 20 amperes. Due to the connection of powerful devices, a short circuit or moisture ingress, this value may exceed the maximum permissible. To protect against fire, the fuse blows.
The mounting block is located under the hood of the car, on the left side of the car, behind the engine. Its location is common to the VAZ 2108, 2109, 21099 models. On the back cover there is a diagram explaining the purpose of each fuse. The part with index F4, rated for 20 amperes, must be replaced.
It is important to install a fuse rated for these values. Installing a more powerful element is fraught with overheating of the wiring, melting of thermal insulation, and a potential fire
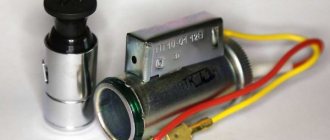
Device and purpose
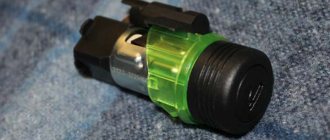
The operating principle of the device is simple. Inside the metal cartridge there is a thin spiral. When the cigarette lighter is pressed into the working position, current begins to flow through the contacts, exposing the coil to thermal effects. After reaching the maximum value, the thermal relay is activated and the device returns to its original position.
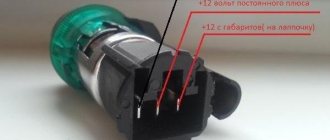
Three wires come to the VAZ 2109 cigarette lighter itself. The connection diagram is implemented as follows.
- Red cable. The positive wire goes directly to the cigarette lighter battery. Responsible for heating the element. This section of the circuit is protected by a 20 ampere fuse.
- Yellow cable. A constant plus that goes to the lamp. Responsible for lighting the cigarette lighter.
- Black cable. Minus. One end is powered to the cigarette lighter body, and the other ends to the car body.
When operating the device on a VAZ, it is important to adhere to several basic rules. It must be remembered that the total power of connected devices is calculated using the formula P=I*A (power=voltage*current). In this case, A = 20 amperes, and the voltage in the car circuit is 12 volts. The maximum power rating should not exceed 240 watts. The cigarette lighter fuse may blow, and the insulating part of the wires may melt.
Repair
As practice shows, in some cases, if the cigarette lighter stops working, the problem must be looked for in the socket. In this situation, most likely, the washer made of tin fails - it simply melts from excessive load. The thing is that it is with its help that the voltage reaches the central contact of the cigarette lighter device. To fix it, you will need to remove the part that has become unusable.
The main thing here is to act extremely carefully so as not to spoil the porcelain base - it is quite fragile. Without this washer, the cigarette lighter will function normally.
To restore functionality, sometimes it is also necessary to remove the semiconductor wafer. Here you will have to act in the following order:
- before disassembling the connector, it is worth photographing the location of the wires on the contacts - this will help you assemble everything the first time without errors;
- the fastening nut holding the socket on the panel is unscrewed;
- inside there is a plate made of mica - it needs to be pulled out;
- then the connector is assembled completely, but without the above-mentioned part.
In addition, quite often loss of contact occurs due to banal oxidation of the terminals or a broken connection
For this reason, during repairs, attention is always paid to cleaning all connectors and connectors. Remove oxides with a regular student's eraser
The break is identified by inspection. To avoid confusion, it is better to mark the tested wire with something. It will be faster to check with a multimeter set to Ohms. In general, there are not many of them, and the test is carried out quite quickly. All damaged veins must be replaced with new ones.
When working on the vehicle's electrical system, you should always follow safety precautions. You shouldn’t think that 12 volts are completely harmless - as you know, it’s not the voltage that kills, but the current. The latter in a car sometimes reaches 30 amperes, which is quite enough for an ordinary person to suffer serious injury.
Every modern car has this device. Even non-smoking drivers use it. A lot of electronic devices are connected to the cigarette lighter socket. The connector is used for:
- direct purpose (lighting cigarettes);
- connecting a GPS navigator that plots the route;
- a video recorder that records the current traffic situation;
- an electric compressor that inflates tires;
- fan;
- additional batteries or chargers for a mobile phone, laptop or tablet.
Failure of the device is fraught with additional problems and inconveniences. Information on how to remove the cigarette lighter and repair it with your own hands on the VAZ 2109 model will help car owners.
Removal instructions
Armed with the tools, you can begin the repair. Before removing the cigarette lighter of the VAZ 2109, you must open the hood and remove the negative terminal from the battery. This will eliminate the possibility of a short circuit during removal.
- Unscrew the two fastening screws on each side of the decorative panel.
- Disconnect the wires of the control buttons.
- We remember where the plus of the contact chip is and take it out.
- We remove the cigarette lighter from its seat for subsequent repair or replacement.
The device should be connected in the reverse order to that described. If you don’t have a backlight bulb, you can add one to the design. Before starting, you should check the battery voltage with the ignition off. Then turn it on and try it again. If there is a drawdown of more than 0.5 Volts, then there is a short circuit.
https://youtube.com/watch?v=6czakJ0X9GM
Fuse burned out
One of the most common causes of car cigarette lighter failure is failure of the protective element. The current strength of this section of the circuit should not exceed 20 amperes. Due to the connection of powerful devices, a short circuit or moisture ingress, this value may exceed the maximum permissible. To protect against fire, the fuse blows.
A hint that the protective element has failed is the failure of electrical equipment. This fuse is also responsible for the rear window heating relay, and on later models, the car radio circuit. If these devices fail, then it is worth replacing with a working element.
The mounting block is located under the hood of the car, on the left side of the car, behind the engine. Its location is common to the VAZ 2108, 2109, 21099 models. On the back cover there is a diagram explaining the purpose of each fuse. The part with index F4, rated for 20 amperes, must be replaced.
It is important to install a fuse rated for these values. Installing a more powerful element is fraught with overheating of the wiring, melting of thermal insulation, and a potential fire
It is better to arm yourself with tweezers to make it easier to pull out the part. After replacement, you need to check the functionality of the device. If the protective element lights up frequently, then there is a high probability of a short circuit. Then you should arm yourself with a multitester and carry out repairs. Information on how to remove the cigarette lighter on a VAZ 2109 model with a high panel is located below.
How to connect the device to a cigarette lighter without a plug
Some owners decide to abandon the device itself and prefer to install other devices directly. To connect the device directly without a plug you will need:
- blowtorch, solder;
- screwdriver.
- We dismantle the car cigarette lighter, gaining access to the cables.
- We connect the wires of the installed device, observing the polarity.
- We carry out the assembly.
- A constant minus. Comes to the car body.
- A constant plus. Connects through a fuse to the battery.
- Plus, coming up to the backlight bulb.
What to do if the cigarette lighter in the car does not work: step-by-step instructions
- Checking the consumer device. If your electronic devices no longer work from the cigarette lighter, connect them to other sockets to check whether the gadgets are charged from other sources. If the device receives power, then the cigarette lighter itself is faulty.
- Finding the cigarette lighter fuse. There is a fuse in the passenger compartment or under the hood that controls the cigarette lighter. Find him. The vehicle's operating instructions will tell you exactly where this device is located. The manual contains a diagram of the fuse locations. All fuses are identified by numbers. Find in the diagram the one that powers the cigarette lighter. Then check its actual location in the fuse box.
- Checking the fuse. You will need a multimeter. Turn on the continuity or continuity test mode on it. It is marked with an icon depicting several parallel arcs. Connect the red and black probes to different sides of the fuse. The multimeter should beep. The presence of a signal indicates that the fuse is working. Check again that you have diagnosed exactly the fuse that is responsible for the cigarette lighter. If you did not make a mistake with the fuse and there is a beep when checking, then the problem is not in it.
If the multimeter does not emit a signal, then the fuse is not working and needs to be changed.
Replacing a blown fuse. In 90% of cases, if the cigarette lighter in a car does not work, it is due to the fuse. If this is indeed the case, simply replace it. Remove the non-functioning part from the puller. You will most likely notice black marks on the fuse housing.
This indicates that the part has burned out. Use a new fuse. But it must meet certain standards. These can be found in your machine's owner's manual. The most commonly used fuses are 15 amps. Place a new element in place of the faulty one
Gently press it down until it fits snugly into the connector. Warning! Do not use a fuse whose rating does not match the one recommended by the vehicle manufacturer.
Otherwise, there will be problems with the wiring; it may overheat and even catch fire.
Warning! Do not use a fuse whose rating does not match the one recommended by the vehicle manufacturer. Otherwise, there will be problems with the wiring; it may overheat and even catch fire.
With the ignition turned on, insert any electronic device into the cigarette lighter socket. If the device works, then congratulations! If not, then proceed to further steps to diagnose the problem.
Checking the voltage in the cigarette lighter unit. The multimeter must be in constant voltage state (DCV or V- mode). This mode assumes different ranges of measured voltage. We need to measure 12V, so we set the switch to 20V. We connect the red probe to the central contact of the cigarette lighter connector, connect the black probe to the outside of the connector. Turn on the ignition and watch the multimeter screen. If an indicator appears on it in the region of 12V, then there is power in the connector, which means it is working. If the numbers are different, then follow the next step.
Check the cigarette lighter socket for foreign objects. Check for debris or foreign objects in the connector. Because of them, contact may weaken. Use a toothpick to clean the inside of the socket. Use a vacuum cleaner as needed.
Recheck if the cigarette lighter socket is working. Replace it if it still does not function.
The VAZ-2109 cigarette lighter does not work: reasons, what fuse?
- chargers for smartphones and tablets;
- navigator;
- multimedia center;
- radio;
- compressor;
- vacuum cleaner, etc.
The need for the serviceable device in question, as you might guess, has increased significantly over the past few decades.
This is the topic that this article is devoted to.
How to use it correctly
What happens if the cigarette lighter breaks? In this situation, the additional equipment installed on the machine will not be able to receive electricity and, therefore, will stop working.
To prevent this from happening, when using a cigarette lighter, you just need to follow a few fairly simple, but very important rules.
First of all, you should not connect the compressor, which is currently used by many car owners to pump up wheel chambers, directly into the connector, that is, directly. It would be more correct to power it from a battery. The thing is that these types of devices require a lot of voltage to operate and, therefore, create high loads on the wires. As a result, the latter often overheat and even melt. This most often happens on machines where fuses are replaced by jumpers.
Under no circumstances should you try to insert too thick plugs into the socket - they will damage the connector elements, some of which are made of porcelain.
Why it breaks and what to do
- fuse blown;
- loss of any contact.
In the first case, you will need to replace the melted protective device with a working one. It is located directly in the mounting block. So, if you have:
- low instrument panel (that is, an older car), then this is F4 or F10;
- high panel – 11.
It is worth noting that in this situation the following will also stop working:
- rear window heating element;
- socket for extension cord.
In early cars the fuse rating was 20 amperes, in new ones it was only 16.
By the way, the stove is powered through F7 in old models, 4 in new ones.
The blown fuse is removed with the battery disconnected and replaced with a new one.
It is important to monitor his condition for some time. If it burns out again, then you should look for the cause in a short circuit
If contact is lost, you must:
- inspect the cigarette lighter socket;
- make sure that all wires are holding well;
- use a tester to check the voltage (black and red wires - should be 12 volts).
If everything is in order, then you should look for the problem in the socket. If there is no electricity, inspect the wiring for integrity.
It is important to understand that the cigarette lighter itself has a certain margin of safety, and not every load will pass without leaving a mark on it. If the norm is exceeded, the risk of breakdown increases.
Therefore, you need to be more attentive to the selection of gadgets, giving preference to the most energy-saving ones.