Any car has its own on-board autonomous electrical network with all the inherent elements, energy source, storage device and consumers. Each of the nodes is functionally complete, they are connected by electrical wiring, and the network parameters are clearly standardized thanks to the accumulated experience in the production of automotive electrical equipment.
The power source for the electronics is a generator, which will be discussed in this article.
Kinds
There are two main types of car generators:
- Direct current, a voltage of a certain polarity is generated directly on the windings;
- Alternating current, since a constant voltage is still required, the generator is equipped with an internal semiconductor rectifier.
Currently, only the second type is used, since it has undeniable advantages, and its windings produce three-phase voltage, which is easier to smooth out ripples and allows more efficient use of the weight and size of the device.
We will look at what is inside this device below.
Why do you need a generator in a car?
First of all, let’s take a closer look at the functions of a car generator.
All modern machines are equipped with an extensive list of electrical equipment that requires a power source. It is also needed for models that do not have any additional peripherals; electricity is required, at a minimum, to start the engine with the starter, create a spark on the candles to ignite the air-fuel mixture, etc. To supply all these consumers, the car uses 2 sources - the battery and the generator. The battery stores energy and can release it to consuming devices when needed. While the generator produces energy, powers devices and recharges the battery. Thus, if you remove the generator from the structure of the car, it will be able to start and even drive for some time, but after the battery charge is exhausted, the car will stall. It will not be possible to start it again without “lighting it” from another car.
Thus, the main functions of a car generator are:
- battery recharging;
- power supply for electrical equipment installed in the vehicle.
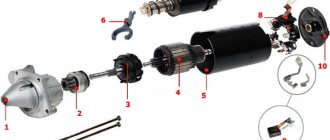
Device
Externally, all generators are similar at first glance, but those who are familiar with electrical engineering can easily determine which device they are dealing with. The situation is simplified by the fact that DC machines were used only on very relic cars, long out of production.
DC generator
The DC dynamo includes:
- frame;
- field windings on a stator fixedly fixed in the housing;
- power windings on a rotating armature;
- brush assembly with copper-graphite or carbon brushes that remove current from the rotating armature commutator;
- a voltage regulator that stabilizes the output by regulating the excitation current in the stator electromagnet windings;
- drive pulley on the armature shaft;
- bearings in which the armature shaft rotates.
To create acceptable output power, the entire unit had to be massive and metal-intensive, so with the advent of high-quality rectifier semiconductor devices, DC generators were no longer used in cars.
Alternator
In principle, it is designed similarly, but the output power is generated by multiphase stator windings, made of thick wire and not requiring powerful and unreliable current collectors.
The composition of the equipment is also similar:
- housing with mounting brackets and electrical terminals;
- stator windings installed in the housing can be removed when its halves are disconnected;
- rotor with soft electrical iron poles, copper windings and commutator;
- brush assembly, where a pair of carbon brushes is usually installed and an integrated semiconductor voltage regulator is built in, through which excitation power is supplied to the brushes;
- a rectifier block, where a three-phase bridge of six power valves (diodes) and three relatively low-power additional diodes for powering the field winding is located; the number of diodes may differ in specifically designed modern designs;
- bearings on the rotor shaft;
- output connectors, power and control, the second power contact is the metal housing of the generator;
- drive pulley and forced cooling impeller.
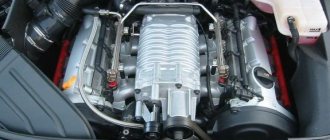
The entire structure is attached to the front of the engine for convenient organization of belt drive from the crankshaft pulley. Often, by deflecting the generator to the side, the belt tension is adjusted in cases where the more complex design of the drive of mounted units does not imply the presence of a separate tensioner with a roller.
Replacing the VAZ 2106 Generator with a More Powerful One
Probably wondering which generator is better?
install on VAZ 2106 and 2107. After all, the standard device has some shortcomings that negatively affect the performance.
Standard generators were developed quite a long time ago, and they were not designed for significant volumes of energy consumers. The office one used a couple of light bulbs and a starter.
It is clear that with a larger number of devices, the generator cannot cope with its obligations.
We have to find a suitable replacement for him. For this purpose, it is important to take into account what remains for our client to do about the electronic circuits of the machine. The new device must fit this list one hundred percent.
Which generator is better to install on VAZ 2106 and 2107?
The question is quite difficult. It is necessary to consider it, starting with the development of the most ordinary option. Any manufacturer will say that a specific standard version must be installed on the car. Let's look at the features of the standard version G221.
Here, in the type of relay generators, the regulator is installed separately from the brush assembly. This, within certain limits, simplifies the work to eliminate certain defects.
The advantage is the ease of installation; there is no need to adjust the wiring for connection; our client can only do it according to the standard scheme.
However, such a generator is low-power, it produces a maximum charge of 42, which is not enough for the majority of modern batteries.
Replacing the VAZ 2106 generator with a more powerful one
From all this, they conclude that the standard generator is naturally excellent. However, if you have additional devices, it is not entirely profitable to use it. It is best to choose a more powerful option.
This generator is intended for use on Niva cars. It is capable of delivering 50 A of current, which is enough for real electrical work.
Its difference from a standard “six” generator is the range of built-in regulator relays. Here it is assembled into one unit with brushes. For installation on VAZ 2106
, it is very important to make small improvements.
This electronic machine is installed on 2107 without any special interference or modifications.
VAZ Generator Replacement
If you have set a goal to MAKE EARNING ON YouTube You must: 1. Make your own channel 2.7. Connect it to AIR by filling out .
There are several methods for modifying such a generator. The most common would be to install brushes from generator . They are perfectly installed in the area of the relay assembled with the brush assembly.
No modifications are needed, this allows you to install such a generator, even for people without special abilities.
It is possible to install the G222 with a standard regulator, but for this purpose you will have to redo the generator connection diagram. Otherwise, nothing is possible.
Replacing a VAZ 2106 generator with a VAZ 2107
The myth device is quite often installed on 2106, 2107. This is all due to its greater efficiency; it produces a charging current of 55 A, which is quite enough for the majority of motorists. If your car has more than just equipment, then it is better to choose something more powerful.
These generators are similar in terms of mounting, so there will be no problems with the installation itself. This is if you remember to remove the terminal from the battery. The fun starts when you connect. What remains for our client to do, what exists, that 4 wires are connected to the native device. Only 3 goes to the figure eight.
This is all connected to the integrated voltage relay. To obtain the usual result, you need to insulate the dark wire, and connect the others as usual. While the generator is operating, the light indicating the discharge will glow. This is a common occurrence with this connection.
Accordingly, it should fade away in the absence of charging.
By and large, this is already an option to drive, but if you want to do everything possible, as expected, you will have to make some more modifications. We remove the old relay and replace it with an ordinary power relay. Now the light will glow only when the engine starts, and at low speeds, which is completely acceptable.
To install on a VAZ 2107 you will only need to add a power relay.
Fans of various additional equipment require an even stronger “gene”. Of course, they should be advised to install a device from a VAZ 2107i.
Myth unit produces 80 And this is quite enough to perform the work of all electronic systems added by the owner. In purchasing such a generator
, please note that there are a number of their varieties.
For installation on a VAZ 2106, only model 2107-3701010 is suitable; on carburetor “sevens” there is an option to install any generators of this series.
Replacing the VAZ 2101 generator with a more powerful one
It is better to modify the device for installation on the “six”. For this purpose, the relay regulator is replaced with a similar one from G222. The connection is quite similar to working with a figure-of-eight generator.
Conclusion
. Initially, rather weak generators were installed on the “sixes” and “sevens”.
But, in the process of technology development, their power was no longer enough to provide adequate power to the car. So the question arose, which generator is better to install on the VAZ 2106 and 2107.
Luckily there is plenty to choose from. The next generations of devices are perfect for old Zhiguli cars after a little modification.
Source: https://vivauto.ru/zamena-generatora-vaz-2106-na-bolee-moshhnyj/
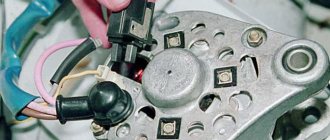
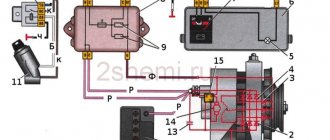
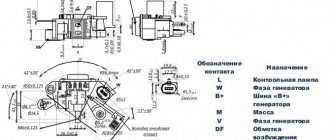
Connection diagram
The circuit is divided into power and control circuits. The powerful output of the generator is connected directly to the positive terminal of the battery through a power connector made of a large cross-section wire secured with a nut on a stud.
The thin control wire is most often simply connected to the ignition circuit through a control light. There are also other schemes when the light bulb has its own control from a specially designed contact on the body.
Choosing a generator for a passenger car
Due to the different diameters of the V-belt drive pulleys, the generator is given a higher angular speed compared to the crankshaft speed. The rotor rotation speed reaches 12 - 14 thousand revolutions every minute. Therefore, the generator resource is at least half that of an internal combustion engine car.
The machine is equipped with a generator at the factory, so when replacing, a modification with similar characteristics and mounting holes is selected. However, when tuning a car, the owner may not be satisfied with the power of the generator. For example, after increasing the number of consumers (heated seats, mirrors, windows), installing a subwoofer, an audio system with an amplifier, it is necessary to select a new, more powerful generator or install a second electrical appliance complete with an additional battery.
In the first case, you should select a power sufficient to recharge the battery with a 15% margin. When installing a second generator, the initial and operating budget increases dramatically:
- for an additional generator you will have to install an additional pulley on the crankshaft;
- find a place to mount the body of the electrical device so that its pulley is located in the same plane as the crankshaft pulley;
- maintain and change consumables of two “mobile power plants” at once.
With the advent of brushless generator models, some owners are replacing the standard device with this device.
Principle of operation
Before starting work, the ignition is turned on in the car, and voltage is supplied to the control contact of the generator through the light bulb. Since the generator is not generating energy at this moment, there is no voltage at the contact, and the light bulb is at battery potential. The indicator lights up and the initial current flows through the field winding.
After the motor starts, the rotating field of the excitation winding on the rotor creates a response induction in the stator windings and the generator begins to generate electricity. Additional diodes raise the voltage at the contact of the light bulb, there is no drop across it, and it stops lighting, signaling that everything is in order, the generator is working.
An electronic circuit in the brush assembly relay-regulator monitors the output voltage, increasing or decreasing the excitation current, thus maintaining the output at a given level, usually 14-15 volts, depending on the type of battery used and its temperature.
The battery at this voltage stops delivering current and goes into charge or hold mode, acting as an additional filter element, since the generator voltage pulsates with the frequency of a three-phase rectifier.
If many consumers are turned on and the engine speed is low, the device is not able to deliver the required power, the voltage decreases, and some consumers begin to be powered by the battery.
When you add speed, the generator increases power, powers consumers, and the excess goes to charge the battery. If the battery is charged and there is excess power, the relay-regulator reduces the excitation current to prevent a dangerous increase in voltage in the network.
Charging diagram for VAZ with injection engines
This scheme is identical to the schemes on other VAZ models. It differs from the previous ones in the method of exciting and monitoring the serviceability of the generator. It can be carried out using a special control lamp and a voltmeter on the instrument panel. Also, through the charge lamp, the generator is initially excited at the moment it starts working. During operation, the generator operates “anonymously,” that is, excitation comes directly from pin 30. When the ignition is turned on, power through fuse No. 10 goes to the charging lamp in the instrument panel. Then it goes through the mounting block to pin 61. Three additional diodes provide power to the voltage regulator, which in turn transmits it to the excitation winding of the generator. In this case, the indicator lamp will light up. It is at that moment when the generator operates on the plates of the rectifier bridge that the voltage will be much higher than that of the battery. In this case, the control lamp will not light up, because the voltage on its side on the additional diodes will be lower than on the side of the stator winding and the diodes will close. If the control lamp lights up while the generator is running, this may mean that additional diodes are broken.
Basic faults
The manifestation of malfunctions is the voltage in the network leaving the specified limits, as well as extraneous sounds from the operating generator.
The reasons may be different:
- wear of the brush assembly, it is replaced together with the integral relay;
- deep wear of the commutator with brushes, if it can no longer be eliminated by grinding, replace the slip rings or the armature assembly;
- failure of the armature bearings; they can be easily replaced after complete or partial disassembly of the generator;
- burnout of rectifier diodes, currently they are not replaced individually, the entire diode bridge must be replaced;
- short interturn short circuits or breaks in the armature or stator, the corresponding parts are changed;
- burnt or corroded contacts, they can also be replaced or cleaned.
Not directly related to the generator, but a common malfunction is a strong whistle when adding engine speed. This indicates that the belt is slipping on the drive pulleys; the tension can be adjusted, but it is better to replace the belt.
When removing the generator for repair, it is advisable to immediately change the diode bridge, bearings and relay regulator with brushes. This way, the repaired device will gain the highest possible reliability, although only a new generator from a reputable manufacturer can provide a full guarantee.
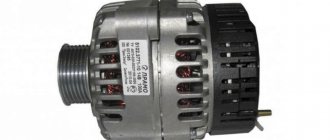
Design Features
The operating principle of a car generator is based on the effect of electromagnetic induction, which makes it possible to receive an electric current by inducing and then changing the magnetic field around the conductor. To do this, the generator contains the necessary parts:
- rotor - a coil inside two pairs of multidirectional magnets, receiving rotation through a pulley, and direct current to the field windings through brushes and commutator rings
- stator - windings inside the magnetic circuit in which alternating electric current is induced
- diode bridge – rectifies alternating current into direct current
- voltage relay - regulates this characteristic within 13.8 - 14.8 V
Rice. 2 Generator design
When the engine is not running, at the moment of starting it, the excitation current is supplied to the armature from the battery. Then the generator begins generating electricity on its own, switches to self-excitation, and completely restores the battery charge while the car is moving.
At idle speed, recharging does not occur, but the on-board network and all its consumers (headlights, music, air conditioning) are provided in full.
Stator
The most complex part of a generator is the stator structure:
- from transformer iron 0.8 - 1 mm thick, plates are cut out with a stamp;
- packages are assembled from them (welding or fastening with rivets), 36 grooves around the perimeter are insulated with epoxy resin or polymer film;
- then 3 windings are placed in bags, fixed in the grooves with special wedges.
Rice. 3 Generator stator
It is in the stator that alternating voltage is generated, which the car generator later rectifies into direct current for the on-board network and battery.
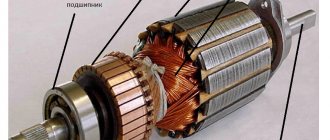
Rotor
When using rolling bearings, the journal is hardened, and the shaft itself is created from alloy steel. A coil covered with a special dielectric varnish is wound on the shaft. Magnetic pole halves are placed on top of it and secured to the shaft:
- look like a crown;
- contain 6 petals;
- are made by stamping or casting.
Rice. 4 Generator rotor
The pulley is fixed on the shaft with a key or a nut with a hex key. The power of the generator depends on the thickness of the excitation coil wire and the quality of the varnish insulation of the windings.
When voltage is applied to the field windings, a magnetic field appears around them, interacting with a similar field from the permanent pole halves of the magnets. It is the rotation of the rotor that ensures the generation of electric current in the stator windings.
Current collection unit
In a brush generator, the structure of the current collection unit is as follows:
- the brushes slide along the commutator rings;
- they transmit direct current to the excitation winding.
Electrographite brushes wear out less than copper-graphite modifications, but a voltage drop is observed on the collector half-rings. To reduce electrochemical oxidation of rings, they can be made of stainless steel and brass.
Rice. 5 Generator current collection unit
Since the operation of the current collection unit is accompanied by intense friction, brushes and commutator rings wear out more often than other parts and are considered consumables. Therefore, they are quickly accessible for periodic replacement.
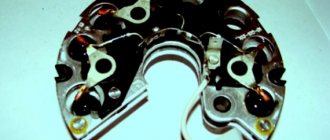
Rectifier
Since the stator of an electrical appliance generates alternating voltage, and the on-board network requires direct current, a rectifier is added to the design, to which the stator windings are connected. Depending on the characteristics of the generator, the rectifier unit has a different design:
- the diode bridge is soldered or pressed into horseshoe-shaped heat sink plates;
- The rectifier is assembled on a board, heat sinks with powerful fins are soldered to the diodes.
Rice. 6 Generator rectifier
Rice. 7 Diode bridge option with independent radiators
The main rectifier can be duplicated by an additional diode bridge:
- sealed compact unit;
- dida-pea or cylindrical shape;
- inclusion in the overall scheme by small buses.
The rectifier is the “weak link” of the generator, since any foreign body that conducts current, accidentally falling between the heat sinks of the diodes, automatically leads to a short circuit.
Voltage regulator
After the alternating amplitude is converted into direct current by the rectifier, the generator power is supplied to the voltage regulator relay for the following reasons:
- The internal combustion engine crankshaft rotates at different speeds depending on the type of driving, travel distance and vehicle driving cycle;
- therefore, a car generator by default is not physically capable of producing the same voltage at different periods of time;
- The regulator relay device is responsible for temperature compensation - it monitors the air temperature, and when it decreases, it increases the charging voltage and vice versa.
The standard temperature compensation value is 0.01 V/1 degree. Some generators have manual summer/winter switches that are located in the interior or under the hood of the car.
Rice. 8 Voltage regulator
There are voltage regulator relays in which the on-board network is connected to the generator excitation winding with a “–” wire or “+” cable. These designs are not interchangeable, they cannot be confused; most often, “negative” voltage regulators are installed in passenger cars.
Bearings
The front bearing is considered to be on the pulley side, its housing is pressed into the cover, and a sliding fit is used on the shaft. The rear bearing is located near the collector rings; on the contrary, it is mounted on the shaft with interference; a sliding fit is used in the housing.
In the latter case, roller bearings can be used; the front bearing is always a radial ball bearing with a one-time lubricant applied at the factory, which is enough for the entire service life.
Rice. 9 Generator bearing kit
The higher the generator power, the greater the load the bearing race experiences, and the more often both consumable parts need to be replaced.
Impeller
The friction parts inside the generator are cooled by forced air. To do this, one or two impellers are placed on the shaft, sucking air through special slots/holes in the product body.
Rice. 10 Generator impeller
There are three types of air-cooled car generators:
- if there is a brush/collector ring assembly and the rectifier and voltage regulator are moved out of the housing, these components are protected by a casing, so air intake holes are created in it (position a) of the lower circuit;
- if the arrangement of the mechanisms under the hood is dense, and the air surrounding them is too hot to properly cool the internal space of the generator, a specially designed protective casing is used (position b) in the lower figure;
- in small-sized generators, air intake slots are created in both housing covers (position c) in the bottom figure).
Rice. 11 Options for generator air cooling schemes
Overheating of the windings and bearings sharply reduces the performance of the generator, and can lead to jamming, short circuit and even fire.
Frame
Traditionally, for most electrical appliances, the generator housing has a protective function for all components located inside it. Unlike a car starter, the generator does not have a tensioner; the sagging of the transmission belt is adjusted by moving the housing of the generator itself. For this purpose, in addition to the mounting tabs, the body has an adjustment eye.
The body is made of aluminum alloy and consists of two covers:
- The stator and armature are hidden inside the front cover;
- Inside the back cover there is a rectifier and a voltage regulator relay.
Rice. 12 The generator housing consists of two covers
The correct operation of the generator depends on this part, since a rotor bearing is pressed inside one cover, and the belt is tensioned in the eye of the housing.
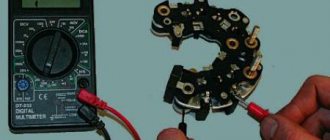
How to check a car alternator
Ideally, the generator should be checked on a stand, where it will be spun up to rated speed and loaded to maximum, with the power output in this mode checked.
But you can approximately check it without removing it from the car.
- A digital voltmeter (for example, as part of a multimeter) is connected to the output terminal of the generator.
- The engine starts. The voltmeter readings should increase to the nominal 14 - 14.5 volts. The exception will be the case when the battery is very discharged, then the voltage will increase gradually as it charges.
- The engine is brought to medium or high speed, and the car's headlights and other powerful consumers are turned on, the total demand not exceeding the full power of the generator. The voltage should remain stable, which means the generator is delivering its required power.
- The generator should not emit the characteristic howling sounds of worn bearings. If in doubt, simply remove the belt and turn the pulley by hand. The rotor must rotate absolutely smoothly, without vibrations or backlash.
The new generator is very reliable and the first problems may arise only after a run of 100-150 thousand kilometers. But often these devices last much longer, especially with intermediate replacement of the brush assembly.
Replacing the generator yourself
Typically, the VAZ 2106 generator must be replaced only in the most exceptional cases, and in case of most malfunctions it is simply repaired.
But if this device on your car has completely failed and cannot be repaired, then it is necessary to replace it.
To make this repair procedure as simple as possible, below is a list of necessary tools that will help make this operation easier:
- Keys for 17 and 19
- Heads for 10, 17 and 19
- Ratchet handles and knobs
- Extension with universal joint
The procedure for removing and installing the generator on a VAZ 2106
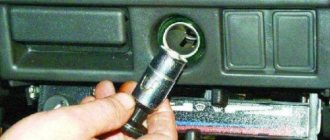
Before attempting this repair, disconnect the negative battery terminal. Then you need to disconnect all power wires from the generator itself. First you need to unscrew the terminal securing nut:
Now you can pull out all the other wires and plugs, just pull them to the side with a little effort:
Loosen and completely remove the alternator belt.
Then we tear off the upper mount of the generator with an ordinary open-end wrench 17, and after that we throw on the head with an extension and a cardan joint to unscrew this nut quickly and without unnecessary effort:
Next, you need to crawl under the car from below and tear off the nut with a spanner wrench and unscrew it completely using the ratchet handle:
After the nut is completely unscrewed, you need to knock the bolt out. To do this, you can use a wooden block, pointing it at the bolt and hitting it several times with a hammer. The photo shows it without a block, but keep in mind that the backing must be present so as not to damage the thread:
After which the bolt can be pulled out by hand. If it is difficult to move, you can resort to penetrating lubricant, spraying it a little in the right place.
Then you can remove the generator from below, as this is more convenient. If it doesn’t give in right away, you can turn it a little in the right direction so that nothing gets in the way when removing it. This is roughly what it looks like in practice, as shown in the photo below:
The price of a new generator for a VAZ 2106 varies from 2,500 rubles and above, it all depends on your wallet. The replacement process is not complicated and installation occurs in the reverse order of removal.
Source: https://vaz2106-remont.ru/zamena-generatora-svoimi-silami/