Functions performed
So, what is a generator for?
First of all, in order to provide all VAZ 2110 equipment that runs on electricity with energy. Perhaps someone thinks that this is the battery's task. Not really, because the battery is needed to maintain functionality when the engine is not running (it starts the engine, supports the alarm, music system while parked, etc.). But when the engine has already started, with the help of the battery, the generator comes into play. During the trip, it is he who supports the operation of all electronics, air conditioning, audio (or even video systems), and everything else that you have added to your VAZ 2110.
Another equally important function of the generator is charging the battery. This also happens when the engine is running. And if it weren’t for this device, the battery would not be able to cope with its tasks, and it would have to be charged all the time.
Considering that today on the VAZ 2110, in addition to the standard layout, many additional energy consumers are installed, it happens that the generator voltage is not enough. In this case, it makes sense to install a 120 amp generator.
Lada Priora - generator replacement
The Priora requires a powerful generator; the car has a lot of electronics and a weak installation cannot cope with it.
A generator labeled 5102.3771 is recommended for the Priora, providing a power of 80 A; on luxury versions with even more electronics, a 115 A device is installed. Then which generator is better to install on the Priora?
Car owners recommend a unit produced by KZATEtm Samara plant under number 9402.3701-14, producing 115 A.
There is no need to modify it during installation, you just need to find the connector, because there are differences from the standard one. You can use a plug from a VAZ-2108 from the limit switch for turning on the reversing lights, which costs only 20 rubles.
Next, you will have to make a little modification when connecting to the “B+” power terminal in order to fit it to the desired size.
The cost, of course, of domestic units is higher than that of Chinese or Bulgarian ones, sold for 2200 and 3000, respectively. For Russian ones they ask for about 4000. But if you need repairs with Russian-made components, you can easily find spare parts.
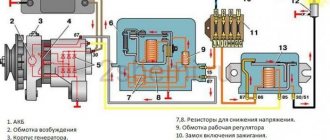
Electrical circuit of the VAZ 2110 generator
4d56 characteristics, repair and maintenance
Electrical circuit of the VAZ 2110 generator in the detailed figure below.
Basic elements of an electrical circuit.
- 1 – battery
- 2 – generator
- 3 – mounting block
- 4 – ignition switch
- 5 – battery charge indicator lamp, located in the instrument cluster
The “ten” generator is an alternating current unit, three-phase, with a built-in rectifier unit and an electronic voltage regulator. Over the years, generators of both domestic and foreign production were installed on the VAZ-2110, 2111 and 2112 family. Therefore, they may differ structurally.
Malfunction No. 5
When the ignition is turned on and the engine is running, the warning lamp indicating a low battery does not light up, the remaining lamps in the instrument cluster work:
- Burnt-out control lamp/poor contact – replace the burnt-out lamp/clean and press the contacts in the seat;
- Open circuit “generator output “D” to the instrument panel” - check for continuity of the brown wire with a white stripe coming from terminal “D” to the instrument panel;
- Oxidation of contact rings, as well as hanging and wear of brushes - the brush holder assembly with brushes should be replaced, the contact rings should be wiped with a clean cloth moistened with a degreaser;
- Open circuit “DF terminal – ground” (damage to voltage regulator) – replace the regulator;
- Broken brush holder wire from terminal “D+” - restore contact;
- The positive diodes (valves) have closed - replace the rectifier unit;
- The leads coming from the slip rings to the rotor excitation winding have been unsoldered - solder the leads in place/replace the rotor/replace the generator.
This is where the list of the main malfunctions of the VAZ 2110 generator ends, I hope that this instruction will help you out at the right moment. As they say - no nail, no wand)))
If you find an error, please select a piece of text and press Ctrl+Enter.
Generator VAZ 2110 | VAZ 2111 | VAZ 2112 - device, description, diagram
VAZ 2110 engines: characteristics, repairs, tuning
The vehicle is equipped with a three-phase alternating current generator with electromagnetic excitation, a diode rectifier unit and with a built-in voltage regulator, model 9402.3701 or similar. The maximum current is 80 or 90 A. The generator is driven by a poly V-belt from the crankshaft pulley. A generator is an electrical machine that converts the mechanical energy produced by the engine into electrical energy. When the rotor rotates, an alternating current is generated in the three stator windings of the generator, to convert it into direct current, a rectifier unit based on semiconductor diodes is built into the generator. The voltage generated by the generator depends on the rotor speed and the strength of the excitation current flowing through the rotor winding (excitation winding).
To regulate the current in the excitation winding, an automatic voltage regulator is built into the generator. It maintains a constant voltage in the vehicle's on-board electrical network within 13.2-14.7 V, regardless of engine crankshaft speed. With the simultaneous operation of powerful electricity consumers and low crankshaft rotation speed (idling), the voltage in the vehicle’s on-board network may be below the specified limit. At the same time, the battery stops charging, and if current consumption is high, it even begins to discharge. Weak tension in the generator drive belt causes it to slip along the pulleys, which does not allow the generator to develop the required power and leads to rapid wear of the belt. Indirect belt slippage
The generator can be identified by the dim glow of the headlights at night and by a whistling sound in the front of the engine when the crankshaft speed increases.
RECOMMENDATION If the battery charge indicator lamp on the instrument panel lights up, do not rush to immediately remove the generator for repair or replacement. First, check the serviceability of fuse F19, the supply of +12V voltage to the generator excitation winding when the ignition is turned on (connector D) and the tension of the generator drive belt. The serviceability of the generator can be checked without removing it from the engine.
See also: Generator - checking without removing it from the car
Electrical connection diagram of the generator on a VAZ 2110, VAZ 2111, VAZ 2112 car:
1 - battery; 2 - generator; 3 — mounting block; 4 — ignition switch; 5 - generator malfunction warning lamp in the instrument panel
Generator parts VAZ 2110, VAZ 2111, VAZ 2112:
1 — protective casing of the rectifier unit; 2 — screws for fastening the voltage regulator; 4 - rectifier block; 5 - capacitor; 6 — back cover; 7 - stator with windings; 8 - rotor; 9 — front cover; 10 — spacer sleeve; 11 - pulley; 12 — washer; 13 — spring washer; 14 — pulley fastening nut; 15 — front bearing; 16 — rear bearing; 17 — coupling bolts of covers; 18 — bolts (with insulating gaskets) for fastening the rectifier block and stator winding terminals; 19 — bolt (without insulating gasket) for fastening the rectifier block; 20 — capacitor mounting screw; 21 — fastening elements of the contact bolt; 22 — spacer sleeve; 23 — insulating sleeve; 24 - contact bolt
Useful tips for motorists
Device components
If the generator device is considered in terms of size, then there are compact and traditional ones. They also differ in their design features.
- drive pulley;
- excitation wire;
- bracket;
- anchor device.
They can be fastened with one bolt, or with several, and other “little things”. However, any generator has a general structure.
- The rotor (or armature) is the rotating part of the generator. The armature is designed to create a magnetic field using an excitation winding located on the shaft. The excitation wire is powered by slip rings located on the same shaft. The following are also located here: the excitation winding wire, the fan impellers (one or two), the drive pulley and the bearing assembly;
- The stator is the stationary part of the generator, consisting of three windings (three-phase), which create alternating current. These windings can be connected to each other by the so-called “star” or “delta”;
- The housing is most often made of lightweight non-magnetic aluminum alloy; it consists of two covers, secured with a bolt. The front cover is located in the same place as the drive pulley; the back cover is on the side where the slip rings are. Each bolt that connects the back and front covers is tightened. In the future, to disassemble the generator on a VAZ 2110, it is enough to remove the bolt mounts;
- Mounting the generator on a VAZ 2110. There is an upper mounting bracket that uses 2 bolts. The lower mounting bracket most often has one bolt, but there may be two, in which case minor modifications may be necessary. The bolt can be anything, the main thing is that the size is suitable, sometimes a sleeve is required for this. It is better not to redo the bracket itself. The bracket securely holds the generator, which has many responsibilities. And yet, we should not forget that the bracket, like the bolt, can break, so you need to monitor its condition;
- The structure of the brush assembly consists of two graphite brushes, springs that press them, and a brush holder;
- In modern Katek generators, the voltage wire and brush holder are located together in a non-separable unit. Therefore, if the voltage regulator fails, the entire assembly must be replaced. Structurally, this regulator can have a hybrid device - when radio elements with electronic devices are in the same circuit. But an integral is when the regulator is made in thin-film microelectronics technology. Many believe that the integral regulator copes better with its mission - controlling the duration and frequency of current pulses. The regulator changes the voltage used to charge the battery. At higher temperatures, less voltage goes to the battery. Although, in principle, it is not so important whether the integral is responsible for this regulation, or the hybrid;
- A rectifier unit with six diodes is responsible for converting the alternating current generated by the armature and stator into direct current, directly used by all on-board equipment. It also serves to charge the battery;
- The device is driven by a belt drive. It provides a significant increase in the speed at which the crankshaft rotates. In this case, the V-belt wears out faster if the pulley has a small diameter. If the driven pulley is small, it is better suited to a serpentine drive, which is more often used in modern generators.
VAZ 2110 no battery charging
VAZ-21310 niva: description, technical characteristics, reviews
If the battery on a VAZ 2110 is discharged and periodically reaches a completely sluggish charge level, then the problem often lies in problems with the on-board network.
Connection diagram for the generator and battery in a VAZ 2110 car. 5 – charge indicator lamp, 4 – ignition switch, 3 – mounting block, 2 – generator, 1 – battery. The “W” generator output is not used on the VAZ 2110.
In normal mode, the “tens” battery, having a capacity of 55 Ah, sufficiently replenishes its discharge with the current of the standard generator. During normal, coordinated operation, recharging the battery with a stationary device does not require several months; it retains a sufficient charge level - about 60-80%.
First you need to determine the cause of the discharge. This is either a current leak when the car is idle, or a malfunction of the on-board generator. Another option could be increased total consumption of all vehicle electronics. VAZ 2110s are very popular for tuning, remodeling, and installing homemade on-board computers or multimedia systems. It is the latter that can lead to the fact that the VAZ 2110 does not charge the battery, even with a working generator, due to the disproportionate power of the installed acoustics with the capabilities of the car.
If the car enthusiast knows for sure that no changes have been made to the electrical system, then first of all it is worth measuring the current output when the car is idle. Ideally, it should not exist at all, but often due to poor contact, short circuits, or poor-quality signaling, the battery charge can go literally overnight
If you are sure that the battery is not charging, but otherwise it is working normally, the closest attention should be paid to the generator
The simplest reason why the VAZ 2110 does not charge the battery is a loose alternator belt. If the belt slips, the generator does not reach the required speed and, therefore, does not produce the voltage necessary for charging.
If, after tensioning the belt, the situation has not changed, and the battery light is still on on the instrument panel, look at how the generator works.
Scheme for checking the functionality of the generator on the stand. 7 – battery, 6 – switch, 5 – ammeter, 4 – rheostat, 3 – test lamp 12 V, 3 W, 2 – voltmeter, 1 – generator.
He can be weird for several reasons. For example, the voltage regulator could fail. If it works as it should, the voltage will be below the threshold 13 V and the battery will not charge. The regulator must be replaced by first removing and disassembling the generator.
The problem may also lie in the generator rectifier unit (diode bridge). A diode in its normal state allows current to flow in only one direction, preventing reverse flow into the generator winding. If the diode fails, it begins to either pass current in both directions or not pass it at all. In the first case, at first the problem may not be noticed during operation, but over time the generator will begin to act up. In the second case, no current will flow from the generator at all, and the battery will naturally run out, and quite quickly.
Very often, a car enthusiast sees that the battery on a VAZ 2110 is discharged quickly, and decides to install a larger capacity battery. Sometimes a standard 55 Ah battery is replaced with a 70 Ah model, and the effect is felt - the charge lasts for several days. But this happens because a fully charged, capacious battery is installed, and after a few days it will still run out. But when the real problem is identified and the generator is repaired, such a capacious battery will still run out, since the VAZ 2110 generator is not designed for such a capacity and will not have time to charge it.
When should a generator be repaired?
If it stops supplying current and the voltage going to the battery drops (By the way, the voltage can be checked using a voltmeter, to do this it will be enough to start the car and connect the wires of this device to both terminals, if the device itself shows too low a voltage and while the car is running the volts will drop, then this indicates that the generator is faulty and needs to be replaced), then it must be replaced, in addition to this method, you can also check the generator like this: start the car and let it work for a while, then pull out the choke to about the middle and remove the minus terminal from The battery, if the car stalls, then the generator needs either repair or replacement (This operation cannot be performed on injection cars, and on a carburetor it is also not advisable, because the diode bridge can burn out, so carry out it at your own peril and risk and if everything after all, they threw it off and the car did not stall, immediately install the terminal in its place and tighten the nut that secures it), the last way to understand whether it needs repair or not is the battery charge lamp (by the way, it is indicated by an arrow in the photo below) , so if this lamp suddenly lights up while the engine is running, then again, there is a high probability that the generator is not producing current and needs to be repaired.
Note! As you already understood, the best way to check is with the help of a multi-meter that has a voltmeter function (And everyone has it), so if you still decide to check with it, then remember the current that should be on the battery when the engine is running equals approximately 13-14.5 volts, if it is less, then either the battery is completely discharged, or the generator has become unusable, in this case, try accelerating, to do this, briefly press the gas pedal and remove your foot from it, if the current supply increases, then the battery is discharged , if nothing happens, then try to do this again and remember, if the current is less than 12 volts, which is no longer acceptable, then in a very short time the battery will be completely discharged and you will no longer be able to start the car (To start the car, you need at least 11.5 volts , if the battery produces less, then starting the engine will be problematic)!
What to do if the voltage relay fails?
It happens that the relay fails at the most inopportune moment, when you still have a drive home and the battery is not charging. The battery capacity in economical mode can ensure fairly long engine operation, which will allow you to get to the repair site without any problems. Below we will provide a list of recommendations that will help you drive, as they call it, “on battery power” and not stall.
- If the battery is overcharged, the relay must be disconnected from the circuit. To do this, the contact wires are removed from it and left hanging. In the case of the “ten”, it is enough to unplug the plug with the wire from the generator brush connector. Thus, battery charging is turned off, and further movement will no longer harm the battery.
- Many experts suggest going the other way - turning off the generator excitation winding. To do this, remove the corresponding fuse. However, this can be done if you know where the fuse is located.
- If the battery is weakly charged, then there is practically no reason to panic. To get to your destination, you need to maintain high speeds in order to, at least a little, bring the voltage value to the nominal value. Before stopping the engine, it is recommended to maintain the speed at 3000 rpm for a few seconds using the gas pedal. This will prepare the battery for the next start.
- Avoid using music, power windows, headlights (especially high beams), and other electrical devices unless their use is absolutely necessary. This will save battery power well.
How does he work
First, let's figure out how this device functions. His work scheme is as follows:
- The key is inserted into the ignition switch;
- The current goes to the excitation wires;
- The magnetic field created by the armature passes through the stator windings, and voltage appears at its terminals;
- When the armature rotation frequency becomes high enough, the self-excitation mode begins;
- The rectifier unit provided by the car design converts alternating current into direct current;
- The voltage regulator starts working when the crankshaft rotation speed changes, and the time for which the excitation wire is activated is adjusted.
About the current-speed characteristic
TLC is the dependence of the current supplied by a car generator to the on-board network on the rotor speed at a constant voltage. This parameter is calculated when the device is operated together with a charged and serviceable battery with a rated capacity of at least 50% of the rated current of the generator. The characteristic is calculated in the heated and cold states of the equipment.
Main consumer characteristics
- Maximum current.
- The magnitude of the operating voltage.
- Rated power.
- Gear ratio.
- Efficiency
- Dimensions and weight.
The main operating parameters, type and brand are usually indicated on the device label.
Purpose of the voltage regulator relay on the VAZ 2106
As you know, the power supply system of the VAZ 2106 consists of two important elements: a battery and an alternator. A diode bridge is built into the generator, which motorists in the old fashioned way call a rectifier block. Its job is to convert alternating current into direct current. And to ensure that the voltage of this current is stable, does not depend on the rotation speed of the generator and does not “float” much, a device called a generator voltage relay regulator is used.
The internal voltage regulator of the VAZ 2106 is reliable and compact
This device provides constant voltage throughout the entire on-board network of the VAZ 2106. If there is no relay regulator, the voltage will deviate abruptly from the average value of 12 volts, and it can “float” in a very wide range - from 9 to 32 volts. And since all energy consumers on board the VAZ 2106 are designed to operate under a voltage of 12 volts, without proper regulation of the supply voltage they will simply burn out.
Design of the relay regulator
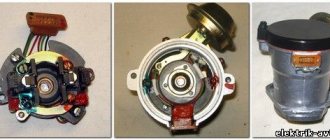
On the very first VAZ 2106, contact regulators were installed. It is almost impossible to see such a device today, since it is hopelessly outdated, and it has been replaced by an electronic regulator. But to get acquainted with this device, we will have to consider the contact external regulator, since its example reveals the design most fully.
The first external regulators of the VAZ 2106 were semiconductor and were implemented on a single board
So, the main element of such a regulator is a winding of brass wire (about 1200 turns) with a copper core inside. The resistance of this winding is constant and is 16 Ohms. In addition, the regulator design includes a system of tungsten contacts, an adjustment plate and a magnetic shunt. There is also a system of resistors, the connection method of which can change depending on the required voltage. The highest resistance these resistors can provide is 75 ohms. This entire system is housed in a rectangular PCB body with contact pads for connecting wiring brought out.
Operating principle of the relay regulator
When the driver starts the VAZ 2106 engine, not only the crankshaft in the engine begins to rotate, but also the rotor in the generator. If the rotation speed of the rotor and crankshaft does not exceed 2 thousand revolutions per minute, then the voltage at the generator outputs does not exceed 13 volts. The regulator does not turn on at this voltage, and the current goes directly to the excitation winding. But if the speed of rotation of the crankshaft and rotor increases, the regulator automatically turns on.
The relay regulator is connected to the generator brushes and to the ignition switch
The winding, which is connected to the generator brushes, instantly reacts to an increase in crankshaft speed and is magnetized. The core located in it is pulled inward, after which the contacts on some internal resistors are opened, and the contacts are closed on others. For example, when the engine is running at low speeds, only one resistor is used in the regulator. When the engine reaches maximum speed, three resistors are turned on, and the voltage on the excitation winding drops sharply.
Dismantling and repair
After you have succeeded in removing the device, you need to perform an inspection and find defective parts. It is better to carry out diagnostics at a service station in order to be sure which part needs to be removed and a new one installed. The work must be carried out in a garage with an inspection hole. Disassembly is performed as follows:
- The negative terminal must be disconnected from the battery;
- The next step is to remove the power plant mudguard. After this, access to the generator excitation wires will appear - they must be removed;
- Using a 10mm wrench, you need to unscrew the nut that secures the wires to the positive drive. Now both wires can be removed;
- Next you need to remove the belt. Having opened access to the device, unscrew the adjusting bolt and then pull the unit out of the top bracket;
- Now you can remove the tension bar. While holding the device, unscrew the lower fastening nut and remove the bolt;
- Disassembly is complete - the unit can be removed.
After performing troubleshooting, you can understand whether the VAZ 2110 generator needs to be replaced or not. In some cases, it will be enough to replace a few worn parts. When disassembling, you should have a diagram at hand. If you have no experience working with electrical appliances, it is better to contact a service center.
What's wrong with the belt
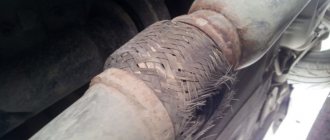
The VAZ-2110 generator belt serves as a drive for the rotor of the device. It transmits torque from the engine crankshaft to the armature pulley. The operation of the generator directly depends on its condition. An important point is belt tension. If it is loose, the pulley may slip. Because of this, the device will not be able to generate the current required parameters.
A sign of a loose belt is a characteristic “whistle”, which is more likely to occur in wet weather. The same symptoms indicate its wear and tear. Over-tensioning the belt distorts the rotor shaft. This contributes to accelerated wear of the device bearings.
The optimal belt tension is such that each of its fields in the middle between the pulleys can be shifted to the opposite side by a maximum of 15 mm.
Charging relay on a VAZ: purpose and symptoms of malfunction
So, the battery charge relay or the VAZ generator relay-regulator is responsible for ensuring that the car’s battery is charged “correctly” from the generator. In fact, a car alternator has a diode bridge (rectifier unit) to convert alternating current to direct current.
It is important that the voltage remains constant, regardless of the rotation speed of the generator, which changes. For this, a generator voltage regulator relay or charging relay 2106 is used separately.
This device is responsible for the constant voltage in the on-board network at around 12V.
Without a regulator, there will be voltage surges, “dips” and “rises” (for example, 9V - 30V). Of course, in this case, many energy consumers will simply burn out, and problems will begin with the battery charge and the battery itself.
If we talk about malfunctions, the regulator relay on a VAZ and other cars does not fail very often, but the possibility of such a breakdown cannot be ruled out. As a rule, failure is usually indicated by the fact that the battery stops charging, while the generator operates normally. However, this is not all, as there are other symptoms and signs of a broken voltage regulator.
Often, if the regulator is faulty, the voltage on the battery begins to deviate from the norm. As a result:
- the battery does not charge or does not charge completely (usually the reason is a broken regulator relay).
- the battery is boiling, which indicates a breakdown of the regulator relay and that the charging current to the battery is higher than normal, the battery is overcharged and is boiling.
At the same time, both the first and second cases are a problem, you won’t be able to operate the car normally, the battery quickly fails, etc. In fact, if the VAZ voltage regulator relay is faulty, checking allows you to quickly determine the cause.
Criteria for choosing car generators
- Maximum power . Power is one of the main characteristics of VAZ generators. It must ensure an uninterrupted supply of current and supply electricity to the battery, which is discharged due to the operation of regular electricity consumers at low speeds of the power unit. To perform basic tasks, the device must have the required power. The required indicator is indicated in the vehicle operating instructions.
- Current strength . The factory generator installed in the car is not designed for a large number of additional consumers, but at the same time it has a certain reserve. If the autogenerator is “not enough,” then before purchasing a new device, first inspect the old equipment, clean the contacts, check the bearings, etc. You shouldn't use 120A generators in every car. First of all, it's expensive. Secondly, the current may be excessive. Such power-generating devices are installed in tuned cars with a powerful acoustic system.
- Dimensions . Before purchasing, it is also worth comparing generators by overall dimensions. The device must be compact with high technical characteristics.
- Noise level . The generator should not make too much noise during operation. This “disease” often affects high-power generators that are sold at a low price. One of the main reasons for the appearance of extraneous sounds (hum) is the poor quality of bearings, which wear out quickly.
- Availability of guarantee . If there is a warranty, you can exchange a faulty device for a new one if it is defective.
What to choose?
The choice of motorists is not limited to Katek generators. Therefore, if the old device fails, you should think about who will take its place.
https://youtube.com/watch?v=PGLXZBe5c6M
There are several main options.
Katek. A standard, fairly reliable and very efficient generator. AvtoVAZ’s choice in its favor is due precisely to this. Plus it is a domestic manufacturer. Chinese products. The attitude of motorists towards Chinese generators is quite skeptical. There are explanations for this. Compared to them, Katek is simply an ideal solution. Although in fairness, we note that you can find some pretty good Chinese-assembled options. But this is the exception rather than the rule. Imported analogues
Here, first of all, you should pay attention to Bosch companies. Denso and Delphi
High build quality, impressive service life, efficient operation. They cost more than their Russian counterparts in the form of Katek, but for such a thing it makes sense to spend a little more.
Katek
Among imported devices, the following are considered good options:
- Dynamo - manufacturer Bulgaria;
- Eldix - also produced in Bulgaria;
- BATE - produced in the city of Borisov, in Belarus.
https://youtube.com/watch?v=oK5FpoIF6i8
When choosing a new generator for your car, pay attention to its technical characteristics and safety margin. Then think about the manufacturer
We do not recommend looking towards China if you are doing repairs for yourself and want to achieve high quality work.
https://youtube.com/watch?v=f6cOgEFu5fU
Loading …
Rotor and stator
The stator is the stationary part of the generator, consisting of a three-phase element. The winding of the device is designed to create alternating current. In turn, the rotor is designed to create a magnetic field. This is a rotating element that receives power from slip rings. The drive pulley, fan impeller, bearings and field winding wires are also located here.
When considering the generator on the VAZ 2110 injector, you cannot ignore the rectifier unit, the function of which is to transform alternating current into direct current. The block contains 6 diodes
The device provides battery charging
Another important part of the device is the belt drive. Its purpose is to increase speed depending on the degree of rotation of the crankshaft
In modern cars, a poly-V drive is installed. It is recommended to install it on the tens generator. The advantage of the belt is its high wear resistance
The block contains 6 diodes. The device provides battery charging
Another important part of the device is the belt drive. Its purpose is to increase speed depending on the degree of rotation of the crankshaft
In modern cars, a poly-V drive is installed. It is recommended to install it on the tens generator. The advantage of the belt is its high wear resistance.
Also in the VAZ-2110 car generator there are two important elements: a brush holder assembly and a brush assembly. The brush holder assembly is found in modern Katek devices.
Technical specifications
If the old generator fails, many motorists wonder which generator they should now replace the old one with.
There is no need to invent anything here. The most correct solution is to install the same generator as before, or a more powerful one.
Today, the VAZ 2110 provides for the use of three types of power supply devices:
- Katek 5102.3771. The generator produces 80 Ampere power and its voltage is approximately 14V.
- Katek 94.3701. This is a device with the same parameters. They are not seriously different.
- Catek 120 amp. A generator that is more adapted to modern realities, when in addition to standard electrical equipment, motorists install many additional devices.
If you have a powerful audio system in your car, you use an electric pump powered by the car, as well as a number of other additional consumers, it is recommended to install a 120-amp unit instead of a standard 80-amp generator.
If we take into account the size of the devices, then we can distinguish between ordinary and compact ones. They have a certain difference in design. To be specific, the differences are in the following components:
- Brackets;
- Anchor;
- Excitation wire;
- Drive pulley;
- Number of mounting bolts.
But in reality this does not play a special role. After all, the structure of all generators used for the VAZ 2110 is the same. Therefore, let's look at the circuit and structure of this unit.
He's an anchor. It is a rotating element of the generator, which creates a magnetic field due to the excitation winding located on the shaft. The field wire receives power from the slip rings. They are mounted on the same shaft. There was also room for a drive pulley, field winding wire, bearing assembly and fan impeller. There may be 1-2 last ones
This is a stationary three-phase element that includes three windings. They provide the creation of alternating current. The windings are connected to each other using a triangle or star
A lightweight non-magnetic aluminum alloy is most often used to make the generator housing. The body looks like a pair of covers connected by a bolt. The front cover is located near the drive pulley, and the rear cover is located on the side of the slip rings. Each connecting bolt must be tightened. To disassemble the housing, simply unscrew the mounting bolts.
The upper mounting bracket for the generator uses two bolts, while the lower bracket is predominantly mounted on one bolt. In some cases there are two. It is not recommended to modify the brackets, since the factory one performs important functions. The purpose of the brackets is to hold the generator. It is recommended to monitor the condition of the brackets as they are subject to wear and breakage
It consists of a pair of graphite brushes, springs that press the brushes, as well as a brush holder
Brush holder assembly and voltage wires
This design is typical for modern Katek generators. Therefore, if the regulator fails, you will have to replace the entire assembly
Equipped with 6 diodes, it is responsible for converting alternating current into direct current. It is direct current that is required for the operation of all auto equipment. This element charges the battery, among other functions.
The belt drive allows you to increase the speed at which the crankshaft rotates. If the pulley has a small diameter, then the V-belt will wear out faster. Therefore, for small driven pulleys it is recommended to use a poly-V-ribbed drive. It is most often found in modern generators
The presented device is relevant for all generators used on the VAZ 2110, regardless of their power - 80-120 Amperes.
Margin of safety
If we take into account the standard Katek generator, which is installed on domestic dozens, then its resource is enough for about 10 years of operation or 140 thousand kilometers.
Many people fear that a powerful 120 A generator can negatively affect the condition of the battery. In practice, nothing like this happens. Moreover, installing a more powerful unit is recommended if you plan to install an impressive audio system or video equipment on the car.
Generator system diagram
Visual diagram of generator circuit connections
1 – battery; 2 – generator; 3 – mounting block; 4 – ignition switch; 5 – battery charge indicator lamp, located in the instrument cluster
- The “minus” of the battery should always be connected to ground, and the “plus” should always be connected to the “B+” terminal of the generator. Failure to turn the battery back on will immediately cause increased current through the generator valves and they will fail.
- It is not allowed to operate the generator with the battery disconnected. This will cause short-term overvoltages to occur at the “B+” terminal of the generator, which can damage the generator voltage regulator and electronic devices in the vehicle’s on-board network.
- It is prohibited to check the functionality of the generator “for spark” even by briefly connecting the “B+” terminal of the generator to “ground”. In this case, a significant current flows through the valves, and they fail. The generator can only be checked using an ammeter and voltmeter.
- The generator valves are not allowed to be checked with a voltage of more than 12 V or with a megger, since it has a voltage too high for the valves and they will be broken during testing (a short circuit will occur).
- It is prohibited to check the vehicle's electrical wiring with a megger or a lamp powered by a voltage of more than 12 V. If such a check is necessary, you must first disconnect the wires from the generator.
- The insulation resistance of the generator stator winding with increased voltage should be checked only on a stand and always with the terminals of the phase windings disconnected from the valves.
- When electrically welding components and parts of the car body, you should disconnect the wires from all terminals of the generator and battery.
Generator type 94.3701 – alternating current, three-phase, with built-in rectifier unit and electronic voltage regulator, right rotation (drive side).
An AAK-5102 generator made in Slovenia can be installed on some vehicles. In terms of its characteristics and installation dimensions, this generator is interchangeable with the 94.3701 generator, but has some differences in the design of components and parts. This chapter describes the 94.3701 generator.
The stator and covers 10 and 11 (Fig. Generator 94.3701) are tightened with four screws. The rotor shaft 19 rotates in bearings 20 and 25, which are installed in the covers. Power is supplied to the rotor winding (excitation winding) through brushes and slip rings 27.
The three-phase alternating current induced in the stator winding is converted into direct current by a rectifier unit attached to the cover 10. The electronic voltage regulator 8 is combined into one unit with a brush holder and is also attached to the cover 10.
The generator connection diagram is shown in Fig. Generator system connection diagram. The voltage to excite the generator when the ignition is turned on is supplied to terminal “D+” of the regulator (terminal “D” of the generator) through indicator lamp 5 located in the instrument cluster. When the ignition is turned on, the lamp should be on, and after starting the engine, it should go out if the generator is working. A brightly burning lamp or glowing at full intensity indicates a malfunction.
After starting the engine, the excitation winding is powered by three additional diodes installed on the generator rectifier block.
The “W” output of the generator is not used on vehicles of the VAZ-2110 family.
Technical characteristics of generator type 94.3701:
— maximum output current at 13 V and 6000 rpm, A: 80 — regulated voltage limits, V: 13.2–14.7 — motor-generator gear ratio: 1:2.4 — capacitor capacity, μF: 2 .2±20%
The generator is the basis for the functioning of the entire car. It can be compared to the human heart, since the generator is responsible for transporting electricity through all systems and components that depend on electricity. Mechanical energy is converted into electricity.
Like any other element of the machine, the VAZ 2110 generator has its own characteristics, functions, and operating principle. Today we will get to know him in as much detail as possible.
Appearance of the device
Design, principle of operation and possible breakdowns of the generator
The very first generators, which were once installed on cars, were created according to the collector principle. They were a simplified design, but were unreliable, short-lived and could not ensure uninterrupted operation. Therefore, for many years, designers puzzled over how to create a more complex type of device, the operation of which would not have such numerous flaws.
This is how selenium nodes appeared, and after them more advanced silicon nodes. This design ensured synchronous current supply; in addition, it turned out to be more compact, economical in materials costs and durable. The generator for VAZ is presented in a synchronous three-phase version. The presented device has the following design. The body is made of duralumin or other light alloy metals, which can significantly reduce the weight of the part.
Generator structure: 1 – casing; 2 – output “B+” for connecting consumers; 3 – noise suppression capacitor 2.2 μF; 4 – common terminal of additional diodes (connected to the “D+” terminal of the voltage regulator); 5 – holder of positive diodes of the rectifier unit; 6 – holder of negative diodes of the rectifier unit; 7 – stator winding terminals; 8 – voltage regulator; 9 – brush holder; 10 – back cover; 11 – front cover; 12 – stator core; 13 – stator winding; 14 – spacer ring; 15 – washer; 16 – conical washer; 17 – pulley; 18 – nut; 19 – rotor shaft; 20 – front rotor shaft bearing; 21 – beak-shaped pole pieces of the rotor; 22 – rotor winding; 23 – bushing; 24 – tension screw; 25 – rear rotor bearing; 26 – bearing sleeve; 27 – slip rings; 28 – negative diode; 29 – positive diode; 30 – additional diode; 31 – pin “D” (common pin of additional diodes)
To ensure that the system does not overheat, there are special holes in the body of the VAZ generator, through which the system is cooled, which is especially important during intensive operation of the unit. The main role here is played by bearings and rotor. The brush assembly is also a critical part; it transmits the voltage force throughout the system.
If even one part fails, the entire assembly loses its functionality. Before you begin repairing the VAZ 2110 generator, you should understand by what symptoms you can determine that the unit is faulty. There are many of these symptoms, but the main ones are:
- the node produces low voltage;
- the node loses the ability to charge or, conversely, is recharged from time to time;
- the unit, despite charging in normal mode, does not transmit an impulse to the dashboard, or the controller light flashes alternately;
- noise appears when the unit operates.
Now, having made sure that the breakdown is obvious, we repair the VAZ generator. If, after disassembling the device, you notice that the contacts, brushes or relays are deformed, then you just need to replace the defective parts.
It also happens that the chain breaks, then you have to tinker longer. You will need to purchase a new winding and arm yourself with a soldering iron. The work is painstaking and intricate, requiring attention and accuracy. But generator repair only consists of eliminating damaged areas, which can be done independently.
A car generator is a mandatory element of the on-board network of any modern car, regardless of the type of engine and the fuel it consumes. It is he who provides energy to all systems and mechanisms that consume electric current.
Generator system diagram
Visual diagram of generator circuit connections
1 – battery; 2 – generator; 3 – mounting block; 4 – ignition switch; 5 – battery charge indicator lamp, located in the instrument cluster
- The “minus” of the battery should always be connected to ground, and the “plus” should always be connected to the “B+” terminal of the generator. Failure to turn the battery back on will immediately cause increased current through the generator valves and they will fail.
- It is not allowed to operate the generator with the battery disconnected. This will cause short-term overvoltages to occur at the “B+” terminal of the generator, which can damage the generator voltage regulator and electronic devices in the vehicle’s on-board network.
- It is prohibited to check the functionality of the generator “for spark” even by briefly connecting the “B+” terminal of the generator to “ground”. In this case, a significant current flows through the valves, and they fail. The generator can only be checked using an ammeter and voltmeter.
- The generator valves are not allowed to be checked with a voltage of more than 12 V or with a megger, since it has a voltage too high for the valves and they will be broken during testing (a short circuit will occur).
- It is prohibited to check the vehicle's electrical wiring with a megger or a lamp powered by a voltage of more than 12 V. If such a check is necessary, you must first disconnect the wires from the generator.
- The insulation resistance of the generator stator winding with increased voltage should be checked only on a stand and always with the terminals of the phase windings disconnected from the valves.
- When electrically welding components and parts of the car body, you should disconnect the wires from all terminals of the generator and battery.
Generator type 94.3701 – alternating current, three-phase, with built-in rectifier unit and electronic voltage regulator, right rotation (drive side).
An AAK-5102 generator made in Slovenia can be installed on some vehicles. In terms of its characteristics and installation dimensions, this generator is interchangeable with the 94.3701 generator, but has some differences in the design of components and parts. This chapter describes the 94.3701 generator.
The stator and covers 10 and 11 (Fig.) are tightened with four screws. The rotor shaft 19 rotates in bearings 20 and 25, which are installed in the covers. Power is supplied to the rotor winding (excitation winding) through brushes and slip rings 27.
The three-phase alternating current induced in the stator winding is converted into direct current by a rectifier unit attached to the cover 10. The electronic voltage regulator 8 is combined into one unit with a brush holder and is also attached to the cover 10.
The generator connection diagram is shown in Fig. . The voltage to excite the generator when the ignition is turned on is supplied to terminal “D+” of the regulator (terminal “D” of the generator) through indicator lamp 5 located in the instrument cluster. When the ignition is turned on, the lamp should be on, and after starting the engine, it should go out if the generator is working. A brightly burning lamp or glowing at full intensity indicates a malfunction.
After starting the engine, the excitation winding is powered by three additional diodes installed on the generator rectifier block.
The “W” output of the generator is not used on vehicles of the VAZ-2110 family.
Technical characteristics of generator type 94.3701:
— maximum output current at 13 V and 6000 rpm, A: 80 — regulated voltage limits, V: 13.2–14.7 — motor-generator gear ratio: 1:2.4 — capacitor capacity, μF: 2 .2±20%
Diagnostics
Due to the fact that the price of a new generator is “biting”, and maintainability is quite high, many motorists do it themselves with their own hands to eliminate generator malfunctions in the VAZ 2110, which I suggest you do with the help of these instructions:
Fault No. 1
In the case when the control light on the instrument panel indicates a discharge of the battery, and when checking with a tester in the electrical circuit of the car, the voltage does not rise above 13.2 volts, it is necessary to check:
Checking the voltage in the on-board network
- Tension of the VAZ generator drive belt - tighten if necessary;
- If the rectifier block valve is damaged, replace the entire rectifier block;
- Diodes powering the exciting winding of the rotor - replacement of diodes or the entire rectifier block;
- The outputs of the exciting winding coming from the slip rings for their unsoldering - solder the outputs/replace the rotor or the entire generator assembly.
It is also possible that the stator winding may short-circuit, break or short circuit to ground (in this case, noise from the generator appears in the VAZ 2110, the generator “howls”). These assumptions are checked using an ohmmeter; if a malfunction is detected, the stator or the entire generator must be replaced.
Malfunction No. 2
The warning lamp in the instrument panel also indicates that the battery is low, and the tester displays a voltage value in the vehicle circuit of at least 14.7 volts:
- The voltage regulator has definitely failed (the contacts of the “DF” output have closed with ground) - replace the regulator.
Malfunction No. 3
The generator noise is clearly audible in the VAZ 2110:
- If sounds such as howling and squealing are heard. When disconnected, the wires remain, and when the drive belt is removed, they disappear, this means that the bearings have failed - replace the bearings (the front one is replaced as an assembly with a cover);
- If, when the wires are disconnected, the noise disappears, this indicates a short circuit in the stator windings and their connection to ground—replace the stator/generator.
Also in this case, one of the valves may close, which threatens to replace the rectifier unit.
Malfunction No. 4
The warning lights in the instrument panel do not light up when turning the ignition key:
- Checking the “F19” fuse in the mounting block - replacement (it is advisable to find out the reason for the fuse failure);
- Open circuit in the instrument cluster “ignition switch” - check the integrity of the blue wire with a red stripe running from the mounting block to the ignition switch, as well as the orange wire running from the instrument panel to the mounting block;
- Malfunction of the ignition switch contact group - check the presence of a contact with a tester, if necessary, replace the contact group or the entire ignition switch.
How to remove and replace the generator - step-by-step instructions
Owners of the Russian automobile industry often encounter problems with the operation of the generator. And what can we say about old cars, when on new cars it often fails. So, in this article we will look at how to remove the generator on VAZ 2110-2112 cars.
It is better to do the work in a viewing hole.
- The first thing to do is to disconnect the negative terminal of the battery so as not to short-circuit anything.
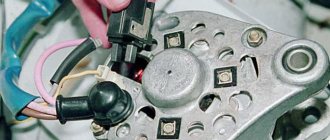
Next, you need to remove the engine splash guard (read about how to remove it here) Disconnect the generator excitation wire, as shown in the figure
Take a 10mm wrench and unscrew the nut securing the wires to the positive drive of the generator and remove both wires
After this, you need to remove the alternator belt (read here how to remove the alternator belt)
Next, take a 10mm spanner and unscrew the alternator adjusting bolt, then remove it from the top bracket.
Removing the tension bar
Take a 13mm wrench and unscrew the nut of the lower mounting of the generator and remove the bolt (as shown in the pictures), holding the generator
After this you can remove the generator itself
Install and replace the generator in the reverse order.
Principle of operation
In order for the generator to supply current to the load, the field winding must be energized. This, in fact, happens when we turn on the ignition. Next, the crankshaft of a running engine causes the armature to rotate. At this time, electricity begins to be generated in the stator winding, which is sent to the on-board network.
In VAZ-2110 cars, the generator produces alternating current, and all consumers are designed for direct current. To convert it, a rectifying diode unit is used.
But that's not all. The fact is that the voltage produced by the generator constantly changes depending on the number of crankshaft revolutions. To stabilize it, a voltage regulator relay is used.
As a result, at the terminals of the device we have a constant electric current of stable voltage.
Device
Before you look for alternator faults in your VAZ 2110, you need to know that the fundamental design and principle of its operation are the same for all types of cars. They can differ only in dimensions, workmanship and location of mounting fasteners. Therefore, to broaden your horizons, you can listen to the advice of owners of all brands of cars, since some generator spare parts are interchangeable.
The photo highlights the main components of the generator:
- Alternator belt pulley (I hope there is no need to explain its purpose);
- A housing consisting of a front half located on the pulley side and a rear half, which is installed on the slip ring side. In addition, in the rear part of the case there is a brush assembly, a rectifier, a voltage regulator, as well as electrical wiring leads for connecting to the vehicle's electrical circuit.
The stator is installed in the housing, and the rotor support bearings are placed; it also has fastenings for installing the generator on the car engine.
- A rotor with excitation windings, the terminals of which are connected to cylindrical slip rings made of copper;
- The heart of the generator is the stator. It is in the grooves between its steel sheets where the three-phase winding is located and the electric current necessary for the car is generated;
- Assembly of rectifier diodes (no comments);
- A voltage regulator is necessary to maintain the voltage in the vehicle's electrical circuit within the specified parameters during changes in loads, generator speed and ambient temperature;
- Brush assembly, where there are spring-loaded brushes in contact with the rotor slip rings;
- Plastic cover protecting the diode module.
Location, dismantling of the VAZ 2110 generator
The unit is located under the hood at the bottom right, at a level below the right headlight, opposite the passenger seat. Dismantling work does not cause any particular difficulties. The device is planted deep in the engine compartment. It is more convenient to remove it downwards.
Location of the VAZ 2110 generator
There are two options:
- work by placing the car on a viewing hole,
- use a jack.
The third option is that the fault occurred on the road. There is a spare generator; there is nothing to lift the car with. Repairs are carried out for a long time, by touch, blindly.
Step-by-step instruction:
- Set the car to the handbrake.
- Raise the front right side with a jack.
- Loosen the fastening, remove the negative terminal of the battery.
- Pull off the rubber protective cap, unscrew it with an M10 wrench, remove the nut and washer from terminal B+. An open-end wrench will do. A ratchet wrench or head will speed up and simplify the process. - Disconnect the wire with the connector.
- Unscrew and remove the alternator belt tension adjusting bolt.
- Reduce the belt tension and move the generator closer to the engine.
- Unscrew the nuts of the upper and lower mounting bolts. Remove the bushing.
- Knock out the bottom bolt, remove the top one with the bar.
- Holding the generator with one hand, remove the belt from the pulley with the other, release it, and remove the device.
- A working device is installed in the reverse order. Check the reliability of the contacts, avoiding sparking.
- Adjust the belt tension: a whistle indicates a weak tension, a humming noise from the generator bearing indicates an excessive tension.
Bearings
A faulty bearing in a VAZ-2110 generator is easy to recognize by the sound it makes. Usually it hums or rustles. This sound is a clear sign of wear on the device.
The front bearing of the VAZ-2110 generator is pressed into the “seat” of the cover. It is impossible to remove it from there, since it is rolled up. It changes along with the front cover. The rear bearing is packed onto the armature shaft and supported by a cover. Its replacement is possible if you have a special puller.