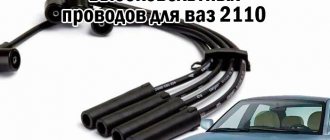
An article about existing modifications of VAZ radiator pipes and hoses used on Lada cars...
Greetings, readers to the blog RtiIvaz.ru. The article examines all existing VAZ radiator pipes, heater hoses, and filling cooling systems used in Lada cars ever produced by the plant.
In any modern car that has a liquid cooling system, all kinds of pipes are used to connect the elements of the system. When operating a car, special attention should be paid to them, since if not noticed in time, a defect that appears can lead to serious consequences for the engine of your car.
From my many years of experience, I can conclude that attention should be paid not only to the pipes themselves, but also to the clamps that serve as a guarantor of the connection. There are cases when a clamp that is not tightened or has come loose ultimately leads to a major overhaul of the engine.
To make it easier for you to navigate the vast “sea” of today’s spare parts, I offer you this review article, which shows everything in detail. For a more complete overview, all presented materials have design numbers and visual photographs.
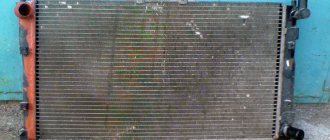
We start the review with classic models and present the radiator pipes of the VAZ 2101-2105 cooling system, used with a copper radiator, which have a number of advantages over the aluminum radiators used today, namely: the possibility of subsequent repairs, higher heat capacity, longer service life.
The pipes for Lada 2101-2105 cars are presented in the amount of 4 pieces. The upper supply pipe (on the right in the photograph, see further at the end of the article) has a design number: VAZ 2105-1303025 1-one; outlet sleeve (left) 2101-1303010 1-one; thermostat bypass pipe (corner in the middle) 2101-1303090 1-one also coupling connecting the thermostat and water pump (short in the middle) 2105-1303092 1-one piece.
The pipes of the copper radiator of the VAZ differ from the aluminum ones in their size; they have lower “discharge” hoses that are different in shape.
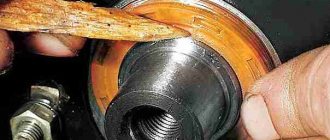
I advise you to pay special attention to the lower outlet pipe during installation. The lower fastening clamp is made technologically in a very inaccessible place and it is very difficult to make a high-quality tightening, which very often causes leakage. In this case, I advise you to completely remove the radiator and assemble the unit separately.
Removal takes no more than 10-15 minutes and will guarantee a reliable tightening. In this case, assemble all the pipes together with the thermostat in place except the upper one and install it in this form on the car. Since they are made of rubber and bend easily, installing the assembled unit is not difficult.
Next, we will consider a set of aluminum radiator pipes for the VAZ classic 2101-2107, also consisting of 4 hoses. The longest one on the far right in the photo is the top one (inlet), with a small angle of inclination the bottom one (outlet), the smallest one (the short one) goes to the thermostat, with an angle of ninety degrees (corner) the one on the far left in the photo goes to the pump.
Design numbers: VAZ 2105—1303025-10 (aluminum upper inlet pipe) 1 piece. 2105-1303010-10 (aluminum bottom outlet pipe) 1 piece. 2105-1303092 (coupling for connecting thermostat and water pump) 1 piece. 2101-1303090 thermostat bypass pipe (angle) 1 piece.
Next comes a set of radiator pipes for VAZ front-wheel drive models and we begin the review from the most common of them, Lada 2109, to the main radiator of the carburetor engine cooling system.
The set of pipes consists of four pieces: the upper inlet (wave) in the middle, see photos, the bottom outlet on the left, see photo, also two short ones (short ones), located on the right, see photos, connecting pipes for the thermostat and the water pump.
Design numbers of the upper supply pipes 2108-1303025 1-one; lower outlet 2108-1303010 1-one; connecting couplings for thermostat and water pump 2108-1303092 2 pieces. The pipes of a carburetor engine differ from the pipes of an injection engine and will be considered separately.
The Lada 2110 car has an injection engine. The set consists of four hoses, and have the following design numbers: upper radiator inlet pipe (in the middle of the photo) VAZ-2110-130302525 1-one and lower radiator outlet pipe (from the left in the photo) 2110-130302510 1-one, and two short thermostat and water pump couplings (on the right in the photo) 2110-1303092 2 pieces.
The upper inlet brings cooled liquid to the radiator at the top, and the lower outlet takes the heated coolant to the bottom of the radiator engine, as happens on most Lada cars.
The VAZ -2115 radiator kit includes three pipes. Design number of the supply pipe (on the left in the photo); 21082-1303025 1-one, outlet (in the middle of the photo) 21082-1303010 1-one, connecting pipes for the thermostat and water pump (on the right in the photo) 2109-1303093-01 1-one.
The smallest representative of the VAZ Oka family - 1111 has not been forgotten. The set of small car pipes consists of four hoses: design numbers of the outlet (from the left in the photo) 1111-1303010 1-one; supply (in the middle of the photo) 1111-1303090 1-one; coupling (short) 1111-1303092 1 piece; 2101-1303090 thermostat bypass pipe (angle) one.
And we complete the selection by showing the radiator cooling system pipes for modern classics equipped with an injector. Equipment: VAZ-21073 injection engine.
The upper supply hose (on the left in the photo) has design number VAZ-21073-1303025 1-one; lower outlet pipe 2105-1303010-10 1-one; 2101-1303090 thermostat bypass pipe (angle) one and 2105-1303092 coupling connecting thermostat also water pump 1 piece.
Additionally presented at the end of the article are the filler necks of the VAZ 2110 tank, which is compatible with the entire family of tens, and is slightly different in size from the tank neck of the Lada 2108, we are mutually interchangeable and then we see a picture of the long tank neck of the car 21099 of the family of nines and fourteens.
Preparation
It is necessary to remove the pipes only when the car engine has completely cooled down. Therefore, if you have just stopped by your garage for procedures, do not rush. It is better to leave the car overnight and return to work tomorrow morning.
- Make sure that the pipes are actually damaged and need to be replaced.
- Be sure to drain the coolant from the system. If you recently changed it, there is no need to dispose of the liquid. Just use a clean container to drain so you can refill it later.
- The order in which you perform the work depends on what hoses are used on your vehicle.
Standard pipes with union connector
If such hoses are present, dismantling them is carried out as follows:
- Elements of this type are usually mounted using clamps. Just check what kind of clamps they are - disposable twist type or standard worm clamps. If they are disposable, we highly recommend replacing them with worm driven items. They are more practical and reliable;
- Armed with a screwdriver, loosen the clamp slightly and move it along the pipe. This way you can completely release the fitting;
- The hose is carefully, without unnecessary or sudden movements, removed from the receiver, that is, the fitting. Quite new pipes that have not yet worn out are easy to remove, but old ones can “stick”;
- If the element does not want to be removed just like that, twist it on the receiver, pry it with some sharp object, and pull it. You just can’t put in a lot of effort, because the pipes are very fragile. If the situation is really sad, just cut the hose with a knife. It is simpler, easier, although it will require large financial costs;
- When installing new hoses, clamps are first put on and then pulled onto the cooling system receivers;
- If you previously used a twist-type clamp, be sure to remove it. As an alternative, both a screw clamp and a worm clamp are suitable. There is no big difference in price, but the level of reliability is significantly higher;
- If you have difficulty fitting the elastic pipe onto the fitting, slightly wet the latter with soapy water. Another option is to warm the ends of the hoses in warm water;
- To facilitate installation, never use lubricants containing oils;
- Pull the ends of the hoses onto the fitting, check the correct installation and laying in the engine compartment;
- Now move the clamp to the required position and tighten, thereby ensuring a strong fastening of the new element of the cooling system;
- Follow the procedure to fill the system with coolant;
- Turn on the power unit and watch for signs of coolant leakage. It is quite possible that the clamp was not tensioned tightly enough, or there is a defect on the pipe itself. Although such things should be checked before purchasing.
Heater heat exchanger hoses
The other hoses in the VAZ 2110 cooling system are those connected to the heat exchanger of the heater.
, the O-rings must be replaced . Therefore, we advise you to purchase them in advance. The dismantling procedure itself is as follows.
- Two heater hoses are connected to the heat exchanger using a single connector. Some modifications of the VAZ 2110 may require dismantling the camshaft cover.
- Remove the metal clip that is located on top of the connector.
- Push the plastic tab towards the left side of the connector to release it.
- Remove the heat exchanger connector, remove the old O-rings. It is strongly not recommended to return the same ones to their place.
- An alternative to such connectors can be hoses with a spring clamp made of metal.
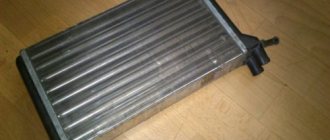
Dismantling the heating radiator VAZ 2107
To do the job you need a Phillips screwdriver and a set of wrenches (open-end and socket).
- loosen the heater hose clamps located in the engine compartment;
- remove the hoses from the heater radiator pipes (this may result in a slight leak of antifreeze);
- unscrew the screws securing the rubber seal;
- remove the seal;
- unscrew the radio panel;
- disconnect the cable from the tap of the VAZ 2107 stove;
- Using a screwdriver, remove the brackets on the fan casing;
- lower the casing down;
- remove the heater radiator.
Replacement
Now all that remains is to install a new set of pipes and complete the job. For this:
- Carry out installation by following the reverse sequence of disassembly and dismantling;
- Be sure to put new O-rings in place;
- Fill the cooling system with coolant;
- Start the engine and make sure there are no coolant leaks.
If you cannot or do not want to deal with such issues yourself, contact a good car service center, where they can quickly and efficiently bring your cooling system to normal condition.
To maintain the desired temperature inside the VAZ 2110 car, there is a device called a heater or stove. The automatic control system allows you to adjust the temperature with an accuracy of two degrees. On a VAZ 2110, the stove in which the pipes can fail can fail.
Replacing a hose on a VAZ 2110 stove in different ways
As a rule, any car has a heater or, in other words, a stove. The role of such a device is important; the stove ensures the required temperature inside the cabin. With the help of an automated control system, it becomes possible to regulate the temperature with high accuracy. Of course, no one is immune from a breakdown of the stove on a VAZ 2110, so to reduce the risk of such a situation occurring, you need to check the outlet and inlet hoses more often. Replacing a hose on a VAZ 2110 stove is an important process. And in this article we will talk about how to replace the VAZ 2110 stove hose.
Pipes in the heating system of VAZ 2110
Any car that has liquid in its heating system uses all kinds of pipes to connect all the elements. When operating a VAZ 2110 car, they need to be given special attention. If the defect that appears is not corrected in time and the pipes on the VAZ 2110 stove are not replaced, this can lead to problems with the car’s engine. Attention must be paid not only to them, but also to the clamps that ensure a tight connection. A loose clamp or not tightened in time can lead to unexpected engine overhauls.
Required parts for repair
The photo shows a set of pipes:
- lower pipe for draining fluid from the radiator;
- upper inlet pipe;
- shorts of the water pump and thermostat couplings.
The upper inlet pipe supplies heated fluid to the radiator, and the lower outlet pipe removes cooled engine fluid from the radiator. If leaks are detected from the pipes, it is necessary to urgently replace these elements on the VAZ 2110.
Rules for repair and modification of the “six” heating
Cleaning or replacing the faucet and/or radiators usually improves the performance of the heating system, but another option is also possible.
| Action | Works | Subtleties |
| More often, owners of “sixes” and mechanical specialists tend to completely remove the heating valve, replacing it with a curved pipe. | Its output is fixed in the engine compartment, and a hose is connected to a pipe in the cylinder head. This allows you to avoid regular leaks or blockages of the faucet and interruptions in the operation of the stove due to a more uniform circulation of antifreeze. | The disadvantage of this modification is problems with regulating the heat supply, which makes it difficult to achieve a uniform temperature (and the windshield can “fog up” in winter). This is solved either when one hose is closed (disconnected) in the summer or when a ball valve (ordinary, water supply) is installed at the same time as the tube. |
| The next step is to replace or clean the heater core. | This part must be cleaned regularly: its plates inside become clogged with dirt and help reduce heat transfer by a third. You can clean clogged plates with water pressure, but it is safer to “soak” them in special pipe cleaners (such as “Mole”), and only then wash them with water pressure. For this procedure, the pipes are disconnected, and hoses for flushing are attached to the inlet and outlet. | The water supply is carried out in reverse to better wash away the dirt. |
| Building a fan into the pipe will help to increase the flow of warm air mixture from the left deflector. | It will help disperse the heat supplied by the stove and increase the heating of the interior. A regular fan for cooling a computer processor (cooler) is quite suitable for this purpose. The optimal size is 50 mm; a larger one will not fit into the pipe. A place for the cooler is cut out in the plastic, sealing the holes with plastic and silicone sealant. | If necessary, adjust the blades of the pipe. After completion, the pipe is mounted and connected to the network. |
Work order
Every slave must have its own consistency. Then it can be done efficiently.
- The wire from "-" is disconnected from the battery.
- The coolant is drained.
Tip: Before draining the coolant, you must allow the engine to cool, otherwise the temperature of the drained liquid will be high.
- The lining, frame trim on the windshield, and sound insulation upholstery are removed.
- The heater fan is removed.
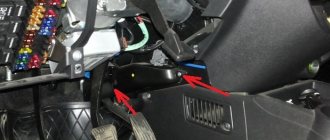
- The vacuum hose clamp is disconnected from the stove body.
- Using a screwdriver, remove the three spring clips that secure the front housing of the heater air collector.
- Remove the screws securing the front housing.
- The front housing is removed.
- The tightening of the clamps is loosened and the hoses are disconnected from the fittings.
Installation of new pipes
When replacing the stove pipes on a VAZ 2110, it is better to replace the clamps connecting all the elements. So:
- Replacement in progress. New pipes have been installed on the VAZ 2110 stove for supplying coolant and draining it from the radiator.
- The remaining parts and assemblies are installed in the reverse order.
- Coolant is poured into the cooling system and the tightness of the pipes and all connections is checked, if necessary they are tightened.
Replacing a tee or outlet hose of a VAZ 2110 heater radiator
Attention: There are cases when coolant leaks at the junction of the tee with the heater, expansion tank and engine cooling pump.
The structure and operating principle of the VAZ 2106 heating system
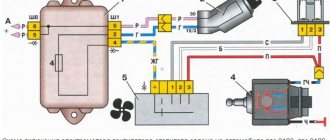
The classic structure of the interior stove of the VAZ “Six” is as follows. Through the supply from the head cylinder block, its discharge set (consists of an electric motor, a fan and its impeller) and a heating unit (radiator plus control valve) are connected.
The operating principle of the system is simple.
- A running car engine heats up the antifreeze.
- The antifreeze circulating through the engine cooling system enters the heating system - the heater radiator.
- The intake air is driven through the cells by a fan.
- Heated air enters the cabin through air ducts.
- The antifreeze passed through the heating radiator passes back into the engine, thus constantly circulating and maintaining heat in the radiator.
Malfunctions of this unit can be different, but the most common ones are identified by specialists and experienced drivers:
- breakdown of the electric heater fan motor;
- faucet and radiator leaks.
It happens that cold air from the stove is caused by a lack of coolant in the system, then you just need to add it.
If the hose valve or radiator needs repair, if they need a complete replacement, it is necessary to dismantle and disassemble the stove. To do this, take simple tools and perform the following steps. Having opened the heater tap and drained the antifreeze, unscrew the fastenings of the hoses and remove them. Then remove the shield and fan assembly of the stove, dismantle the radiator, stove pipes and tap. Having removed the pipe from the radiator and the flange gasket, remove the heating tap with them. This unit is disassembled into parts. Gaskets are replaced as needed.
Necessary tool for replacing the heater core
In order to deal with this problem as comfortably as possible and carry out repairs with minimal labor costs, it is advisable to have the following list of tools on hand:
- Ratchet handles large and small
- The head is 13 deep and 10 similar
- Extension
- Regular length screwdriver with Phillips blade
- Short screwdrivers: flat and Phillips
- Magnetic handle
Since the stove radiator is located in a rather hard-to-reach place, you will first have to perform some preparatory steps, namely:
- Remove the windshield wiper arms assemblies
- Remove the trapezoid assembly with the wiper motor
- Get rid of all plastic windshield linings, frills, insulation and sound insulation
- Dismantle the heater motor
- Drain the coolant from the system
And only after this you can directly begin the process.
Procedure for replacing heater pipes
Work should be carried out when the car engine has cooled down, as the coolant will need to be drained.
Preparing tools
Before you begin work, you need to prepare the necessary tools:
- screwdriver for plus;
- ratchet;
- extension;
- heads 13.8 and 7.
Dismantling faulty pipes
First you need to remove the air pipe that goes to the throttle valve (if it’s a carburetor, then the air filter).
Remove the windshield wiper blades. To do this, you need to unscrew the two 13 nuts and pull them up.
Remove the boot. Unscrew the five fastening screws, move the top part and pull it up.
Remove the frill. Unscrew the side fastenings of the frill, shown in step 2, and the four clamping screws, then simply lift it and put it aside.
Remove the stove casing. The stove casing consists of two parts. To begin, remove the left side of the casing - unscrew two screws and remove three clips, disconnect and remove through the left side. After this, you can begin to dismantle the right part of the casing - unscrew the four screws and the ground wire, disconnect the chip with the wires and snap off the two tin brackets on top, then remove it in the same way as the first part - through the left side.
Video on replacing the heater radiator on VAZ 2110, 2111 and 2112
In the usual style for everyone, first I’ll post my video review of the repair, and then I’ll give a few words regarding the replacement of this part.
Please note that for greater simplicity and convenience when performing this repair of the VAZ 2110, it is better to first unscrew the master brake cylinder, as well as the vacuum brake booster. And move all these parts a little to the side so that they do not interfere with the removal of the heater radiator.
Of course, there is no need to unscrew the brake pipes; just unscrew the two nuts securing the cylinder to the vacuum chamber, and then remove the entire assembly. As for the amplifier, on the interior side there are 4 nuts under the steering shaft that need to be unscrewed. And after that you can move this detail to the side a little.
To maintain the tightness of the heater system, or rather its body, be sure to ensure the safety of the sealing foam gasket, which is glued along the entire perimeter of the radiator.
Also, be sure to install clips - metal spring clamps, especially on the lower side of the inner housing of the heater motor. If this is not done, the case may not fit tightly, and heat will be lost during air circulation.
Malfunctions of the VAZ 2107 stove and how to eliminate them
If the VAZ 2107 stove does not heat up and when the heater is on, the air leaving the deflectors remains cold, the reasons may be as follows:
- Airing the cooling system . This can happen when replacing antifreeze or repairing cooling system . To restore heating, you need to remove the air plug.
- The heater valve in the open position continues to shut off the line. The reason for this is a clogged faucet or the formation of scale in it due to the use of water in the system instead of antifreeze. To restore the heater's functionality, the tap must be removed and then cleaned or replaced with a new one.
- The stove remains cold when the tap is open. The cause of this phenomenon may be a non-working pump. This breakdown quickly makes itself known through rapid overheating of the engine; it is impossible not to notice it. If the engine is warmed up to operating temperature, and the pipes leading to the VAZ 2107 heater remain cold, the pump needs to be repaired. One of the reasons why the pump will not work is a slipping or broken alternator belt.
- The air is cold and the supply hose is hot. This is a common problem resulting from clogged radiator honeycombs. They can become clogged due to scale build-up, oil in the antifreeze, or the use of “leak stop additives.” In this case, the VAZ 2107 stove must be dismantled and washed.
- The radiator pipes are hot and the air is cold. This occurs when a baffle in the radiator moves and creates a straight path between the inlet and drain pipes. You can restore functionality by replacing the radiator.
Preparation
Silicone
It is necessary to remove the pipes only when the car engine has completely cooled down. Therefore, if you have just stopped by your garage for procedures, do not rush. It is better to leave the car overnight and return to work tomorrow morning.
- Make sure that the pipes are actually damaged and need to be replaced.
- Be sure to drain the coolant from the system. If you recently changed it, there is no need to dispose of the liquid. Just use a clean container to drain so you can refill it later.
- The order in which you perform the work depends on what hoses are used on your vehicle.
Standard pipes with union connector
Standard
If such hoses are present, dismantling them is carried out as follows:
- Elements of this type are usually mounted using clamps. Just check what kind of clamps they are - disposable twist type or standard worm clamps. If they are disposable, we highly recommend replacing them with worm driven items. They are more practical and reliable;
- Armed with a screwdriver, loosen the clamp slightly and move it along the pipe. This way you can completely release the fitting;
- The hose is carefully, without unnecessary or sudden movements, removed from the receiver, that is, the fitting. Quite new pipes that have not yet worn out are easy to remove, but old ones can “stick”;
- If the element does not want to be removed just like that, twist it on the receiver, pry it with some sharp object, and pull it. You just can’t put in a lot of effort, because the pipes are very fragile. If the situation is really sad, just cut the hose with a knife. It is simpler, easier, although it will require large financial costs;
- When installing new hoses, clamps are first put on and then pulled onto the cooling system receivers;
- If you previously used a twist-type clamp, be sure to remove it. As an alternative, both a screw clamp and a worm clamp are suitable. There is no big difference in price, but the level of reliability is significantly higher;
- If you have difficulty fitting the elastic pipe onto the fitting, slightly wet the latter with soapy water. Another option is to warm the ends of the hoses in warm water;
- To facilitate installation, never use lubricants containing oils;
- Pull the ends of the hoses onto the fitting, check the correct installation and laying in the engine compartment;
- Now move the clamp to the required position and tighten, thereby ensuring a strong fastening of the new element of the cooling system;
- Follow the procedure to fill the system with coolant;
- Turn on the power unit and watch for signs of coolant leakage. It is quite possible that the clamp was not tensioned tightly enough, or there is a defect on the pipe itself. Although such things should be checked before purchasing.
Heater heat exchanger hoses
The other hoses in the VAZ 2110 cooling system are those connected to the heat exchanger of the heater.
Hose diagram
, the O-rings must be replaced . Therefore, we advise you to purchase them in advance. The dismantling procedure itself is as follows.
- Two heater hoses are connected to the heat exchanger using a single connector. Some modifications of the VAZ 2110 may require dismantling the camshaft cover.
- Remove the metal clip that is located on top of the connector.
- Push the plastic tab towards the left side of the connector to release it.
- Remove the heat exchanger connector, remove the old O-rings. It is strongly not recommended to return the same ones to their place.
- An alternative to such connectors can be hoses with a spring clamp made of metal.
Replacement
Replacement
Now all that remains is to install a new set of pipes and complete the job. For this:
- Carry out installation by following the reverse sequence of disassembly and dismantling;
- Be sure to put new O-rings in place;
- Fill the cooling system with coolant;
- Start the engine and make sure there are no coolant leaks.
If you cannot or do not want to deal with such issues yourself, contact a good car service center, where they can quickly and efficiently bring your cooling system to normal condition.