A possible sign of the need to replace the fuel supply hose to the fuel rail is the smell of gasoline in the cabin. This hose begins to flow at the junction with the fuel supply line from the fuel tank (plastic tube). The location of this connection is below the battery near the partition of the engine compartment. Moreover, for many people the hose starts to leak in cold weather.
I started to leak when my Kalina was 4 years old, in frosts of -25, and heavily, in copious drops. When the engine warms up, the leak in many Kalinovods disappears. So it was with me. Since in such frost there is no point in getting under the hood yourself if there is no warm garage, and in such weather there are enough customers in the services, so I went. To be honest, it was scary, because I saw how quickly the cars were burning. Luckily there was a fire extinguisher in the trunk. When the temperature warmed up to -20, the leak disappeared when warming up.
This happens because in such frost the rubber rings in the seal become stiff, losing elasticity. When the engine warms up, they heat up, become elastic, expand, and stop leaking. This can also be caused by increased pressure in the engine power supply system - the pressure limiting valve (located in the gas tank) freezes. Since at -25 outside, the pressure in the fuel rail was somehow not ready to be measured, I couldn’t determine the reason for sure. Without waiting for the next frost, when it warms up, I decided to change the fuel hose.
The length of the original hose is 26 cm. After a long search, I found a hose of acceptable quality, but it turned out to be Chinese, and besides, it is 3 cm longer than the original - its length is 29 cm. The price is 350 rubles. For lack of anything better, I put it in. These extra 3 cm did not play a role. I was alarmed by the inscription on the hose - instead of GOST - TOAST. But I still didn’t “wash” the hose).
And I’ll immediately give you an example of what you shouldn’t put. The sealing rings of this hose are worse than those of the Chinese one. In addition, it is longer and thinner in diameter, which can lead to bending, etc. The braid of this hose is made of synthetic woven fiber
The fuel supply hose to the fuel rail from the Chevrolet Niva is also suitable, but it is almost 2 times longer. In my opinion, it’s better to just pull out the two O-rings from it and insert them into your original one if you can’t find the original one. This should only be done if it is not possible to buy an original one for Kalina. Since it is easier to change the entire hose.
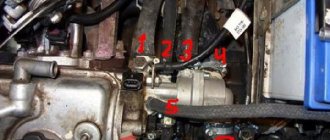
When replacing the hose, it is necessary to replace the O-ring on the fuel rail, which must also be purchased. It is highlighted in red in the photo. The other two rings are precisely the cause of gasoline leakage.
To remove the hose from the plastic high-pressure fuel supply line, it is necessary to relieve the pressure in the system. To do this, remove the plastic plug near the cigarette lighter (the one under which the ECU diagnostic connector is located) and pull out the fuel pump fuse (in the middle between the outermost ones).
Next, we start the engine and wait until it stalls (for the fuel to be completely exhausted). After this, turn the starter for about 3 seconds. Remove the air supply hose to the throttle assembly. Using a 10mm socket, unscrew the nut securing the clamping plate of the fuel supply tube holder and the canister purge solenoid valve tube and remove it. This holder is located under the battery tray. Next, remove the fuel supply hose to the fuel rail. To do this, first place a rag under it so that residual gasoline does not flow through the engine compartment. In the very top first photo you can see the metal locking bracket. We press it from ourselves (if you look at the photo) and remove the hose from the fuel line. Use a previously prepared rag to remove any remaining dripping gasoline. We unscrew the hose itself from the fuel rail, holding the tip of the hose with a 17 key. An O-ring should remain on the fuel rail when the hose is removed. We replace it immediately with a new one.
We put the new hose on the plastic tube of the fuel line until it is fixed with a metal bracket and screw it to the fuel rail. We screw the bracket back, insert the fuse, turn on the ground and check for leaks. If there is no leak, you can start the engine.
If someone decides to change only two o-rings in the hose, this must be done at a positive temperature so that the plastic is not fragile (there is a risk of breaking 2 plastic clips). Outer and inner diameter of 2 o-rings
Replacing fuel pipes on a VAZ 2110
Good day, dear forum users!
I came across a surprise - I was leaving work and there was a shy oily spot under my beauty (21102, 2000). Approximately at the level of the rear door, under the bottom. I climbed onto the overpass - it was leaking from the main line at the point of attachment to the bottom (the last fastening, which is closer to the rear of the car. Of course, I will change both lines, forward and return. But before I climbed under the bottom I wanted to consult with those who have already done such an operation : — In order to remove the pipes, do you need to remove the tank? — What additional spare parts are needed besides the pipes themselves and rubber rings? — Are the fuel lines for the tenth family the same or is there a difference between 2110, 11, 12? — Maybe it makes sense to change the brake pipes as well? — The studs are curled up fastening the plastic protection (“ski” goes like this - protects the tubes) How to secure it?
Thanks in advance for your answers. Regards, Alexey. _________________ Survived by yourself? Survive the other!
He told me everything he knew. I don’t know the rest _________________
Good day, dear forum users!
I came across a surprise - I was leaving work and there was a shy oily spot under my beauty (21102, 2000). Approximately at the level of the rear door, under the bottom.
I climbed onto the overpass - it was leaking from the main line at the point of attachment to the bottom (the last fastening, which is closer to the rear of the car. Of course, I will change both lines, forward and return. But before I climbed under the bottom I wanted to consult with those who have already done such an operation : — In order to remove the pipes, do you need to remove the tank? — What additional spare parts are needed besides the pipes themselves and rubber rings? — Are the fuel lines for the tenth family the same or is there a difference between 2110, 11, 12? — Maybe it makes sense to change the brake pipes as well? — The studs are curled up fastening the plastic protection (“ski” goes like this - protects the tubes) How to secure it?
Thanks in advance for your answers. Regards, Alexey.
10, 11, 12 identical tubes. Of course, it’s better to change the brake ones, too, but I decided to wait until they leak, they shouldn’t explode, I just fixed them properly. By the way, don’t forget to seal/anticorrode everything well. There's no point in protection from it. In addition to the tubes, see. I also remembered that the tubes are inserted into such plastic masks with grooves, the servicemen turned them over for a more reliable fastening.
This is how she was (schematically) _______________ | 000 | 000 | 000 | 000 |
And don’t forget that gasoline will flow, prepare containers and it’s better that the tank is empty. _________________ VAZ 21102; 2003 ; 1.5 l.; 8th grade
Replacement of fuel pipes VAZ 2112 1.5 16 cells. with your own hands.
To watch online, click on the video ⤵
Replacement of fuel and brake pipes VAZ 2114,2110-12. More details
We carry out the fuel pipe (return) for VAZ 2110 - 2112. Part 2 Read more
How to repair a fuel system pipe? More details
How to replace a gasoline filter with your own hands on a VAZ 2112 1.5 16 cl for dummies. More details
Replacement of fuel pipes (VAZ 2115) More details
Installation of the tank and fuel pipes. More details
replacement of fuel line VAZ 2110 Read more
removing the VAZ 16 valve ramp without removing the manifold Read more
Repair of the connection between the plastic fuel pipe and the fitting Read more
Cleaning and removing injectors VAZ 2110-12 1.5 16kl Read more
replacement of the power system with a newer one, without return, VAZ 2110-12 Read more
THE rarest part on a VAZ 2110. Replacement of the fuel line. More details
Replacing the fuel supply hose and TRW pads are the best in the world)))Part 2 Read more
Replacing the fuel filter on VAZ 2110, 2111 and 2112 injector Read more
Replacing the fuel filter on a VAZ-2112 (10.11.) Opening the old one Read more
Replacing fuel pipes (fuel lines) on an old-style Chevrolet Niva Read more
INJECTOR EXTENSIONS 12MM FOR FUEL RAIL 1.5 16V | REPLACING STEERING POLD SWITCHES FOR VAZ 2110 More details
Replacing brake pipes. Brake tube replacement Read more
Diagnostics and repair of VAZ (LADA) 16v FUEL SYSTEM Read more
Replacing brake pipes on VAZ 2110, VAZ 2111, VAZ 2112
Welcome! Brake pipes - unlike brake hoses, they do not crack over time, because the pipes are made of metal, and besides, they are not so easy to break (We are not talking about brake hoses at all, because they are easier to break and are more susceptible to deformation), that’s why tubes are used in a car, and hoses are only placed at the end, most often this occurs on the front wheels, because the wheels turn when the steering wheel is rotated and if tubes are installed instead of hoses, they will simply burst and you will be left without a braking system. Note! Why do the tubes change at all? Most often this happens precisely during the replacement of brake hoses, because the tubes burst (namely their tips) and in this case you cannot do without replacement; in order to replace the tubes, you need to take: A set of all kinds of keys , as well as special Be sure to stock up on a brake bleeding wrench, a rubber bulb and everything you need to bleed your car’s brake system!
Summary:
Where are the brake lines located? They go to all four wheels, you can find out in more detail the location of each tube only if the car is nearby, this is as easy as shelling pears, you just need to find the master brake cylinder at the beginning (see small photo), to which all four tubes are connected and then Well, you need to go from the pipe you need with your eyes, so you will understand their more detailed location, but to put it in a nutshell, the pipes are located in the engine compartment and are connected to both front wheels, and two more brake pipes (Main pipes are also called ) go to the sorcerer, and they pass under the bottom of the car (Indicated by a red arrow), so that they do not hang down, the tubes are secured using special. protection to the body, at the end (When they approach the sorcerer) there is a branching of pipes (from the sorcerer there is a branching, the sorcerer himself is indicated by a blue arrow) and they go separately to each rear wheel, you can see all this perfectly in the photograph, but there The picture shows a slightly different car, namely the Lada Kalina, but their braking systems are not too different (If the Kalina is without ABS), so don’t pay too much attention to the fact that the photo shows a different car.
Fuel hoses VAZ 2110-2112 high pressure (5 pcs.)
Dear customers, in order to avoid mistakes when sending a set of VAZ 2110-2112 high pressure fuel hoses, in the “Comment” line indicate your car model, year of manufacture, engine size, number of valves.
The fuel system of VAZ 2110-2112 vehicles is the most important unit, which determines the high efficiency and operability of the entire gasoline system of the unit.
The set of 2110-1104243 high-pressure fuel hoses for VAZ 2110-2112 includes:
Fuel hose Article No. 2112-1104208 – 1 pc.;
Fuel hose Article No. 2112-1104222 – 1 pc.;
Fuel hose Article No. 2112-1104226 – 1 pc.;
Fuel hose Article No. 2112-1104218 – 2 pcs.;
The fuel system of the VAZ 2110-2112 is a mechanism that is designed to supply the engine with fuel (mainly gasoline), as well as for its storage and cleaning.
The fuel system of the VAZ 2110-2112 car consists of:
— fuel gauge sensor;
The fuel is located in the fuel tank, which contains the fuel pump. When the ignition is turned on, the pump turns on and begins to supply fuel to the fuel line. The fuel passes through the fuel filter and the fuel pump, where it is cleaned by the fuel filter. Next, the fuel passes into the fuel rail. The fuel rail maintains constant pressure, which is provided by the fuel pressure regulator. Excess fuel is drained back into the fuel tank (by opening the fuel regulator, which is essentially a valve). The fuel entering the ramp is injected into the intake manifold. Fuel circulates uninterruptedly in the fuel system all the time the engine is running, because For normal operation, more fuel enters the ramp than is needed, and the excess is then drained back into the tank.
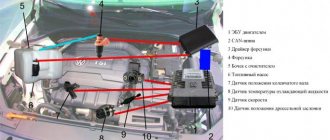
1 – hose mounting bracket; 2 – electric fuel pump; 3 – filling pipe; 4 – fuel tank; 5 – fuel rail outlet pipe; 6 – fuel rail supply pipe; 7 – nozzle; 8 – fuel rail; 9 – fuel pressure regulator; 10 – fuel filter mounting bracket; 11 – fuel filter; 12 – fuel hoses; 13 – fuel pipes
Detailed diagram of the fuel system
Detailed diagram of the fuel system.
1 — nozzles; 2 — fitting plug for monitoring fuel pressure; 3 — injector ramp; 4 — bracket for fastening fuel pipes; 5 — fuel pressure regulator; 6 — adsorber with solenoid valve; 7 — hose for suction of gasoline vapors from the adsorber; 8 — throttle assembly; 9 - two-way valve; 10 - gravity valve; 11 - safety valve; 12 - separator; 13 — separator hose; 14 — fuel tank plug; 15 - filling pipe; 16 — filling pipe hose; 17 — fuel filter; 18 — fuel tank; 19 — electric fuel pump; 20 — fuel drain line; 21 - fuel supply line.
Below we will look at the main elements of the fuel system separately.
Fuel tank
Dismantled VAZ-2112 gas tank.
The filled gasoline is supplied from the tank, which is located in the rear of the car, in the area where the sofa is located . The tank is made of steel and assembled by welding two stamped parts. Gasoline is supplied to the tank through a special neck, from a gas-resistant hose made of rubber, secured together with clamps.
Gasoline pump
Fuel pump VAZ-2112 1139009
A gas pump is an electrical functional device, submersible, installed directly into the gas tank itself. This pump is started by a signal from the ECU controller, which is responsible for fuel injection, through a relay when the ignition is turned on. If the fuel pump doesn't pump, the engine won't start! The operating pressure of the pump is at least 2.8-3 bar (atmospheres - approx.). In order to get to it, just lift the rear sofa and unscrew the technical hatch.
Fine filter
The new filter is ready for installation.
From the fuel pump, through a flexible steel hose, gasoline passes under pressure to the fine filter. The filter is made of steel and cannot be disassembled. A special paper filter element is installed inside. On the housing cover there is a special arrow, created for visual indication during installation, showing the direction of movement of gasoline in the system.
Fuel rail
Through steel fuel pipes, after filtration, gasoline passes directly to the fuel rail. It is designed to transfer gasoline to atomization and is mounted on the “outlet”. On one side of the fuel rail there is an RTD, on the other there is a fitting for controlling gasoline pressure. The pressure in the ramp in operating condition should be from 2.8 to 3.2 bar ( 2.8-3.2 atmospheres - approx.) - this indicator depends on the stabilization in the receiver, indicating constant differences in them. This is necessary in order to dose the optimal amount of gasoline into the injectors.
Fuel pressure control
Be careful when dismantling.
An RTD is a special device with a valve, assembled with a special diaphragm with a spring retainer. Under the influence of this element, the working position is in the locked type. It is also designed to divide the internal space of the regulator itself into two closed cavities - air and fuel.
The cavity for air is connected to the hose and receiver, and for fuel it is connected to the structure itself on the ramp.
During operation of the motor, the vacuum overcomes the resistance created by the spring and tries to tighten the diaphragm, thereby opening the valve. And from another position, at this time, gasoline presses on the diaphragm, also influencing the spring. As a result of this action, the valve opens slightly and part of the fuel flows back into the gas tank through the fuel line.
When the gas is pressed, the vacuum behind the throttle valve (throttle valve - approx.) becomes less, and the diaphragm, under the influence of a spring, closes the valve, increasing the fuel pressure. And if it is closed, the vacuum pulls the valve as far as possible - reducing fuel pressure.
The total pressure drop in the sensor is determined by the stiffness of the spring and the size of the hole. It cannot be adjusted, it is a non-separable element, and when it fails it must be replaced.
Injectors
Fuel rail with injectors
An injector is a special solenoid valve that is needed to transfer gasoline to the manifold when current is applied to it, and close under the influence of a return spring when the power is turned off. They are mounted in place of fixation through special rubber rings and held there with a metal bracket. It is controlled by the ECU from the injection system. If a break or short circuit occurs in the injection wiring, the injectors should be replaced.
Injection system
An injection system in which feedback is provided and a fuel evaporation trap is installed. It consists of an adsorber, a separator, connection hoses and valves mounted under the hood. Its action is as follows:
- Some of the fuel vapor that accumulates in the tank is condensed in the separator and then drained back into the tank. And the rest pass through two-way and gravity valves.
- A two-way valve prevents excessive decrease and increase in pressure inside the fuel tank, and a gravity valve prevents fuel from leaking out when the vehicle rolls over.
Vapor recovery system
This is what the adsorber looks like on a VAZ-2112.
Afterwards, fuel vapors go through one fitting into the engine compartment - namely into the adsorber, where coal is installed to absorb them. The second fitting of the adsorber is connected to the throttle units using a tube, and the third is directly connected to the atmosphere. However, when the engine is not running, the 3rd fitting is closed by a valve and in this state the remaining elements are not associated with air. And when starting the engine, the controller of the system responsible for injection sends a signal to the valves with a frequency of 15-16 Hz , communicating the adsorber itself with the atmosphere. During such work, if the air flow rate is higher and the intensity of the pulses passes through more, then the blowing will be much more efficient.
And where this feedback does not exist, fuel vapors are “caught” only by a separator and one check valve.
Air intake system
When installing a new filter, follow the installation instructions.
The air filtration element is installed in a special plastic case and mounted on three rubber elements (supports - approx.). This filtration device is made mainly of a paper base, and during installation, its numerous corrugations must be located according to the arrows, that is, parallel to the machine itself.
Fuel circuit under the hood - adsorber and air filter housing
Bypassing the filtration element, the air passes through the sensor (mass air flow sensor - approx.) and enters the intake hose and then straight to the throttle assembly. The throttle valve assembly is mounted on the receiver, and when you press the gas pedal, it opens slightly, thereby changing the rate of air entering the system, while simultaneously regulating the addition of the fuel mixture. After all, fuel distribution directly depends on the amount of fuel consumed.
When the engine is idling, when the throttle column is closed, air enters the system through the IAC (idle air regulator - approx.) and is controlled by the controller. If the idle speed is not stable, then it is necessary to check the operation of the idle speed regulator.
The idle air control is not dismountable ; if it fails, it may need to be cleaned or replaced with a new one.
Fuel system VAZ 2110
Publication date Mar 07, 2013, Categories VAZ cars |
The fuel system of the VAZ 2110 car, consisting of a whole complex of components, assemblies, and connecting mechanisms, is responsible for storing, cleaning, and supplying the flammable VAZ 2110 car, from the gas tank, along the fuel path, to the carburetor or injector, where mixing with the supplied air flow, ignites and produces energy that propels the vehicle.
The high quality of operation of the VAZ 2110 fuel system can be guaranteed by its timely maintenance and care. Also, the quality of the fuel filled into the car’s gas tank plays a very important role in the operation of the ignition system. But there are times when one of the components of the power system loses its functionality due to a reason beyond the driver’s control. We are talking about accidental mechanical damage, such as a leak in a fuel tank.
Types and design of VAZ fuel hoses
All fuel hoses used on VAZ cars can be divided into two groups according to applicability:
- For models with carburetor engines;
- For models with engines with a fuel injection system (injectors).
Hoses of the first type are used in all VAZ Classic cars (2101 - 2107), as well as on some later ones (2108, 2109, early modifications of the Lada-110 family). These are ordinary reinforced rubber hoses that do not have special fasteners; they are fixed to the fittings using clamps. All hoses used in these cars are the same, differing only in length (from 400 to 1000 mm).
Hoses of the second type are installed on some early (21099, 2113 - 2115) and all current VAZ models, starting with Lada Kalina. These hoses come in a variety of designs, applicability and mounting types.
According to their purpose, fuel hoses for injection engines are divided into the following types:
- Fuel supply hose to the ramp;
- Hoses for draining fuel from the ramp (return hoses) - usually there are two of them, one is located on the ramp side, the other is on the tank side;
- Hoses for connecting the fuel filter - one from the tank to the filter, the second from the filter to the ramp;
- Filler hose;
- Hoses for connecting the adsorber (separator), in fact these are air hoses, but they belong to the fuel system.
Structurally, hoses are divided into three large categories:
- Hoses without fasteners;
- Hoses with connectors at both ends;
- Hoses with a connector at one end and a metal tube at the other.
As already mentioned, hoses of the first type are a traditional solution used on classic VAZ models. They are attached to fuel system parts and pipelines using clamps (or wire loops).
Hoses of the second type have a connector of one design or another at both ends. There are two main types of fasteners currently in use:
- “Nut” type fastener - at the end of the hose there is a metal tip with a union nut, which is screwed onto the mating threaded fitting;
- Quick-release fastener - at the end of the hose there is a fitting (female type) with a locking mechanism that allows you to quickly install or remove the hose from the mating fitting (male type).
Today, in VAZ cars, hoses with “Nut” type fasteners at both ends are used, as well as with “Nut” type fasteners at one end and with quick-release fasteners at the other end.
Quick-release fittings, in turn, come in two types:
- With a plastic latch - such fittings are usually square in shape, and to remove the hose you need to press the button on the side of the fitting;
- With a steel spring bracket - such fittings are usually round in shape; to remove the hose you need to press on the bracket.
The device of the VAZ 2110 gas tank
There is nothing complicated about the design of the “tens” gas tank. In fact, this is an ordinary metal fuel tank with a capacity of 43 liters. Inside this tank there is a fuel level sensor and a fuel inlet pipe with a strainer.
Diagram of the gas tank and fuel system of the VAZ 2110
An electric fuel pump is attached to this pipe externally, which pumps gasoline out of the tank and delivers it through the fuel line to the fine filter. Next, the gasoline goes to the pressure regulator and enters the fuel rail to the injectors, which spray it into the combustion chambers.
The answer to the question why the fuel pump in a car does not work will be given by this article: https://vazweb.ru/desyatka/pitanie/pochemu-ne-rabotaet-benzonasos.html
RDT VAZ 2110
Introduction
Fuel pressure in the injection system is one of the important criteria for stable engine operation. It is when any signs of vehicle malfunction appear that you should start by checking the fuel pressure. In the VAZ 2110, the pressure is regulated using an RTD, also known as a fuel pressure regulator. It is he who determines the required pressure and discharges the excess into the return line.
RTD affects most of the symptoms in the operation of the internal combustion engine, which will be discussed in this article. All possible malfunctions of the VAZ 2110 pressure regulator, its replacement and independent testing are described below in detail.
Security measures
Remember, you are working with fuel. Therefore, you need to protect yourself and everything around you. To do this you need:
- Do not smoke during repairs. Even a small fire can lead to a large fire that can spread far beyond your garage. Especially if you are in a garage co-op;
- Have a working fire extinguisher in the immediate vicinity of the workplace;
- Ensure ventilation of the work area. It is best to work outside, but since there may not be an inspection hole there, and it is almost impossible to organize a lift, open the garage door completely or even turn on the fan so that it expels fuel vapors from the garage to the street;
- If you get flammable on your skin, be sure to wash the area using soap.
Article on the topic: Replacing the CV joint and outer boot on a VAZ 2110 with your own hands (video)
New fine filter
Reasons for replacing the gas tank on a VAZ 2110
There are two main reasons why a car owner will have to remove the gas tank on a VAZ 2110:
- mechanical damage to the gas tank. The tank can simply be pierced by catching it on a ledge, a stone, or some other obstacle on the road. This happens quite often. And the reason for this is the location of the tank on the “ten”. On earlier VAZ models (up to and including VAZ 2108), the gas tank was actually located in the trunk. Because of this, the trunk of these cars could not boast of spaciousness, but the gas tank was intact. Starting from the VAZ 2110, the tank is located lower, under the bottom of the car. On the one hand, the trunk capacity has increased. On the other hand, the risk of damage to the tank has increased manifold;
The tank on the VAZ 2110 is located low and
the gas tank is easily destroyed due to corrosion. This is another consequence of the low location of the tank, which was mentioned above. The lower the gas tank, the more often it interacts with water, dirt and reagents that are sprinkled on the roads. And this interaction does not pass without a trace.
A completely rusted tank of a VAZ 2110
Whatever the reason, the car owner has no choice: if the tank leaks, it will have to be removed and welded (in the case when the tank is new and the damage is mechanical). If the tank is seriously damaged by chemical corrosion, then there is only one way out - replacement. Such spare parts cannot be restored.
An article devoted to checking the serviceability and replacing the fuel pressure regulator is here: https://vazweb.ru/desyatka/pitanie/regulyator-davleniya-topliva.html
Replacing the gas tank on a VAZ 2110
To successfully replace the tank on a VAZ 2110, we will need the following tools and materials:
Sequence of operations when replacing a tank
The success of the event lies in the scrupulous implementation of the following actions:
- The VAZ 2110 is installed on an overpass or on an inspection hole. The handbrake is applied.
- In the cabin, the floor covering moves back, under which there is a fuel pump hatch. The power wires are disconnected from this pump and a pair of fuel pipes are unscrewed. This is done using a 17mm open-end wrench.
The power wires and fuel pipes are removed from the VAZ 2110 fuel pump.
Now, using a screwdriver, loosen the clamp on the filler tube, and it is disconnected from the fuel hose. These manipulations are carried out from the inspection hole.
The clamp holding the VAZ 2110 filler tube is loosened and the tube is removed
There is another hose on the filler neck of the tank, which is supported by a clamp. This clamp is loosened with a socket head 8, after which the hose is moved to the side.
The hose on the neck of the VAZ 2110 is loosened with a socket head by 8 and then moved to the side
Access to the gas tank bolts is provided. These bolts hold the mounting strips on which the tank is suspended. There are two bolts, and they are unscrewed with a 10mm socket.
Two mounting bolts holding the bars on which the tank of the VAZ 2110 hangs
After unscrewing the bolts, the fastening strips are carefully bent down.
The slats on which the VAZ 2110 tank hangs bend down
The gas tank, freed from its fasteners, tilts down slightly.
The VAZ 2110 gas tank needs to be tilted down a little to get to the last hose
After this, access to the last, thinnest hose opens, which is removed from the tank manually.
The thinnest hose is removed from the VAZ 2110 gas tank manually
Since all hoses and mounting bolts have been disconnected, the tank can be carefully removed from under the machine.
The VAZ 2110 gas tank was dismantled and removed from under the car
- A new tank is installed in its place, after which the fasteners are reassembled, and all removed hoses are installed in their original places.
Fuel hoses VAZ 2110 injector 8 valves
A possible sign of the need to replace the fuel supply hose to the fuel rail is the smell of gasoline in the cabin.
This hose begins to flow at the junction with the fuel supply line from the fuel tank (plastic tube). The location of this connection is below the battery near the partition of the engine compartment. Moreover, for many people the hose starts to leak in cold weather. I started to leak when my Kalina was 4 years old, in frosts of -25, and heavily, in copious drops. When the engine warms up, the leak in many Kalinovods disappears. It was the same for me. Since in such frost there is no point in getting under the hood yourself if there is no warm garage, and in such weather there are enough customers in the services, so I went. To be honest, it was scary, because I saw how quickly the cars were burning. Luckily there was a fire extinguisher in the trunk. When the temperature warmed up to -20, the leak disappeared when warming up.
This happens because in such frost the rubber rings in the seal become stiff, losing elasticity. When the engine warms up, they heat up, become elastic, expand, and stop leaking. This can also be caused by increased pressure in the engine power supply system - the pressure limiting valve (located in the gas tank) freezes. Since at -25 outside, the pressure in the fuel rail was somehow not ready to be measured, I couldn’t determine the reason for sure. Without waiting for the next frost, when it warms up, I decided to change the fuel hose.
The length of the original hose is 26 cm. After a long search, I found a hose of acceptable quality, but it turned out to be Chinese, and besides, it is 3 cm longer than the original - its length is 29 cm. The price is 350 rubles. For lack of anything better, I put it in. These extra 3 cm did not play a role. I was alarmed by the inscription on the hose - instead of GOST - TOAST. But I still didn’t “wash” the hose).
And I’ll immediately give you an example of what you shouldn’t put. The sealing rings of this hose are worse than those of the Chinese one. In addition, it is longer and thinner in diameter, which can lead to bending, etc. The braid of this hose is made of synthetic woven fiber
The fuel supply hose to the fuel rail from the Chevrolet Niva is also suitable, but it is almost 2 times longer. In my opinion, it’s better to just pull out the two O-rings from it and insert them into your original one if you can’t find the original one. This should only be done if it is not possible to buy an original one for Kalina. Since it is easier to change the entire hose.
When replacing the hose, it is necessary to replace the O-ring on the fuel rail, which must also be purchased. It is highlighted in red in the photo. The other two rings are precisely the cause of gasoline leakage.
To remove the hose from the plastic high-pressure fuel supply line, it is necessary to relieve the pressure in the system. To do this, remove the plastic plug near the cigarette lighter (the one under which the ECU diagnostic connector is located) and pull out the fuel pump fuse (in the middle between the outermost ones).
Next, we start the engine and wait until it stalls (for the fuel to be completely exhausted). After this, turn the starter for about 3 seconds. Remove the air supply hose to the throttle assembly. Using a 10mm socket, unscrew the nut securing the clamping plate of the fuel supply tube holder and the canister purge solenoid valve tube and remove it. This holder is located under the battery tray. Next, remove the fuel supply hose to the fuel rail. To do this, first place a rag under it so that residual gasoline does not flow through the engine compartment. In the very top first photo you can see the metal locking bracket. We press it from ourselves (if you look at the photo) and remove the hose from the fuel line. Use a previously prepared rag to remove any remaining dripping gasoline. We unscrew the hose itself from the fuel rail, holding the tip of the hose with a 17 key. An O-ring should remain on the fuel rail when the hose is removed. We replace it immediately with a new one.
We put the new hose on the plastic tube of the fuel line until it is fixed with a metal bracket and screw it to the fuel rail. We screw the bracket back, insert the fuse, turn on the ground and check for leaks. If there is no leak, you can start the engine.
If someone decides to change only two o-rings in the hose, this must be done at a positive temperature so that the plastic is not fragile (there is a risk of breaking 2 plastic clips). Outer and inner diameter of 2 o-rings
Preparatory activities
You don't have to spend a lot of time replacing the fuel filter. The process is easy and does not require the involvement of experienced specialists. In addition, the services of technicians from service stations are expensive. You can do everything yourself and no less efficiently than experienced specialists.
Article on the topic: Independent replacement of generator brushes on a VAZ 2114
To get started, arm yourself with a set of tools and auxiliary materials, which include:
Let’s say right away that if you don’t want or are not ready to do such work with your own hands, it’s not too late to stop. You can entrust your VAZ 2110 and the replacement of the fuel filter on it to specialists. It will cost money, but you guarantee yourself a high-quality task.
Flushing the gas tank of a VAZ 2110
Flushing the gas tank is an operation that must be performed at least once every two years, regardless of whether the tank is in good condition or not. Over time, contaminants accumulate in the tank, which can subsequently impair the performance of both the fuel pump and other components of the fuel system.
Tank flushing sequence
To clean the gas tank, you must perform the following manipulations:
- The gas tank is removed from the VAZ 2110 as described above. After this, you need to drain all remaining gasoline from the gas tank.
- Now you need to rinse the tank. To do this, any detergent is poured into it. Even household dishwashing liquid diluted in water will do.
- After filling the liquid, the tank must be allowed to stand for at least half an hour.
- After this time, the washing liquid is drained and the tank is rinsed with clean water.
After draining the washing liquid, the VAZ 2110 tank is washed with clean water.
Next, a special composition for cleaning gas tanks, previously diluted in water, is poured into the tank. The best option would be to fill with PROLINE JC liquid. This is a concentrated and very aggressive composition that can easily cope with any contaminants.
The cleaning composition PROLINE JC is optimal for washing the gas tank of the VAZ 2110
Which fuel pump to choose for replacement
BOSCH fuel pump 580454138 is installed from the factory . Its service life depends on the quality of the fuel used, as well as on operating conditions. It is also worth noting that this pump is suitable for most other cars, including imported ones. The cost of a BOSCH fuel pump at the moment is from 1,700 rubles. Cheaper analogues are also offered on the market:
- WEBER FP 453-453 from 600 RUR
- ATS 2112-1139010 from 550 RUR
- PEKAR 2112-1139010 from 600 RUR
- FENOX EFP35005O7 from 700 RUR
- HOFER HF 830 301 from 550 RUR
- StartVOLT SFP 0153 from 750 RUR
- VOLTON VLT2112-1139010 from 650 RUR
Any of the above fuel pumps will be suitable as a replacement for the original one, however, not all of them are of the same quality as the original. In addition to the pump itself, you may need a corrugation to replace it, and if the fuel pump mounting ring is damaged, you can order it or purchase it using the following article number:
- Electric fuel pump ring /2110/ metal price from 120 rub.
- Fuel pump corrugation /2110/ 1.5 white from 50 rubles per piece
- Fuel pump corrugation /21101/ 1.6 long from 60 rubles per piece
Repair of studs on the gas tank of a VAZ 2110
The fuel pump is attached to the gas tank using studs. They, like any other part, wear out and break over time. As a result, the driver is forced to repair them. For repairs you need the following:
- bolts for 8, 25 mm long (8 pieces);
- file;
- hacksaw for metal;
- M5 tap;
- electric drill with a 4.5 mm drill bit.
Stud repair sequence:
- Use a hacksaw to cut off all the old studs. The surface of the gas tank underneath is processed with a file.
The surface of the VAZ 2110 gas tank, carefully processed with a file.
Now the pressure ring from the gas pump is applied to the gas tank. This ring has 8 holes. New holes are drilled through them in the gas tank. In this case, it is necessary to ensure that the drilled holes do not coincide with the holes from the old studs.
The VAZ 2110 fuel pump is held in place by a ring with eight holes
In the resulting holes, an M5 internal thread is cut using a tap.
In the new holes on the VAZ 2110 tank, threads are cut with a tap
8 bolts are screwed into the holes so that their heads are inside the tank.
New bolts are screwed into the VAZ 2110 tank so that their heads are inside the tank
The fuel pump is one of the most important components of the fuel system. The following material will help you carry out independent diagnostics of this mechanism: https://vazweb.ru/desyatka/pitanie/toplivnyj-nasos.html
DIY fuel tank repair
The first step is to assess the current condition of the gas tank. Does it make sense to repair it or is it easier to buy a new one?
Only soldering (if there are microscopic cracks) or welding (if a small hole has formed on the body) can be considered as a repair. If the VAZ 2110 tank is completely rotten or broken, then no restoration methods will help.
Argon welding allows you to eliminate minor defects and holes on the tank
In any case, the repair of the gas tank on the “ten” begins only after it has been dismantled and thoroughly washed.
Selecting tools and accessories
To independently remove, repair and install the gas tank, you will need a standard set of tools and some auxiliary materials:
- heads for 8, 10 and 13;
- Phillips screwdriver;
- flat screwdriver;
- open-end wrench 17;
- WD-40;
- flushing liquid;
- hot water;
- file;
- grinder (angle grinder);
- drill;
- extension for keys.
Article on the topic: Car lifts for car service - support for your business
Removing the tank
The dismantling of the tank from the VAZ 2110 must be carried out in an inspection pit or overpass. You can, of course, jack up the body, but this option cannot be called convenient.
In large private garages, car enthusiasts usually arrange an inspection pit for servicing their cars.
Removing the gas tank on a VAZ 2110 can be divided into two stages:
- Turning off the fuel pump in the car.
- Removing the fuel tank.
First stage: turning off the fuel pump in the cabin
Before removing the tank from the “ten”, you will need to relieve the fuel pressure in the system. To do this, you need to open the rear door of the car and fold down the rear passenger seat cushion:
- It is recommended to completely remove the pillow and remove it from the passenger compartment.
- Under the pillow there is a sheet of sound insulation.
- Find a special cutout in the sound insulation, under which the gas tank hatch is located.
- Unscrew the hatch fastening screws with a screwdriver.
- Open the hatch cover and remove the pump from the tank cavity.
- Before removing the pump, you will need to disconnect the two fuel lines - disconnect the connector.
- After this, the first stage of work can be considered completed.
You need to remove the fuel pump from the hatch to be able to safely remove the tank.
Second stage of work: dismantling the tank
After the pressure in the fuel system has been relieved and the fuel pump has been removed from the tank cavity, you can begin the second part of the work, which takes place under the car body:
- Disconnect the fuel level sensor (wires go to the tank, you need to pull the wire out of the connector).
- Next, remove the hose from the sensor fitting.
- Find the tank mounting bolts and unscrew them.
- Remove the tank vent pipe.
- Remove the sensor.
- After this, carefully lower the tank itself to the surface.
If the metal tank mounts cannot be removed, you can spray them with WD-40 lubricant.
To remove the gas tank from the “ten”, you will need to carry out some work both inside the car and under the body. It is important to ensure that all suitable wires and lines are disconnected from each other.
It is not recommended to restore such a product, since the service life of a rotten tank is obviously minimal
Clean and wash the gas tank
You can flush the gas tank only after dismantling it. You will need to remove the tank from the body, disconnect all fuel and electrical lines, and remove the fuel level sensor.
Some car enthusiasts perform flushing without removing the tank from the car: they simply direct a stream of hot water under pressure through the filler pipe. After steaming, about five liters of gasoline are poured into the tank, tightly capped and shaken. After draining this mixture, the container must be thoroughly dried, it is best to use compressed air.
A stream of hot water is directed into the tank lid, after which the dirt and liquid are sucked out by a pump, and the tank cavity itself is dried with air.
For washing, it is recommended to use detergents such as “MS”, “ML” or “Labomid”. If the tank has not been washed for a long time, it is best to pour detergent into it several times and rinse it with water. At the end of the wash, be sure to steam the internal cavities with hot water and then dry the tank.
Rust inside a gas tank can only be removed with special preparations called “rust converters.” To thoroughly clean the tank, you will need about two liters of this substance, which you will need to pour inside and shake well. After 15 minutes, you can drain the converter - the liquid will come out along with remaining rust and dirt.
The rust converter is available in containers of different volumes, due to which you can choose the volume needed to wash the tank of a specific car model
Article on the topic: Diesel engine is going haywire
We repair studs
Studs are elements of the fuel system that secure the gas tank hatch located in the car's interior. We are talking about that small hatch that is hidden under the soundproofing sheet and the rear seat cushion.
The first sign that indicates that it is time to change the studs is the appearance of the smell of gasoline in the cabin. The fact is that the gas tank hatch is closed using both bolted connections (nuts and studs) and a gasket. If the gasket is worn, then most likely the threads on the stud have been stripped (or one or more studs have broken). Accordingly, the gas tank loses its seal, which is why a persistent smell of fuel appears in the cabin.
Questions regarding maintenance and replacement of fuel hoses
Fuel hoses are constantly exposed to aggressive environments (gasoline from the inside, oils, exhaust gases and high temperatures outside), so over time they lose their strength characteristics. In order not to miss the moment to replace the hoses, they should be periodically inspected, monitored for the appearance of cracks or kinks, as well as leaks at the attachment points. Particular attention should be paid to the places where the hose comes into contact with other parts, at bends and at the places where the fittings are attached. If any problems arise - be it cracks or small leaks - the hose must be replaced as soon as possible.
The procedure for replacing hoses depends on the engine model and the types of mounting used. But in any case, you first need to remove the fuel and relieve pressure in the fuel system; this is generally done like this:
- Disconnect the fuel pump (disconnect the electrical connector from it; access to the pump may require removing the rear seats of the car);
- Start the engine;
- Wait until the engine has exhausted the remaining fuel from the system and stalls;
- Crank the engine with the starter for a few seconds.
Now you can begin replacing hoses and other parts of the fuel system. If we are talking about the classic VAZ family, then you should simply loosen the clamps and remove the hose from the fittings (or tubes); installing a new hose is done in the reverse order and preferably using new clamps.
To replace hoses with “Nut” type fasteners, use a “10” wrench to loosen and unscrew the nuts, install a new hose and tighten its nuts with the torque recommended by the manufacturer. When replacing hoses, the rubber O-rings should also be replaced; old O-rings should not be used. This work should be performed at positive air temperatures, since in cold weather the ring loses its elasticity and the connection will not be airtight.
The easiest way to replace hoses is with a quick-release connection - to remove the hose, you need to press a button or bracket. The new hose is simply installed on the fitting until it clicks. However, before installing a new hose, the mating fitting should be inspected and if it is damaged or worn, it should be replaced. Otherwise, when you first start the engine, the hose may simply be torn off by fuel pressure.
With timely and correct replacement of hoses, the fuel system of a VAZ vehicle will serve reliably, ensuring uninterrupted operation of the power unit in any conditions.
If such malfunctions occur in the operation of the carburetor engine of VAZ 2108, 2109, 21099 cars, such as unstable idling, failure when pressing the gas pedal, drop in power and throttle response, difficulty starting the engine, etc., you should pay attention to the fuel supply system to the carburetor, namely on the cleanliness of fuel lines and the cleanliness of the vehicle’s fuel tank. The presence of blockages and contaminants in them often leads to disruption of the fuel supply to the carburetor and further to the engine, followed by the occurrence of the above-mentioned malfunctions. Let's consider cleaning fuel lines on VAZ 2108, 2109, 21099 cars.
— Raise the back seat in the car.
Under it in the body there is a hatch for access to the fuel intake of the fuel tank. Remove the hatch by unscrewing the screws securing it.
— Remove the fuel hoses (main line and) from the fuel intake.
To do this, loosen the clamps and move them from the fittings on the fuel intake. The fit of the tubes on the fittings is very tight, so when moving, you can help yourself with a 10 mm open-end wrench.
— Place a cloth under the fuel pipes to prevent splashing.
— We disconnect, in the engine compartment, the fuel pipes from the fine fuel filter (if there is none from the inlet pipe of the fuel pump) and the non-return valve fitting. To do this, you need to loosen the clamps securing them.
Cleaning fuel lines of VAZ 2108, 2109, 21099
— We blow compressed air from a compressor or a conventional pump into the fuel pipes in the direction from the engine to the tank.
First to the main highway, then to the return line. The duration of the purge is arbitrary.
— We check the ease of air passage through the fuel lines.
To do this, we blow them through again, but this time with our mouth and evaluate them. If necessary, repeat blowing with compressed air.
We assemble everything in reverse order.
Notes and additions
— You shouldn’t limit yourself to cleaning only the fuel lines. You should also clean the entire fuel supply system, namely the fuel tank, mesh filters in the carburetor, in the fuel pump and on the fuel intake, and replace the fine fuel filter.
— On VAZ 2108, 2109, 21099 cars a check valve is installed. When cleaning the fuel lines, it is worth removing it completely and rinsing it with gasoline. Blow with compressed air. You can check its performance by blowing it with your mouth. Air should flow freely in one direction and not at all in the other. In case of malfunction, replace the check valve.
— You can quickly clean the fuel lines on a VAZ 2108, 2109, 21099 car. To do this, we disconnect the pipes only in the engine compartment from the check valve and the fine fuel filter. Remove the cap from the gas tank. We blow with compressed air for a short time until active seething of the fuel appears in the tank. We check by blowing through the lines with our mouth.
Check fuel pipes, hoses and their connections as follows.
Metal fuel pipes are laid under the bottom of the car and secured with clamps and self-tapping screws. Inspect them periodically for leaks and damage.
If, when replacing the fuel filter, there is dirt in it and the fuel lines, be sure to disconnect the lines and blow them out with compressed air. Also check the condition of the strainer on the fuel pump assembly.
Never use copper or aluminum tubing to replace the steel tubing installed on the vehicle, as it may not withstand the vibration of the vehicle.
Because fuel pipes are under high pressure, they require special maintenance.
Some fuel lines have O-ring threaded connections that must be loosened before servicing or replacing components. In such connections, cone nuts are used, which, when tightening the nut, additionally compresses the connection. Check the O-rings for cracks and damage and replace if necessary. If steel tubes are being replaced, install only original tubes.
Flexible fuel hoses must be located at least 100 mm from the exhaust system components and 250 mm from the catalytic converter.
Some models have nylon fuel hoses with quick-release connectors. In this case, if you need to replace one hose, replace the hoses complete with quick-release connectors.
Replace fuel pipes/hoses as follows.
Relieve pressure in the fuel system.
Release all clamps securing the tube/hose to the vehicle body.
On normal steel fuel pipe and hose connections, loosen the clamp, then pull out the hose tube. Turning the tube and hose in different directions makes the disconnection process easier.
If the hoses are connected using a quick-release connector, open and remove the clamp, then press the latches on both sides with one hand and remove the tube from the connector with the other hand ( , ).
A fuel filter is an essential element of a vehicle's fuel supply system. The main purpose of the unit is to mechanically clean fuel from solid impurities that can clog the system. It can also harm the engine or impair its performance.
Important nuances
When replacing the gas tank and the studs on it, we must not forget about several important points:
- Fire safety. Work on the gas tank, as well as on any part of the vehicle’s fuel system, should only be carried out in a well-ventilated area or in the open air. There should be no sources of open fire or flammable materials nearby. And, of course, you should always have a fire extinguisher at hand;
During any work on the VAZ 2110 fuel system, a fire extinguisher must be nearby
Repair manual for VAZ 2110, 2112, 2111 (Lada 110)
The power supply system includes elements of the following systems:
– a fuel supply system, including a fuel tank, a fuel pump, a pressure regulator, a fuel filter, a ramp with injectors, hoses and pipelines;
– an air supply system, which includes an air filter, an air supply pipe, a throttle assembly;
– a fuel vapor recovery system consisting of an adsorber and connecting pipelines.
The functional purpose of the fuel supply system is to ensure the supply of the required amount of fuel in all operating modes.
4.17. Engine fuel supply system mod. 2111 and 2112: 1 – fitting plug for monitoring fuel pressure; 2 – injector ramp; 3 – bracket for fastening fuel pipes; 4 – fuel pressure regulator; 5 – fuel pump; 6 – fuel filter; 7 – fuel drain line; 8 – fuel supply line; 9 – nozzles
Design of the motor power supply system mod. 2111 and 2112 (Fig. 4.17) differs from the power supply system for mod. 21114 and 21124 (Fig. 4.18) in that the latter do not have a return fuel line, since the pressure regulator is installed directly in the gas tank in the fuel pump module. In addition, for connecting elements of the fuel line on engines mod. 21114 and 21124 use special clamping tips instead of threaded fittings, the shape and design of the fuel rail are changed, new injectors are used, and the pressure is increased.
4.18. Engine fuel supply system mod. 21114 and 21124: 1 – fitting plug for monitoring fuel pressure; 2 – injector ramp; 3 – fuel pump module; 4 – fuel filter; 5 – tee; 6 – fuel supply line; 7 – nozzles
Recommendations
Every car enthusiast can do a lot to extend the life cycle of all elements of the unit in question. To ensure that your car's power system works flawlessly, use the following recommendations:
- Refuel only at approved gas stations.
- Replace fuel and air filters in a timely manner.
- Use cleaning additives with caution.
- Try not to drive on a half-empty gas tank, especially in winter.
A possible sign of the need to replace the fuel supply hose to the fuel rail is the smell of gasoline in the cabin. This hose begins to flow at the junction with the fuel supply line from the fuel tank (plastic tube). The location of this connection is below the battery near the partition of the engine compartment. Moreover, for many people the hose starts to leak in cold weather.
I started to leak when my Kalina was 4 years old, in frosts of -25, and heavily, in copious drops. When the engine warms up, the leak in many Kalinovods disappears. So it was with me. Since in such frost there is no point in getting under the hood yourself if there is no warm garage, and in such weather there are enough customers in the services, so I went. To be honest, it was scary, because I saw how quickly the cars were burning. Luckily there was a fire extinguisher in the trunk. When the temperature warmed up to -20, the leak disappeared when warming up.
This happens because in such frost the rubber rings in the seal become stiff, losing elasticity. When the engine warms up, they heat up, become elastic, expand, and stop leaking. This can also be caused by increased pressure in the engine power supply system - the pressure limiting valve (located in the gas tank) freezes. Since at -25 outside, the pressure in the fuel rail was somehow not ready to be measured, I couldn’t determine the reason for sure. Without waiting for the next frost, when it warms up, I decided to change the fuel hose.
The length of the original hose is 26 cm. After a long search, I found a hose of acceptable quality, but it turned out to be Chinese, and besides, it is 3 cm longer than the original - its length is 29 cm. The price is 350 rubles. For lack of anything better, I put it in. These extra 3 cm did not play a role. I was alarmed by the inscription on the hose - instead of GOST - TOAST. But I still didn’t “wash” the hose).
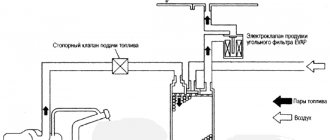
How the system works
This system is used in a closed loop injection system. It uses the method of vapor capture with a carbon adsorber. It is installed in the engine compartment and connected by pipelines to the fuel tank and throttle pipe. There is an electromagnetic valve on the adsorber cover, which switches the operating modes of the system based on signals from the control unit. When the engine is not running, the solenoid valve is closed and gasoline vapors from the fuel tank flow through a pipeline to the adsorber, where they are absorbed by granular activated carbon. When the engine is running, the adsorber is purged with air, and the vapors are sucked to the throttle pipe and then into the intake pipe for combustion during the operating process.
Malfunctions of the fuel vapor recovery system lead to unstable idling, engine stalling, increased toxicity of exhaust gases and deterioration of the vehicle's driving performance.
The following system malfunctions are possible:
- malfunction of the purge solenoid valve;
- overflow of the adsorber, which collects more than 60 g of fuel (the weight of the new adsorber is no more than 1.1 kg);
-damaged or incorrectly connected hoses.
Inspect the hoses and adsorber. If there are cracks or other damage to its body, replace the adsorber. If a fuel leak is detected, check the tightness of the hose connections. If fuel leaks from the adsorber, replace it. Check the correct installation of the solenoid valve and the connection of the vacuum supply hoses
Fuel supply diagram for an engine with a fuel injection system
1 – nozzles; 2 – fitting plug for monitoring fuel pressure; 3 – injector ramp; 4 – bracket for fastening fuel pipes; 5 – fuel pressure regulator; 6 – adsorber with solenoid valve; 7 – hose for suction of gasoline vapors from the adsorber; 8 – throttle assembly; 9 – two-way valve; 10 – gravity valve; 11 – safety valve; 12 – separator; 13 – separator hose; 14 – fuel tank plug; 15 – filling pipe; 16 – filling pipe hose; 17 – fuel filter; 18 – fuel tank; 19 – electric fuel pump; 20 – fuel drain line; 21 – fuel supply line.
Fuel is supplied from a tank installed under the bottom in the rear seat area. The fuel tank is made of steel and consists of two stamped halves welded together. The filler neck is connected to the tank with a gas-resistant rubber hose secured with clamps. The plug is sealed.
The fuel pump is electric, submersible, rotary, installed in the fuel tank. The developed pressure is at least 3 bar (300 kPa).
The fuel pump is turned on at the command of the injection system controller (with the ignition on) through a relay. To access the electrical connector of the pump, there is a hatch under the rear seat in the bottom of the car. From the pump, fuel under pressure is supplied through a flexible hose to the fine filter and then through steel fuel lines and rubber hoses to the fuel rail.
The fine fuel filter is non-separable, in a steel housing, with a paper filter element. There is an arrow on the filter housing that must coincide with the direction of fuel movement.
The fuel rail serves to supply fuel to the injectors and is mounted on the intake manifold. On one side there is a fitting for monitoring the fuel pressure, on the other there is a pressure regulator. The latter changes the pressure in the fuel rail - from 2.8 to 3.2 bar (280-320 kPa) - depending on the vacuum in the receiver, maintaining a constant difference between them. This is necessary for accurate dosing of fuel by injectors.
The fuel pressure regulator is a fuel valve connected to a spring-loaded diaphragm. The valve is closed under the action of the spring. The diaphragm divides the regulator cavity into two isolated chambers - “fuel” and “air”. The “air” is connected by a vacuum hose to the receiver, and the “fuel” is connected directly to the ramp cavity. When the engine is running, the vacuum, overcoming the resistance of the spring, tends to retract the diaphragm, opening the valve. On the other hand, fuel presses on the diaphragm, also compressing the spring. As a result, the valve opens and part of the fuel is released through the drain pipe back into the tank. When you press the gas pedal, the vacuum behind the throttle valve decreases, the diaphragm, under the action of a spring, closes the valve - the fuel pressure increases. If the throttle valve is closed, the vacuum behind it is maximum, the diaphragm pulls the valve harder - the fuel pressure decreases. The pressure drop is determined by the spring stiffness and the size of the valve opening; cannot be adjusted. The pressure regulator is non-separable; if it fails, it is replaced.
The injectors are attached to the ramp through rubber sealing rings. The injector is an electromagnetic valve that allows fuel to pass through when voltage is applied to it and closes under the action of a return spring when there is no power. At the injector outlet there is a nozzle through which fuel is injected into the intake manifold. The injection system controller controls the injectors. If there is a break or short circuit in the injector winding, it should be replaced. If the injectors become clogged, they can be washed without dismantling at a special service station.
The closed-loop injection system uses a fuel vapor recovery system. It consists of an adsorber installed in the engine compartment, a separator, valves and connecting hoses. Fuel vapor from the tank partially condenses in the separator, and the condensate is drained back into the tank. The remaining vapor passes through gravity and two-way valves. The gravity valve prevents fuel from leaking out of the tank when the vehicle rolls over, and the two-way valve prevents excessive increase or decrease in pressure in the fuel tank.
Then the fuel vapor enters the adsorber, where it is absorbed by activated carbon. The second fitting of the adsorber is connected by a hose to the throttle assembly, and the third is connected to the atmosphere. However, when the engine is turned off, the third fitting is closed by an electromagnetic valve, so that in this case the adsorber does not communicate with the atmosphere. When the engine starts, the injection system controller begins to send control pulses to the valve with a frequency of 16 Hz. The valve communicates the adsorber cavity with the atmosphere and the sorbent is purged: gasoline vapors are sucked through the hose into the receiver. The greater the engine's air consumption, the longer the duration of the control pulses and the more intense the purging.
In an open-loop injection system, the fuel vapor recovery system consists of a separator with a two-way check valve. The tube connecting the tank to the atmosphere is led into the cavity of the rear right wing.
The air filter is installed in the front left part of the engine compartment on three rubber holders (supports). The filter element is paper.
After the filter, the air passes through the mass air flow sensor and enters the intake hose leading to the throttle body.
The throttle assembly is fixed to the receiver. By pressing the gas pedal, the driver slightly opens the throttle valve, changing the amount of air entering the engine, and therefore the combustible mixture, because the fuel supply is calculated by the controller depending on the air flow. When the engine is idling and the throttle valve is closed, air flows through the idle air control valve, a valve controlled by the controller. By changing the amount of supplied air, the controller maintains the idle speed specified (in the computer program). The idle speed regulator is non-separable; if it fails, it is replaced.
The vehicle's power system is designed to store fuel reserves, purify fuel and air from foreign impurities, and supply air and fuel to the engine cylinders. The power system consists of a fuel tank, a fuel module, a fuel filter, a fuel rail with injectors, an air filter, fuel lines, air ducts, a throttle assembly, a receiver, and a gasoline vapor recovery system.
The air entering the engine cylinders is cleaned of dust by an air filter. Air filter
installed in the engine compartment on three rubber supports. The filter element is replaceable and made of special paper. To prevent contaminated air from leaking into the intake tract, there is a sealing edging at the top of the element. To replace the filter element, the filter cover is removable. The purified air passes through the mass air flow sensor (for more details, see “Engine Management System”) through the air duct to the throttle valve.
Replacing the fuel filter on an injection machine
I think there is no need to explain once again that the fuel filters on injection VAZ 2110-2112 cars are completely different than on carburetor cars. And they are also located in a completely different place. As for a fuel-injected car, the fuel filter is located behind the gas tank. In order not to create problems for yourself when replacing, it is best to do this work in a pit, or by lifting the rear of the car with a jack.
As for the tool that we need, we will need a minimum of it, namely:
Now regarding the replacement procedure itself. So, when you get to this design, the first thing you need to do is apply a penetrating lubricant to all the connections, since usually in these places everything rusts quite badly.
Operating principle of the fuel filter
Depending on the make of the car, the design of the fuel filter may differ. But the basic principle of operation and operation scheme is the same for all models.
The principle of operation of the fuel filter: 1 - filter element for injection cars, 2 - its housing.
The gasoline filter is located in the fuel line and looks like a metal or plastic bulb with two terminals. To which the main pipelines are connected. Inside the housing there is a filter element, which is usually made of special paper.
The device works like this:
- The fuel moves along the line and enters the housing through the inlet pipe;
- During the passage of fuel through the bowels of the unit, mechanical impurities (dirt, sand, rust, etc.) are retained on it. The purification fraction depends on the type of model used.
- Purified gasoline leaves the flask through the outlet pipe and moves to the engine.