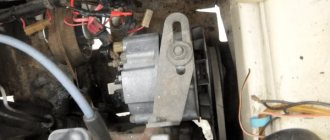
Searching in auto parts stores for such small, but sometimes very necessary parts as generator brushes, starter brushes, heater motor for my car (VAZ-11174, 2010 onwards, mileage at the time of writing 135,000 km) in my region (I live in a village, I work in a small town) led to a disappointing conclusion - you will find horseradish (((. Please, the entire assembly is assembled - either in stock or to order. The experience of reassembling the KZATE 85A generator speaks in favor of the last option (due to the hassle of removing and installing) I removed the old one I immediately installed a new one (preferably BOSCH, especially relevant for lovers of music and heating everything and everyone, since the KZATE 85A does not keep the windshield heated when connected to the “north” - I installed it and connected it myself while I’m using it to the “South”).
If you have time to tinker, and if you have “direct hands”, you will definitely find a useful resource on the details of starter-generators on the Internet. The downside is that it is English-language.
We find the required article and then search the Internet resources of local auto stores. In my region I can find something in ASTA and Dvizhkom stores.
Cargo BX2132 analogue of BOSCH 1 127 014 028, I suspect that the BOSCH F 000 BLO 6F8 (2170-37010-13) will also fit
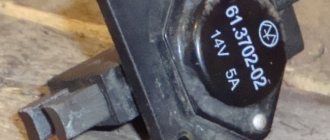
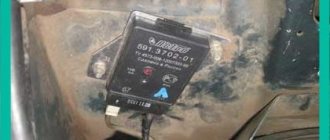
I collected brushes in the near future and expect to use them in the TRT5 10142 voltage regulator of the KZATE 9402.3701-06 14V 85A generator.
The regulator needed to be torn apart a little (in the photo), so having hands with soldering experience is simply necessary))) Some kind of black, possibly silicone sealant, was poured under the regulator control board.
Attention, question - tell me what can I fill the cavity with? Can regular vinegar silicone corrode too much?
If the voltage regulator unit, capacitor and not a tight fit of the brushes are faulty, or if they are worn out, the vehicle's supply voltage deviates from the norm. In this case, it is necessary to check the above listed elements and, if necessary, replace them. In this article we will talk in more detail about diagnosing and replacing generator elements in a Lada Kalina car.
To remove the Lada Kalina voltage regulator you will need the following tool:
flat-blade screwdriver, 8mm and 10mm open-end wrenches and 7mm, 8mm and 24mm socket wrenches, hammer, soldering iron, universal meter (with DC voltmeter and megger)
Checking the functionality of the voltage regulator on the Lada Kalina generator
1. Move aside the rubber insulating cover of the positive terminal from the generator.2. Start the engine and allow the engine to warm up so that the vehicle operates normally at idle speed.3. Measure the voltage between the positive terminal and the body (negative terminal). The voltage should be 14.5-15.1 volts.
Main process
Replacing the generator in the case of Kalina with an 8-valve or 16-valve engine involves performing the following steps:
- First of all, you will need to install the car on the repair site and fix the position of its wheels using wheel chocks. It is also necessary to turn off the engine and disconnect the terminals from the battery to ensure the safety of the work being carried out.
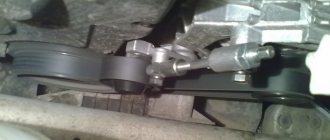
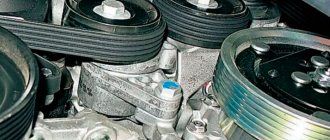
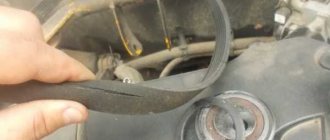
- After this, you need to loosen the belt tensioner roller, which fixes the position of the generator. To do this, you will need to unscrew the fasteners and dismantle them.
- The next step is to disconnect the plug secured by a plastic latch. To remove it, you need to lightly press it and pull it to the side. If everything is done correctly, the plug can be removed without problems.
- You will also need to remove the wire terminals located under the protective cap. Therefore, the car owner will first need to dismantle the protective cap by prying it off, and only then remove the terminals.
- Once the top bolt of the generator is removed, you can proceed to the bottom one. The actions are the same - a knob, a ratchet handle, a light knock and dismantling. However, in this case, it is recommended to hold the nut on the reverse side so that it does not turn.
- Next, you should begin dismantling the rod. This should be done carefully and carefully, since there are bearings and bushings inside. They will need to be held so that they do not fall and get lost.
The final step will be to dismantle the generator, clean the internal space of dirt, rust, possible traces of oil, and install a new unit - a standard generator or its equivalent.
You can check the functionality of the generator with a multimeter by connecting it to the battery terminals. The voltage reading should not be less than 13.4 volts.
The pitfall when replacing a Lada Kalina generator with air conditioning is its changed position, so you will have to approach it from the other side.
Thus, in order not to have to change the generator frequently, it is recommended to regularly inspect the technical condition of the car and, if necessary, repair certain parts, devices, and systems. Undoubtedly, repairs will cost the owner of Kalina somewhat less than buying new spare parts and entire units.
The process of replacing the generator regulator relay
So, the process of replacing the generator regulator relay will require dismantling the product itself, but it will not require a pit, and all operations can be carried out from the engine compartment. Let's take a step-by-step look at how to replace the generator regulator relay on a Lada Kalina:
- We remove the “minus terminal”.
- To replace the relay, you will have to dismantle the generator.
- Having loosened the generator mounts, let it loose a little and remove the belt.
- Remove the wire block from the connector.
- We unscrew the nut that holds the contact group of wires and dismantle it.
- We unscrew the bolts of the upper and lower fastenings and take them out.
- We dismantle the generator.
- When the generator is removed, you can proceed to replacing the relay.
- We unclip the three plastic latches of the back cover and remove it.
- Disconnect the diode bridge.
- Unscrew the nut and remove the bushing on the contact group bolt.
- Unscrew the two screws that hold the regulator relay in place.
- We dismantle the relay.
- Assembly is carried out in reverse order.
Thus, the Lada Kalina generator regulator relay was replaced.
Restoring an electric motor at a VAZ
Let's first look at how to replace the brushes of a VAZ 2107 generator. For work, we will be equipped with the following tools:
- set of spanners;
- screwdrivers - set;
- rubber hammer.
So, we begin work on changing the generator brushes on the VAZ 2107.
- We disconnect the terminals of the battery, and also unscrew the cables from the terminals of the electric motor, dismantle it by unscrewing the fasteners. Loosen the belt and remove the electric motor.
- Unscrew the pulley mount while holding the rotor with a tool.
- Disconnect the traction relay.
- After unscrewing the nuts, remove the front cover of the assembly unit using a rubber hammer.
- We also use a rubber hammer to push the rotor out.
- We detach the back cover from the stator.
- We remove the brush holder from the stator and reinstall the worn parts.
- The electric motor is assembled in the reverse order.
This process, if something is not clear, you can also visually study the video called “replacing VAZ 2107 brushes.” Replacing brushes in a VAZ 2106 generator is done in exactly the same way.
If we turn to VAZ models with front-wheel drive, then there are not so many differences in the procedure. For example, let’s first consider how to replace brushes on a VAZ 2110, for which we first take this:
- spanners;
- Screwdriver Set;
- hammer, block, or rubber-tipped mallet.
- Having loosened the belt, disconnected the wires and unscrewed the three bolts, we dismantle the electric motor.
- Having taken the unit out of the car, remove the pulley, holding the rotor with a screwdriver. In principle, the traction relay and rotor do not need to be dismantled; for the “seven” we did this for ease of work.
- Next, unclip the latches on the back of the electric motor, and then remove the plastic casing.
- We immediately see the voltage regulator assembly along with the brush holder.
- Unscrew the two screws and remove the brush holder.
- We renew worn parts.
- We do the assembly in reverse.
By the way, changing brushes on the VAZ 2112 is carried out one by one according to the same instructions. Now let’s figure out how to replace an element on a VAZ 2109.
We will need to prepare:
- set of spanners;
- Phillips and slotted screwdrivers;
- rubber hammer.
Here's what we do (this is an option without removing the traction relay).
- After loosening the belt and removing the tensioner bar, we dismantle the entire unit.
- On the dismantled unit, unscrew the pulley.
- After unscrewing the nuts, remove the front cover of the electric motor.
- Push the rotor out with a rubber hammer.
- We detach the stator from the back of the electric motor.
- We unfasten the diode bridge, take out our failed graphite tips and install new ones.
- Assembly is done on the way back.
It must be said that the work of replacing brushes on a VAZ 2114 takes place in exactly the same sequence. The same applies to work on the VAZ 2115.
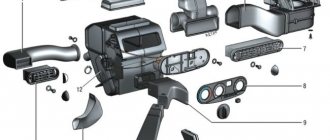
How to replace the voltage regulator and check its serviceability on a VAZ 1117-VAZ 1119?
Checking the voltage regulator for serviceability:
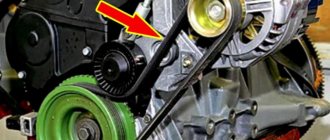
1) At the beginning of the operation, you will need to find where the generator itself is located and after you find it, move your hand to the side with the rubber cover indicated by the red arrow, this cover covers the “B+” terminal; in simpler words, this is the positive terminal and it comes from the generator to this terminal (By the way, it is also indicated by a blue arrow) you will need to connect the positive wire of the voltmeter and after connecting it, throw another wire (Minus wire) coming from the same voltmeter to ground (The places where you need to connect the wire , indicated by a green arrow), after the operation has been completed, a DC voltmeter will show you the voltage in the vehicle’s on-board network.
2) After everything is connected, start the engine of the car and turn on the headlights, when the engine is started, let it run for a while (About 15 minutes) and after this time has passed, at medium speed engine, measure the voltage in the on-board network, which you should have in the range of 14.4-15.1 V.
Note! If this voltage is either more or less, then replace the voltage regulator with a new one!
3) Now, as for the capacitor, to check whether it works or not, you just need to use a megohmmeter to connect the leads that go from it to the contact of the capacitor; when connecting, your resistance should initially decrease and then become infinite (What kind of infinity do you have on the device? it’s very easy to understand, for this, without connecting anything, first look at the numbers that the megohmmeter shows, for example, if it shows 0, then this will be infinity), if this is what happened, then in this case the capacitor is fully operational and does not require replacement, otherwise, replace the capacitor with a new one.
Note! Capacitor - it is built into the voltage regulator itself, and as such it serves as a filter for current, thanks to it the voltage in the network is equalized; for example, it can pass high-frequency currents through itself well, but will delay low-frequency currents!
Detailed description of replacement
First, you need to disconnect the negative terminal of the battery to prevent a short circuit. After this, remove the protective plastic cover by slightly pressing the three latches on it, as shown in the photo:
Then you need to pry up the small power plug with a screwdriver and pull it up with the force necessary to remove it. Personally, in my case, the wire was very tight on the contact, so I had to try hard before removing it. It is better to do everything carefully so as not to tear the solder off the voltage regulator.
After this, you can unscrew two small bolts, as shown in the photo:
And the last one will be a large bolt, which does not need to be turned out completely, you can just loosen it slightly:
And freely remove the voltage regulator along with the brushes, as clearly shown below:
Signs that it's time to change the alternator brushes:
- The car's electrical appliances suddenly turn off (even while driving);
- Headlights, dimensions and even interior lighting dim and flicker;
- A sharp decrease in the voltage of the vehicle's on-board network;
- A sharp discharge of the battery, which will be very difficult to recharge in the future.
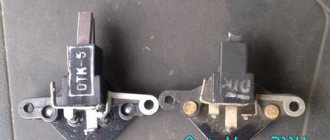
Each of these points may indicate wear on the generator brushes, which are located inside this unit. Many people wonder how to check brushes. In order to check the remaining length of the generator brushes, it is enough to disconnect the generator from the battery and remove the voltage regulator. After this procedure, you can determine by eye how worn out any of the generator brushes are. If the length is less than 0.5 centimeters, the brushes definitely need to be changed. Checking the brushes should be carried out during routine inspection of the generator.
About the principle of operation of a car generator
The operation of the Lada Kalina generator unit is based on the following principle: an alternating current is induced in the stator winding, which is subsequently transformed into direct current through a rectifier module located on the body of the unit. The generator cover is also equipped with an electronic voltage regulator and a brush holder. The rotor of the device receives torque from the crankshaft pulley. The transmission link is a poly V-belt.
The basic characteristics of the generator set include the following parameters:
- maximum generated current – 85-90 Amperes;
- operating range of on-board voltage – 14.4-15.1 Volts;
- rotation ratio of the motor and rotor – 1:2.4;
- right-hand direction of rotation.
The housing of the unit is held together by pins that tighten the stator with the covers. The mounting sockets of the indicated covers contain bearings, which ensure the ability of the rotor to rotate. The rear bearing is installed inside the cover with a minimum gap. The front element is equipped with the ability to slide along the surface of the rotor shaft. It is fixed inside the front cover with a slight interference fit, and a pressure plate covers it from the outside. The back of the device is protected by a plastic casing.
Let's move on to the switching diagram of the generator with the on-board network. The connection diagram is very simple. After turning on the ignition, power begins to flow to the voltage regulator through the battery discharge lamp circuit. When the motor starts, the excitation winding is supplied with supply voltage from three diodes mounted in the rectifier unit.
Using the indicated signal lamp, the generator unit can be checked. If the device is working properly, the lamp lights up when the ignition is on. It goes out when the engine starts. When this phenomenon is not observed and the lamp continues to shine, the generator set should be diagnosed for the presence of malfunctions. In some cases, replacement is required, and many are interested in how to remove the generator?
We change bearings in Lada Kalina
The rectifier units present in the designs of generator sets of the AvtoVAZ model range have received a considerable number of negative reviews during operation. This statement is also true for the Lada Kalina we are considering. These modules can break down even after a mileage of 10 thousand km, which requires repair or replacement of the device. It has also been revealed in practice that the cause of most malfunctions is the generator set bracket. However, bearings can also fail prematurely. It is gratifying that the owners are able to cope with such a problem on their own.
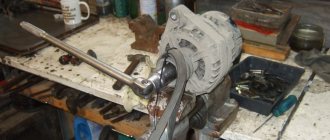
To repair the generator module, it will require preliminary disassembly. For this purpose, we “grab” the tips of the stator cables with a screwdriver and slightly pull them out of the springs present in the diode bridge. Next, you need to unscrew the bolts holding the bridge itself. In addition, unscrew the connecting bolt.
Having disassembled the body of the LADA Kalina generator set, we resorted to checking the integrity of the rear bearing. Here you will need to twist its outer ring. If it rotates without noticeable difficulties or sounds, and is not inclined to emit play, then we ascertain the serviceability of the bearing. When the slightest signs of wear are evident, we change it without hesitation.
The next step is to dismantle the generator unit bracket. Using the same screwdriver, we pry up the stator and remove it from the casing. The bracket design contains a bearing, which is also subject to inspection and replacement (if necessary).
The bearing of the front part of the LADA Kalina generator is rolled inside the casing. The manufacturer does not recommend replacing it. However, experts still advise performing this procedure, since if it breaks down, you will have to replace the entire generator, which is very expensive.
Replacing rear pads Kalina
Idle air control Kalina
Kalina torpedo
This bearing can be removed, but you will first have to remove the pulley and the plug present here. Next, using a hammer with a rubber striker, we excavate the rotor. Note that the front lining of the product will have to be clamped with a vice. We remove the bearing with special care.
If you need to replace the roller or brushes?
When, during operation of the engine, the owner of a Lada Kalina hears a distinct “rustle” coming from the rotating roller of the tension unit, then a detailed inspection of this element will be required and, if necessary, replaced.
To carry out this repair operation, it is recommended to stock up with ordinary keys and a screwdriver with a flat-tipped tip. All replacement procedures do not cause any difficulties, so we act with confidence.
- First, we resort to loosening the degree of belt tension. To do this, unscrew the stem.
- Using the designated screwdriver, carefully pry up the protective cap of the roller and unscrew the bolt holding the bearing.
- From the worn-out roller we remove the bushing together with the washer (they are necessary for installation in conjunction with a new product).
- The entire assembly is mounted in its proper place and secured with a bolt.
- We tighten the belt and start the engine. We make sure that the new product functions correctly.
One of the factors characterizing weak battery charging is wear on the brushes of the generator set. In order to eliminate this negative aspect, the generator brushes will need to be replaced. To monitor their condition, they will need to be dismantled. Replacing generator brushes is available both on a removed generator set and on one installed on a Lada Kalina car.
In order to achieve safety of work and eliminate the risk of a short circuit in the circuit, before repair work it will be necessary to disconnect the network from the battery (remove the terminals). Now you need to dismantle the protective cover and remove the plug. This can be done conveniently using the previously designated screwdriver.
At the final stage of the process, unscrew the bolts, after which we remove the regulator itself with the brushes present on it. Replacement of generator brushes is complete. Brush wear is assessed by measuring their height. This parameter should not be less than 5 mm. If the brushes are worn out, then replace them and the regulator included.
How to replace a generator set?
How to remove the generator? In some cases, repairing the generator unit is impractical or cannot restore the functionality of the device.
Replacement is required here. The process itself is not an intricate undertaking, so it will not take much time from the owner of the Lada Kalina.
For a successful replacement operation we will need:
- Remove the belt, first loosening the tension element.
- Disconnect the plug together with the cable terminals.
- Unscrew the nut securing the upper section of the unit and remove the bolt.
- Use the same method to remove the bolt at the bottom of the device.
- Remove the generator unit from the engine compartment.
Replacement and installation of a new device is carried out using the reverse algorithm.
Steel rings and their advantages
Replacing slip rings on a VAZ 2110 generator
There is no point in installing copper rings, as they wear out very quickly. Therefore, it is better to opt for steel rings, which have a number of advantages:
- They hardly wear out, so the brushes remain in almost perfect condition for a long time.
- They are easy to install.
Note: by the way, for more reliable fixation, they are first lubricated with a flux solution, and then washed with soda.
- Once installed, they are securely fixed, remaining motionless in all situations.
Operating principle
The basic principle of operation of the generator is as follows: a three-phase alternating current is induced in the stator winding, which is converted into direct current using a rectifier unit attached to the cover of the device. On the cover there is a unit consisting of an electronic voltage regulator and a brush holder. The rotor rotates from the crankshaft of the car engine via a serpentine belt.
The Lada Kalina generator has the following characteristics:
- maximum output current - 85-90 A;
- voltage - 14.4-15.1 V;
- direction of rotation is right.
4 bolts secure the stator and covers of the device. The covers contain bearings in which the rotor shaft rotates. The rear bearing is located on the rotor shaft; it is mounted in the rear cover with a small gap. The front bearing, which slides along the rotor shaft, is installed in the front cover with a slight interference fit and covered with a pressure plate. The device is covered at the back by a plastic casing.
The generator connection diagram is quite simple. When the car's ignition is turned on, voltage is supplied to the voltage regulator through the low battery warning light. When the engine is started, the field winding receives power from 3 diodes that are installed on the rectifier block.
Typically, checking the alternator is easily done using the battery charging warning light. If the device is working properly, this lamp should light up when the ignition is turned on, and when the engine starts, it should go out. If the lamp burns brightly or at full intensity, then the generator needs to be replaced or repaired because it is faulty.
What causes rings to wear off?
Alternator rings for VAZ 2110
The following generator parts can cause slip ring failure.
Stator
- On its inside there should be no traces from the rotor that would appear during its operation. Otherwise you will have to change it.
Note: You also need to check the bearings, as this problem often appears when they are broken. Sometimes even the generator cover can also get broken. This problem urgently needs to be fixed by replacing the damaged part with a new one.
- After this, you should check whether there is a break in the stator winding. It needs to be checked in the same way as the rotor.
Generator VAZ 2110
Of course, if you are sure that the stator is completely intact, then you should not carry out such manipulation. But if there is even the slightest suspicion that it is malfunctioning, then it is better to check it. A faulty stator can lead to rotor failure again.
Bearing
- See if the generator bearing located on the rotor rotates correctly. It should rotate freely on the slip ring side without jamming.
- If it dangles too much or, on the contrary, is very tightly clamped, then it needs to be compressed.
Lid
- The generator cover on the slip ring side may have damage, cracks or other defects.
- In this case, it needs to be replaced, otherwise it will have a bad effect on the contact rings, leading to their abrasion.
Replacing bearings
AvtoVAZ cars are very often subject to fair criticism from the owners of cars produced by this company. The Lada Kalina model was no exception to the general rule. Almost all current converters installed on cars of this brand break down after 10 thousand kilometers, after which the generator requires repair or replacement.
As practice has shown, the cause of many breakdowns is not only the bearings, but also the Kalina generator bracket. Car owners often fix this problem on their own. Doing this with certain skills is not so difficult.
To repair the generator, it is necessary to disassemble it. To do this, use a screwdriver to hook the tips of the stator wires and pull them out a little from the springs of the diode bridge. Then unscrew the bolts that attach the diode bridge. After this, the connecting bolt is unscrewed.
After disassembling the generator, check whether the rear bearing is in good condition. To do this, you need to twist its outer ring. If it rotates easily, without noise or rattle, and there is no play, then the bearing is in good condition. At the slightest suspicion of a malfunction, it is better to replace the bearing.
Next, you need to dismantle the Kalina generator bracket. Using a screwdriver, the stator is picked up and removed from the device casing. The bracket includes a bearing, which should also be checked. If a malfunction is detected, the part must be replaced.
The front bearing of the unit is rolled into its casing. Although AvtoVAZ does not recommend changing it, it would still be more advisable to do so, because otherwise you may then need to buy an expensive new generator for Kalina.
The bearing is removed by removing the pulley and spacer plug. After this, the rotor is removed from the rubber using a hammer, and the front casing of the unit is clamped in a vice. The bearing is carefully removed.
Slip ring block
ATTENTION! A completely simple way to reduce fuel consumption has been found! Don't believe me? An auto mechanic with 15 years of experience also didn’t believe it until he tried it. And now he saves 35,000 rubles a year on gasoline! Read more"
Disassembling the generator is the first thing to do. In order to see the rings, it is enough to remove the back cover of the gene from the side of the diode bridge. However, to replace it you will need to disassemble the entire device.
A block of rings is like this.
The rings, as you can see, come assembled. Factory rings have a decent thickness - 1-2 mm. Purchased analogues may be thinner. Blocks of rings “run” on generators, depending on operating conditions, for approximately 300 thousand vehicle kilometers. If the generating device did not fall into the area of primary concern of the car owner, and “lived out its life,” so to speak, in oil, the service life of the slip rings will decrease significantly.
The block is inexpensive. If you replace it along with the bearings and the tablet, you get an almost brand new generator.
However, a block with rings is not always available for sale. Here you should proceed like this: first find a new block with rings, and only after that remove the old one. In some cases, worn rings on an old block can be restored by sanding them down.
You can do this if you can’t find a block on sale: buy a new regulator and put a couple of washers under it. But this should be done so that the brushes move with the worked part of the rings. Even on some regulators, the brushes are initially offset from the standard. By doing this, you can extend the life of the rings for some time.
This is interesting: Removing and installing the sound warning device Lada Largus