Removing and disassembling the generator
Disconnect the wire terminal from the negative terminal of the battery.
Remove the generator belt (see “Checking the condition and replacing the generator drive belt”). By pressing the lock of the generator pre-excitation wire block. . disconnect the block from the voltage regulator connector.
Using the “13” socket, unscrew the nut securing the wire lugs to terminal “B+”. . and remove them from output.
Using a 17mm socket, unscrew the bolt of the lower mounting of the generator and remove it. Remove the nut from the generator bracket.
Using a 13mm socket, unscrew the nut of the bolt for the upper mounting of the generator.
. and remove the generator. We disassemble generator 5132. 3771 to replace the voltage regulator, rectifier unit, rotor, stator and bearings.
Using the “8” socket, unscrew the three nuts securing the casing.
. and remove the casing.
Remove three metal washers from the casing mounting studs.
Using a slotted screwdriver, unscrew the two screws securing the voltage regulator terminals.
Using the “8” socket, unscrew the two nuts securing the voltage regulator.
. and remove the regulator.
We use a marker to mark the relative positions of the generator covers.
Using a 7-point socket, unscrew the four bolts holding the covers together.
Remove the back cover with the stator assembly. If the stator does not come out of the front cover, pry it off with a screwdriver from different sides relative to the front cover.
We put a high “24” head on the pulley fastening nut and through its hole insert a “8” hexagon into the hole of the rotor shaft. We unscrew the pulley fastening nut, holding the tool head with a pipe wrench or in a vice. Remove the spring washer
. and a spacer washer.
Push the rotor shaft out of the front cover.
. and remove the cover to replace the front bearing.
. Using a slotted screwdriver, unscrew the four screws securing the bearing pressure plate.
Remove the pressure plate.
Use your hands to push the bearing out of its seat.
. and remove it. If it is not possible to push out the bearing, we knock it out using a mandrel or tool head of a suitable diameter. To replace the rear bearing...
. Using a two-jaw puller, press the bearing from the rotor shaft. When performing this operation, the puller screw should be pressed exactly into the center of the shaft so as not to damage the plastic insulator of the rotor slip rings. To install the puller grips, two flats are made on the plastic rotor bushing. If it is necessary to remove the rectifier unit or stator.
. We unsolder the six terminals of the stator winding from the terminals of the rectifier block. . and, having unscrewed the three fastening nuts with a “8” wrench, remove the rectifier unit and the stator. Using a tester, we check the stator and rotor windings for open circuits and short circuits to the housing (see “Checking the generator”). We assemble the generator in the reverse order. To install the rear bearing, rest the front end of the rotor shaft on a wooden block.
. and press the bearing onto the rear end of the shaft using a mandrel or a piece of pipe of a suitable diameter, applying force only to the inner ring of the bearing. If the front bearing cannot be inserted into the generator cover...
. We press it in with a suitable tool head, applying force to the outer ring of the bearing.
About the principle of operation of a car generator
The operation of the Lada Kalina generator unit is based on the following principle: an alternating current is induced in the stator winding, which is subsequently transformed into direct current through a rectifier module located on the body of the unit.
The basic characteristics of the generator set include the following parameters:
- maximum generated current – 85-90 Amperes;
- operating range of on-board voltage – 14.4-15.1 Volts;
- rotation ratio of the motor and rotor – 1:2.4;
- right-hand direction of rotation.
The housing of the unit is held together by pins that tighten the stator with the covers. The mounting sockets of the indicated covers contain bearings, which ensure the ability of the rotor to rotate. The rear bearing is installed inside the cover with a minimum gap.
Let's move on to the switching diagram of the generator with the on-board network. The connection diagram is very simple. After turning on the ignition, power begins to flow to the voltage regulator through the battery discharge lamp circuit. When the motor starts, the excitation winding is supplied with supply voltage from three diodes mounted in the rectifier unit.
Using the indicated signal lamp, the generator unit can be checked. If the device is working properly, the lamp lights up when the ignition is on. It goes out when the engine starts. When this phenomenon is not observed and the lamp continues to shine, the generator set should be diagnosed for the presence of malfunctions. In some cases, replacement is required, and many are interested in how to remove the generator?
How to remove the generator on Lada Priora, Kalina, Granta
The generator has to be removed for various purposes, for example, to repair it, modify it, check it, or replace it with a new one. Sometimes in order to gain access to other elements of the engine compartment. The process of removing the generator may vary depending on the engine type and vehicle configuration. The instructions presented below will also be useful for replacing the alternator belt.
Removing a generator on a Lada car without air conditioning
Before starting work, disconnect the negative terminal from the battery and the engine protection. Prepare the keys “10, 12, 13”.
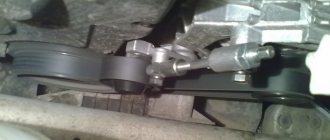
On 16 valve engines (VAZ-21126, VAZ-21127) an alternator belt tensioner is used:
- Unscrew the tensioner nut (No. 2) 3-4 turns.
- Loosen the generator belt by rotating the tension roller screw (No. 3).
- remove the alternator belt
For all trim levels:
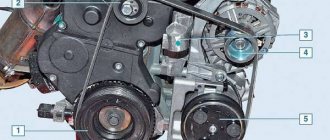
- remove the protective cap (No. 1), unscrew the nut and remove the wiring harness terminal.
- disconnect the block with wires (No. 7) from the generator.
- Unscrew the nut (No. 3) and remove the bolt from the upper mounting of the generator.
- Unscrew the nut (No. 5) and remove the lower fastening bolt.
- remove the belt from the pulley, and then the generator itself.
ps To remove the back cover of the generator, lift three latches at the same time. This is difficult to do, so it is suggested that before dismantling the cover, fix all the clamps in the upper position by placing nails under them. Now the generator cover can be removed without difficulty.
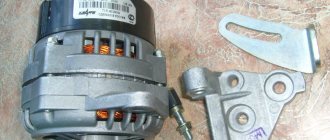
Replacing the generator bracket with tensioner on the Lada Granta from the Lada Kalina
Bracket from Lada Kalina
Despite the fact that the previous method is the most economical, it is time-consuming.
Many drivers prefer to pay an additional 350-450 rubles and purchase a ready-made kit for installing a bracket from the Lada Kalina to the Lada Granta.
The sequence of actions is as follows:
- After dismantling the converter from its standard place in the engine compartment, we proceed to install the bracket from the Lada Kalina.
Original equipment of the modernized mount:
- belt;
- tensioner roller;
- bracket;
- axis to “10”;
- tensioner
- We unscrew the three mounting screws from the old converter, remove the old bracket, install and screw the new one.
- We fix the structure in its regular place, screw the three nuts to “13”.
- We activate the rocker to the third gear position.
- We put on the generator belt, turn the generator pulley by hand until the belt fits into the groove grooves.
We start the engine, check the charging and the LED indication on the dashboard.
Replacing a generator on a Lada with air conditioning
The air conditioning compressor and alternator are driven by one belt. The air conditioning compressor, its tubes and hoses make it difficult to remove the generator.
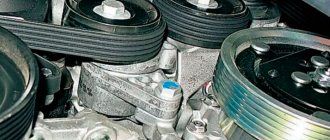
It is necessary to additionally disconnect the compressor (No. 2) from its mounting bracket (No. 3) by unscrewing the four bolts (No. 1). There is no need to disconnect the air conditioning system pipes; we simply move the compressor down and towards the right side member of the body. Otherwise, the process of removing the generator is similar (see above).
Installation of the generator is carried out in reverse order. When pressed with a force of 100 N (10 kgf), the belt deflection should be 8-12 mm. (you can use scales). Let us remind you that other recommendations and tips for operating Lada cars can be found in this category. See also the report on replacing the alternator belt without a tensioner and how to assemble the belt tensioner yourself.
Guide to replacing the Kalina generator yourself
So, let's proceed to a very detailed description of all the types of work that need to be performed. First of all, we need to loosen and release the belt tensioner and then remove it. So be sure to check out this Alternator Belt Replacement Guide first. After this, you can proceed directly to removing the device from the car.
First, we disconnect the plug, which is secured with a plastic latch, just lightly press it and pull it to the side, it will come out without any problems:
And the wire terminals that are under the rubber protective cap, pry it off and unscrew the nut:
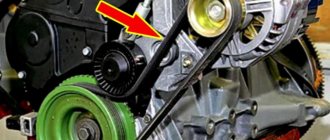
Then we unscrew the nut securing the upper part of the Kalina generator, this is clearly shown in the photo below. You can first move it with a knob, and then work with a ratchet handle:
And tapping the protruding bolt a little so that it moves, remove it from the back side, as shown in the photo below:
Next, we proceed to the lower fastening bolt, and proceed by analogy, only if necessary, hold the nut on the reverse side, since it can scroll:
Be careful when removing this rod as there are bushings there. Hold them immediately so that they do not fall and get lost. And holding the generator body with one hand so that it does not fall, we remove this bolt with the other hand:
Now almost everything is ready and you can safely remove this device from the engine compartment, turning it slightly from side to side, finding the most convenient position for its removal.
To replace the generator on the Lada Kalina, we purchase a new one and install it in the reverse order of removal, putting all the bushings in place in the same places as they were. The price of a new generator ranges from 4000-5000 rubles, so you will have to fork out a little.
Removing and disassembling the generator
Disconnect the wire terminal from the negative terminal of the battery. Remove the generator belt (see “Checking the condition and replacing the generator drive belt”).
By pressing the lock of the generator pre-excitation wire block. . disconnect the block from the voltage regulator connector.
Using the “13” socket, unscrew the nut securing the wire lugs to terminal “B+”. . and remove them from output.
Using a 17mm socket, unscrew the bolt of the lower mounting of the generator and remove it. Remove the nut from the generator bracket.
Removing the Kalina generator
| A car generator is a very reliable device without which the operation of a car is not possible. In this article we will talk about the belt tensioner, as well as how to remove the generator yourself and adjust the tension of the generator belt. |
In April 2011, a pilot batch of 1000 elastic belts 1118-1041020-07 manufactured (Germany) was installed. These Kalinas do not have an alternator belt tensioner, all problems caused by its absence are solved, like the Lada Granta. On other Lada Kalina cars, the alternator belt tensioner is present.
Required tools: socket wrench “8”, wrench “19”, socket “13”, socket “17”. Disconnect the negative terminal of the battery. Then:
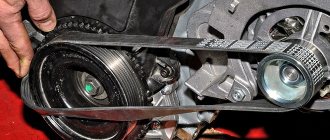
- We hold the belt tensioner pin with a 19mm wrench, put a 8mm wrench on the hexagon of the adjusting pin, and turn it clockwise. The tension will weaken.
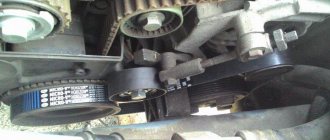
- Remove the Kalina generator belt from under the tension roller, and then from the generator pulleys and crankshaft.
- Press the lock of the generator pre-excitation wire block. Disconnect the connector from the voltage regulator connector.
- Unscrew the nut securing the wire lugs to terminal “B+” using a “13” socket. Remove them from output.
- Unscrew the lower mounting bolt of the generator using a 17mm socket and remove it. Remove the nut from the generator bracket.
- Unscrew the nut of the bolt of the upper mounting of the generator, using a 13mm head.
- Remove Kalina generator
We press the lower branch of the belt upward with our hand; with a pressing force of 100 N (10 kgf), the belt deflection should be about 10 mm. In the absence of a special tool, household scales can be used.
- Excessive belt tension causes increased loads on the belt, generator bearings and tension roller, which leads to premature failure.
- Insufficient belt tension will cause it to slip on the pulleys, causing wear and preventing the battery from charging.
When to change?
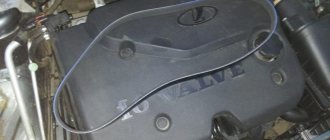
VAZ Lada Kalina vehicles use a belt drive for auxiliary units. On cars with air conditioning, the service life of such a belt is no more than 30 thousand km. On simple versions of cars, the strap can last longer, but most owners try to change it after the same 30 thousand kilometers traveled. For various reasons, the belt may fail earlier, so it must be checked periodically during vehicle operation. There should be no cracks on the working track, and delamination on the outer part of the belt is unacceptable. If such defects are present, we immediately change the strap. Another signal to replace this element is a whistle or other noise when the unit is operating.
The process of replacing the belt on a Kalina with air conditioning (sixteen valves) is presented in a video from the user Alexander.
We change bearings in Lada Kalina
The rectifier units present in the designs of generator sets of the AvtoVAZ model range have received a considerable number of negative reviews during operation. This statement is also true for the Lada Kalina we are considering. These modules can break down even after a mileage of 10 thousand km, which requires repair or replacement of the device. It has also been revealed in practice that the cause of most malfunctions is the generator set bracket. However, bearings can also fail prematurely. It is gratifying that the owners are able to cope with such a problem on their own.
To repair the generator module, it will require preliminary disassembly. For this purpose, we “grab” the tips of the stator cables with a screwdriver and slightly pull them out of the springs present in the diode bridge. Next, you need to unscrew the bolts holding the bridge itself. In addition, unscrew the connecting bolt.
Having disassembled the body of the LADA Kalina generator set, we resorted to checking the integrity of the rear bearing. Here you will need to twist its outer ring. If it rotates without noticeable difficulties or sounds, and is not inclined to emit play, then we ascertain the serviceability of the bearing. When the slightest signs of wear are evident, we change it without hesitation.
The next step is to dismantle the generator unit bracket. Using the same screwdriver, we pry up the stator and remove it from the casing. The bracket design contains a bearing, which is also subject to inspection and replacement (if necessary).
The bearing of the front part of the LADA Kalina generator is rolled inside the casing. The manufacturer does not recommend replacing it. However, experts still advise performing this procedure, since if it breaks down, you will have to replace the entire generator, which is very expensive.
Replacing rear pads Kalina
Idle air control Kalina
Kalina torpedo
This bearing can be removed, but you will first have to remove the pulley and the plug present here. Next, using a hammer with a rubber striker, we excavate the rotor. Note that the front lining of the product will have to be clamped with a vice. We remove the bearing with special care.
Belt and roller selection
Several types of belts are used on Lada Kalina cars.
The type of element depends on the engine model and its equipment:
- The motor version without air conditioning and tensioner has a belt length of 823 mm. Gates (number 6PK823) is standardly used, but such a part is not supplied as spare parts. To replace it, a slightly different strap is used - Gates 6PK823SF.
- The version of the unit with a belt tensioner, but without air conditioning is 882-884 mm. Standard part manufactured by Gates (article 6PK882). In addition to it, straps are often used - Finwhale BP6883, Dayco 6PK888 or the cheapest Balakovo belt BRT882.
- Engine with air conditioning and belt tensioner (motor 11183) - 1018 mm. Standard element manufactured by Gates (number 6PK1018). Alternative options are Dayco 6PK1018 or Continental 6PK1015.
- The 21127 16-valve engine with air conditioning and tensioner uses a 995 mm belt. The Gates part (6PK995) is supplied from the factory, and it is also used as a spare.
Sometimes when replacing a belt it becomes necessary to install a new tensioner. It is the same for all motors, its article number is 2123–1041056.
How to change it yourself?
The complexity of replacing the alternator belt on Kalina does not depend on the number of valves or additional units on the engine.
Replacement on 8 valve engines without tensioner
Replacing the belt on such an engine is the simplest; the only tools you need are a 13 mm wrench and a short flat-blade screwdriver. Since the tension in such a drive scheme is quite strong, when changing it is necessary to use only a Gates 6PK823SF or Dayco 825 six-V belt with the additional marking POLY-V. The remaining straps are too rigid, quickly collapse and damage the bearing on the generator shaft.
Stages of work
To complete the task you need to do the following:
- Unscrew the lower mounting bolt of the generator 2-3 turns.
- Unscrew the nut of the upper fastening, use a screwdriver to push out the bolt and remove it completely.
- Lower the generator down. The eye of the mechanism must pass through the gap between the radiator and the TV body.
- Remove the old belt and replace it with a new one. If the strap does not fit easily onto the pulleys, you can carefully tighten it using a screwdriver.
- Raise the generator up, ensuring the belt is tensioned.
- Insert the upper mounting point bolt and tighten the nut.
- Tighten the lower mounting point bolt.
- Check the operation of the belt.
Assembling the Lada Kalina generator
Complete unit
Before you begin to fit the bearing into the front cover of the generator, you will need to inspect its seat for deformed areas. If they are found, you need to straighten the wrinkled areas using a knife or scraper. When seating the front bearing inside the casing, do not press on the central part; the part should be inserted by pressing on the edges of the outer ring.
Having selected the desired frame from the cup puller set, fit the bearing tightly onto the front casing of the generator. Using gentle blows of a rubber hammer, you need to correct the rolling of the bearing inside the casing. Using a small tube (18 mm), slide the rear bearing onto the rotor shaft.
Before you begin mounting the rear bearing, you need to make sure that the shaft is well clamped in the vise. You can put a small wood chip under it. This will help secure the front rotor wing during the bearing installation process. In order not to damage the bearing, you need to hit only its central part with a hammer.
The rest of the generator assembly is carried out in the reverse order of disassembly. Here the marked marks that were applied during the dismantling of the generator will help you. The fastening of the unit should be tightened in the mode of a car wheel, that is, crosswise.
In this case, you need to tighten the bolts gradually, without tightening them all the way right away. After successful tightening, the rotor should spin without unnecessary effort or stopping. If it sticks, it means that the generator casing is assembled incorrectly. Before attaching the plastic casing, you need to make sure that the stator winding is securely fastened.
Repairing a Lada Kalina generator is not a very labor-intensive process, but it requires care and some experience working with electrical appliances. If you encounter difficulties in servicing the unit, you must entrust this matter to qualified specialists at dealer service stations.
LadaKalina
LadaGranta LadaKalina 2
LadaKalina Sport
Lada Granta Sport
AR 0301 / AR18-1041034
Replacement cost
The cost of changing a belt on a Lada Kalina car depends on the type of engine, range of units and is:
- for a motor without a tensioner - from 300 rubles;
- engines with a tensioner without air conditioning - from 150 to 350 rubles;
- motors with tensioner and air conditioning - from 220 to 400 rubles;
- for unit 21127 - about 600 rubles.
Replacing the roller will require an additional 250 rubles. The total amount required by the car owner to purchase spare parts, in the maximum version, will not exceed 850 rubles.
Video “Replacing the belt on Lada Kalina”
The author Kalinin talks about the procedure for replacing the belt on his Kalina with a tensioner.
Hi all. So I’m on my way to work and here on you:
Battery charging disappears. At lunchtime I went out, threw the multimeter probes on the battery with the engine running, it gave about 12 volts - this is bad. I removed the negative terminal of the battery, and with the engine running, it stalled. This means there is a problem with the generator... I took the battery to work. Thanks to my colleague for borrowing the charger. I put the battery on charge until the end of the day... In general, I was able to get home on one battery) The next day I started removing the generator. There is nothing complicated (if you have the tools), just jack up the right side.
Removing a generator on a Lada car without air conditioning
Before starting work, disconnect the negative terminal from the battery and the engine protection. Prepare the keys “10, 12, 13”.
On 16 valve engines (VAZ-21126, VAZ-21127) an alternator belt tensioner is used:
- Unscrew the tensioner nut (No. 2) 3-4 turns.
- Loosen the generator belt by rotating the tension roller screw (No. 3).
- remove the alternator belt
For all trim levels:
- remove the protective cap (No. 1), unscrew the nut and remove the wiring harness terminal.
- disconnect the block with wires (No. 7) from the generator.
- Unscrew the nut (No. 3) and remove the bolt from the upper mounting of the generator.
- Unscrew the nut (No. 5) and remove the lower fastening bolt.
- remove the belt from the pulley, and then the generator itself.
ps To remove the back cover of the generator, lift three latches at the same time. This is difficult to do, so it is suggested that before dismantling the cover, fix all the clamps in the upper position by placing nails under them. Now the generator cover can be removed without difficulty.
Stages of work
To adjust the degree of belt tension on Kalina engines, a mechanical tensioner is used, in contrast to the timing drive, which uses a hydraulic tensioner. When changing an element, it is recommended to carry out preventive maintenance of the roller by adding fresh lubricant.
To complete the work you need to do the following:
- Loosen the roller bolt. The thread on it is reversed.
- Use a screwdriver to pry up the plastic plug on the roller and carefully remove it.
- Unscrew the fixing nut on the tensioner rod a few turns.
- Loosen the belt tension by rotating the rod nut clockwise. The nut must be unscrewed until the rod begins to move freely in the seat.
- Unscrew the side bolt securing the rod end, located next to the tension roller.
- Remove the tensioner and set it aside.
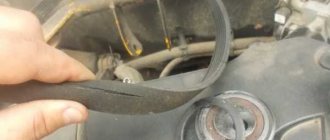
- Proceed to dismantle the strap. The procedure must begin with the generator pulley, while overcoming the slight resistance of the belt.
- Remove the element from the crankshaft pulley and remove it completely.
- Unscrew the roller bolt and remove it.
- Using a needle, carefully pry up and remove the protective caps on the bearing. Wash the bearing with white spirit or gasoline.
- Refill with fresh grease and install protective rubber caps.
- Assemble all the parts and mount the roller in place. When assembling, you must remember that the bushing is in the bearing on the side of the bracket.
- Change the belt by installing it in the reverse order - from the crankshaft pulley to the generator pulley.
- Install the tensioner and begin tightening the belt by turning the nut counterclockwise. The nut must be tightened until the resistance increases. A well-tensioned strap should be slightly pressed when pressed by hand.
- Tighten the nut securing the tensioner rod.
- Check the operation of the mechanism; if a whistle occurs, tighten the strap.
Loosening the 17mm left nut
Removing the cover on the roller
Disassembled tension roller
Bearing with caps removed
Washed roller
Reassembling the unit
Belt tension
Tightening the control nut
Replacing a generator on a Lada with air conditioning
The air conditioning compressor and alternator are driven by one belt. The air conditioning compressor, its tubes and hoses make it difficult to remove the generator.
It is necessary to additionally disconnect the compressor (No. 2) from its mounting bracket (No. 3) by unscrewing the four bolts (No. 1). There is no need to disconnect the air conditioning system pipes; we simply move the compressor down and towards the right side member of the body. Otherwise, the process of removing the generator is similar (see above).
Installation of the generator is carried out in reverse order. When pressed with a force of 100 N (10 kgf), the belt deflection should be 8-12 mm. (you can use scales). Let us remind you that other recommendations and tips for operating Lada cars can be found in this category. See also the report on replacing the alternator belt without a tensioner and how to assemble the belt tensioner yourself.
Replacement process
During the work process you need to perform the following actions:
- Raise the car on a jack and remove the right wheel, as well as the protective wheel arch liner and the support boot.
- Install a safety support under the bottom of the machine.
- Remove the protective shield under the engine.
- Raise the engine under the crankcase with a jack. A wooden stand must be placed between the lifting part of the jack and the engine oil sump.
- Remove two TORX E14 bolts securing the power unit support to the bracket. If the screws are tight, you need to vary the position of the motor with a jack, achieving easy rotation.
- Unscrew the three TORX E14 bolts securing the support to the side members of the car body.
- To loosen the belt tension, to do this you need to unscrew the fixing nut.
- Rotate the nut 8 mm clockwise until the belt is completely loosened. Then you need to remove the strap and thread a new element through the place where the support was removed.
- If necessary, you can replace the grease in the tension roller. The scheme is completely identical to that described above.
- Tension the belt by turning the nut 8 mm counterclockwise. The tension should be controlled by hand - the element should bend when pressed.
- Secure the tension with a 19 mm nut.
- Install all removed parts in reverse order.
- Start the engine and check the operation of the drive. To do this, you need to load the belt as much as possible - turn on all electricity consumers and the air conditioner.
- If a whistle occurs during operation, you must tighten the strap. To do this, with the engine running, you need to loosen the lock and carefully tighten the tensioner rod until the whistle disappears.
- Tighten the lock nut.
- If a whistling noise occurs during operation, the belt must be tightened further.
The engine mount is circled in red.
Loosening the tensioner
Arch locker and support boot
The engine mount is highlighted with a red oval.
Location of five TORX E14 bolts
Engine mounting location
DIY generator replacement
Usually, even factory generators on Kalina serve for quite a long time and do not require replacement, of course, unless you come across a car with a factory defect of this device. If this electrical equipment unit fails, it will have to be replaced. Although this is not difficult to do, it will take at least an hour, especially if this is your first time doing this procedure. So, we will need the following tools:
- Open-end or ring wrenches for 8, 13 and 19
- Small and large ratchets and heads for 8, 13 and 19 for more convenient and faster work
- Wrench with extension