Owners of domestic VAZ 2110, 11 and 12 cars unanimously claim that the stove in these cars is one of the most capricious and problematic units. Considering our frosty winters, you simply cannot do without a working stove in your car, and it breaks down quite often. Therefore, specialized experts recommend that if the heating system fails, immediately contact a car service center or restore the operation of the stove yourself.
How to check the serviceability of the SAUO controller
To check the automatic control system, you will need a multimeter to measure the voltage on the pink and brown wires (turn on the ignition and turn the temperature knob). Depending on which controller is installed on the car, the voltage changes differently. On cars before 2001, a heater control controller 1303.3854 was installed; its voltage in the “min” position decreases after 13 ± 5 seconds, and is constantly supplied to o. Thus, when the output voltage of the ACS unit does not change, it is not working. On cars after 2003, block 1323.3854 and stove 2111-8101012 were installed.
When the controller malfunctions, the dampers may not work , but in order to diagnose other causes of malfunction of the VAZ 2110-12 heater, you will have to disassemble the heater.
The stove doesn't blow at all, what's the problem?
If the heater fails, you can do the initial fault diagnosis yourself.
Unfortunately, the complex heater control system has not proven itself as a device that allows you to take the hassle off the driver and automatically maintain the set temperature. Instead, we got a lot of trouble and cold interiors in the frost. Let's go from simple to complex and first let's look at the problems with the electric heater motor. Everything is more or less simple here:
- Fuse. We turn on the stove, it doesn’t work. If we were lucky, the fuse had blown. Finding it is as easy as shelling pears, it is more difficult to find out the reason for its burnout. The 25-amp fuse F18 is located in the main mounting block; it also protects the circuit for the glove compartment lighting, heated rear window and is partially related to the cigarette lighter, so it is easy to diagnose its failure. And in order to find the short circuit that caused it to burn out, you will have to call all these circuits - the glove compartment light, the rear window heating, the headlight washer and the cigarette lighter.
Heater fuse location.
We check the contacts on the heater control unit and the electric motor.
Video about replacing the VAZ-2110 heater motor
Checking the automatic heater control system
The stove control system can also give out surprises. They consist in the fact that one of the speeds may not work, several, or only one, the most powerful, may work. At the same time, the SAUO block is not universal and is selected depending on the year of manufacture of the car:
One of the reasons for the failure of the stove may be the unit of the automatic heater control system.
- 2110-8128020-03 , price 2300 rubles, applies to the last ten years of production;
- 21102-8121020 , price 3100 rubles, installed on cars with air conditioning;
- 2110-8128020-02 , about 2 thousand, were put on the first ten years of production;
- 2110-8128020-01 , 1840 rubles, used on some cars until 2000.
Nevertheless, the design of all units is similar, only some parameters are different, and the signs of malfunction are similar for all.
Checking the dampers of the VAZ 2110 heater system
The stove system has 2 dampers. The upper one regulates the intake of cold air, and the lower one regulates the intake of hot air from the heater radiator. And when the drive mechanism or the damper itself breaks down, the stove can heat weakly, not heat at all, or fry too much.
Breakdowns of the heater damper can be of different types; firstly, the damper often gets stuck or jams , and secondly, the damper drive (micromotor-reducer) fails . In some cases, the damper warps or jams due to rust , since there are two types of dampers: the old and the new type, the old ones are plastic with a foam rubber seal, and the new one is metal with a rubber seal. Therefore, if you cannot hear the damper moving, you can move it by hand by removing the deflector in the central panel. The problem with metal ones is that they often jam from rust, and plastic ones warp from exposure to hot air. So if, for example, warm air blows into the front window of a VAZ 2110, and hot air blows from the sides and into the legs, then most likely the damper has not completely blocked the air intake from the street. And when the dampers do not move at all, then you need to check the microdetector - the damper drive mechanism.
Principle of operation
Due to the lack of a tap, the heating inside a domestic car is controlled by a hot air power damper. The adjustment is automatic, with an accuracy of two degrees Celsius. The damper has proven to be less practical than the faucet, as the latter can jam, stick or freeze. The main flow of heated or cooled air is evenly distributed throughout the cabin - first onto the windshield, and then passes through the deflectors closed with flaps to the side windows. The floor and footwells are heated using a similar principle. There is also an air recirculation system inside the cabin, which prevents an environmental disaster in the car due to unauthorized entry of outside air polluted and filled with road dust.
How to check the heater damper micro-reducer?
To check the damper drive, you will need an ohmmeter for measurement. In old SAUO controllers, the resistance at the minimum position of the blue dot should be from 800 to 1200 Ohms, and in new controllers - 3.5-5 kOhms. To check, you will first need to set the degrees to minimum and wait 15 seconds. Disconnect the controller connector and, with the engine running, measure the resistance between contacts X1.4 and X1.1.
At maximum temperature (red dot of the left handle), the multimeter should show 3.2-5 kOhm if the controllers are old and 1.2-1.6 kOhm if there is a new controller (1323.3854). If there is no resistance or if it does not change, it reports that the micro-gearbox shaft position sensor is faulty ( the tracks are erased ) or the ACS itself has simply failed and no voltage is supplied to the micro-gearbox.
To replace the microdetector, check the fan or repair the heater radiator, you will have to disassemble the stove.
Possible problems
If the stove motor is not working well, do not rush to blame it. Of course, it tends to become clogged with extraneous small things - particles of dust, soot and other contaminants. It is enough to do preventative cleaning once or twice a season. Similar procedures must be carried out before the end and at the beginning of the operating season. The temperature sensor may fail. In this case, the movement of the damper is disrupted. In normal mode, it opens at the maximum when the red dot is reached and closes when the blue minimum point is reached. The indicators of normal resistance also differ. Typically the value is in the range of 20-25 ohms. If it goes beyond the limits, the fan may not heat or cool the air properly. A malfunction of the stove fan itself is indicated by unusual behavior. For example:
- Grinding noises during operation and extraneous noises;
- The fan does not start at all;
- Reduced efficiency and volume of air injection;
- I hear the fan is not working well.
The first place in the frequency of breakdowns is occupied by the electrical circuit from the battery to the stove motor. If the cable fails completely, a blown fuse is to blame. Malfunctions of the electric motor at different speeds hint at a blown resistor. And if there are no changes in the operating mode, the diagnosis is obvious - the control controller does not respond. The terminals of various connections may also fail. But if the electrical equipment is normal, then the device will have to be dismantled and thoroughly rebuilt.
Checking the resistance resistor
The stove resistor has 2 spirals, the resistance of the 1st is 0.23 Ohms, and the 2nd is 0.82 Ohms. When both are activated, the heater electric motor operates at the first speed, but if the resistor operates at the first spiral, then the 2nd speed is activated. At the third, maximum fan speed, when the resistor is not used. When the electric motor is turned on without a resistor, the fan rotor rotates at the maximum 3rd speed.
In addition to the above malfunctions, the stove may also not work due to a low level of antifreeze, air in the cooling system, or a non-working thermostat or pump.
The heater only blows at one speed
Without dismantling, you can diagnose a breakdown if the fan spins only at one speed or only in the third mode . The reason is the resistor, which is installed in the heater controller itself.
When the stove operates at only one speed, you should check the resistor.
Structurally, the switch is designed so that in the first two modes the electric motor is supplied with low voltage through a resistor, and in mode 3, bypassing the resistor. You can check this using a multimeter in resistance measurement mode.
The resistance of the first speed resistor is 0.23 Ohm , the second is 0.82 Ohm . If the spiral breaks or the contact tracks are worn, the multimeter will show infinity or a break.
Depending on the controller model, it may have three or four control positions, but the principle of operation is the same and understanding the connection diagram is not so difficult. Whatever the switch is, if speeds 1 and 2 are not working, you need to check the resistance on the switch slider . Thus, you can try to restore the heater control system or replace it with a new one as a last resort. Good luck to everyone in their search and warm cozy salons!
Checking the automatic control system
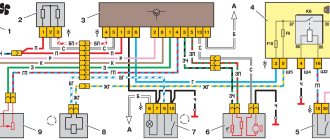
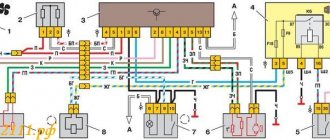
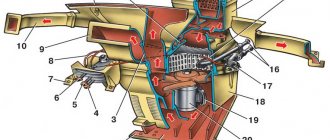
Diagram of the automatic heater control system : 1 – fan electric motor; 2 – additional resistor; 3 – controller; 4 – mounting block; 5 – ignition switch; 6 – cabin air temperature sensor; 7 – recirculation switch; 8 – recirculation valve; 9 – micromotor gearbox for heater damper drive; A – to the instrument lighting switch; B – to power supplies
Troubleshooting
Standard situation: the fan operates in all provided modes, but the heater only blows cold or hot air.
In this case, you can conduct a fairly simple test. Turn on the ignition, turn off the heating fan and move the interior temperature control knob to the extreme left (minimum) or extreme right (maximum) position. In this case, you can determine by ear whether the micro-gearbox is working. If it works, the heater fan is turned on at its fastest speed, and the temperature control is again moved to the far left and far right positions, allowing it to run in each of them for a few seconds. In this case, the sound of the air flow should change; if this is not the case, then this indicates a mechanical break in the connection between the electric motor and the damper or its jamming in one position. This will require further disassembly of the system and restoration of the functionality of the damper.
In a situation where during testing you cannot hear the operation of the micromotor-gearbox, you need to carry out other checks that will help you figure out why the stove temperature regulator is not working. Its handle must be set to the middle position. After this, remove it from its seat on the panel. Without disconnecting the pads, the controller should be turned towards you as much as possible.
We test the supply voltage to the control unit. To do this, you need to take a 12 V test lamp, connect one clamp contact in a small screwdriver, which is inserted into contact 3, with a black wire coming out of it. Insert the second contact into pin 6, which is located under pin 3 and the blue wire comes out of it. If the control lights up when the ignition is turned on, it means that power is supplied to the control unit, and the VAZ 2110 heater regulator stopped working for this reason. For diagnostics to proceed normally, the battery and on-board voltage must be at least 12.5 V.
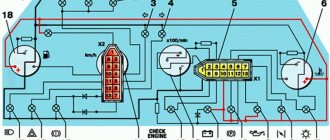
If power is supplied to the controller, you need to turn off the ignition and disconnect the large X1 block with 13 connectors. Next, you need to take two conductors with contacts that can be connected to the controller plugs. One wire attaches to pin #2 in this connector, it will be the first one on the right in the top row when looking directly at the connector. The second end of the conductor is connected to the positive connector of the multimeter. The other wire connects to connector No. 8, which is located in the top row in 4th place, if you count from the right. The conductor is connected to the negative terminal of the multimeter.
To carry out further measurements, the multimeter is set to voltmeter mode at direct current, with measurement limits up to 20 V. We turn the controller towards ourselves and set the temperature regulator to the middle position. After this you need to turn on the ignition. Small readings in the range of hundredths of a volt may appear on the multimeter; these can be ignored.
The temperature control is turned to the extreme right position (maximum heat). A voltage in the range of 10-11 V should appear on the multimeter screen, which is applied for 10-14 s, after which it disappears.
After this, the regulator is moved to the extreme left position (minimum heat). The same readings should appear on the device in the range of 10-11 V, in the same time period, but with a minus sign. It indicates that the polarity of the connection at the output of the controller has been reversed.
When checking controller 13333854, where the temperature of the VAZ-2110-12 stove is adjusted automatically, you need to know that its polarity at the outputs will be the opposite. That is, in the extreme right position, the multimeter readings will have a minus sign, and in the extreme left position without a sign in front of the readings. Otherwise, its testing is similar.
Thus, repairing the VAZ-2110 stove regulator does not require special skills and tools, and the only complex equipment you will need is a multimeter, which many car enthusiasts have. You can check and troubleshoot problems yourself, including in cases where the damper jams, which will be signaled by one of the control system tests. If a sensor or micro-reducer fails, you can easily change them yourself, since access to them is quite simple. The only serious problem is the failure of the control unit itself, which is practically beyond repair, since it is based on an integrated circuit, so it is easier to replace.
Stories from our readers
“Fucking basin. "
Hi all! My name is Mikhail, now I’ll tell you a story about how I managed to exchange my two-wheeler for a 2010 Camry. It all started with the fact that I began to be wildly irritated by the breakdowns of the two-wheeler, it seemed like nothing serious was broken, but damn it, there were so many little things that really started to irritate me. This is where the idea arose that it was time to change the car to a foreign car. The choice fell on the melting Camry of the tenth years.
Yes, I had matured morally, but financially I just couldn’t handle it. I’ll say right away that I am against loans and taking a car, especially not a new one, on credit is unreasonable. My salary is 24k a month, so collecting 600-700 thousand is almost impossible for me. I started looking for different ways to make money on the Internet. You can’t imagine how many scams there are, what I haven’t tried: sports betting, network marketing, and even the volcano casino, where I successfully lost about 10 thousand ((The only direction in which it seemed to me that I could make money was currency trading on the stock exchange, they call it Forex. But when I started delving into it, I realized that it was very difficult for me. I continued to dig further and came across binary options. The essence is the same as in Forex, but it’s much easier to understand. I started reading forums, studying trading strategies. I tried it on a demo account, then opened a real account. To be honest, I didn’t manage to start earning money right away, until I understood all the mechanics of options, I lost about 3,000 rubles, but as it turned out, it was a precious experience. Now I earn 5-7 thousand rubles a day. I managed to get the car buy after half a year, but in my opinion this is a good result, and it’s not about the car, my life has changed, I naturally quit my job, I have more free time for myself and my family. You’ll laugh, but I work directly on the phone)) If If you want to change your life like me, then here’s what I advise you to do right now: 1. Register on the site 2. Practice on a Demo account (it’s free). 3. As soon as you get something on the Demo account, top up your REAL ACCOUNT and go to REAL MONEY! I also advise you to download the application to your phone, it’s much more convenient to work from your phone. Download here.
Trouble-shooting
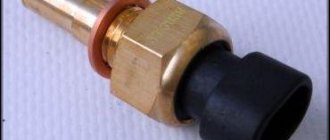
Checking the cabin air temperature sensor
You can check the serviceability yourself; special skills are not required. Carefully remove the sensor from its original place. We find the contacts on the back side. Using a multimeter, apply a voltage of 1.2V. We set the regulators of the automatic heater control system to the “Min”, “Max” positions. The motor should not be activated.
The second method is to turn off the cabin air sensor. Check fan speed settings. The first speed (“A”) should be inactive.
Video: Heater VAZ 2110, 11, 12. Design and principle of operation.
Checking the proper operation of the automatic control system
The proper operation is checked with a multimeter. The voltage at the terminals of the pink and brown wires is measured, the ignition is activated. Smoothly turn the temperature regulator; the arrow on the multimeter display should show an increase in voltage.
On old-style heaters, at maximum voltage, the controller value remains unchanged. Take this into account so as not to make hasty conclusions about the malfunction of a particular unit.
The cause of controller malfunction may also be deformed dampers. To verify this and eliminate the breakdown, we disassemble the heater.
Prevention of the damper of the heating system of VAZ 2112
To be precise, two dampers are subject to inspection; this is the number of them present in the VAZ 2112. The cold air intake is regulated in the upper part. In the lower part, warm (hot) air is supplied to the car interior. Due to wear on the drive mechanism, the damper opens halfway or partially, the air flow is reduced, and the interior is not heated sufficiently.
Reasons for failure:
- biting, jamming during operation, due to the lack of a sufficient amount of lubricant;
- a lot of debris, moisture, sand, dirt, which contributed to jamming;
- failure of the gear motor damper cable;
- numerous layers, rust, corrosion.
The old and new dampers differ only in the type of sealing ring. In the old ones it is plastic with foam rubber, in the new ones it is a metal seal with rubber. If you can’t hear the movement of the “curtain”, move it, set it in motion, after first removing the deflectors from the central part of the dashboard with a flat-tip screwdriver. Be careful, as the plastic casing of the console is damaged.
Metal ones are better and more practical, but they are afraid of moisture, rust, and deposits. Plastic ones, on the contrary, are deformed from heat and elevated temperatures.
The second way to check the performance of the damper: if the windshield heats hot air, but the sides or legs are warm, there is a malfunction. There is no air flow - the microdetector has failed. This is the drive mechanism.
Defective damper micro-reducer
Diagnostics is permissible if you have a special device - an ohmmeter. It is designed to measure resistance in an electrical circuit. In old-style controllers, the indicators are in the range of 750 - 1250 Ohms, in new ones - 3400 - 5100 Ohms.
Troubleshooting occurs as follows: we start the power unit, set the temperature to o, wait 15 - 20 seconds, turn it off. We disconnect the controllers, measure the resistance with the ignition on between contacts X1.4 and X1.1.
At maximum temperature, the ohmmeter shows up to 5.0 Ohms on the new one or 1.6 Ohms on the old one. The absence of resistance indicates a malfunction: failure of the micro-gear sensor. More often, the tracks wear out, the wiring becomes damaged, and the fuse blows. To replace the micro-reducer, the stove is disassembled.
Fan runs at one speed
If the motor rotates only in the first two speed modes, then look for the reason in the resistor. It's faulty. Activation only at the third speed indicates “direct” operation, bypassing resistors. The reason is worn tracks on the switch, temperature controller.
Diagnosis of resistance resistor
The resistor design contains two spirals: the first with a resistance of 0.23 Ohms, the second with 0.82 Ohms. When both spirals are activated, the fan operates at the first speed; when one is activated, the motor operates at the second speed. When starting directly without a resistor, third gear is activated.
The most common causes of breakdowns of the VAZ 2112 stove are low levels of antifreeze, air in the system, malfunctions of the thermostat and pump.
Source
Adjusting the automatic control system
Place a regular mercury thermometer near the temperature sensor on the ceiling. Turn on the heater controller and set the fan control knob to position “A”, and set the temperature dial to 2C higher than the air temperature in the cabin. If, with the doors and windows closed, after 15 minutes the temperature in the cabin does not correspond to the set temperature, then the heater control unit should be adjusted.
To adjust, pull out the SAUO block from the socket and rotate the regulator on the left side of the controller:
- turn clockwise to increase temperature.
- turn counterclockwise to decrease.
Check the operation of the heating system again by repeating the above steps.
Block responsible for temperature
The central unit in the stove system is the heating unit. Its main function is to directly heat the interior. This block is arranged as follows. An electric motor with fan blades pumps hot air, three dampers perform the function of recirculation and closing/opening the channels. There is also a heater core. On modern new generation systems, heat exchangers are not equipped with a tap.
Therefore, the radiator is always heated, regardless of the time of year. The manufacturer claims that this has solved the problem with constant faucet leaks. In addition, heating of the interior is significantly faster. In summer, supply ventilation occurs outside the radiator.
SAUO repair
Before repairing the SAUO VAZ 2110 unit, you should make sure that the problems with the stove are associated with it. To do this, you should connect a known working heater control unit (borrow from a friend or from a store). If there are no problems with the stove with the working unit of the automatic control system, then we try to find out what the reason is. If the obviously working unit of the automatic control system did not help, then the problem with the stove is somewhere else.
Remove the buttons next to the SAUO block. We take out the stove control unit. Set the controls to position 0 and remove, and then remove the front cover and glass from the latches. Unscrew 2 screws in front and 1 in back. We remove the board from the plastic case and check the integrity of all tracks, jumpers and resistors. In this example, a broken jumper was found. We solder it on one side and the other. Reassemble in reverse order. Now all speeds of the SAUO block work .
FAQ on the operation of the VAZ 2110 stove
1st oven speed does not work
- All heater fan speeds (except the last one) are connected through an additional heater resistor, which is located under the frill (wind flap). One of the reasons when the first speed of the heater does not work is a malfunction of this resistor. Depending on the ACS unit, this additional resistor varies:
RDO 2108-8101081 is used on the oldest SAUO units, which have only 2 speeds. (0 A 1 2).
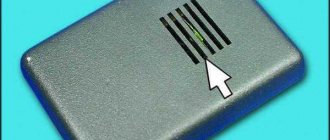
RDO 2110-8118022-01 is installed on a modified heater until September 2003, the SAUO unit has 3 speeds (0 A 1 2 3). The most common malfunction in this resistance is that all stove speeds stop working, except maximum 3. The reason is that the thermal fuse is unsoldered (indicated by a red arrow), and is treated by soldering it in place. But if it is unsoldered later, you need to look in the direction of the motor, the motor takes a very large current (not lubricated, wear on the brush assembly, etc.).
RDO 2123-2118022 has been installed on the latest heaters since September 2003, the SAUO unit has 4 speeds and does not have an auto mode (0 1 2 3 4).
- In addition to a malfunction of the additional heater resistor, the problem may also be in the contacts of the heater control unit board. Often, due to high temperatures, the board becomes very hot and the contact is soldered off. Carefully examine all contacts on the boards, especially at the power supply points.
- Clean contacts.
Heater speed 2 doesn't work
- The reason is exactly the same as in the case when the first heater speed does not work.
3rd speed heater doesn't work
- If the 3rd speed is the last, then it works without resistance (directly). And the problem may be in the contacts of the ACS unit (stripped/crimped), or in the contacts on the board of the ACS unit.
- If you have a stove control unit with 4 fan speeds (0 1 2 3 4), then look for problems with the 1st stove speed.
4th oven speed does not work
- The reason is exactly the same as in the case when the third heater speed does not work.
The stove blows equally at speeds 1 and 2, that is, there is almost no difference between the first speeds, but at speed 3 it blows much stronger
- The reason is the additional heater resistor, it needs to be replaced.
The temperature on the heater control unit is not regulated or the heater fan does not work. Disassemble the ACS unit and carefully examine all tracks and contacts. If there are no visible defects, then you need to look for the cause in the part indicated in the photo.
- Another reason could be poor contact in the fuse box. On the back of the block there is a 6-terminal chip, the blue wire on it is to the fan. Perhaps it was burnt in this connector at the connection point. It is necessary to replace the chip and crimp the new connector. Remove the block, disassemble and solder the leg (perhaps it melted and became unsoldered due to heating).
ps If there are other solutions to problems with the operation of the stove , then leave comments, we will supplement the FAQ on the operation of the SAUO unit . By the way, malfunctions in the heater can be caused by other reasons.
What most often failed in the stove of your “ten”?
Stove fan
Structurally, the fan consists of a DC electric motor with a commutator-brush assembly and an impeller mounted on the electric rotor. motor. The electric motor is powered from the vehicle’s on-board network. There are several modes of fan operation, the difference between which comes down only to the rotor rotation speed, and this is realized by inserting a resistor into the power supply circuit of the electric motor.
The fan operating mode is set using a handle located in the heater control unit on the center console. Initially, on the VAZ-2110, this handle was part of the design of the SAUO controller, but functioned separately from the controller itself. Later, the ACS added an automatic fan control function (position “A” on the handle), using which the controller regulates the rotation speed of the electric motor in order to maintain the set temperature.
The electric motor used in the design of the VAZ-2110 fan is simple, but it has “weak points” - the commutator-brush assembly and bearings. Wear of these elements causes incorrect operation and complete inoperability of the fan. Short circuits and winding breaks in the stove drive are rare, but don’t forget about these breakdowns either.
Symptoms of failure. Heater components that affect fan operation
Signs of a malfunctioning stove fan are quite obvious and impossible not to notice. Common symptoms of failure:
- Increased noise, grinding noise during operation.
- Significant reduction in air injection efficiency.
- The fan does not turn on.
- Spontaneous change in the rotation speed of the electric motor.
- It can be determined by ear that the electric motor is operating under heavy load.
In some cases, such consequences result from malfunctions in the power supply and fan control circuits, so you should check them first. This applies to:
- fuse (blowout is the cause of complete failure of the electric motor);
- resistor (if it is faulty, some speed modes of the electric motor stop working);
- controller (the knob for switching fan modes is part of its design, so malfunctions of the automatic control system affect the functioning of the electric motor);
- wiring terminals of the power and control circuits (oxidation, damage to wires is one of the reasons for a malfunctioning electric fan).
If diagnostics of these elements shows that they are in good working order, it is necessary to dismantle and repair the fan itself. But it can be diagnosed first.
Fan check
A check is done by directly powering the electric motor from the battery (we lay wires from the battery terminals and connect them to the power terminals of the motor) - operation under load, difficulty in gaining rotation speed, squeals and squeaks indicate wear of the drive components and the need to replace them. But if, even with direct voltage supply, the electric motor does not start, it is most likely that it has burned out or the windings have broken. Such faults are difficult to fix and it is easier to replace the entire unit.
Causes of poor foot airflow
Heater malfunction
Air through the cabin filter is taken from the street by the rotating blades of the electric heater motor. Through a damper system, air is distributed through air ducts and supplied into the cabin through deflectors and non-adjustable grilles.
Air, like any gaseous medium, tends to follow the path of least resistance. Therefore, it is logical that the air flows first come out of the central and side deflectors. The feet of the driver and passengers are blown last. Structurally, the air ducts to the central deflector and the upper side airflow points have a larger cross-section, and it is much easier for air to pass through them.
Initially, you need to make sure that nothing interferes with the intake of air from the atmosphere. After all, if the air is supplied in insufficient volume, then it will not be enough to supply all airflow points with the intensity that was calculated at the design stage of the car.
Check the condition of the cabin filter. To do this, remove the wipers and frill. The cabin filter is located on the right side of the vehicle under the windshield. It is covered with a plastic casing, which is secured with four self-tapping screws. Unscrew the screws and remove the cabin filter. We start the engine, warm it up to operating temperature and check the operation of the stove. If the situation has improved, change the cabin filter and close the issue.
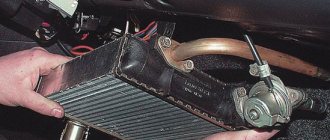
The second common cause is a clogged heater core. In this case, the heating of the interior will be weak, because warm air does not come out of all the deflectors well, and not just into the legs. But the fact is that when driving for a long time, your feet begin to freeze first, so it seems that the problem is in this part of the airflow.
Video: Why the stove does not blow at the feet of VAZ 2111,2110
This malfunction is easily diagnosed. We find two pipes for supplying antifreeze to the heater radiator (rubber hoses on the left side in the direction of travel of the car). With the engine warm, carefully touch the two pipes one at a time with the heater running at full power. The difference in temperature between the pipes should be minimal. If one pipe is hot and the second is cold or barely warm, we wash or replace the heater radiator.
Checking the operation of the dampers
There are nine exit points for air flows from the heater on the VAZ-2110:
- central deflector;
- two side deflectors and two windshield air vents;
- heated feet of the driver and front passenger;
- two outputs for heating the feet of rear passengers.
In an ideally operating system, the pressure generated by the heater motor is sufficient to create an effective flow to warm the feet. However, over time, gaps form in the joints of the air ducts, and the dampers of the VAZ-2110 heater begin to fit loosely to the body. This leads to atomization of the air flow. As a result, a minimum amount of air reaches the distant exit points.
First, dismantle the panel with the central deflector. It is held in place by four plastic clips. To remove it, simply pry it off one of the sides with a suitable object, such as a flat-head screwdriver. Be careful: the clips are fragile.
Evaluate the damper's performance
In older cars with a manual damper drive, pay attention to the play in the linkage of the rods. A broken rod system will not allow the damper to fit tightly to the body in the extreme position, which will cause air to leak from the cold circuit
The problem is corrected by adjusting the damper. In a mechanical drive, it is possible to shorten the rod due to a movable lock on a gear rod or a threaded tip. During the adjustment process, check that the position of the switch on the panel corresponds to the actual position of the damper.
Another reason why the VAZ-2110 stove does not blow into your feet is a malfunction in the operation of the automatic heater control system (AHC) unit or the gear motor of the VAZ-2110 stove. In this case, there is usually insufficiently warm or even cold air from the stove operating in maximum heating mode. This is due to the incorrect position of the damper in which the gearmotor sets it.
Evaluate the operation of the gear motor of the VAZ-2110 stove. To do this, visually check how it closes the damper when switching modes. The easiest way to do this is to remove the panel with the central deflector. Move the temperature knob to the extreme position (for example, set the minimum temperature), then sharply switch to the opposite mode. The damper should completely block the channel visible from the driver's position. If this does not happen, the problem lies in the gear motor or the automatic control system unit. Check the serviceability of the gearmotor and unit.