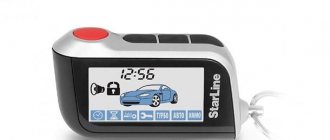
The main key fob Starline A91 is very functional: it allows you to use almost all functions of the system using button combinations, it is used to control periodic autostart modes, the icons on the key fob provide complete information about the state of the car, controlled by the alarm. At the same time, despite the external similarity of both key fobs and security systems, the firmware of the StarLine A91 key fob makes it incompatible with the key fob used in the A61 alarm system.
Indication on the key fob screen
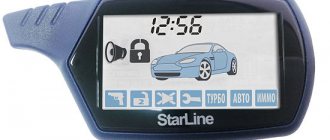
The icons on the Starline A91 key fob are divided into several functional groups:
- Animated icons on the image of the car are responsible for transmitting information about the status of the car. “Hood”, “door” and “trunk” indicate the activation of the corresponding limit switch, the key behind the windshield indicates that the ignition is turned on, and smoke at the exhaust pipe indicates that the engine is running. The “brake” indicator on cars with a manual transmission signals that the handbrake is pulled, on cars with an automatic transmission it indicates that the brake pedal is being pressed. “Hammer” indicates the shock sensor is triggered. Nearby there are icons with a lock (open or closed, respectively, indicating a disabled or enabled security status) and a speaker (crossed out – sound signals are disabled);
- The bell and hourglass icons next to the digital clock indicate that the alarm and countdown timer are on;
- The “Manual transmission” indicator lights up if the alarm system is configured to automatically start a car with a manual transmission. This is not a key fob setting, it is set during installation and cannot be disabled by the key fob or through the system settings menu;
- the bottom row of icons is a cursor menu with which you can select the modes of periodic autostart, turbo timer, immobilizer, Valet, auto-arming;
- the icon with a thermometer lights up when polling the vehicle’s condition simultaneously with the engine temperature being displayed in place of the digital clock;
- “Satellite” appears on the screen if the M20-M21 beacon is connected to the system in slave mode (that is, it does not work autonomously, but as a GPS/GSM signaling interface);
- The “PIN CODE” icon lights up if a secret code is specified in the settings, which is used when disarming the car without a key fob.
Functions of the Starline A91 key fob
The device has a set of commands. A rubberized key fob (see photo) of the alarm with a small screen responds to attempts to enter the cabin without keys. The system also performs security functions.
Among the main alarm commands A91 are listed.
- Security actions. The system turns off the ignition, locks the doors and hood lock. This prevents car theft and battery theft.
- Automatic heating of the power plant. You can program the engine to turn on at the desired hours and bring it to operating temperature. Additionally, you can assign interior heating.
- Setting up system options. The owner can prescribe the time for oil changes, scheduled repairs, etc. During operation, the screen will show how much is left until the required procedure.
How to register the main and additional key fob
The alarm itself does not tend to “forget” the registered key fobs, so the need to register the A91 key fob may only arise when adding another one or replacing a broken one, or as a diagnostic measure in case of malfunctions (if StarLine A91 does not respond to the key fob or when the key fob “does not see” the car ).
Please note that linking the Starline A91 key fob automatically erases the data previously registered in the system: you cannot bind a key fob in addition to those that are already working; the entire set that is supposed to be used must be registered.
Procedure:
- Disarm the car and turn on the ignition.
- Press the service button seven times.
- When registering the main key fob, simultaneously press and hold buttons 2 and 3, on the additional one - 1 and 2.
- When the siren sounds, release the buttons.
- With a pause of no more than 5 seconds, repeat operations 3-4 on all other prescribed key fobs.
- Turn off the ignition.
If the Starline A91 key fob is not registered (but only one of the set, and not all), it is necessary to disassemble it and check whether there is a soldering problem on the antenna, or whether one of the buttons is torn from the board by pressing too hard. If the system refuses to “see” the entire set, first of all the antenna module, its cable and connectors are checked.
System Features
This system can support up to 4 key fobs maximum.
It is very important to pay attention to the model of both the key fob and the alarm; in some cases, car owners do not pay attention to the additional indices following the model name.
It will not be possible to flash a key fob of the same model, but with a different index; you will need to replace the alarm key fob. You should replace the key fob with the exact same one you have, without any indexes.
The car owner should know that programming a Starline key fob into the alarm unit will not cost only the firmware of an additional key fob; you need to immediately write down the key fobs that you are going to use. Thus, having one working key fob and one unstitched one, when programming it is necessary to bind the key fob (old and new) at the same time.
This point is very important, because Many car owners are faced with a problem when the additional key fob works, but the main key fob does not work.
Setting the time StarLine A91
Setting the time on the key fob is not really important (it’s more natural to check the time on your wristwatch or phone screen, rather than reaching into your pocket for the keys), but it is necessary for the correct functioning of auto-start on an alarm clock. In this case, both the exact time and the alarm time must be set.
You can set the time on the Starline A91 key fob in several steps:
- Press and hold button 3 for a long time. First, the key fob will give one long signal, then a short signal, then two more short signals. After this, the button can be released.
- The clock will start blinking on the screen. Pressing button 1 will sequentially increase the value, button 2 will decrease it.
- After setting the clock, switch the key fob to the minutes setting mode with button 3.
- Same as step 2, adjust the minutes.
- If you do not need to make further settings (alarm time, etc.), do not press the buttons for 5 seconds or proceed to the next setting step with button 3.
- Programming the Starline A91 key fob in the following steps allows you to set the alarm time, alarm status (ON/OFF), countdown timer (time and ON/OFF).
The time setting on the key fob is lost every time the battery is removed; after replacing it, it must be done again.
Setting the time
One of the functions of security system key fobs is to display the current time on the screen. This is not just an opportunity for the owner of such a device to find out the exact time at any time of the day, but also to remotely start the engine on a schedule. But sometimes there is a need to know how to reset the time. One of the reasons is replacing the device's battery. The degree of its discharge is indicated by a special symbol on the key fob screen. If the battery status indicator starts blinking, this is a sign that it is time to replace it.
And when the battery is removed, the time is automatically reset. And now, if the time is not set correctly, the programmed capabilities of the system - starting the engine by an alarm clock, by a given interval or by a timer - will not work correctly. And this can lead to such troubles as:
- By the time you are scheduled to leave the house, the engine will not be warmed up.
- Increased loads on the starter when starting the engine in winter.
- The battery may fail.
Setting the clock can be done in two ways:
- According to the instructions. Time is customizable. Corrected by calling special commands from the menu;
- Radical. Change the battery strictly at zero hours and zero minutes local time. As soon as the battery takes its place, the time on the key fob will reset to zero and the countdown will begin from that moment.
In order not to wait until midnight, programming is easier to do according to the instructions.
You must press and hold button No. 3 in this position. After three signals from the remote control, you can set the time using service buttons No. 1 and No. 2 (see the figure above). These buttons increase or decrease the time digits, and button No. 3 allows you to move between hours and minutes.
Once the time is set correctly, you don't have to press anything. The system will automatically signal with a short signal that the key fob has been programmed.
Trunk control
The alarm has a standard “trunk opener” function. If the appropriate connections are made during installation, then to open the trunk using the Starline A91 key fob, you must:
- on the main key fob – long press button 3, then briefly press button 1;
- The additional key fob does not provide trunk control in this alarm model.
For correct operation of the trunk release, in addition to the appropriate connections, it is necessary to correctly configure the corresponding alarm output. The programming table for this provides function 13 of the service menu, it must be set to value 1.
The Starline A91 programming mode is activated as follows:
- Disarm the car.
- Press the service button 5 times.
- Turn on the ignition. The siren should sound five times, indicating successful entry into the service menu.
- The Valet button must be pressed the number of times that corresponds to the number of the desired function (in this case, 13 times). After each press, the alarm will beep to confirm the transition to the next function (a short signal is equal to one, a long signal is equal to five, that is, one long and three short signals will indicate that function 8 has been selected). The number of the selected function and its value will be displayed on the key fob screen. We need function 13 to have the value 1, that is, the screen will display “13-1”.
- Programming the Starline A91 functions to the desired value is carried out by pressing buttons 1-3 briefly (the corresponding value from 1 to 3 will be set) or for a long time and then briefly pressing button 1 (this will set the value 4).
- To exit the settings menu, just turn off the ignition.
Operating manual for Starline A91 alarm system
To fully understand how custom settings are made, you need to study the operating manual and the Starline A91 programming table. The link to the document is provided below.
Of course, the designers of the StarLine company tried to ensure that the key fobs for their alarms were shock-resistant. In addition, the branded case protects the case from damage when dropped. But situations happen from which no one can be immune. The key fob can be lost or the display on it can be broken, which cannot be replaced separately. But there is a way out - just buy a new, similar keychain. True, the security system needs to know that a new control panel has appeared. From this article you can find out how to register the starline a91 alarm key fob yourself.
Remote engine shutdown
Starline A91 allows you to remotely turn off the car engine both to prevent theft (the interlocking circuits should in this case break the wiring sections necessary for the engine to operate, and not block the starter), and to terminate the autostart early.
In the first case you will need:
- Program function 8 of the service menu in advance (see procedure above) to value 1 or 2. In the first case, the engine, after turning on the “anti-robbery” mode, will be turned off the first time you press the brake pedal, in the second - immediately.
- To directly turn off the engine, simultaneously press and hold buttons 1 and 2 on the key fob.
Disabling the anti-robbery mode will require pressing button 2, as with normal disarming.
To turn off an engine running on autostart:
- On the main key fob, press button 2 for a long time, then briefly press button 3.
- The additional key fob does not provide the ability to turn off the engine.
Video: Starline A91 feature set.
Starline keychain prices
You can buy a standard remote control in any city in the country. The price of Starline A91 fluctuates between 1000-3000 rubles, depending on the distance of the seller or additional services.
- universal design - compatible with almost all cars with manual or automatic transmission;
- complex encryption system;
- increased range;
- versatility and long warranty periods.
Key lock
The key fob functions provide the ability to block accidental button presses (for example, when worn in a pocket). To do this, you need to simultaneously briefly press buttons 1 and 3. After this, the key fob will give one short signal, and the “KN BLOCK” icon will light up on its screen. The key fob will not respond to all subsequent button presses.
To unlock the StarLine A91 key fob, just press buttons 2 and 3 simultaneously. The key fob will emit sound and vibration signals, and the “KN BLOCK” icon will disappear.
Is it possible to flash a stitched A-91 key fob?
Moderator: Megavolt
Is it possible to flash a stitched A-91 key fob?
#1 Message experimenter » Oct 23, 2015, 02:35 pm
Re: Is it possible to flash a stitched A-91 key fob?
#2 Post by Romanych48 » 23 Oct 2015, 14:58
One key fob - one alarm.
Is it possible to flash a stitched keychain?—- yes.
Re: Is it possible to flash a stitched A-91 key fob?
#3 Post by Aleks45 » Oct 23, 2015, 4:15 pm
Re: Is it possible to flash a stitched A-91 key fob?
#4 Message experimenter » Oct 23, 2015, 05:36 pm
Re: Is it possible to flash a stitched A-91 key fob?
#5 Message Vasek » 23 Oct 2015, 19:17
Re: Is it possible to flash a stitched A-91 key fob?
#6 Post by Romanych48 » 23 Oct 2015, 20:18
Any keychain is sewn if it is working.
even if it’s new, BUT you can only bind it to ONE. Those. if you take it from yours and write to a friend, he will manage it, but he will stop managing yours.
No response to key fob
If the Starline A91 key fob does not respond to button presses and, of course, it has a working battery installed (the display is displayed clearly and in contrast), make sure that:
- The key fob sees the car and it is in the zone of reliable reception. Near sources of strong interference (for example, under power lines), in a large parking lot, the alarm can significantly reduce the two-way communication range necessary for the operation of the dialogue code used by Starline.
- The car responds to the spare key fob (that is, the source of the problem is not in the alarm itself).
You should try to re-register an unrecognized key fob as stated above. Breakdowns or malfunctions of the key fob's software will require its repair (you can re-solder broken buttons or the antenna yourself if you have sufficient soldering skills; reflashing the key fob yourself is impossible, since the manufacturer does not provide information on connecting the programmer and the firmware itself to the public) or replacement.
The complete or partial absence of icons on the screen when the backlight is working normally indicates problems with connecting the screen to the main board of the key fob; it needs repair. However, even completely physically turning off the display will not prevent the key fob from controlling the alarm.
Why is it not registered?
Unfortunately, many inexperienced drivers regularly encounter situations in which the device in question simply refuses to carry out user-specified commands. There may be several reasons for such problems to occur:
- Defective or broken battery. Before starting all operations, the car owner must check the charge level of the module itself. You should also inspect the contacts of the current source: they should not show signs of damage, oxidized areas, corrosive deposits, etc.
- Exactly four key fobs were already attached to the car - and this is the maximum possible number of remote controls that can be connected to one car. When you try to activate the fifth device, one of the previous modules will simply be deleted from the memory of the central electronic alarm device.
- The appearance of irreversible damage to the processor unit or antenna. It will not be possible to cope with the repair or restoration of such parts on your own. If faced with such problems, the user should go straight to a specialized service center.
Absolutely every individual situation requires detailed consideration. Therefore, if the device cannot be registered, perhaps the driver should visit specialists. Replacing the Starline key fob module is an operation carried out in almost every more or less large service establishment.
Key fob doesn't open doors
The instructions for the Starline A91 key fob indicate that to unlock the doors on the main or additional key fob, button 2 is briefly pressed. The lack of a correct response is possible in two ways:
- the car does not disarm and does not open the doors;
- The car is normally disarmed, but the doors do not open.
In the first case, perform the same checks as in the previous section of the article. A common problem with the main key fob is the button moving away from the board due to too strong pressing, since it is soldered to the board at a right angle, while on the additional key fob the buttons only press against the board when pressed.
If the doors do not open during normal disarming (that is, everything is fine with the connection), then you need to check:
- On vehicles without standard central locking: wiring to additionally installed door actuators, fuses on the green and blue wires from the 6-pin connector of the central alarm unit.
- On cars with standard central locking - connect the alarm circuits to the standard wiring according to the installation map for a specific car model.
Ways to unlock Starline A91 key fob
If the remote control malfunctions, turn it off. You can use a custom code that you programmed earlier.
- open the door with the key. The car will blink its turn signals 4 times;
- turn the ignition key by pressing the Valet button the previously set number of times;
- write the system startup code. The Starline remote control should vibrate slightly;
- turn off the ignition. We receive confirmation from two flashes of turn signals;
- The system is deactivated, you can go.
Factory reset
Both Starline settings menus can be reset to default values. Please note that the default settings do not necessarily correspond to the connection of the system to a specific car, therefore, after a reset, the central locking or autostart may stop working, the engine may lock up (if the locking relay is configured to operate as normally open, since the default values are designed to use a normally closed relay ).
Resetting Starline A91 to factory settings will require:
- for the service menu - disarm the car, press the Valet button 9 times, then turn on the ignition, press the Valet button again and after the sound signal, press button 1 of the key fob and turn off the ignition;
- for the autorun menu - the same, but the Valet button must be pressed not 9, but 10 times.
How to disable the alarm (service mode)
If the starline a91 alarm key fob is faulty, you need to drive your car to a service center. To start the engine you need to know how to turn off the alarm using the Valet button. There are two ways to disable:
- If an individual code for disabling was not programmed:
- The car door can only be opened with the key. The turn signals should blink 4 times;
- Turn on the ignition and immediately press the Valet alarm button three times. The system allows 20 seconds for the shutdown action;
- The ignition key is turned off. The system must respond with a siren signal twice;
- The security mode is removed and the car can be started.
- To disable the system, write the code:
- The door opens with a key. The car will blink its turn signals four times;
- Turn the ignition key and press the Valet button a certain number of times, according to the starting number, write down the system start code;
- Turn off the ignition - the system should respond with turn signals that blink twice;
- The security system is now deactivated.
Two-way and one-way communication
The keychain itself can be with or without feedback. Roughly speaking, its electronics can only contain a transmitter or a transmitter and a receiver.
When there is no feedback, data transmitted from the alarm unit cannot be received.
A printed circuit board without a receiver is installed only in additional key fobs. And feedback, in turn, is always provided by the main key fob (it has a display).
Thanks to recent research, it has become clear that one-way communication is not suitable for providing serious protection. These are not just general words, but a real fact. Therefore, new alarm models are equipped with key fobs with feedback. Example: Starline B6 Dialog. That is, now only two-way communication is used. But not for the classic B6 alarm system.
Controlling the Starline A91 alarm using key fobs
StarLine A91 brings the built-in functionality into reality, both automatically and using a set of standard key fobs to control it. Individual parameters and potential of the device may change as a result of reprogramming user settings, based on the needs of the owner.
The car alarm kit includes a main key fob with a liquid crystal display and three control keys and a spare one with two control buttons without a monitor.
By executing control commands coming from any of the key fobs, the device sends information to a pager with a monitor, which graphically displays the status of the protected object, the degree of its security, and attempts of unauthorized entry into the car.
The key fob equipped with a display implements an original method for selecting individual methods for changing parameters. Status icons are located on the screen. By moving the cursor by pressing the corresponding control key, the user has the ability to switch setting modes for various parameters.
A key fob with a monitor and feedback and interactive authorization of access to an object is of premium value, guaranteeing the impossibility of intercepting a signal for use for unseemly purposes of stealing someone else's property.
The second key fob has a backup purpose, although in terms of the method of receiving and transmitting data it fully corresponds to the characteristics of the main one. The inability to receive graphical alerts on the monitor leaves it with a limited list of functions. A key fob without a monitor is used exclusively to switch operating modes of the signaling system.
Purpose of the main key fob sensors according to the starline a91 operating instructions:
Key No. 1
- Start of the “under protection” mode with active sound (click);
- Activation of the silent security state of the object (again);
- Enable or disable the shock sensor (twice);
- Car door lock block with active ignition system (one time).
Key No. 2
- Disabling the security state with acoustic accompaniment (one-time);
- Deactivation of silent security (repeat);
- Activating or disabling the additional shock sensor (twice);
- Unlocking door locks with active ignition (one time);
- Deactivation of the “anti-robbery” mode (twice briefly);
- Clear a working alarm (one time).
Key number 3
- Displaying the status of the security system and the temperature level inside the car (once);
- Activation of search and information on the engine coolant temperature level (twice);
- Enabling additional communication line No. 3 (serial);
- Turning on the cursor to select the required mode for setting up the complex or controlling the operating states of the security system (long press);
- Activation of the mode for setting the correct time on the pager display, alarm clock setting time, timer.
Indication of modes and functions
Setting autorun on alarm clock. Configuring autostart by timer Configuring autostart of the engine by temperature level Status of service changes in the main operating modes VALET Turbo timer is active or inactive Automatic activation of the “armed” state Status of the immobilizer The control sensors of the key fob are blocked The personal identification code of the owner has been entered into the car alarm memory The option of operating a car with a manual transmission is active an algorithm for the corresponding sequential manipulations is laid down The “protected” status is activated with an acoustic notification of danger The mode with the sound turned off is in effect The car doors are locked The car doors are unlocked The ignition system is active In the car the following are not tightly closed: 1) the car doors 2) the engine compartment lid 3) the luggage compartment lid Works the handbrake or the pedal of the main brake system is pressed The engine is running The anti-robbery state is turned on Low charge level of the key fob battery Coolant temperature level The StarLine m-20, StarLine m-30 unit is connected The notification for setting the alarm is turned on The device timer is activated
| “DAT 1” Enables the first level of shock sensor security | |
| “DAT 2” Turning on the first level of the auxiliary sensor |
| “DAT 1” Simultaneously testing all stages of the shock sensor | |
| “DAT 2” Simultaneously testing all stages of the auxiliary sensor |
| “SH-1” Triggering of the first stage of the shock sensor | |
| “SH-2” The first level of the auxiliary sensor has worked |
| “SH-1” The first circuit of the shock sensor has worked | |
| “SH-2” The second circuit of the auxiliary sensor has worked |
| “SA-2” Single-level auxiliary sensor No. 1 triggered | |
| “SA-2” Single-level external sensor No. 2 has worked |
Table: setting up the main key fob function menu
| Setting the correct time for the key fob a 91 | When setting the clock, you need to press and hold button No. 3 of the key fob until the notification appears: 1 melody; 1 short sound; 2 short signals. | You can achieve higher or lower parameter values using keys No. 1 and No. 2 | The clock picture on the screen blinks |
| Setting minutes | Click on button number 3 | Parameters are changed using keys No. 1 and No. 2 | The minute display flickers |
| Setting an alarm | |||
| Adjusting the clock | The watch parameters can be changed after a short press on button No. 3. The icon will appear | The readings are adjusted by pressing keys No. 1 and No. 2 | The alarm time indicator on the screen flashes |
| Setting the minutes | Click on button number 3 | Parameters are adjusted by keys No. 1 and No. 2 | Flickering minutes on the pager screen |
| On or off | Brief onslaught of the third button | Enabling the function with button No. 1, disabling No. 2 | The remote control displays “On” or “Off” |
| Setting the timer | |||
| Setting the clock | Short press of the third key | The parameter is increased and decreased through sensors No. 1 and No. 2 | Timer minutes icon flashes |
| Enable and disable | Briefly press sensor No. 3 | Clicking the first button starts the function, clicking the second button disables it. | The screen will display "On" or "Off" |
Checking the key fob and searching for the service button
How to register a new key fob tomahawk
Alarm Starline A93. How to Stop the Engine. Irina Belousova 0107 HD
The very first step will be to check the key fob itself for its functionality. Inspect the key fob housing for cracks and chips, check the batteries. You can check the voltage on the key fob battery using a multimeter. If the key fob is new or the batteries have been changed recently, then you can skip this step.
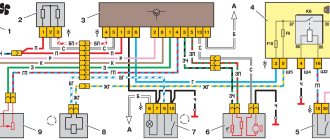
The next step is to find out where the service button is located. Programming an alarm is not such a complicated process; you need to find a button from the alarm unit, usually it is connected to a wire. Most often, alarms are installed under the front panel of the car on the passenger or driver's side. You need to look under the front panel and find this button. If you cannot find the button, then you need to find the alarm unit and walk along the wires from it in search of the button.
Initial alarm setup
Before programming, it is necessary to adapt the communicator to the main unit of the security system.
After this action, you need to enter a personalized code value into the system memory and register the digital codes of the forced engine shutdown relay.
Recording key fobs in the complex memory
The process of changing the system's factory settings is as follows:
- The pager contains a battery;
- The ignition system is turned off. After which the VALET service mode sensor is pressed seven times.
- The ignition is turned on, and the service mode for programming the car alarm is activated. The siren of the device sounds seven short beeps, which indicates the activation of the control panel programming function.
- On the remote control, hold down buttons No. 2 and No. 3 simultaneously until the siren beeps. The adaptation was successful.
Entering the main menu for programming functions
The transition to the catalog of settings and service capabilities of the device, including engine autostart, is carried out after performing the following manipulations:
- Turn off the ignition. Then press the VALET service sensor five times if the security and service functions of the system are being configured. If a remote start setting is provided, there should be six clicks.
- Turn on the ignition. An audible warning should follow with five short siren signals. The transition to the settings directory is completed.
- The selection of the required function is made through the appropriate number of presses of the service button. The vehicle will respond with the appropriate number of LED flashes and alert beeps.
Table: programmable security and service functions
| Variable function | One short press of button No. 1 | One short press of button No. 2 | One short press on button No. 3 | Long and short press on button No. 1 | |||
| Single sound pulse | Two sound pulses | Three sound pulses | Four sound pulses | ||||
| 1 | Door lock response time | 0.7 seconds to open/close | 3.6 seconds to open/close | Double signal for opening door locks 0.7/0.7 s | Comfort option with delay of 30 seconds when closing / 0.7 seconds when opening | ||
| 2 | Automatic control of blocking access to the salon | From the brake pedal or turning off the ignition | From the ignition system. (10s/off) | Only opening the locks from the ignition system | Function disabled | ||
| 3 | Turning on the car interior lighting, delaying the start of the controllers when the security mode is turned on | 60 seconds | Instantly | 30 seconds | 45 seconds | ||
| 4 | Automatic start of the “security” state with an algorithm for analyzing data from an additional controller | Door locking | Without closing door locks | Without closing door locks | |||
| Two levels of companion controller | Two companion controllers with one security level each | Two-level additional controller | Two single-level additional regulators | ||||
| 5 | Duplicate activation of automatic security | With door lock | No blocking | Option disabled | |||
| 6 | Period before the siren turns on | 100 ms | 50 ms | To a steering horn of 50 ms duration | On the steering horn with a duration of 20 ms | ||
| 7 | Light warning about open or loosely closed car doors | 10 Seconds | 20 seconds | 30 seconds | Option disabled | ||
| 8 | Locking when the “anti-robbery” mode is running | When braking | From an alarm | Anti-robbery function is disabled | |||
| 9 | Emergency shutdown of the complex | Without personification | Entering a personal access code | Two-digit personal code | Three-digit personal code | ||
| 10 | Powertrain lock | Closed | Open | Normally closed together with digital relay | Normally open in conjunction with digital relay | ||
| 11 | Disabling the powertrain lock | Function active | Disabled | ||||
Table: programmable trigger functions
| Variable function | Briefly press the first key | Briefly press the second key | Briefly press the third key | Long then short press of the first key | |
| 1 pulse | 2 pulses | 3 pulses | 4 pulses | ||
| 1. | Duration of turbo timer operation | 1 minute | 2 minutes | 3 minutes | 4 minutes |
| 2. | Duration of engine operation after starting | 10 minutes | 20 minutes | 30 minutes | No limits |
| 3. | Engine operating intervals when starting by timer | 2 hours | 3 hours | 4 hours | 24 hours |
| 4. | Starting the engine based on temperature readings | -5ºС | -10ºС | -18ºС | -25ºС |
| 5. | Warm-up phase | Enabling protection | Protection is not active | Protection is not active | Protection is not active |
| 6. | Status of lighting devices when the engine is running | The headlights are blinking | Headlights are constantly on | Lights are turned off | Lights are turned off |
| 7. | Blocking access to the cabin when the power unit is stopped, protection is active | Function not active | Active | Active | Active |
| 8. | Work function algorithm | The output is activated simultaneously with the appearance of voltage at the ACC contact | Activated simultaneously with the appearance of voltage on the IGN1 contact | Starting cars without a key. 2 seconds voltage to starter, then shutdown | Once per engine start cycle. At the first start, simultaneously with the voltage on ACC |
| 9. | Starter operating period | 0.8 seconds | 1.4 seconds | 2 seconds | 3.6 seconds |
| 10. | Engine type by fuel | On gasoline engines there is no starter delay | Diesel with starter delay of 4 s | Diesel with starter delay of 6 seconds | Diesel with starter delay of 10 seconds |
| 11. | Motor operation control | By on-board voltage | Plus from the generator | By minus on the generator | By tachometer |
| 12. | Ignition stabilization on a car with a running power unit | Automatically | Via communicator | Via communicator | Via communicator |
Personal code programming
You can set up a personal access code as follows:
- Enter the directory for changing settings. Select the emergency shutdown option. Programming of the personal identifier is done through menu item 9. The message “PIN CODE” will appear on the pager display.
- Enter access code settings. Turn off the ignition. Press the service button four times. Each press is accompanied by a blinking diode.
- Turn on the ignition. The siren sounds four times.
- Click on VALET once. If the input is correct, A91 will respond with one sound alert.
- After which you have five seconds to enter the first digit of the identifier. Keys No. 1, No. 2, No. 3 correspond to numbers 1,2,3 when entering a PIN. When the control keys are pressed twice (long and short), the buttons acquire the numerical expression 4,5 and 6, respectively. When memorizing the code number, the system emits a multiple number of beeps.
- To exit the settings, you must turn off the ignition.
Recording digital engine locking radio relay codes
The system's peripheral relays adapt when security is disabled.
- The operating mode of the system is selected. If the contacts, according to the type of correspondence, should be normally closed, then the loop on the body is retained; if they are normally open, it is removed;
- This will take you to the function settings menu. The tenth paragraph is selected. Depending on the type of relay, the 3rd or 4th method is selected. After which you need to exit the mode;
- The wire from the recording devices will be connected to ground on the body;
- Press VALET seven times when the ignition system is inactive;
- The ignition turns on. The system generates seven acoustic alerts to confirm correct entry;
- Within five seconds, the VCC cable must be connected to the ignition system circuit. The complex will indicate a successful change in the program, adaptation of the DRR relay to the memory of the control unit with a long beep.
Similarly, other additional devices are implanted into the electrical circuits of the machine.
We record the key fob code
Obviously, to replace the alarm key fob with a new one, it is enough to write it into the memory of the main unit. In reality, everything is a little more complicated: you will have to register all the key fobs that you want to use. That is, both new and all old. Their total number should not exceed 4. Be patient - few people manage to do everything right the first time.
As you can see, nothing complicated.
For the B6 family, as you can see, activating the recording mode looks difficult - you need to press VALET 7 times. Everything is simpler in the A8 line.
The procedure is completed by turning off the ignition, after which the dimensions should blink. That's all.
If the instructions seem too complicated for you, you have a choice. You can go to a service station and pay 300 rubles for performing the actions listed here. But then, do not forget to take a complete set of devices that you want to use.
Reasons for failure of the key fob
If the device does not go off when you press the button on the alarm remote control, the reason should be sought not only in the key fob itself, but also in the anti-theft system. If the alarm does not respond to the key fob and the car does not open, this may be due to several types of faults.
Problems with the key fob
When the anti-theft installation refuses to see, respond and react to pressing buttons from the key fob, first of all it is necessary to diagnose the remote control itself. It is quite possible that the car alarm does not see the key fob due to a dead battery. If the remote control is equipped with a screen, check whether it responds to key presses; if there is no display, then there should be an indicator light that also lights up when a key is pressed or when the batteries are low.
Key with key fob for car anti-theft system
The problem with the car alarm may also be related to the remote control, namely the transmitter located inside. Doing the repair yourself is problematic, so try using a spare key fob. If the system does not work correctly with it, most likely the problem is not with it.
Dead battery
A completely discharged battery can also make it impossible to operate the anti-theft system. If the battery is not completely drained, you can try to press the remote control from a closer distance to the car. Even if you manage to open the car, starting the engine will be problematic. To prevent the battery from being completely discharged, when arming the car, you need to turn off all electrical equipment.
Radio interference
It happens that radio wave impulses are jammed by various interference, and if you suddenly find yourself in such a zone, then you will not be able to either park the car or remove it from the signaling system.
Interference may occur near airports, military factories, and also near objects of national importance. If you really find yourself in an area of electromagnetic interference, you can check it using your phone - the interference will also affect the signal, as well as GPS communication
In this case, the only optimal solution would be to bring the remote control as close as possible to the pulse receiver.
Disassembled remote control
Loss of communication between the remote control and the unit
Malfunctions in the software can lead to loss of communication between this element and the pulse receiver, that is, the block. Only reprogramming the signal will solve this problem. To do this, you need to turn off the anti-theft system unit in emergency mode by disconnecting the wiring from it, and then resynchronize it with the remote control.
The programming procedure in this case can be done by yourself, but for this you will need a service book for the signaling. Sometimes it happens that the program is simply deleted from memory; in this case, synchronization will not produce results, since first of all you will need to restore the software. This type of repair can only be carried out by specialists.
Electronics malfunctions
Electronic malfunctions can occur even when the motor is turned off. If there is a power surge in the on-board network, the anti-theft system control unit may burn out. This is fraught not only with the need to repair or replace the unit, but also with possible wiring problems.
If the unit itself is not behaving correctly, signs of its malfunction can be identified in advance. For example, the system may turn on automatically, commands sent by the remote control will not be executed correctly, and some options may not work. If you have any doubts about the need to repair the unit, it is better to consult with specialists (the author of the video about disabling a non-working alarm is Nadezhda Bespyatykh).