Where and how to install correctly
For the gadget to work effectively, you need to install it correctly. It is recommended to place it either on the windshield or on the dashboard of the car. There is no difference, you can install it wherever it is convenient. In this case, the main requirement must be met - the radar detector should not block the view of the road.
There is one more rule - you need to install the device in the car parallel to the road.
In addition, the installation of the radar detector must be such that it can easily detect electromagnetic radiation.
Most often, the device is installed near the rearview mirror, but away from windshield wiper blades, sun strips and other metal parts (this can cause distorted results).
You can install the radar without using any special tools. It comes complete with suction cups
RADAR4
Is a radarless complex (such as Avtodoriya, etc.) a step forward compared to conventional microwave technology?
In technology there are almost no steps forward - mostly in a spiral. A hundred years ago, two hoses with water were placed across the road at a distance of several tens of meters, and a policeman with a stopwatch measured the time interval between the “fountains” when a car passed through the hoses. The next version implied two cameras at a distance of 1 km and a bunch of operators who determined the numbers of the “racers” by eye. And these days, “Avtodoria” has appeared: video cameras record the vehicle as it enters and exits the measured section of the road. Having calculated the travel time, the system displays the speed at which the car covered this distance. The system itself is not new: similar systems have been used for many years in a number of European countries. It can be used on highway sections from 500 m to 10 km.
Do license plates “sealed” with a special film save you from photo/video recording complexes? Smartphones do not see anything in these cases...
Detailed materials on this topic can be found here and here.
Let us briefly note that serious measuring systems use so-called machine vision cameras, and not household “telephone” toys. They record even the minimal difference between the background and the taped-on number. And recent developments make it possible to cope with more complex tasks, such as reading completely contaminated license plates. However, we will not disclose the technical features of such devices, so as not to provoke another “arms race” between guardians of the law and its violators.
[ All about radar detectors ] [ Radar detectors: results of Zarulev tests ]
[ Why a radar detector needs GPS ] [ How to hide from speed detectors ]
Radar detectors: main questions and answers
How to connect
You can connect the radar detector yourself. The simplest option is to connect through the cigarette lighter. But this method has disadvantages, for example, the power cable will always be visible.
If this is essential, then hidden installation is also possible. In this case, you can do without a cigarette lighter. To do this, the radar detector must be connected either to the ignition or to the lampshade. When choosing the second option, you need to prepare the following tools and materials:
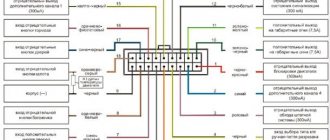
Now you can start working directly (it is advisable to have the connection diagram at hand):
- Remove the lamp housing, then disassemble it to get to the hardware.
- Strip the cables of the device, which must first be stretched under the ceiling upholstery, and then connect to the corresponding “minus” and “plus” of the lampshade.
- Reinstall the lampshade.
You can also connect the radar detector to the ignition yourself, but it’s a little more difficult to do:
- Install the gadget (in this case, it is better on the windshield).
- Remove the upholstery from the side pillar and, if necessary, from the threshold.
- Pull the power wire through the channel that is in the rack, then bring it out at the bottom of the dashboard and route it to the block.
- Now you can put the upholstery back in place, and then connect the wires to the block, or rather to the 12-volt cable through the fuse.
- After this, the block must be hidden, and then the threshold trim must be installed back.
What determines the operating range?
Cobra in the cabin
Please note that the detection range of the radar detector largely depends on factors such as:
- geography of the area (winding or hilly road, lack of reflective objects and surfaces);
- weather, traffic on the road.
It is impossible to determine in advance the maximum range of the antiradar, since in each specific case the combination of factors influencing the range may be different.
Also, you should not use two radar detectors at the same time, since the heterodyne background of one device can interfere with the operation of the other.
Do not bring the radar detector close to a functioning police radar - up to five meters. This is not normal for its use and the detector board may simply be damaged.
VidSyst.ruFor car Radar detectorsCorrect setup of the radar detector: how to use the device in the city and on the highway4minute(s)
The radar detector allows you to passively detect sources of radio waves and lasers from police radars.
Warning the driver in a timely manner helps reduce speed. The operating principle of the device is based on converting the signal from police speed detection devices and amplifying it.
Installation and location features
It is recommended to install the device on the windshield or dashboard.
The main requirement is that the device should not interfere with the driver’s view of the road.
The radar detector is mounted parallel to the road surface.
The easiest way to connect a radar detector is through the cigarette lighter.
However, in this case the power cable will be constantly visible.
For hidden installation of the wire, you can connect the device to the ignition or lampshade.
In the second case, you will need electrical tape, a fuse and a screwdriver.
The installation procedure for the radar detector is not difficult:
- Fix the device in the desired place.
- Remove the lamp cover.
- Disassemble the lampshade, getting to the hardware part.
- Find the “minus” and “plus” wires, and then connect to them the pre-stripped device cable stretched under the ceiling trim.
- Reinstall the lampshade.
Connecting a radar detector to the ignition is more difficult.
For this job you will need a multimeter and a fuse.
Connection procedure:
- Attach the radar detector to the windshield.
- Remove the door sill and side pillar trim.
- Pass the power cord through the channel in the rack, bring it out at the bottom of the dashboard and bring it to the block.
- Place the pillar trim in place and connect the wires to the block, using a multimeter to identify the 12-volt cable.
- Solder and insulate one wire of the device's power cord to the 12-volt cable.
The connection is made through a fuse. Hide the block and install the threshold trim in its place.
Hidden wiring does not take much time.
Initial setup of the radar detector (radar detector)
Setting up the radar detector is necessary for trouble-free operation of the device at different levels of interference.
The main reasons for false positives:
- Motion sensors installed in stores and on barriers.
- Distronic system sensors (cruise control, blind spot assistance) used in various VAG, BMW and Mercedes vehicles.
- Short-pulse signals appearing during pulses from powerful transmitters (usually SB radios).
- Strong electromagnetic fields. Such interference is rejected by most modern radar detectors.
To effectively detect police scanners and alert the driver, you need to configure:
- distance to the speed control device,
- backlight brightness,
- device sensitivity level
- and sound notification.
It is also important to choose the right mode so that the device does not distract the driver with display flickering and other signals.
Operating modes
Modern radar detectors have several operating modes:
- Instant-On.
In this mode, the police radar is in standby mode, but does not emit radio waves.
If it is necessary to measure the vehicle's speed, aiming is performed and the radar instantly produces a pulse signal.
It takes 1 second to measure.
If the radar detector does not work in this mode, it will not be able to instantly detect the signal from the speed control device and the driver will not be able to react in time.
POP.
Many radars measure a target's speed in 1/15 second pulses.
This mode is necessary to detect Iskra radars.
The “Highway” and “City” modes are used to reduce the number of false alarms. When the “Highway” mode is turned on, the device operates at maximum performance.
There are several City modes (City1, City2). They differ in their operation in different frequency ranges.
Frequency ranges
When the device operates in the X-band, the pulse reading frequency is 10.525 GHz. The first radars emitted signals in this range.
Some Russian speed control devices (Sokol, Barrier) still use this range.
K-band (with a receiving frequency of 24.150 GHz) is the base for most speed control devices.
L-band (1-2 GHz) radars are less common.
Some speed monitoring devices use the VG-2 band (16000 MHz), which allows them to identify vehicles that have radar detectors installed.
Laser radars (lidars) emit short pulses in the infrared spectrum, which are reflected from the machine at a distance of up to 500 m and received by the measuring device.
When setting up a radar detector, it is worth turning on the K and POP bands.
How to use a radar detector?
For ease of use, many radar detectors have buttons with the names of ranges and operating modes.
The display shows information about the operating functions.
Meaning of indicators on the display
The display of the device shows the enabled modes and frequency ranges of radar detection.
Basic designations:
- When City mode is on, the letter “C” appears on the display. Lights up yellow.
- The inscription “K/Ka” (green) appears when the K and Ka ranges are turned on.
- An “X” appears on the display when the X band is in operation mode (lit in red).
- "L" appears when laser radars are detected.
- The red numbers “2 3 4” indicate the detection strength of the speed control device.
These inscriptions ensure ease of use of the device.
How to use a radar detector?
Instructions for use are included with each radar detector. Features depend on the model, but there are general recommendations. People who constantly use the detector can read the symbols on the display and understand the sound signal without prompting:
- if you turn on the device in the “City” mode, the letter “C” will appear on the display and will light up in yellow;
- green letters “K/Ka” and red “X” indicate the corresponding mode;
- “L” will warn about laser radar;
- The red numbers indicate the detection strength of the radar.
You also need to pay attention to the sound signal. For example, when operating in the K-band, a weak, short-lived signal may indicate a false alarm.
Nowadays, various gadgets that are mounted on the windshield are very popular and few drivers can do without them. This is especially true given the specifics of traffic in our country and fines for the slightest traffic violations, which are constantly growing. A video recorder or radar detector for a birthday or other holiday would be a pleasant gift for any driver
Manual
For some versions of these devices, instructions are only in Chinese. When purchasing, it is better to additionally find out if it is at least in Russian.
You will find several buttons on the device. One of them is intended for adjusting the brightness, the other is for turning the device on and off, and the third is for switching operating modes. The setup is quite simple and this is rather a minus, since the devices do not have much functionality.
Price issue
As mentioned above, the cost of the cheapest models is only 700 rubles. The most expensive ones, v9, reach 5-6 thousand in price.
Install a radar detector RUB 1000
Let's connect and remove the wires from the video recorder in Podolsk
Installation of these devices is usually very simple and does not raise any questions for their owners. However, the device part is mounted in the area of the rear view mirror on the windshield and requires connection to the cigarette lighter . The result is a hanging cable that constantly gets in the way and irritates the driver. What if you want a radar detector and a DVR at the same time, and also only have one cigarette lighter? And then the “weaving of the web” begins - Chinese cigarette lighter tees and other “perversions”.
Connect a DVR to your car
- Extensive experience and knowledge of the features of all brands and models of cars.
- Multi-stage quality control system for work performed.
- Affordable prices.
Prices for installing a DVR in our installation centers
| Type of service | Price |
| Installing a simple DVR on the windshield (the wires are hidden under the upholstery) | 1,000 rub. |
| Installing a DVR with two cameras (the wires are hidden under the upholstery) | from 1500 rub |
| Hidden installation of the recorder (the main unit is retracted into a convenient place) | from 1500 rub |
Peculiarities
These models belong to the lower price range. Various manufacturers present their models under the same name. They use a common chip and different filling. The most common name is Car radar detector V7. There are several hundred sellers of these products on Ali-Express.
The cost of products varies. During various promotions, it can be purchased for only 500 rubles. In some cases, the cost reaches even 2000 rubles. The cost of the V8 and V9 is slightly higher, although their technical characteristics are not too different.
Radar or DVR installation technology
Installation of a DVR in a car can be carried out by the vehicle owner himself, but the process will not only require a certain amount of time, but may also be unsatisfactory in terms of quality.
Traditionally, the DVR is installed inside the car on the windshield. To install it in different system models, either Velcro (double-sided tape) or a suction cup are used. When determining the installation location, it is important to consider not only the ease of handling the device, but also that it does not block the driver’s view.
The main requirement of most RealZvuk visitors is to “install the DVR in a car wirelessly.” This means that after completion of work, the device’s power wires should not be visible in the interior. To accomplish this requirement, the installer runs wiring under the roof trim and connects it to the vehicle's ignition system. In this form, it does not interfere either physically (the driver and passengers do not get caught on it) or visually (it is simply invisible). The hidden installation of the recorder is even more complex, but attractive: a large control and information processing unit is mounted in a hidden niche, and one or two remote cameras are connected to it on the front (window) and rear windows or in other places of the car. Direct connection of the recorder to the ignition allows you to use the device in automatic mode: after turning on the ignition, it will begin video recording. This scheme is incomparably better than the common connection to the interior lamp, which is often used by unqualified installers.
Our technicians install DVRs “wirelessly” in any car model, taking into account the wishes of customers.
How to install a DVR correctly: choosing a location and connecting
Installing a DVR: how to choose a location
Most often, DVRs are mounted on the windshield and dashboard. In any case, it is necessary that the device does not impair visibility and does not distract the driver. If the device is small, you can try to hide it behind the rearview mirror. This option for installing a DVR is one of the best: the visibility for the camera is excellent (you just need to orient it correctly) and does not interfere with the driver. True, there is one drawback: in this case, it is difficult or even impossible to deploy the camera so as to record what is happening from the driver’s side (for example, during a “showdown” with the patrol service). Installing a DVR on a dashboard often does not provide proper visibility, but if the device is heavy, then there is not much choice: you will have to “land” it.
How to install a DVR correctly
The installation location has been selected and the holder is installed. Now you need to connect the power wires. Most often, DVRs are powered from the cigarette lighter and most power cords come with a plug for this connector. This is all well and good, but wires hanging in the middle of the windshield can interfere with the driver's view and distract the driver. Therefore, it is advisable to bring the wire under the ceiling (leave a little free wire so that you can change the position of the camera if necessary), tuck the wire under the ceiling panel, moving it a little, then exposing the side stand, attach the wire to the harnesses already laid there using plastic clamps. It’s difficult to say exactly how to move the roof panel and side pillar: it varies from car to car.
