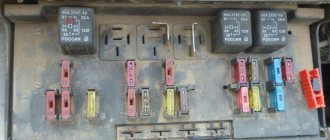
The operation of each automobile engine depends on the quantity and quality of the air-fuel mixture prepared by a special device called a carburetor. All carburetor systems create the mixture and help distribute it evenly throughout the cylinders. You can mix fuel with air flow in different ways. For example, there are membrane-needle carburetors, and there are float carburetors. It is this type that includes carburetors of the VAZ family, produced by the Dimitrovograd Automotive Aggregate Plant (DAAZ).
Adjusting the VAZ 2107 carburetor is an important means of keeping the engine in working condition.
Before adjusting the carburetor, you need to know what type is installed on the car. To do this, you need to remember that:
- If you have a vacuum ignition corrector, this means that you have the latest type of VAZ 2103 or 2106 engine installed, and the modification of the 2107 carburetor is 1107010-20.
- If your “seven” is equipped with a six-wheel engine, but there is no installed vacuum corrector, then you have a carburetor modification 2107-1107010-10.
Main carburetor components to be adjusted:
In order to adjust the carburetor, you need to know the main signs of its malfunction. Since the carburetor is responsible for the acceleration dynamics of the car, these include the following:
- difficulty starting the engine, prolonged “sneezing”;
- all sorts of “jerks”, “jerks”, “failures” when you press the gas pedal;
- sluggish acceleration ability of the car;
- unexplained increase in gasoline consumption.
So, if your car has corresponding “complaints”, let’s start adjusting it.
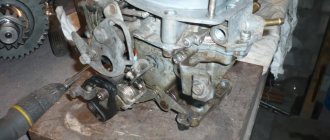
Attention! The most accurate adjustment can be made with the carburetor removed. Adjusting the VAZ 2107 carburetor does not involve the use of fleecy and woolen fabric, as well as various wires for cleaning the jets.
How to adjust the carburetor yourself on a VAZ 2107? When removing the carburetor cover, the float system is adjusted first, so convenient.
Adjusting the float system
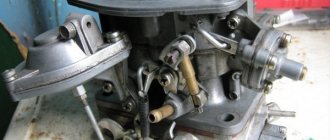
The free play of the float varies between the following values: 6.5 mm on one side and 14 on the other. This can be adjusted using a checking template by placing the camera vertically. In this case, the float lightly touches, but does not press, the valve ball.
If the distance is less than 6.5 mm, then you need to slightly bend the valve tongue (needle-shaped), which is shown in the figure as the letter “A”.
After this, we adjust the degree of opening of the needle valve, which allows gasoline to flow into the float chamber. When the float rises, the fuel supply decreases; when you sharply press the gas pedal and open the throttle, the fuel consumption increases and the float drops.
Now we adjust the deflection of the float in the other direction. To do this, we move it away from the lid as much as possible and check it with a template, the thickness of which is 14 mm with a certain tolerance.
If the distance does not match, you need to bend the stop of the float mounting bracket and make it no more than 14 mm.
Now, after adjustment, the free play of the float is about 8 mm. Adjusting the VAZ 2107 carburetor also involves checking the incoming grids and fuel filters to maintain a full flow of fuel.
Basics of fuel mixture dosage
The situation when a VAZ carburetor overflows happens especially often. Before examining the reasons, you need to learn a little about the principles of preparing the fuel mixture.
A mixture is considered normal when there are 14.7 parts of air to one part of fuel. All other ratios are a consequence of an incorrectly configured carburetor. If the ratio is from 7 to 1 to 12 to 1, then we can talk about overflow. In this case, difficulties arise in starting the engine. It must be remembered that too rich a mixture, as well as too lean, can be dangerous for the engine. It burns more slowly, which means there is a risk of valve burnout. But the combustion temperature is low.
Let's start adjusting the starting device
Setting up a VAZ 2107 carburetor with your own hands necessarily includes adjusting the starting device. Let us remind you that it serves to confidently start a cold engine. To do this, the mixture is twice or three times more saturated with fuel than when normally feeding a hot engine.
The starting device for carburetors of the 1107010 family operates at a frequency of 1500 rpm, that is, at the manufacturer’s recommended starting frequency for a cold engine.
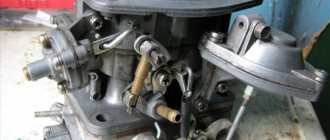
If you look at the carburetor from the side, you can clearly see the channel through which vacuum is supplied from the space behind the throttle to the diaphragm of the damper opener:
If you remove the carburetor and look at it from the back, you can see the air vacuum supply channel:
If you disassemble the carburetor, you can see the details of this diaphragm starting device:
Below you can see a schematic representation of the carburetor starting device of the 1107010 family:
We explain the mechanism of action of the starting device. By pulling the “choke”, the driver seems to bring the starting device into a cocked state. Wherein:
- The three-arm lever is “cocked” with a cable counterclockwise;
- Favors telescopic traction;
- The rod, in turn, rotates the air damper through a lever.
- The second arm of the lever presses on the axis of the throttle valve 1 of the chamber.
- The air flow damper is now completely closed, the throttle valve of chamber 1 is slightly open for starting, creating a starting gap
When adjusting the starting device with your own hands, you first need to remove the carburetor. Then:
Turn the choke lever until it closes. The device is now “cocked”.
Now you need to turn the carburetor over, measure the gap between the edge of the throttle valve (chamber 1) and its wall. For “Seven” carburetors this gap is 0.85-0.9 mm. The gap can be measured with a feeler gauge or calibrated wire:
To bring it into this range, the drive rod on the throttle valve is bent.
After this, set the gap “A”. It is located between the channel wall and the edge of the air damper below. To do this, close the damper again and “cock” the device. To create an imitation of rarefaction of air, we recess the starting rod:
Now the rod has pulled the rod along the slot, and as a result the damper opens. Gap “A” is 5-5.4 mm.
To adjust this gap, you need to turn the adjustment screw with a screwdriver, but first remove the screw plug from it:
How to set idle speed on a VAZ 2107
First you need to make sure that the ignition system is configured correctly, all wires are working properly and the engine is completely warmed up.
- We tighten the mixture “quality” screw to maximum speed (counterclockwise), while the mixture is enriched with fuel;
- By rotating the “quantity” counterclockwise, we set an even higher frequency on our own.
- We carry out a “quality” check: is it possible to increase the speed further?
The meaning of this operation is to increase the “quality” at a constant “quantity” to 850-900 rpm.
Reasons for the appearance of failures during acceleration of the VAZ 2109
So, why can failures appear when accelerating a VAZ 2109? The Nines were equipped at the factory with a Solex carburetor, which, as owners of cars with this carburetor know, regularly fails. And failures during acceleration of a car that is equipped with this particular type of carburetor can be caused by both incorrect operation of the economizer and an oversaturated or undersaturated fuel mixture. The cause may also be a malfunctioning accelerator pump. Let's look at everything in order.
To determine if your car has problems with proper saturation of the fuel mixture, you will need to remove the spark plugs, after which you will need to look at the carbon deposits on the electrode. If the candles have a milky-whitish color, it means that the mixture is most likely poor. A blackened spark plug electrode indicates that the mixture in the car is rich, and accordingly, more fuel is consumed than it should be. With a normal mixture, a brown soot forms on the candles, but there are no traces of oil combustion on it.
Difficulties during acceleration of the VAZ 2109 can be caused by a malfunction of the economizer, and to check the operation of this device, the carburetor should be completely removed. Then you will need to disassemble the assembly and see what condition the economizer diaphragm is in. If you have any suspicions, it is best to replace the diaphragm with a new one.
Difficulty in accelerating a car also occurs due to malfunction of the accelerator pump, as well as due to clogging of the nozzle, which is located in the primary chamber of the main dosing system.
Which carburetor model to choose
For any VAZ car, starting from 2101 to 2107, only certain carburetor models are suitable.
DAAZ carburetors
Carburetors DAAZ 2101, 2103, 2106. They were produced at the Dmitrov Automotive Unit Plant, which bought a license from the Italian company Weber, therefore these carburetors can be indicated under both names. The devices were not distinguished by the complexity of their design, but they could please their owners with the rapid acceleration of the car and good speed. One of the biggest problems in installing these models is their virtual absence on the market.
In addition to speed and simplicity, Weber carburetors also provided incredibly fast fuel consumption - these “monsters” consumed 10–14 liters per 100 km. fuel.
The powerful but resource-intensive Weber carburetor was produced by the Russian Dmitrov plant using Italian technology
Carburetors "Ozone"
More technologically advanced models, which were already installed in VAZ 2105 and 2107 cars, were also produced at the Dmitrov Automobile Unit Plant. However, they were not only more advanced and improved, but also more environmentally friendly. This is why they received the name “Ozone”. This carburetor made it possible to reduce fuel consumption to 7–10 liters. 100 km, while maintaining the dynamic characteristics of its predecessors. The downside of the device was the complexity of its assembly and constant contamination in one of the chambers, which led to the fact that the acceleration of the car noticeably deteriorated, the speed decreased and the engine began to act up.
“Ozone” is an environmentally friendly model of DAAZ carburetors
Solex
A little later, DAAZ 21053 carburetors appeared. They were produced under license from the French company Solex, hence the name of the models. These carburetors were not much similar to previous DAAZ models. The updated design with a fuel return system made it possible to save 400–500 ml of fuel per 100 km. These carburetors were distinguished by good power and low gasoline consumption. The disadvantage of the device was the narrow fuel and air channels, which very often became clogged.
The Solex carburetor successfully combines the power and environmental friendliness of its predecessors
Solex carburetors came in many variations with different auxiliary systems. In the CIS, the most popular option has become an electric idle air valve.
Custom carburetor Solex 21073
Often, inquisitive car enthusiasts resorted to replacing the carburetor on their own. One of the suitable models turned out to be Solex 21073, famous for its fairly wide jets and channels. Such a carburetor increased the car’s power, but at the same time increased fuel consumption - 9–12 liters. per 100 km.
Solex 21083
The second non-standard carburetor, which with some modifications fits the VAZ 2106 and 2107 models, is Solex 21083. After expanding the diffusers and installing jets, this device allows you to significantly increase the dynamics of the car without much fuel consumption. However, the process of upgrading a carburetor is very complex and time-consuming.
Troubleshooting
In order to understand the condition of the carburetor in a car, it is enough to carry out a little diagnostics.
Signs of a carburetor malfunction:
- the car began to consume more gasoline than it previously required;
- the engine begins to overheat quickly;
- Black smoke is pouring out of the muffler and popping, “sneezing” and “shooting” noises can be heard. These malfunctions appear when high-voltage wires are incorrectly connected, late ignition, incorrect operation of the distributor and ignition system switch, after unsuccessful repair of the timing belt, or with an inappropriate fuel mixture;
- the car began to noticeably lose power when driving;
- the car accelerates much more slowly;
- failures occur when, when you press the gas pedal, the car does not react instantly, but acceleration occurs gradually and with a delay;
- there are jerks - frequent and short dips;
- swaying occurs - several dips with insignificant intervals.
It is important to remember that before you begin to repair the carburetor, you should diagnose the entire engine power system and its technical condition.
Typical carburetor malfunctions:
- There is no fuel in the float chamber or the fuel mixture is too rich/lean. In this case, the car engine does not start at all or starts but immediately stalls.
- The idle passages or jets are clogged.
- The solenoid valve operates intermittently.
- Failures have appeared in the control unit or among the elements of the forced idle economizer (EFI).
- The rubber o-ring has started to work incorrectly or has melted.
- The fuel “overflows” and the level in the float chamber does not hold. The reason is the depressurization of the fuel valve.
Seven reasons why candles flood. What to do?
If you get behind the wheel and find that the engine won’t start, don’t be discouraged. Maybe your spark plugs are just flooded. This problem especially often arises in the winter season, which already causes a lot of trouble for motorists. Most often, spark plugs are filled with gasoline, sometimes with oil. You need to understand how and why this happens, then you can act proactively and avoid a situation where the car cannot be started. Well, if everything has already happened, then it would be nice to know how to return the spark plugs to working condition and start the engine.
Carburetor adjustment
After cleaning and repairing the carburetor, it should be adjusted.
How to set the fuel level
- First you need to adjust the float, which primarily affects fuel consumption.
- Unscrew the screws securing the cover and, for convenience, place it vertically. Make sure that the needle lightly touches the float.
- Check that the gap between the cover with the gasket installed on it and the bottom of the float is 6.2 ± 0.25 mm. If there is a discrepancy, correct it by moving the float tongue.
- After this, check the movement of the float. Its value should be 8±0.25 mm.
Video: how to adjust the fuel level in a VAZ carburetor
Adjusting the starter
- To do this, the carburetor must be installed on the engine, but not covered with an air filter. After this, pull out the choke as much as possible.
- Then you need to warm up the engine and use a screwdriver to open the air damper a third. The throttle linkage must be adjusted to 3200–3400 rpm.
- Then lower the throttle and reduce the speed to 2800–3000 per minute.
Do not overlook the hole for the plug - it must be clamped so that rarefied air is formed under the diaphragm of the starting device.
Idle adjustment
Performed with a warm engine. Only the quality screw is engaged.
- Using the quality screw, we accelerate the engine speed to the maximum level.
- After this, use the quantity screw to increase the rotation speed by 100–150 revolutions and, without stopping the engine, reduce the speed by the same number, but using the quality screw.
This operation completes the engine adjustment and ensures high-quality and stable operation with the minimum permissible amount of carbon monoxide.
Using the quality screw, you can lean or enrich the fuel mixture - it is responsible for the supply of gasoline, and tightening it leans the fuel mixture, and unscrewing it, on the contrary, enriches it.
The smell of gasoline in the interior of a fuel-injected car
As mentioned above, the VAZ 2107 was produced in two versions: injection and carburetor. Both models periodically “delighted” their owners with unpleasant odors in the cabin. First, let's look at injection models.
Fuel line leaking
If the gas line in the carburetor “seven” for some reason begins to leak fuel, the appearance of a gasoline smell in the cabin is inevitable. Most often this happens for the following reasons:
- problem with the fuel check valve.
It is located at the rear, behind the passenger seats. This valve was never reliable, and over time it began to leak gasoline. In addition, it may simply get stuck in the closed position. As a result, gasoline vapors will not be able to escape into the adsorber and will fill the interior of the Seven. The solution is obvious - clean or replace the check valve; Due to a clogged check valve, the smell does not escape into the adsorber. - crack in the fuel tank.
Tanks on later injection "sevens" often crack. This usually occurs due to mechanical damage: a strong blow or a deep scratch, which over time has rusted and began to leak gasoline. For whatever reason, a fuel leak starts, the tank will have to be either sealed or replaced. It all depends on the size of the crack and its location; The smell of gasoline in the cabin often occurs due to a cracked gas tank. - problem with the hoses on the fine filter. On injection "sevens" these hoses are attached to the filter using very unreliable thin clamps that weaken over time. Fuel begins to leak, and the smell of gasoline appears in the cabin. The best solution is to replace the standard clamps with thicker ones. The width of the clamp must be at least 1 cm. You can purchase such clamps at any spare parts store.
Electric fuel pump problems
On the latest models of injection “sevens”, electric fuel pumps were installed. The main task of the pump is obvious: to supply fuel from the tank to the injector. At first glance, the appearance of an unpleasant odor in the cabin cannot be associated with a faulty pump, since this device itself is located in the fuel tank. However, there is a connection. The pump, like any other device, wears out over time. The most wear-out element in this device is the sealing gaskets. Also, we should not forget that the pump is cooled by the same gasoline that it supplies to the injector.
The smell of gasoline in the cabin sometimes occurs due to overheating of the fuel pump.
If the driver does not monitor the fuel level in the tank, the pump may begin to overheat, resulting in an unpleasant odor. And if the driver constantly uses low-quality gasoline, the coarse fuel filter may become completely unusable. As a result, the smell of an overheated fuel pump can reach the interior. Solution: remove the pump, replace the gaskets, replace the fuel filters and use only high-quality gasoline with the appropriate octane number.
Poor injector adjustment and other reasons
In some injection-powered "sevens" the smell of gasoline can be felt in the cabin immediately after the engine starts. It should be said right away that this is not always considered a malfunction. For example, on old “Sevens” the smell of gasoline often appears when the driver starts a cold engine in winter, in severe frost. If such a picture is observed, the driver should take into account these points:
- the sensor that takes the temperature from the engine transmits data to the electronic control unit of the “seven” that the engine is cold;
- the block, guided by these data, creates a rich fuel mixture, simultaneously increasing the starting speed of the engine, putting it in warm-up mode;
- Since the mixture is rich and the cylinders are cold, the fuel simply cannot burn completely in them. As a result, some of the gasoline ends up in the exhaust manifold, and the smell of this gasoline enters the cabin.
If the injector is working properly, the smell of gasoline will disappear as soon as the engine warms up. If this does not happen, then there is poor injector adjustment or engine problems. Here's what it could be:
- malfunctions in the ignition system;
- malfunctions in the injector mixture formation system;
- poor compression in the cylinders;
- oxygen sensor failure;
- clogging of one or more nozzles;
- air entering the injection system;
- The ECM sensor has failed.
The result in all of the above cases will be the same: incomplete combustion of fuel, followed by the release of its residues into the exhaust system and the appearance of a gasoline smell in the car interior.
How to install the unit in place
You can assemble and reinstall the carburetor in the same way as you disassembled it, performing all the steps in reverse order.
- The carburetor is installed in its place, the mounting bolts are tightened.
- The pipes through which fuel is supplied are attached. The gas cable is connected to the throttle lever.
- The wiring is attached.
- A vacuum hose is connected to the ignition distributor, and the EPHH limit switches are combined.
- After installing the carburetor, it is adjusted.
Video: installing a carburetor on a VAZ
It is not so difficult to independently remove, disassemble, clean and reinstall the carburetor in the VAZ 2107 and 2106. The main thing is not to be intimidated by the huge number of hoses, valves, parts and dirt and strictly follow the instructions.
What is a carburetor and what does it go with?
The principle of operation of a carburetor from different manufacturers is essentially the same; its task is to create a fuel-air mixture, mixing it in certain proportions with fuel and air, after which it is supplied to the combustion chamber, where ignition occurs. Well, I think the rest is clear!?
There are three types of carburetors: float - this is perhaps the most common among all, needle and bubbler - quite rare.
In today’s article, we’ll talk about the Ozone carburetor, which is installed on a VAZ 2107. After that, you will learn how to clean the carburetor and how to adjust the VAZ 2107 carburetor. Before you begin, you need to understand something, the fact is that some modifications of carburetors can significantly differ from those installed on a similar car model.
- DAAZ 2107-1107010 - installed on the VAZ 2105, as well as the VAZ 2107.
- DAAZ 2107-1107010-20 - installed, as a rule, on new VAZ 2106 VAZ 2103.
- DAAZ 2107-1107010-10 – installed on VAZ 2106 or VAZ 2103 engines without a vacuum corrector with an ignition distributor.
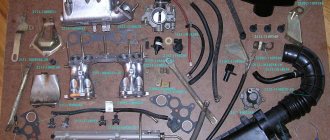
Let's look at the main part of the VAZ 2107 carburetor components
- Autonomous idle system.
- Float chamber.
- Idle shut-off valve.
- Econostat.
- Dosing system.
- Throttle valve.
- Crankcase gas exhaust compartment.
- Transition system for both cameras.
This knowledge is enough to clean and adjust the VAZ 2107 carburetor yourself. There is no need to know more, although it will not hurt for overall development.
Care products
A couple of decades ago, domestic car owners did not have the opportunity to use liquids to clean the fuel system. They had to make do with more affordable means, such as diesel fuel, kerosene, solvent and acetone. These materials were highly accessible, allowing every motorist to put a carburetor into working condition at minimal cost.
Any modern carburetor cleaning spray is an order of magnitude more effective than the compounds that were available before. And first of all, this is manifested in their higher quality.
Types of cleaning compositions
Car owners do not have any particular problems with how to flush the carburetor at home. There are two types of cleaning products available to them today:
- aerosol cleaner;
- a special liquid poured into a tank in which it is mixed with fuel.
Before using an aerosol cleaner, it is necessary to completely disassemble the working unit. In this case, a higher efficiency of the procedure is guaranteed. In the second case, when a special liquid is used, such complex manipulations are not required. The cleaning composition is simply poured into the gas tank, where, after mixing with fuel, it ends up in the carburetor, simultaneously removing all contaminants from the internal walls. Subsequently, the dirt enters the combustion chamber, and from there it exits through the exhaust pipe.
Tips for choosing
In order not to make a mistake when choosing a cleaner, you must follow a number of rules:
- It is recommended to choose formulations for washing that contain more active ingredients. The effectiveness of their work directly depends on this.
- Preference should be given to liquids from well-known manufacturers. Popular brands include Liqui Moly, Mannol, Hi-Gear.
- Before you go to the store for cleaning fluid, it doesn’t hurt to first read the reviews of other car owners who have extensive experience in cleaning the carburetor.
Safety rules should not be neglected. The aerosol cleaner contains many flammable components, so if handled carelessly, a fire hazard may arise. It is also necessary to take into account that such liquids have a specific odor. For this reason, it is recommended to clean this unit not only away from sources of fire, but also when creating conditions for good ventilation.
Now let's look at how the carburetor works, ensuring the distribution of the fuel-air mixture:
- Acceleration pump.
- Econostat system.
- Maintains constant fuel level.
- Idle support.
- Support for engine starting and warming up.
- Jets (air and fuel), diffuser, VTS atomizer, well and emulsion tube are located in the main metering chamber.
The carburetor is adjusted after cleaning and assembly. Before you start disassembling and cleaning, I suggest you remember the main saying of any auto mechanic - “Don’t make a fuss while it’s quiet,” meaning that you shouldn’t get into a place where everything is in order or disassemble something that has nothing to do with the breakdown.
How to properly adjust the carburetor of a VAZ 2107
- First of all, a detailed inspection should be carried out, then everything should be thoroughly washed and cleaned of dirt and other imperfections.
- Afterwards, you need to clean the mesh filter and wash the float chamber.
- Next you need to clean the air jets.
- And finally - adjustment of the float system (1), trigger mechanism (2) and idle speed (3).
Attention! This work does not require dismantling the carburetor.
The strainer, which is located in front of the entrance to the float chamber, is checked at least once every 60,000 mileage.
GDS air jet of the first chamber
The mixture of fuel and air may become over-rich in fuel due to a decrease in the volume of air entering the carburetor. What is the problem? This could be because the fuel jet is too large or the air jet is too small. Sometimes when inspecting carburetors, the jets of the first and second chambers are confused. This is what causes the carburetor to overflow.
What to do in such a situation? Everything is very simple. Here's how to fix carburetor overflow in this case. Remove the carburetor cover, remove the jet and clean it. If you have an aerosol can with a cleaning liquid, then you don’t have to take out the nozzle. As a result, the operation of the power unit will be stable and smooth, not only at idle.
How to check the strainer
This is done as follows. Use manual fuel pumping and fill the float chamber with fuel, after which you will be able to see the shut-off valve close. Then move the top filter cover and remove the valve. It must be thoroughly washed in solvent, then dried using compressed air.
When the engine behaves incorrectly during loads, there are dips or loss of power, or the car “reacts poorly to the pedal,” most likely you have a problem with the fuel supply. In addition, often the cause is a faulty strainer.
Important! It is strictly forbidden to wipe the bottom of the float chamber using a fluffy or any other rag, since after such cleaning, invisible fibers may remain on the bottom of the chamber, which will clog your jets during operation.
The float chamber is cleaned using a rubber bulb and then dried with compressed air.
Checking the tightness of the shut-off needle is carried out using a bulb, since the pressure force that occurs during squeezing is equal to the pressure in the fuel pump. When replacing the carburetor cover, you need to make sure that the floats are in the up position. You should feel strong pressure during installation, after which you need to listen carefully to the carburetor for air leaks. If there is even the slightest leak, the needle and valve body must be replaced.
Troubleshooting methods
If you find that the leak is in the fuel tank, you must replace it. You can try to prevent troubles of this nature. To do this, it is advisable to periodically carry out preventive inspections of the fuel system of the car, as well as monitor the tension of the tapes securing the gas tank and the good condition of their fastenings to the body.
The most vulnerable part of the fuel tank is its filler neck. Malfunctions of this part can also cause a fuel smell in the car interior. This element can either be welded to the container or screwed using a special rubber gasket. The last method of fastening is considered the most reliable. Welding defects or violation of its integrity will quickly lead to destruction of the entire seam. And the flange mount will remain in place and hold the pipe for a very long time. If you smell fuel, the first thing you should do is inspect the weld.
The presence of a fuel smell in the car interior can be caused by damage to the flexible hoses that connect to the fuel pump. They act as adapters from the line to the tank and from the line to the fuel pump. During movement, the pipes may be damaged or broken. If you find faults in these elements, they must be replaced.
It is necessary to maintain not only cleanliness in the salon, but also a pleasant smell. But not everyone succeeds. There is also a weak spot in the fuel supply system - this is the hatch to which the fuel pump and sensors that monitor the liquid level in the fuel tank are attached. All this is assembled into one module and located in the internal volume of the tank.
This entire unit is mounted using bolted fastenings located along the contour of the cover. There is a special rubber gasket between the tank body and this cover. It is this seal that can be a weak point, because it is continuously exposed to fuel vapors. And after a certain period of time, the gasket material begins to deteriorate. The result is a loss of tightness and the appearance of a fuel smell in the car interior.
The fuel system, and more specifically the tank itself, is equipped with special ventilation. It consists of hoses that are connected to plastic pipes. These hoses ensure the removal of gasoline vapors from the tank. And the weak point here is the plastic pipes, which can simply crumble. You can eliminate the smell in the cabin by replacing this entire unit.
Adjusting the VAZ 2107 carburetor: float system
To adjust the float system, do the following:
- Check the position of the float and, if necessary, align the holder bracket. This is necessary for the correct, uniform lowering of the float into the chamber.
- Next is adjustment with the needle valve closed. Open the chamber cover, then move the float aside and lightly pull the bracket tab. The task is to achieve the required distance between the cover gasket and the float; it should be within 6-7 mm, in no case more or less. If the immersion is more than 1-2 mm, if it is more, then the needle can be considered faulty.
The distance between the needle and the float when the needle valve is open should be 15 mm.
This procedure can be carried out on a disassembled carburetor or directly on the engine.
How to adjust the idle speed of a VAZ 2107 carburetor
To adjust the idle speed, you need to warm up the engine to operating temperature, then use the quality screw to set the maximum speed, and use the quantity screw to set the value to 100 rpm. above normal. Start the engine using the quality screw and adjust the speed.
At this point, the adjustment of the VAZ 2107 carburetor can be considered complete, now I hope you will not have any problems with how to adjust the carburetor with your own hands.
To consolidate your knowledge, I recommend to your attention the following video on how to adjust the carburetor with your own hands.
The smell of burning
Be that as it may, if there is a burning smell in the interior of the VAZ 2107, then this clearly indicates a malfunction. But the scale of the breakdown may vary. You can remove the root cause of this odor yourself by digging around in the car a little. And in some cases you will have to take your horse to the workshop, since you can’t do anything with your own hands. Of course, there is no need to panic if the smell of smoke or burning enters the interior from the street and not from under the hood. Close the air intake damper and forget about the problem. The main thing is to open it in time.
Be sure to check if there is a filter for cleaning the air entering the cabin. If it is, then evaluate its condition. It is quite possible that it is already so clogged that it is simply unable to let air pass through it. Often the cause of a burning smell on a VAZ 2107 car, and on others as well, is dirt on the engine. You can improve the situation a little by thoroughly washing the engine. And after such a procedure, when heated, it will not emit a fetid odor.
But if there are deposits on the exhaust manifold or exhaust pipe, then it will be much more difficult to get rid of them. There is often a burning smell in the cabin if there is an oil leak. As you understand, the engine heats up to high temperatures during operation. And when oil gets on it, it instantly boils and gives off an unpleasant odor. As a rule, the culprit of this phenomenon is always the rubber gasket installed under the valve cover. And the last reason is severe burnout of the gasket under the exhaust pipe. But at the same time an unpleasant sound is also heard.