Technical description and interpretation of error P0335
This diagnostic trouble code (DTC) is a generic transmission code. The P0335 code is considered a common code because it applies to all makes and models of vehicles. Although the specific repair steps may vary slightly depending on the model.
Depending on the vehicle, the PCM uses crankshaft position information to correctly determine spark timing. But in some systems, it only detects misfires and does not control ignition timing.
The CKP sensor is stationary and works in conjunction with a ring gear attached to the crankshaft. When this ring passes in front of the CKP sensor, the magnetic field generated by the sensor is interrupted. This creates a voltage signal that the PCM interprets as crankshaft position.
If the PCM detects a lack of crankshaft pulses or if it sees a problem with the pulses in the output circuit, a P0335 code will set.
In other words, while the engine is running, the PCM is constantly comparing input signals from the crankshaft and camshaft. If the crankshaft position is not within the specified degree of deviation from the camshaft position. Under a given set of programmed circumstances, for a given period of time. A P0335 code will be stored and the MIL may illuminate.
Quite often, when this code is set, the engine will not start. If the engine does start, it will likely run very poorly.
What does P0335 mean?
The crankshaft sensor (CSS) tells the engine control unit (ECU) where the crankshaft is at any given time. Many vehicles use this information to determine when the spark plugs should fire and to deliver the correct amount of fuel.
The crankshaft position sensor is stationary. It works in conjunction with a ring gear attached to the crankshaft. The movement of the toothed ring in front of the sensor creates a voltage signal that is sent to the ECU.
If the controller does not detect voltage pulses from the DPKV, fault code P0335 is activated. This could be due to a faulty sensor, but it could also be a problem with the ring gear, wiring or connector.
The OBD2 code P0335 refers specifically to the sensor on bank 1, also called sensor A. Bank 1 is the side of the engine that contains cylinder 1. You may see it in combination with other codes related to the crankshaft position sensor, especially P0336-P0339.
Some vehicles use the crankshaft position sensor only to detect misfires. In this case, it is a less serious code that is unlikely to cause symptoms while driving.
If the DPKV controls the timing of the spark plugs, the occurrence of trouble code P0335 will activate the vehicle's limp mode. This makes it especially important to find the cause of the problem as soon as possible.
Symptoms of malfunction
The main driver symptom of P0335 is the MIL (Malfunction Indicator Light). It is also called Check engine or simply “check light”.
They can also appear as:
Depending on the make and model, the engine control unit may use the CKP sensor to estimate engine speed and position. Therefore, the engine will operate, but not at maximum efficiency. If this happens, you may experience difficulty starting, rough idling, or poor acceleration.
Main symptoms of DPKV malfunction
A faulty sensor or a faulty device sensor can be recognized by the following symptoms:
- The vehicle's propulsion system began to detonate. When the engine is idling or increasing engine speed, a knocking sound occurs from the hydraulic compensators. The so-called pins may knock when driving uphill at low engine speeds.
- The car engine is no longer as stable as before. The engine speed may drop sharply at idle or shift to a higher speed. A car can become stuck idling if it is stuck in traffic or at stop lights.
- The drive may not rotate at the correct speed even if it is running at maximum power.
- The machine's engine power may drop and then increase. In this case, the driver will not take any action.
- The aerodynamic properties and characteristics of the machine are significantly deteriorated.
- The generator may not start. The engine may not start or may catch fire and shut down suddenly.
- No spark when ignition. It may not appear at all or occur with a certain frequency.
If the vehicle owner detects three or more “symptoms” of an internal combustion engine malfunction, the device must be replaced.
It should be noted that the described malfunctions do not always indicate a controller malfunction. They may also indicate other problems with the drive. For example, a sharp change in engine power and a drop in speed indicates a clogged fuel pump or lines connected to it. Symptoms of incorrect operation of the combustion chamber may appear due to contamination of the sensor connection socket.
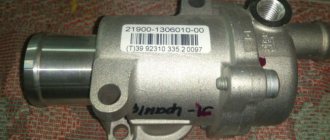
The Govorun4eg Auto channel showed signs of a faulty high pressure control valve in practice.
Diagnosis and problem solving
Begin your diagnosis by visually inspecting all system-related wiring harnesses and connectors. Inspect electrical circuits, sensors, and connectors that are contaminated with engine oil, coolant, or power steering fluid.
Petroleum-based liquids are known to corrode the protective insulation of wires and cause short circuits or open circuits. This may cause the P0335 code to appear.
Multimeter test
Then connect the scanner to the vehicle's diagnostic port and get all the stored trouble codes. After this, continue testing the voltage and ground signals. Most models use five volt power. Also check the ground signal and the third wire, the control circuit, should be sending a signal to the PCM.
Disconnect the electrical connector from the CKP sensor and test it according to the manufacturer's recommendations using a multimeter. Replace the sensor if resistance values do not meet manufacturer specifications. If all CKP circuit resistance values are within specifications, proceed to the next step.
Checking with an oscilloscope
Connect the positive test lead of the oscilloscope to the signal lead of the CKP harness, and connect the negative lead to the CKP ground circuit. Select the appropriate voltage setting on the oscilloscope and turn it on.
With the transmission in park or neutral and the engine idling, observe the waveform on an oscilloscope. Focus on unexpected spikes or glitches in the waveform pattern.
If you notice any spikes or glitches, gently move the wiring harness and connector while looking at the waveform diagram. You are trying to determine whether the problem is a weak connection or a faulty CKP.
Notice the voltage blocks in the waveform pattern. If some of them are missing, this indicates a broken or worn toothed ring. Also check the CKP magnetic tip for excessive metal debris and clean if necessary. If the waveform is normal, proceed to the next step.
Now reconnect the oscilloscope test leads to the same circuits near the PCM connector and observe the waveform pattern. If an abnormality is detected, there is most likely an open or short circuit between the CKP connector and the PCM connector.
If no open or shorted circuits are found, the P0335 code may be due to a faulty PCM or its programming.
VAZ 2114: Error P0335 - what it means, causes, symptoms and solutions
DPKV is one of the most important car sensors, because without it the car simply won’t start.
Let me remind you that the Crankshaft Position Sensor (CPS) transmits the received current pulse to the controller, which in turn regulates engine operation. Read more about DPKV in the article: DPKV on VAZ. Operating principle, signs of malfunction.
The sensor is a simple mechanism, so there is nothing to break there. But nevertheless, nothing lasts forever, and the sensor fails.
How to check DPKV for performance?
You can check the operation of the DPKV in three ways:
- using a multimeter or similar test device;
- using a multimeter or similar test device; - using a combined test;
- Using an oscilloscope.
Diagnostics of the crankshaft position sensor with an ohmmeter
You can use an ohmmeter to test the regulator winding to measure the resistance value. If an ohmmeter is not available, multimeters can be used. As a result of diagnostics, on a working sensor the resistance value should be in the range of 550-750 Ohms.
The testing process itself consists of measuring the resistance of the inductive regulator coil. If this equipment fails, the failure will affect the operating resistance parameter. Therefore, before starting the test, you should set the appropriate range and diagnose the correct operation of the device using measuring sensors.
The method of checking the crankshaft sensor with an ohmmeter is considered the simplest to perform, but does not give a 100% result.
How to repair DPKV?
Unfortunately, DPKV cannot be repaired, BUT! Most often, the fault occurs not in the sensor itself, but in the sensor circuit. In other words, if the DPKV is broken, then it needs to be replaced with a new one, but before replacing it, you need to check the wiring suitable for the sensor.
If the sensor is faulty, the on-board computer or diagnostics generates the following errors:
On a VAZ 2114, error P0335 indicates that there is a problem in the crankshaft position sensor circuit, as a result of which it sends an incorrect signal to the computer.
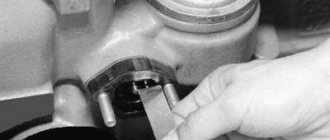
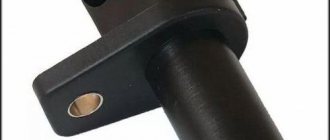
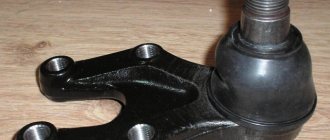
The crankshaft position sensor (CPS) is located in the timing belt area, next to the crankshaft pulley and is bolted to the oil pump cover. The crankshaft sensor transmits information to the engine control unit about the position of the crankshaft at any time. This information is used by the electronics to determine when to turn on the spark plugs and deliver fuel to the rail in the required quantity and time. In this article, you will learn what causes this error, what problems arise due to a malfunctioning measuring device, and how to troubleshoot error 0335.
In the picture: 1) fastening bolt, 2) PCV sensor.
Symptoms of a problem
To understand what signs of a malfunction may relate to the DPKV, let’s briefly consider its participation in engine operation. Asymmetrical projections on the crankshaft sequentially act on the connecting rods, pushing the pistons in the cylinders. The latter compress the air and pump up the compression. At the same time, the timing belt supplies the required amount of air to the cylinders through the cylinder head.
The engine control system “understands” the position of all participants, based on the DPCV data (provided that the timing drive is installed correctly), and opens the injectors to release gasoline. A spark is supplied from the ignition coils to the spark plugs, and the air-fuel mixture ignites. The engine runs smoothly and does not jerk.
If the crankshaft sensor malfunctions, the synchronization of the process is disrupted. The engine ECU does not know at what point to supply gasoline, which affects the operation of the internal combustion engine.
Diagnostics will help you find the cause of the breakdown, but more on that below.
Among the signs of malfunction indicating a possible breakdown of the DPKV there are:
- the Check Engine icon lights up on the dashboard;
- loss of vehicle dynamics;
- unstable engine speed;
- the engine stalls spontaneously;
- detonation when pressing the accelerator pedal;
- The engine jerks and shakes.
If the crankshaft sensor fails completely, the engine cannot be started at all. But this can only be established by checking, where the diagnostics will show the condition of other participants in the ignition system.
Popular brands:
Hyundai Creta
FakeHeader
Comments 5
The problem remained until I soldered all the connections in the replaced wires.
The problem is either the pulley or the wiring.
Pulley if damper check tires
Check the wiring from the ECU to the dpkv. You measure the resistance of the sensor, connect the connector to it, remove the ECU harness, look for the terminals that come with the DCCV and measure the resistance. Ideally there should be no differences. If it's infinity then it's a break. You can try and ring the load: with a light bulb and the battery. Often the test near the connector breaks under the insulation
1. Check the wires and resistance of the crankshaft position sensor. Resistance may change slightly as temperature increases.
2. The output signal of the sensor should have an alternating current voltage amplitude of about 0.3 V when the crankshaft is cranked by the starter.
VAZ P0335 Incorrect crankshaft position sensor signal HOW TO CHECK:
1. Use the Errors menu to clear the error codes. Crank the crankshaft for 10 seconds or until the engine starts.
Code P0335 - Intermittent If it does not set and there are no other codes, analyze the conditions under which the code occurs. Check the drive disc on the crankshaft pulley for missing teeth, runout or other damage. Failure of contacts in the sensor or controller block can cause the intermittent code P0335 to be entered. Also setting an intermittent code P0335 can cause a damaged sensor harness shield.
2. Turn off the ignition. Disconnect the harness connector from the controller. Using a multimeter, measure the resistance between contacts “48” and “49” of the harness block.
If the resistance is 550 Ohms or less, the sensor wires are shorted to each other or the sensor is faulty.
If the resistance is 750 Ohms or more, the connections are faulty or the sensor is faulty.
3. If the resistance is between 550-750 ohms, prepare a multimeter to measure the AC voltage. While turning the crankshaft, monitor the voltage between contacts “48” and “49” of the harness block.
If the voltage is below 0.3V, the connections are faulty or the sensor is faulty.
If the voltage is higher than 0.3 V, connect the harness connector to the controller. With the engine running, clear the error codes using the Errors menu. Crank the crankshaft for 10 seconds or until the engine starts. If code P0335 is entered again, check the condition of the drive disc on the crankshaft pulley for missing teeth, runout and other damage. If the drive is faulty, replace it.
Signs of a faulty crankshaft sensor
There are a number of reasons why a crankshaft position sensor can fail, and a number of symptoms associated with this failure. Crankshaft position sensor problems often manifest as engine timing problems. Here are some common symptoms of a bad crankshaft sensor that can help you determine if it has failed. Problems
problems with the crankshaft sensor may be due to several reasons. 2 common ones include:
1. Engine overheating
.
Excessive engine heat may damage the sensor by melting the plastic coating. 2. Wiring problems
. Incorrect voltage or loose, frayed or damaged wiring can interfere with the transmission of signals to and from the DPCV, causing problems. Typically, a faulty sensor will cause any of the following symptoms, which alert the driver to a potential problem that needs to be fixed.
Problems starting the car
The most common and most common symptom is difficulty starting the engine. The crankshaft sensor monitors the position and speed of the crankshaft, as well as other parameters that play an important role when starting the engine. If the sensor is faulty, the car may have intermittent problems starting or may not start at all, which is more likely. A faulty sensor can affect your vehicle's ignition timing. This can result in no voltage being supplied to the spark plugs, resulting in an inability to start. If only one or two cylinders are affected, the problem may be with the ignition coil.
Intermittent stop
If there is any problem with the sensor or its wiring, it may cause the crankshaft signal to be cut off while the engine is running, resulting in the engine stalling. Problems with the sensor worsen at low engine speeds. Sometimes the engine can even stall completely at low speeds if the fuel injectors are not delivering the fuel it needs. This is usually a sign of a wiring problem. However, a faulty crankshaft sensor can also cause this problem.
Uneven vehicle acceleration
Due to the inaccurate input signal from the crankshaft position sensor, the engine control unit is unable to adjust ignition timing and fuel injection as engine speed increases. Slow or uneven acceleration may result from a lack of precision and make it difficult to maintain a constant speed.
Misfire or engine vibration
If you feel vibration in the engine, this may be a sign of misfire in the cylinders due to a faulty crankshaft position sensor. Therefore, it cannot provide correct information about the position of the piston in the engine, which results in the cylinder misfiring. This can also occur due to improper spark plug timing.
Rough idling and engine vibration
Another sign of a faulty DPKV is rough idle. When idling at a red light or otherwise stopped, you may notice a grinding or vibration from the engine. The sensor does not monitor the position of the crankshaft, resulting in vibrations that affect the overall engine power.
Increased fuel consumption
Without accurate timing information from the crankshaft position sensor, the fuel injectors cannot effectively deliver fuel to the combustion chamber. The engine will use more fuel than it needs on short and long trips, reducing overall fuel economy.
Check Engine light comes on
If the computer detects a problem with the crankshaft position sensor signal, it will activate the Check Engine
to alert the driver of the problem.
Check Engine
Light can also be caused by a variety of other problems. It is highly recommended that you perform troubleshooting. DPCV is critical to proper engine operation and performance due to the important signal it provides for engine calculations. Problems with the sensor can quickly lead to problems affecting the vehicle's handling.
Trouble
I’m driving home, at about the 60th kilometer I get error P0340 - camshaft position sensor error. The check light did not light up, I saw the error on the on-board computer (state).
I came home and reset the error. The next day I go to work and there are no errors. Well, probably a stray mistake. It happens to everyone.
A day later I was driving around the city and heard a squeak from the on-board vehicle and the inscription: there are errors in the ECM system. Crap…
The check did not light up again; this did not affect the driving performance of the car. I come to work, look at the error - P0340 again. Soooo, now it’s more interesting...
I drove like this for another day, but I couldn’t reset the error. As soon as you start the car, P0340 appears. You reset it, turn it off, start it again - and again the error occurs. I decided not to reset the error and try to start the car with this error. The car took a very long time to start! The starter spun for about 3-4 seconds, instead of the standard 1 second.
At this moment, error P0335 appeared in addition to error P0340. As they say, trouble does not come alone. Then I did not yet know that in my case they were interconnected.
I decided to change the camshaft sensor. The new one cost about 500 rubles, the most interesting thing is that it was exactly the same as the old one.
And of course it didn't help. The error came out again.
Causes of error P0335
If the rubber on the pulley is worn out, dampening unwanted vibrations, or the pulley itself is deformed, then it will rotate, making a figure eight, and creating excess vibration. DPKV calculates the teeth on the pulley, forming 58 impulses, and therefore broken teeth are also sources of unwanted impulses and vibrations.
Slipping or breaking of the timing belt is also a consequence of an error.
Code 0335 appears when the resistance in the DPKV changes, which in turn can change with increasing temperature. The error is also caused by electrical impulse noise generated in the generator wires.
Very rarely, an error code appears due to a faulty ECU. Therefore, the electronic control unit is checked when it is ensured that all systems are working properly, but the error continues to be displayed.
To find out the cause of error 0335 in a VAZ 2114, you need to have a special diagnostic scanner and a digital multimeter to check the electrical circuit in the DPKV and the sensor itself.
VAZ 2114: Error P0335 - what it means, causes, symptoms and solutions
On a VAZ 2114, error P0335 indicates that there is a problem in the crankshaft position sensor circuit, as a result of which it sends an incorrect signal to the computer.
The crankshaft position sensor (CPS) is located in the timing belt area, next to the crankshaft pulley and is bolted to the oil pump cover. The crankshaft sensor transmits information to the engine control unit about the position of the crankshaft at any time. This information is used by the electronics to determine when to turn on the spark plugs and deliver fuel to the rail in the required quantity and time. In this article, you will learn what causes this error, what problems arise due to a malfunctioning measuring device, and how to troubleshoot error 0335.
In the picture: 1) fastening bolt, 2) PCV sensor.
The device and where the crankshaft position sensor is located
The electrical sensor plays an important role in the proper operation of the power plant, so all car manufacturers place it within easy reach for inspection and repair. The DPKV is located on the right side of the engine, next to the flywheel in the area of the cylinder block. You need to look above the pan, closer to the starter and coolant outlet pipes.
Crankshaft position sensor location
It is usually secured with one or two bolts (depending on the modification) and has a small wire with a contact chip. The element is coated with an elastic polymer that is resistant to oils and high temperatures
DPKV position relative to the mark
The shaft position is determined by two missing teeth or a dedicated control one (depending on the type of flywheel). DPKV “notices” this visually and using electromechanical processes. There are three types of controller.
With Hall sensor
Works with a magnet mounted on the flywheel. Whenever it passes the sensor, a direct current is excited in the DPKV. This is recorded by the synchronizing disk and the information is transmitted to the engine control unit.
DPKV with Hall sensor
Optic
The device has an LED. Works in conjunction with a receiver. The beam always leaves and is reflected. When the glow is interrupted, it means that the control tooth has passed by the controller. It is used to determine the position of the crankshaft.
Optical DPKV
Inductive
Contains inside a magnetized coil that responds to an electromagnetic field. When the indicators change, a mark is recorded indicating the specific position of the pulley on the shaft.
Inductive DPKV
The last type is the most common and is installed on all modern cars with a fuel injection system into the engine. In addition to the position of the crankshaft, it is able to determine the rotation speed, therefore it is more functional.
How to fix P0335?
Inspect the flywheel teeth and timing belt. Replace it if necessary.
Disconnect the harness and inspect all wires connected to the DPKV for damage, make sure that all connections are intact. Test the wires with a multimeter. To do this, first turn on the ignition, but do not start the engine. Touch the black wire of the multimeter to the body of the machine, and examine the connector pins one by one with the red wire. There should be a voltage of 5 V on one of the connectors. If you do not find such a connector, then the harness is damaged.
The DPKV itself fails rarely. Typically, code 0335 indicates a malfunction not in the sensor itself, but in the circuit associated with it. But if it fails, it cannot be repaired. Unscrew the single bolt and pull out the device. Inspect it for metal shavings and other damage. The sensor may have failed and needs to be replaced.
If the device is externally intact, check it with a multimeter, having previously set the ohmmeter mode. Infinity will indicate a break in the network, and 0 indicates a short circuit. The ohmmeter readings must correspond to those indicated in the technical passport. If there are deviations, then the sensor has a problem.
If error 0335 is not corrected in time, it can lead to more serious problems in the engine. And in order not to end up with a stalled engine somewhere where there are no emergency services, it is necessary, when information about a DPKV error appears, to diagnose the car yourself, or go to a car service center, where the faults will be eliminated quickly and professionally.
Code P0335 indicates a faulty crankshaft position sensor (bank 1) circuit. This is one of the most important sensors in many engines. The malfunction may affect the firing timing of the spark plug, and thus may lead to misfire.
Correcting the P0335 trouble code is very important and should be done as quickly as possible. Read below to learn how to diagnose and fix this trouble code.
Verification methods
The symptoms described above may be signs of a malfunction of more than just the crankshaft sensor. Such symptoms also apply to spark plugs, displaced marks in the timing belt assembly, high-voltage wires, and ignition coil. Here it is important to know how to test the controller.
Checking the DPKV will help make sure that the fault is in it, and not in a skipped timing belt or a dirty engine throttle valve.
There are several diagnostic methods. Since most DPKVs are inductive, we will consider testing just such a controller on the shaft.
wrench
If the engine does not start and there are no measuring instruments or service stations nearby, you can check the position sensor with a wrench. For this method it is good to have a second person as an assistant:
- Open the hood and unscrew the sensor fixing bolt.
- Take the DPKV out and clean it of dirt.
- Turn on the ignition.
- Remove the cushion on the second row of seats so that you can better hear the operation of the fuel pump in the tank.
- Without removing the contact chip, apply a wrench to the end of the sensor.
- The second person should at this moment hear the fuel pump turning on.
This key test triggers the induction coil and simulates the passage of a pulley. If the fuel pump turns on every time a metal object is applied, then the controller responds to the position of the shaft. If the pump is not heard, then the symptom will definitely indicate a breakdown.
Oscilloscope
Checking the crankshaft sensor with an oscilloscope is done in two ways and gives a more accurate idea of the controller's response to the position of the shaft. In the first case, the action occurs with the engine turned off, but with the ignition on.
The sensor is removed from its place, and oscilloscope probes are applied to its contacts. Polarity doesn't matter here. Next, a metal object is passed in front of the end part of the sensor (you can use the same wrench). The coil should fire on metal, but instead of removing the back seat and listening to the sound of the fuel pump, the response will be visible on the oscilloscope screen.
Checking DPKV with an oscilloscope
A more accurate test can be performed with the engine running by connecting an oscilloscope parallel to the DPKV terminals. Then the program will show not only the reaction, but also a complete picture of the controller’s operation. The amplitude of the electromagnetic field will be displayed on the screen. It should have even upper and lower boundaries, as well as equal separation intervals indicating the passage of the control section. If there are more such pauses or the edges of the oscillogram are not smooth, it means that some of the flywheel’s teeth are broken off or severely worn out. This leads to incorrect sensor response. Then the issue is not a malfunction of the crankshaft sensor, but a mechanical part. The flywheel crown will need to be replaced.
Multimeter
Checking the crankshaft sensor with a multimeter is performed in resistance measurement mode. To do this, the step switch is set to the appropriate position. The DPKV is removed outward, and the multimeter probes are inserted into the contacts.
Checking the sensor with a multimeter
Most sensors have a coil resistance range of 500-700 Ohms (you can find out more precisely from the characteristics of a specific model and the manufacturer’s data). Therefore, the device must be set to the upper value of 2000 Ohms. If the tester shows lower values, then the insulation of the coil winding is damaged. Such a malfunction requires replacement of the sensor. The absence of readings on the tester means that the circuit is broken and the DPKV is unsuitable for use.
In addition to resistance, some multimeters can test inductance. For the crankshaft position sensor, this indicator should be 200–400 mH. A significant deviation from the specified range indicates a controller malfunction.
Diagnostic scanner
Those who take a more professional approach to repairing their car have a diagnostic scanner in their tool kit. It helps to check not only the sensor, but also other parameters of the gasoline engine. Among products of Korean origin, OBD–2 Scan Tool Pro scanners are very popular.
Diagnostic scanner
The device is inserted into the car's standard connector and communicates with the ECU. Using a laptop, phone or PC, pairing occurs via Bluetooth or Wi-Fi network. A special program will be required. Collected errors are displayed on the screen. Among the fault codes related to the crankshaft position sensor: P0336 and P0335. Checking with a scanner consists of the presence of a signal from the position sensor and the ability to determine the reference mark to synchronize the subsequent operation of the engine.
Checking with an ohmmeter
If you don’t have a multimeter at hand, but have an ohmmeter, then that will also work. With the engine off, you will need to remove the crankshaft electric sensor and touch the device leads to the contacts in the connector. The operating parameters of the DPKV should be in the range of 500–700 Ohms. If the resistance is very high, it means that somewhere there is interference with the passage of electric current. If the indicator is too low, the integrity of the winding is compromised.
Technical description and interpretation of error P0335
This diagnostic trouble code (DTC) is a generic transmission code. The P0335 code is considered a common code because it applies to all makes and models of vehicles. Although the specific repair steps may vary slightly depending on the model.
Depending on the vehicle, the PCM uses crankshaft position information to correctly determine spark timing. But in some systems, it only detects misfires and does not control ignition timing.
The CKP sensor is stationary and works in conjunction with a ring gear attached to the crankshaft. When this ring passes in front of the CKP sensor, the magnetic field generated by the sensor is interrupted. This creates a voltage signal that the PCM interprets as crankshaft position.
If the PCM detects a lack of crankshaft pulses or if it sees a problem with the pulses in the output circuit, a P0335 code will set.
In other words, while the engine is running, the PCM is constantly comparing input signals from the crankshaft and camshaft. If the crankshaft position is not within the specified degree of deviation from the camshaft position. Under a given set of programmed circumstances, for a given period of time. A P0335 code will be stored and the MIL may illuminate.
Quite often, when this code is set, the engine will not start. If the engine does start, it will likely run very poorly.
Purpose, device and principle of operation
The crankshaft position sensor is the main regulating function of the fuel injection system on a vehicle. Its presence ensures synchronous operation of each engine injector and the entire ignition system.
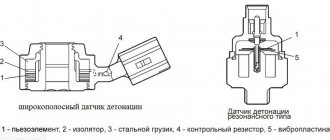
The driver consists of the following components:
- 1 — device of a nylon frame;
- 2 - magnetic circuits, these elements are made of steel;
- 3 - winding kit, for which thin copper wire is used;
- 4 - a layer of electrical circuit insulation, most often in the form of enamel or resin.
Unstable operation of the controller causes temporary interruptions in the fuel supply. During operation of the device, the vehicle control module, which is a microcontroller, ensures the correct piston position at a given time for each cylinder of the internal combustion engine.
To ensure adjustment using the device, the process is based on the following algorithm:
- The crankshaft of the power unit is equipped with a special gear. There are no two gears on it, this was done on purpose.
- When the machine's engine crankshaft begins to move, all the teeth move in close proximity to the controller. This contributes to strong distortions of its magnetic field.
- Signals are generated in the induction coil of the regulator when the shaft moves. Packet pulses are transmitted to the information base, which is located in the memory of the microcontroller. The two gears missing from the shaft are considered the starting point and also the zero point. Due to the absence of these gears, the microprocessor unit diagnoses the initial position of the crankshaft.
- The microprocessor in the car then counts the number of signals sent by the device. Then, after a certain time, the position of the crankshaft is determined.
- The processed pulse data is then sent by the control unit to the controller used to activate the fuel injector. The latter supplies fuel to the ignition system.
How to Diagnose Code P0335
Required Tools
Step-by-step instruction
Contents: 1. Diagnostics1.1 Self-diagnosis VAZ 21141.2 Check using diagnostic equipment2. Main error codes VAZ 2114 injector: decoding 2.1 Exhaust system - 00002.2 Air line defects - 01002.3 Error codes related to fuel supply - 0200 2.4 On-board computer error codes indicating breakdowns in the ignition system - 03002.5 Additional attachment that does not have a direct effect on motor – 04002.6 Failure, malfunctions in the speed control system SU – 05002.7 On-board network of auxiliary or main equipment – 06002.8 Auxiliary systems – 10003 How to fix the breakdown4. Bottom line
The Russian automaker VAZ produces a sufficient range of cars. Brand models are in great demand among domestic car enthusiasts and in the CIS countries. The popularity is due to the moderate cost and cheap repair of cars. However, problems happen with any vehicle and the plant’s products are no exception. Error codes for the VAZ 2114 injector can guide the motorist regarding the area of the breakdown and help in troubleshooting the problems.
Diagnostics
There are two ways to set error codes for VAZ 2114 injector 8 valves. However, each method has unique advantages and disadvantages.
Self-diagnosis of VAZ 2114: error codes and their interpretation
The self-diagnosis method does not require the driver to have complex instruments or additional units. To complete the procedure, the car itself is enough.
The standard sequence of actions looks like this.
If the sequence of actions is performed correctly, all indicators will light up and the display will show a two-digit fault code.
Note!
A failure signal may be a lack of response from the indicator. In this case, it is necessary to check the circuit coming from the device.
The most common error codes for the VAZ 2114 panel, occurring in 90% of cases:
In some cases, errors may be superimposed on each other if the failure is similar. For example, if errors 1 and 4 intersect, the panel will indicate "5".
It is important to know that after viewing, VAZ 2114/2115 error codes do not disappear on their own after repairs are performed. They need to be forced reset. To complete the work you will need a simple sequence of actions:
This also needs to be done if you are planning a trip to a service station. Having discovered the instructions from the on-board computer, the technicians will correct these problems, which will definitely be more expensive.
The disadvantages of an independent procedure include the low accuracy of the data. On-board diagnostics only show the general direction vector where the fault should be looked for.
Check using diagnostic equipment
You can identify error codes for VAZ 2115 and 2114 using a laptop with a special program. The tool is connected to the vehicle's test socket through a set of adapters. The wizard configures the software, and after diagnostics, one or more faults will be displayed on the computer screen in the form of a five-digit code.
The first part is the letter:
The second part is a single digit:
The next element is the breakdown group indicator:
The final two numbers point directly to the problem itself.
Basic error codes for VAZ 2114 injector: decoding
Note!
The table is also relevant for version 2115.
Exhaust system – 0000
Air line defects – 0100
Error codes VAZ 2114 1.6 liters related to fuel supply - 0200
Error codes on the VAZ 2114 on-board computer indicating a breakdown in the ignition system - 0300
Additional attachment that does not have a direct effect on the motor – 0400
Failure, malfunctions in the SU speed control system – 0500
On-board network of auxiliary or main equipment – 0600
Auxiliary systems – 1000
Only the most popular error codes for the dashboard of the VAZ 2114 and similar models are listed here. There are other indices, but due to their low prevalence they are not mentioned.
How to fix the problem
After diagnosis, the problem should be repaired. When reading a signal, it is necessary to check the circuit and devices following it. The most accurate method is to replace the damaged part with a known good one (new). This will eliminate the possibility of incorrect repairs. If the device is in working condition, the lines are checked; usually a primitive test is sufficient. However, if the control unit or relay fails, you will need a special tester and the ability to use it.
Separately, it is necessary to take into account that factory terminals and blocks become loose and oxidize over time. If the contact on the hitch deteriorates, the on-board computer or laptop program will say that the part is damaged, even if it is not.
You can prevent this from happening in the following way.
You can diagnose VAZ 2114 error codes on the instrument panel and ECU yourself, only if you understand the essence of the process. If you don’t have confidence in your own abilities, it is recommended to contact a qualified technician.