Modern cars are rich in technical innovations that ensure stable operation of all systems. The VAZ 2114 crankshaft sensor plays an important role, and if trouble happens to it, you won’t be able to start the car.
Depending on how the crankshaft is positioned, the position of the piston system is calculated, and this affects the period of occurrence of a spark on the spark plugs and the supply of fuel to the combustion chamber of the cylinders. Errors in the operation of a miniature device can be critical.
Purpose and principle of operation
The functional purpose of the DCPV is to supply the ECU with fourteenth information about the current position of the crankshaft, on the basis of which the controller synchronizes the operation of the ignition system and injectors. Simply put, the moment at which the fuel mixture is supplied to the combustion chambers and the frequency of spark occurrence on the spark plugs depend on the DCPV.
If the DCVP fails, the operating mode of the engine will be completely disrupted - due to the fact that fuel will be supplied excessively or, conversely, ignition will not occur at the right time, the engine will begin to stall, the car will twitch when driving and lose speed.
For fourteen different years of production, different DCPVs were installed - frequency and inductive, the differences between them lie in the principle of operation.
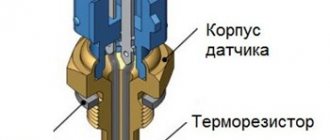
Inductive sensors, also known as electromagnetic sensors, have an electromagnetic core covered with a winding of copper wire. When a metal part (crankshaft) appears near the core, the core reacts to its electromagnetic field, as a result of which its electrical potential changes.
The potential difference is transferred to the copper winding and alternating current is generated on it. The winding itself is routed to contacts located on the DCPV housing. The wires connecting the device to the engine control unit are connected to the contacts. The resulting alternating current is transmitted to the controller, on the basis of which the brains of the fourteenth determine the current position of the crankshaft.
The design and operating principle of a frequency-type crankshaft sensor is somewhat more complicated. Such devices also have an electromagnetic core, but they are also equipped with a converter operating on the Hall principle, which generates a frequency pulse from the resulting alternating voltage.
Information is supplied to the ECU in the form of pulse signals, the frequency of which changes when a metal object is located next to the sensor (in this case, the crankshaft ring teeth).
Using an Oscilloscope
This method is the most reliable and with its help you can be 100% sure of the current state of the sensor. To do this, you need to turn on the oscilloscope to a limit of 10 ms and an amplitude of 1 V/div. And try to start the engine with the starter. In this case, on a well-charged battery, the engine should be accelerated by the starter to 800 rpm, this will correspond to a frequency of 200 Hz and a corresponding period of 5 ms/div. You should observe impulses, one period of which occupies two cells.
Source
How DPKV works, its types and operating principle
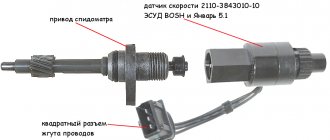
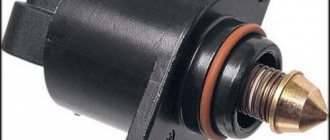
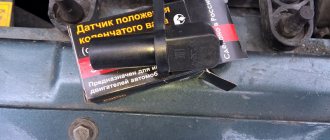
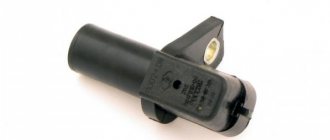
A small device that records information about the rotation of the crankshaft and transmits the data to the on-board computer - the VAZ 2114 crankshaft position sensor, is made of plastic or aluminum. This is a small device with a special eyelet for fastening.
The device has two main parts:
- position sensor;
- sync disc
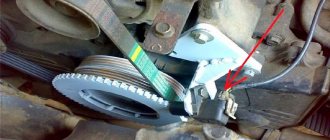
Where is the crankshaft sensor located on the VAZ 2114 - on the oil pump bracket, that is, in the right front corner under the hood. Even a novice car enthusiast can detect the device.
There are three types of DPKV VAZ 2114:
- electromagnetic or inductive ones are distinguished by such an internal structure - they contain an iron rod wrapped with copper wire. Reacting to the magnetic field of the crankshaft pulley, the rod changes the type of electromagnetic signal, the information is sent to the ECU. Thanks to the passing signals, an alternating current is generated, which helps the electronics to correctly calculate the position of the shaft and start the further process;
- frequency DPKVs are more complex in operating principle and design. They also have an electromagnetic rod, but the converter works differently - a frequency pulse is formed from the resulting alternating voltage. The electronic control unit receives pulse signals. Unfortunately, such devices are too susceptible to electromagnetic interference, which reduces their reliability;
- optical ones are equipped with a toothed disk, thanks to which the beam of light emanating from the LED to the receiver is blocked. Interruptions are recorded, which causes a voltage pulse to be sent directly to the electronic control unit.
The operating principle of crankshaft position sensors is very similar, but they are designed differently, which is why the first type has become more widespread - its design is simpler and its operation is more stable.
The crankshaft sensor operates on the following principle: the crankshaft gear has a gap equal to two teeth. When it passes the installed device located on the power unit near the pulley, the piston connecting rod is at the highest point.
The pulse is recorded, processed in the electronic control unit, and the gas distribution mechanism receives a signal allowing the air-fuel mixture to be supplied.
Diagnostic methods
Now let's look at diagnostic methods that involve checking the crankshaft sensor at home on your own. There are several of these methods and we will consider each of them in detail. But in order to carry out diagnostics, you must have at least minimal knowledge about using the devices, which we will discuss below.
Checking with a multimeter (winding resistance)
You don’t need any tools, just prepare a multimeter in advance, since diagnostics will be carried out with its help:
- First, you should dismantle the regulator, and then fix its original position on the motor. You can determine the location of the device from the service manual. So, you need to fix the regulator, while noting its position using the marks.
- After this, just in case, carry out a visual diagnosis of the sensor; perhaps the cause of its malfunction is damage to the housing or wires. The device itself, together with the contacts, must be cleaned and wiped; fuel can be used for these purposes.
- When you dismantle the device, pay attention to the distance between the synchronization shaft and the core. The best option would be if this gap is not lower than 0.6 mm and more than 1.5 mm. If no mechanical damage is detected, then you still have to use a multimeter. In particular, it will be necessary to diagnose the electronic component of the DPKV, namely its winding, since in most cases the problem lies precisely in it.
- The winding diagnostic procedure involves checking the resistance. If you know how to use a multimeter, then this process will not cause you much difficulty. The resistance value for a working sensor should be from 55 to 750 Ohms, however, before checking, we recommend that you read the service book for your car. As a rule, the working interval is indicated there. If, during diagnostics, the signal differs from what it should be, then most likely the problem is a malfunction of the DPKV. Change the regulator before it causes you to become unable to start the car.
Checking on an oscilloscope
As in the previous case, you will not need any tools. If you don't know how to check the crankshaft sensor, then this method is more accurate.
Prepare only an oscilloscope, and for more accurate readings you will also need an alligator clip:
- The clamp is connected to the ground of the motor, and one connector of the oscilloscope should be installed parallel to the signal output of the regulator, namely to terminal A. The second connector is connected to output number 5 of USB Autoscope II. All this must be done so that you can see the signal voltage at the input of the device.
- After this, you should select the operating mode. In our case, to read the voltage readings, you need to activate the “Inductive_Crankshaft” mode, after which you need to start the engine. If the engine cannot be started, you can simply turn the starter.
- If there is a signal from the DPKV, but its output signal does not coincide with the normal one, this may indicate a breakdown of the device. In addition, this may indicate not only a breakdown of the DPKV, but also certain malfunctions of the crank pulley or broken teeth. If the signals on the oscilloscope are incorrect, that is, they “jump” as shown in the photo, then you can safely change the DPKV.
Resistance check
The third tester diagnostic method is a comprehensive one, which allows you to measure insulation and inductance.
Symptoms of a problem
A malfunction of the crankshaft sensor leads to unpleasant consequences for the car:
- at idle speed the car may stall;
- tripping and jerking are noted during movement;
- fuel consumption increases significantly, since the electronics do not provide optimal supply of the fuel-air mixture and spark;
- traction weakens, the car refuses to start, or at idle the speed either rises or falls;
- the operation of the injectors responsible for fuel injection is disrupted, the operation of the ignition system changes;
- an indication appears on the dashboard.
Injecting a fuel-air mixture that does not coincide with the appearance of a spark leads to consequences that are difficult to predict.
In some cases, the symptoms observed by the car owner coincide with how the car behaves when the oxygen sensor fails. When the car does not have an on-board computer capable of indicating a possible malfunction with an appropriate indication, a sensor check is required. The car enthusiast can do it himself or go to the nearest service station.
Replacement
Replacing the sensor is a fairly simple job that even the most distant person from cars can handle. The job involves unscrewing one screw and removing the connector from the sensor.
It is best to carry out work from the inspection hole, but if there is none, then replacement can be done by removing the front right wheel.
Let's start replacing
- Remove the connector from the sensor
- Unscrew the fastening bolt using a 10mm wrench
- We take out the sensor. This may be difficult to do, but since we no longer need the old sensor, we can take it with pliers and turn it in the mount.
- Install the new sensor in reverse order.
How to check DPKV
When it is suspected that the crankshaft position sensor is malfunctioning, it is necessary to dismantle the device and inspect it.
Causes and symptoms of sensor malfunction:
- the device body is cracked due to mechanical stress, the core or contacts are damaged;
- due to scuffing of the journal, the opening in the bearing has increased;
- the surface of the components is damaged, scratches or cracks appear;
- the sensitive element has failed over time;
- the crankshaft liners are melted;
- a manufacturing defect appeared;
- the gap between the crankshaft and the liner has increased;
- the working holes wear out or the key is cut off.
Checking the DPKV is performed with a multimeter. The device is capable of measuring the resistance of the core winding. This is done as follows:
- the multimeter switches to the required position, the switch is set to 2 kOhm;
- the contact group is located on the DPKV terminals;
- if the readings are from 500 to 800 Ohms, then the device is working properly;
- to obtain information about inductance, the multimeter is switched to the appropriate mode;
- If the sensor is in perfect order, then we remove the level of about 400 mH.
Often the terminals become dirty or oxidized. They are pre-cleaned with sandpaper. Multimeter readings do not give a 100% guarantee; a dismantled sensor may be faulty and give correct readings only in this form. While driving and the temperature rises, the readings may change. This happens if a short circuit occurs between the turns of the winding. We find the exact inductance and resistance indicators in the device data sheet.
The crankshaft sensor will also have to be replaced if the insulation is faulty. To check it, you will have to use a megohmmeter:
- the device is set to 500 V;
- one terminal is located on the contact, the second - on the body of the device being tested;
- The resistance of a working device fluctuates between 20–25 MOhm.
Replacing the position sensor can solve the problems that have arisen. These devices cannot be repaired, but quite often the cause of problems is contamination, which is not difficult to eliminate in a timely manner.
The car owner must ensure that the gap between the pulley and the device does not exceed one millimeter. A caliper is used for measurement.
CHECKING THE CRANKSHAFT POSITION SENSOR
There is no need to go to a service station to check the crankshaft position sensor. If you have the simplest equipment - a multimeter, the cost of which is 300-500 rubles, you can do this yourself.
Checking the DPKV with a multimeter involves analyzing two main operating characteristics of the device - voltage and resistance. The check requires dismantling the sensor, how this is done can be found in the next section of the article.
Resistance measurement:
- Set the multimeter to ohmmeter mode;
- We connect the tester contacts to the ends of the winding brought to the surface of the device body;
- If the DPKV is working normally, the device will show a resistance of 500 to 700 Ohms.
Voltage measurement:
- We turn on the tester in the alternating voltage measurement mode;
- We connect the contacts to the same place;
- We pass a metal object along the sensor body;
- If the device is working, it will detect that there is metal nearby, and the multimeter will show an increase in voltage.
If no voltage surges occur, or the resistance of the device is different from the normal level, the unit must be replaced. You can check the crankshaft sensor on a VAZ 2115 using the same algorithm.