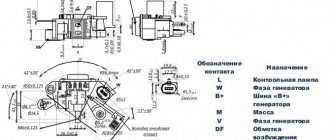
To ensure complete control over the operation of all systems, the engine is equipped with a variety of sensors. Some of them carry an informative and emergency load, others transmit information necessary for the proper operation of the power plant. The latter includes the crankshaft sensor of the LADA Priora car.
There is another gradation of car sensors:
- sensors, the failure of which leads to unstable operation of systems;
- devices on which safety depends;
- sensors, without which engine operation is impossible.
DPKV - what kind of sensor is it, why is it needed on Priora and why the engine does not start
From the brief introduction it is clear that the crankshaft sensor is the most important structural element on a car, without which the engine cannot operate. The main purpose of the device is to transmit a signal to the computer about the position of the crankshaft at an appropriate period of time. Reading information about the position of the crankshaft allows the control unit to decide on sending signals for fuel injection and ignition in the corresponding engine cylinders.
In addition to information about the position of the crankshaft, the sensor also informs the control unit about its rotation speed. The frequency at which the crankshaft rotates is displayed on the car's control panel, for which a tachometer is provided. The electronic method of measuring the crankshaft rotation speed is highly accurate. Based on the readings of this sensor, the following actions occur:
- The fuel injection time is set through the injectors in the corresponding cylinders.
- The ignition timing is determined, which allows fuel assemblies to be burned more efficiently and effectively.
- The efficiency of the internal combustion engine operation is assessed.
- Information about the crankshaft rotation speed is transmitted to the instrument panel, which is necessary for the driver.
By means of DPKV, the moment of passage of the pistons at the top and bottom dead centers is determined. Based on this information, engine operation is adjusted. Without such a device, not a single ECU works, so if it malfunctions, you will need to immediately resort to finding out the causes of the failure and eliminating them.
This is interesting! A car uses a large number of different sensors. In addition, many of them respond to or influence the operation of the motor. However, the failure of any sensor, except for the DPKV, will not entail such consequences as the inability to start the engine. Only the crankshaft position sensor can cause the engine on a Priora to not start.
Replacement
Replacing the DPKV is easy and does not require significant effort in carrying out this work. You just need to prepare the necessary tool and you can get to work.
Required tool:
- 10mm wrench;
- Pliers;
- Penetrating lubricant (WD-40);
Replacement process
To carry out the replacement, you can use the inspection hole or remove the right front wheel for convenience.
- Remove the negative terminal from the battery;
- Remove the connector from the sensor;
Source
Characteristic signs of a faulty DPKV on a Priora: how to understand that the crankshaft sensor has failed
On cars, the crankshaft sensor rarely fails, but on the Priora such an element is one of many diseases. Failure of such a device can occur for various reasons. This can be as contamination of the working surface of the product, which leads to inaccuracy in its functioning. This problem can be easily solved - you need to remove the sensor and remove all contaminants. Typical signs that there are problems with the crankshaft sensor on the Priora are the following:
- A significant decrease in engine power, which is associated with the ECU switching to emergency mode (when the mixture is prepared according to average parameters).
- When the number of revolutions increases, detonation loads arise, which negatively affect the life of the CPG.
- Floating speed at idle.
- Difficulty starting the engine. If the sensor is working properly, but it is dirty or moisture gets into the contacts, then its functioning will be incorrect. In this case, it will be possible to start the engine, but, as a rule, this will happen 3-4 times.
- Dips appear during acceleration.
The manifestation of the above symptoms should force the vehicle owner to resort to identifying the cause of the malfunction and eliminating it. Otherwise, at one point the crankshaft sensor will completely fail, and a characteristic sign of this phenomenon will be the inability to start the engine. You can determine the malfunction of the DPKV on a Priora by displaying errors P0335, P0336 and P0337 on the on-board computer
. Error P0335 indicates a circuit malfunction, P0336 indicates that the device indicators are outside the permissible values, and P0337 indicates a short circuit of the DPKV to ground.
This is interesting! The DPKV cannot be repaired, therefore, if it malfunctions, it must be replaced. However, you should not rush to dispose of the device, since you can first verify that it is faulty by carrying out testing procedures.
Idle speed regulator (sensor) VAZ 2114
At its core, the idle speed sensor is a valve equipped with a shut-off needle, through which the amount of air supplied to the combustion chambers bypasses the throttle valve is dosed. That is, when the damper is completely closed, and the controller comes to the conclusion that it is necessary to increase the idle speed, the idle speed controller (IAC) slightly opens or completely opens the intake port and thereby leans the fuel mixture. As a result, the car does not stall at idle even when driving on a cold engine. A stepper motor integrated into the regulator is responsible for driving the valve needle.
How to check DPKV on Priora yourself
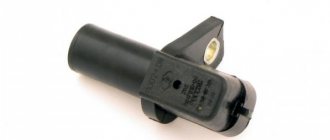
You can check the serviceability of the crankshaft sensor on a Priora with your own hands. First you need to dismantle it. Then carry out a visual inspection. Remove all excess dirt, and especially from the end side of the device (not only dirt, but also metal shavings accumulate there). After this, you can continue the verification procedure:
- Check the integrity of the winding
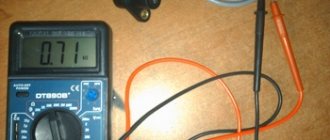
. There is a winding inside the sensor, so first we check its integrity. To do this, switch the multimeter to the “testing” mode and touch the leads with the probes. If there is a characteristic sound from the device, then everything is in order with the winding. - Measure the winding resistance.
To do this, switch the resistance measurement mode on the multimeter (up to 2000 Ohms), and touch the output contacts of the device with the probes. The approximate resistance value is 500-700 Ohms. Anything above or below these limits indicates a device malfunction. - Measuring voltage at the sensor terminals.
If previous measurements have shown that the product is in good condition, then it would not hurt to check the integrity of the steel core. This can be done using a multimeter. It is necessary to check whether voltage is induced in the winding when touching the steel core of a metal part. To do this, we connect the probes to the sensor terminals, and set the multimeter to the DC voltage measurement mode (the minimum value on the device is 200 mV). Next, we bring a metal part to the end side of the sensor and look at the multimeter readings. A change in the device readings indicates that the sensor is working.
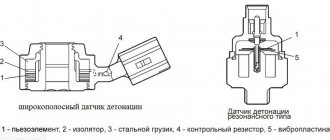
These are the main ways to check the crankshaft position sensor on a Priora. Do not forget that the Priora uses an inductive sensor, not a semiconductor one (it is checked in other ways). Depending on the type of device, the verification method differs.
This is interesting! It is very important to understand that the verification methods described above only allow indirect verification of the serviceability of the product. To make sure the device is working for sure, you need to conduct computer diagnostics or check the DPKV on an oscilloscope. Such testing methods will help ensure not only that the product is working, but also that it is functioning correctly.
If, after checking, you put the sensor in place, but the car does not start or there are interruptions in the operation of the engine, then it is also important to check the condition of the wires and chips that are connected to the element. A multimeter, which can be used to test the wires, will also help in this matter. It is necessary to find the wire leads from the sensor on the ECU unit and check the wiring. It is also important to understand that there is no voltage on the DPKV chip, so do not try to connect the multimeter probes to detect voltage there.
Examination
Checking the DPKV is carried out in two ways: visually and using a diagnostic tool.
Visual inspection
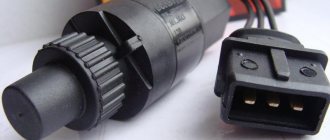
When checking, you must pay special attention to the condition of the sensor; it must be in good condition and free from the following defects:
- There should be no cracks or chips;
- The sensor head must be free of dirt and chips;
- The connector must be clearly fixed and not loose;
- The wire must be without damage to the insulation and screen;
- The wires near the connector should not be exposed;
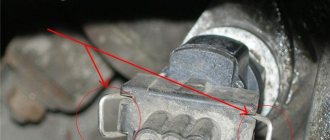
Also, during a visual inspection, it is necessary to check the pulley itself. Its teeth should stand out clearly and not be clogged with dirt.
Particular attention should be paid to its damper, quite often the pulley crown rotates on the damper and the sensor reads incorrect readings from the sensor due to the displacement of the pulley crown
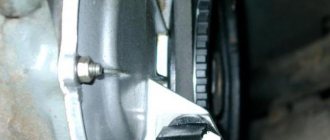
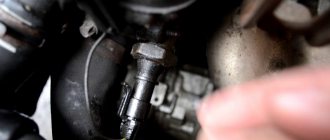
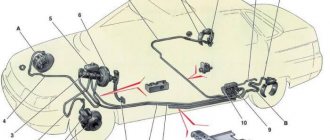
Where is the crankshaft sensor installed on Priora?
It is important for all Priora car owners to know where the DPKV is located. After all, the need to check or replace it may arise at any time, and therefore it is better to figure out where the sensor is located in advance. It is also recommended to purchase a new element and carry it with you in the glove compartment so that an unpleasant situation does not overtake you away from home.
On a Priora, the crankshaft position sensor is located next to the oil filter on the oil pump cover.
You can get to the device both from the engine compartment and from the inspection hole. The photo below shows where the DPKV is located on Priora.
Knowing its location is necessary in order to be able to quickly dismantle it for the purpose of inspection or replacement. When purchasing a new sensor, it is recommended to rewrite the designations on the standard product.
Examination
Checking the sensor is carried out in two stages: visual and with instruments.
A visual check involves inspecting the sensor and its parts for visible damage.
The sensor should not have:
- Cracks and chips;
- Metal shavings on the sensing element;
- There should be no moisture in the DPKV connector;
- The connector must be clearly fixed on the sensor;
You should also check the pulley for its integrity and alignment.
Checked:
- Damper integrity;
- Alignment of the pulley with respect to the sensor;
- Pulley teeth are dirty;
How to remove and replace DPKV on a Priora
The process of dismantling the DPKV on Priora is not complicated, and everything takes no more than five minutes of time. Features of removing the crankshaft position sensor on a Priora:
- Disconnect the plug by first squeezing the tab.
- Unscrew the fastening bolt using a 10mm socket and a ratchet.
- Remove the sensor and install a new element in its place, after making sure that the removed product is faulty.
The process of removing DPKV on Priora is described in detail in the video below.
It is important to know that sensors for cars of the VAZ family are suitable for Priora. They have article number 191.3847 and cost about 200-300 rubles. In conclusion, it is worth noting that knowing the operating principle of the crankshaft sensor, as well as the main signs of its malfunction, it will not be difficult to carry out the necessary manipulations to eliminate them.
Examination
Before you can check it, you first need to get to it. And the device is located in a not very convenient place on the engine. So be prepared to spend some time on this.
Now to the question of how to check it. Let's look at the two most common situations, but first, let's remove the element.
- The sensor is removed with a 10 mm wrench;
- Be sure to make special marks on the crankcase and sensor before removing. This will allow you to return it to its original place, or install a new regulator in the correct position;
- If there is no external, visible damage to the crankshaft sensor, then you need to use a multimeter;
- Don't forget to measure the distance between the sensor and the timing disk. In the normal position, the gap ranges from 0.6 to 1.5 millimeters.
First way to check
In this case, you will need an ohmmeter, which you will use to replace the resistance on the winding. According to the manufacturer's standards, the indicator ranges from 550 to 750 Ohms.
It's okay if your numbers are slightly different from the norm. If the deviations are serious, you will definitely have to replace the sensor.
It should be noted in fairness that the crankshaft position sensor on VAZ 2110 models rarely breaks down. Among the main reasons for its failure to function normally is the accumulation of dirt, mechanical damage, as well as banal factory defects.
Second method
Here you will need a voltmeter, a transformer and an inductance meter. It is advisable to measure resistance under compact temperature conditions.
Once the ohmmeter readings are obtained, arm yourself with an inductance measuring device. Normally, the device should show from 200 to 4000 units (millihenry).
https://youtube.com/watch?v=fpHT2StBVnU