Using the VAZ-2110 crankshaft sensor, mixture is formed in the fuel rail. This device produces a signal that is sent to the electronic control unit of the internal combustion engine. The device is used only on injection engines; on carburetor engines there is no need for them. Fuel is injected into the combustion chambers of carburetor engines under the influence of atmospheric pressure. And the spark is supplied to the electrodes of the spark plugs by a distributor (ignition distributor).
Features of injection systems
The injection system operates thanks to a sensor system and a control unit. All signals are input to the microprocessor unit, which regulates the operation of the actuators. The following sensors are responsible for the correct operation of the engine:
- Crankshaft positions.
- Camshaft positions (not on all versions).
- Intake manifold pressure.
- Lambda probe.
- Speed.
- Mass air flow.
- Throttle position.
And the main role is played by the VAZ-2110 crankshaft sensor (8 valves or 16), since the moment of injection and supply of high voltage to the spark plug electrodes depends on it. The design has a temperature sensor, but it has virtually no effect on operation. It is necessary to control the engine temperature and send a signal to the dial indicator (or to the on-board computer). But it will be indispensable if it is necessary to implement automatic switching of fuel types (from gasoline to gas and back).
Performing a check
You can determine the serviceability of (DPKV) in several ways. Each method requires the use of special devices. Most often, three main methods are used to check the performance of the crankshaft speed controller, let's look at them in order:
- Listening to the advice of professionals, before checking it is always necessary to remove it by unscrewing the fastener of the VAZ 2112 crankshaft sensor, do not forget to fix its initial position on the engine with marks
- Everyone understands that it is necessary to inspect it after removal
- Visual inspection makes it possible to detect external damage on it
- And understand the condition of its contact block and the core of the contacts themselves
- Dirt should be removed from it using alcohol or gasoline.
- The contacts at the crankshaft controller must be clean
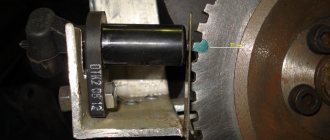
- During the removal process, it is necessary to clearly mark the distance from the controller core to the synchronization disk
- Typically it varies from 0.6 millimeters to 1.5 millimeters
- If there are no visible problems, you need to move on to identifying hidden problems in the electrical circuit of this device
Diagnostics using an ohmmeter
To measure the resistance of the crankshaft controller winding, you can use an ohmmeter (multimeter):
- A normally operating controller will show values ranging from 550 Ohms to 750 Ohms
- This test with a multimeter consists of measuring the resistance of the controller inductor
- If the coil is damaged, the sensor characteristics are displayed on the resistance first
- We set the required range and check the resistance with tester probes at the terminals
- This check is the simplest and most basic, so it does not give 100% confidence in the correctness of the diagnosis.
- In order not to doubt the actions being performed, carefully study the instructions included with your car before starting work.
- If the obtained measurement indicators do not fit into the declared interval, then it is necessary to replace the crankshaft speed controller
The second method of checking the performance of the DPKV is more labor-intensive and to implement it, you will need the following devices:
- Megger
- Inductance meter
- Network transformer
- Digital voltmeter
For the reliability of the obtained indicators, the air temperature is important, preferably 20-22 degrees, we do the following:
- We measure the winding resistance with an ohmmeter, as before
- Then we move on to checking the winding inductance using a special meter
- The inductance of a working meter is in the range of 200-400 MegaHertz
- Next, we’ll use a megger and move on to checking the insulation resistance
- At a voltage of 500 Volts, this parameter should not exceed 20 MegaOhm
- If accidental magnetization of the synchronization disk occurs during sensor repair, then you should definitely demagnetize it using a network transformer
- Having analyzed all the data obtained as a result of these measurements, we can draw a conclusion about the performance of the crankshaft controller or the need to replace it
- When installing a new or old device in its place, do not forget to pay very close attention to the marks left during dismantling, remember the need for a distance of 0.5-1.5 millimeters from the controller core to the synchronization disk
DPKV check diagram
- The third method of checking the crankshaft speed controller is the most accurate of all and is used, as a rule, at professional stations
- Since it requires an oscilloscope and a special program
- This method does not require removing the device from the engine.
- Since it allows you to see the signal formation on the screen
- Therefore, the presence of a digital oscilloscope helps specialists to effectively identify various problems that have arisen in the injection system
Diagnostics with an oscilloscope
The third method is not available to everyone, since oscilloscopes are not available everywhere and not everyone can be satisfied with the price:
- To get correct readings, you need to take the black clamp of the oscilloscope, the so-called “crocodile”, and connect it to the ground of the motor of the machine being tested
- The probe probe is installed parallel to the signal output of the sensor (controller connector - terminal A)
- And the second connector of the probe from the oscilloscope must be connected to the analog input No. 5USB of AutoscopeII
- These actions must be performed in order to see on the screen voltage oscillograms at the input of the crankshaft position controller
- Then you need to enable the oscillogram display mode called “InductiveCrankshaft”
- Only now can you start the car
- When it is impossible to start the engine, then it is necessary to rotate the engine with the starter
- If the signal from the crankshaft position controller is received, but the signal output parameters do not match the nominal ones. Then the car may twitch, and it may be difficult to start its engine, failures
- Violations of the characteristics of the outgoing signal from the crankshaft controller indicate existing malfunctions of either the controller itself or the drive disk and possible breakage of the teeth
- The true assumption about the nature of the malfunction becomes clear when considering the waveform on the oscillogram of the voltage pulses, which are recorded at the output of the crankshaft position controller
And so you have become familiar with all three possible methods for checking the crankshaft controller (sensor):
- Using an Ohmmeter (measuring winding resistance);
- Using a tester (checking insulation resistance and inductance);
- Using an oscilloscope
It is up to you to decide which methods to check according to your capabilities. The main thing is to be objective in obtaining results, careful and very attentive when checking
The VAZ inductive-type crankshaft sensor is checked with a multimeter for breaks inside the coil and the specified resistance, the value of which is in the range of 600-900 Ohms. It is also mandatory to check the DPKV wiring.
The test can be carried out by measuring inductance; for this you need to have three instruments: a voltmeter, a transformer and an inductance meter. The method is not complicated, but cumbersome and it is more efficient to buy a new sensor to check the performance of the engine.
The DPKV can also be checked by cranking the starter while observing the tachometer readings. Using a diode test, you can check for the presence of pulses at the injector connector.
Algorithm of operation of the injection system
The microprocessor has several inputs and outputs. The inputs receive signals from all sensors. But first, these signals are converted and, if necessary, amplified. The microcontroller is programmed to work with sensors and actuators. Programs (firmware) can provide various engine characteristics.
You can achieve an increase in power (gasoline consumption will increase) or a decrease in consumption (power will suffer). But most motorists prefer programs that provide work with average parameters. In this case, the signal from the VAZ-2110 crankshaft position sensor does not change; only the reaction of the actuators to changes in input data is adjusted.
Signs of a malfunction of the VAZ 2114 knock sensor. List and comments from the service station
- The engine begins to throttle. This is to say that the DD does not send signals to the control system, and it does not adjust the ignition timing;
- The dynamics noticeably deteriorate, the car begins to stall when accelerating;
- Acceleration becomes slow, the engine roars, and the car picks up speed slowly;
- The "Check Engine" comes on when you take off, when you roll downhill, and when you accelerate. Moreover, if the “Check” lights up only when the ignition is turned on, and goes out after 6 seconds, this is normal: the “brains” test all the components of the car.
- Code 0325 indicates that there is a break in the power wire. The most common version of what happened is oxidation of the contacts; the wiring itself breaks extremely rarely. Cleaning the terminals will eliminate the problem in most cases. However, if after processing the error does not disappear, you need to check the timing belt: it means it has jumped several teeth. After marking it, the problem disappears;
- 0328 in most cases signals a malfunction of high-voltage wires, but in some cases it can again indicate a belt jump;
- 0326 and 0327 indicate a low signal coming from the knock sensor. There are 2 options here: either the DD tightening has become loose, or the contacts have again oxidized.
- Turn off the ignition and climb under the hood;
- If there is a 2-pin knock sensor, the nut is twisted with a 13 wrench; if it is a 1-pin, use a 22 wrench;
- The multimeter (or voltmeter) is set to operate with a maximum of 200 MV;
- The electrodes of the device are connected to the DD terminals. It is officially believed that the voltmeter reading (they say there is voltage) is sufficient. However, experienced drivers do not think so: the sensor must respond to shocks caused by detonation. Therefore, additional research is carried out: the sensor is lightly tapped with the handle of a screwdriver; During impacts, the meter readings should change. If they remain constant, the DD requires replacement.
AutoFlit.ru
A little about the crankshaft
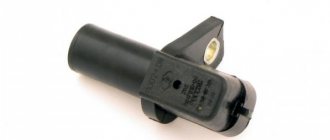
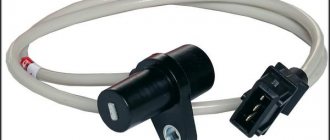
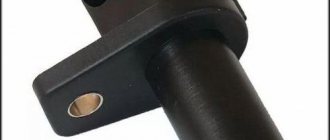
The crankshaft is the most important element of any internal combustion engine. It is driven by the starter (at the moment of starting) and the pistons (in operating mode). From it, torque is transmitted to the gearbox, gas distribution system, and auxiliary mechanisms. And in order for fuel injection to be carried out in a timely manner, a spark to form at the right moment, a VAZ-2110 crankshaft sensor is needed.
It monitors the position of the pulley and transmits a signal to the electronic control unit. The pulley has teeth, the distance between them is the same. But in one place there is a gap - two teeth are missing. The position sensor reacts to the approach of metal. When an empty area passes near the sensor, a signal is generated - the control unit is notified that one revolution of the crankshaft has occurred.
Marking and interchangeability of parts
AvtoVAZ has been installing 2111 injection engines since 1994 on a wide range of its models with the letter i in the marking:
- 2108 and 21083;
- family 2109 (including 21093 and 21099);
- 2114 and 2115;
- 2110–2112.
On all such cars, the design of the crankshaft sensor is similar to the VAZ-2109, so it is difficult to make a mistake when purchasing it.
The part has the factory catalog number 2112–3847010–04. When marking, it is usually not this number that is applied to the outer surface, but the article number of the product. It may vary depending on the manufacturer, but the most common parts are those produced by Kostroma and marked 30.3847 (191–3837).
What happens if the sensor breaks?
If the VAZ-2110 crankshaft sensor fails, symptoms characteristic of its failure will appear. If the device breaks down completely, the engine will stop immediately, since the following processes will not be performed:
- Complete absence of signals to the ignition module. Sparking does not occur when the crankshaft is cranked by the starter.
- The flow of gasoline into the ramp completely disappears or slows down.
- The control unit fails - it stops producing signals necessary for the normal functioning of the engine.
Sometimes the active surface of the sensor simply becomes clogged. In this case, it is enough to clean the dirt. But if the cause of the breakdown lies in the device itself, then you only need to change it completely.
Trouble-shooting
The check may show the inability of the electric sensor to detect the condition of the crankshaft. In this case, if the failure of the DPKV is confirmed, it will need to be replaced with a new one. But if the breakdown happened on the road and the nearest car shop or service station is far away, you can try to find and fix the problem yourself. Sometimes the problem lies not in the coil of the induction device, but in the contacts.
Cleaning from dirt
For example, a common problem is contamination of the working part with grease from the flywheel. The latter flies onto the sensor and covers it with a thick layer of dirt. Dust and sand, as well as metal shavings, stick to the top. All this creates interference with the operation of the element. In this case, you will need to unscrew one or two holding bolts, remove the DPKV out and thoroughly wipe its body protruding after the stop. Then return the device back and try to start the engine again.
Dirty PCV sensor
Broken contact
Another common problem is a broken wire. It often happens before the contact chip. At this point the wires bend, which leads to gradual refraction. Visually, a violation of the integrity of the conductor may not be noticeable, since the outer insulation remains intact.
Repairs will require stripping the insulation and tying off the exposed ends. Then the area is insulated (you can use cambric or electrical tape). But this measure is temporary and will require subsequent soldering.
Contact contamination
Although the connector is protected by a rubber seal, it gradually loses elasticity and tightness. Because of this, moisture and dust penetrate inside. The corrosion process begins. The contacts oxidize and the circuit is interrupted. As a result, a serviceable DPKV ceases to detect the condition of the crankshaft and the engine stalls.
Dirt on DPKV contacts
To solve the problem, try cleaning the contact pins. They are located in the recesses and can be reached with a thin file or sandpaper rolled into a tube. Blow out any dust that has accumulated inside, restore the connection and try to start the engine.
Related Issues
If the DPKV “rings” and there is no violation in the integrity of the contacts, the breakdown may be associated with missing teeth on the flywheel. The electric sensor simply “confuses” the ECU, responding to additional “tags” formed. Only a mechanic at a service station can determine this. To repair, you will need to replace the flywheel crown.
The MAF (determines the mass air flow) also affects the operation of the DPKV and causes deviations in the readings. The problem is diagnosed in the service.
A figure-eight bend of the flywheel can mislead the crankshaft electric sensor, and this will require removing the box and replacing the deformed part.
Main symptoms of breakdowns
But if the device has not completely failed, but is only showing signs of breakdown, you will see it immediately. A light will light up on the instrument panel to indicate engine errors.
This will be accompanied by the following signs:
- Unstable idle.
- Reduced traction characteristics of the vehicle.
- Spontaneous change in engine speed.
- Difficulty starting the engine.
- The presence of pops in the intake manifold.
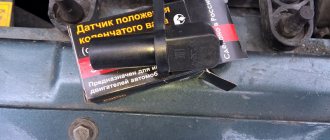
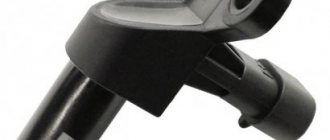
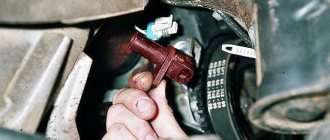
If such symptoms are present, you need to replace the VAZ-2110 crankshaft position sensor. It is located near the oil pump cover, next to the generator drive pulley.
Procedure for replacing the crankshaft sensor on a 16-valve engine
If your car has at least one of the listed symptoms, you should remove this sensor as follows:
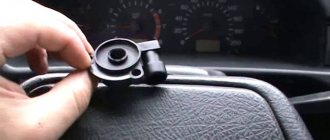
- First of all, turn off the ignition and look for the sensor.
The sensor is marked with a red marker.
Disconnect the block carefully so as not to break off the fasteners.
If there is corrosion, replace the unscrewed bolt with a new one.
The sensor has been removed and you can begin inspecting it.
Buy a new sensor only after the old one has been tested for functionality.
Sensor diagnostic methods
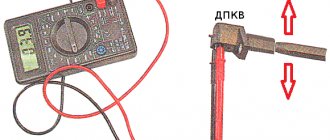
Regardless of how you check the device, you will have to remove it completely. To do this, you need to make marks on the crankcase so that later the new sensor can be installed correctly. The device is unscrewed using the key to “10”. When installing, be sure to maintain a gap between the active part of the sensor and the sync disk - it should be from 0.6 to 1.5 mm.
First, perform a visual inspection of the device - if it has mechanical damage, scratches, or dents, it is recommended to replace it. But if there are no external signs of damage, you will have to carry out diagnostics with an ohmmeter or voltmeter. Of course, if a diagnostic scanner is available, it will show you a crankshaft position sensor error. But only an error can appear when the wiring is broken.
Reasons for failure of the DPKV
In order to ensure the longest possible operation of the new part after replacing the sensor, you need to know about the reasons that most often cause failure of the DPKV.
This category of vehicle states and operating modes includes:
- Mechanical damage.
- Dirt, sand or metal shavings get inside.
- DPKV breakage due to crankshaft teeth.
- Short circuits in the car's electrical wiring.
In addition to the reasons listed, the sensor may not work due to manufacturing defects or errors during repair and installation operations.
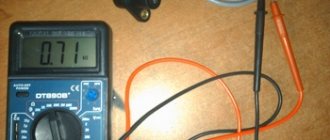
How to check a sensor with an ohmmeter
In this way you measure the winding of the device. To do this, switch the multimeter to resistance measurement mode and carry out diagnostics. Sensor manufacturers set a certain range of resistance values - 550-750 Ohms.
Therefore, if you go beyond this range, you can talk about a breakdown of the sensor. But it should be noted that sensor manufacturers allow a slight deviation from the lower and upper limits. But for a small value - no more than 10%.
Replacing DPKV VAZ 2112 with your own hands
Having accurately determined the breakdown of this part, you can begin to replace the sensor yourself. To perform this operation you will need the following tools and materials:
- Set of wrenches and socket heads.
- New DPKV.
- Slotted screwdriver.
- Rags.
It is recommended to carry out work on replacing the DPKV in the following sequence:
- Place the car on a flat surface.
- Secure the machine with wheel chocks and apply the parking brake.
- Disconnect the negative terminal of the battery.
- Using a screwdriver, pry up the block with wires and disconnect it from the DPKV.
- Using a 10mm socket wrench, unscrew the bolt holding the sensor.
- Remove the DPKV.
After troubleshooting the seat, a new part is installed in the reverse order of removal. After completion of installation work, the functionality of the DPKV should be checked.
For this purpose, you need to start the engine, warm it up and drive the car for several kilometers under different loads on the internal combustion engine. If no abnormalities are found, then replacing the crankshaft sensor can be considered successful.