02 March 2017 Lada.Online 55 792 4
DPKV (crankshaft position sensor), also known as TDC sensor (top dead center sensor) is the only sensor of the engine management system, if which breaks down, the engine will definitely not start. This sensor has no mechanical moving parts, so it rarely fails. Most often, corrosion-damaged wiring is to blame for its failure.
How it all works
A modern car is equipped with a significant number of various sensors, the main task of which is to monitor the operation of mechanisms or systems.
Data from these sensors is transmitted to an electronic control unit, which, based on the information received, configures the operation of certain systems.
One of the most important of these control elements is the crankshaft position sensor (CPS, TDC sensor).
This sensor monitors the rotation speed of the engine crankshaft.
Based on its readings, the control unit adjusts the operation of the fuel system and ignition system.
To put it simply, based on the DPKV readings, the control unit determines how much fuel to supply to the cylinders and when to do it, as well as at what moment to apply a spark.
Therefore, perhaps, this is the only sensor whose malfunction may prevent the power plant from starting, because a failure in its operation will lead to disruption of the fuel system.
Even if the power plant starts, its operation will be unstable, intermittent, etc. Therefore, this crankshaft sensor is very important and you need to monitor its performance.
VAZ 2115 sensors, their purposes and malfunctions. List and tips
- the calculation of the duration of permissible fuel injection is based on them;
- TPS data is the basis for setting the ignition timing;
- They are used to determine the operating mode of the motor, acceleration and many other related parameters.
- On VAZs, the TPD is made in the form of a polymer film, onto which graphite tracks are sprayed, and a slider runs along them. The tracks have a clearly calculated resistance, and the stability of the sensor depends on the coherence of the system. However, the designers did something wrong - either in the material or in the technology. As a result, TPS is the sensor that most often fails. Most often, the path gets worn out, and when the slider hits a “bald” area, trouble begins;
- When the gas pedal is held steadily, the car jerks;
- The operating power drops noticeably;
- There are dips and sharp jerks during acceleration;
- There is virtually no engine braking.
- the engine is frankly dull;
- fuel consumption increases;
- problems of various kinds with startup;
- sudden stops at higher power levels.
AutoFlit.ru
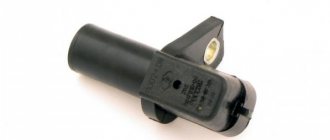
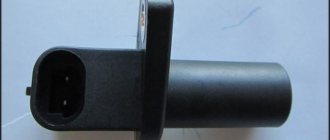
DPKV location - design features
Typically this sensor is located near the alternator belt drive pulley. On this pulley there is usually a gear ring made around the circumference, the so-called synchronization disk. It is to the rotation of this disk that the sensor responds.
It is worth noting that in order to accurately obtain data on the rotation of the crankshaft, the DCPV is located at a certain distance from the disk.
For a correctly installed device, the distance between its core and the top of any tooth should be 0.6-1.5 mm.
The location of the DKPV is not the most convenient, but it is quite possible to get to it.
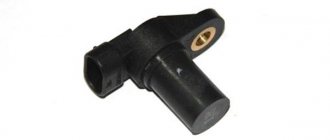
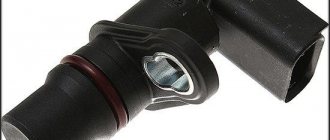
Cars use several different DPKVs in design and operating principles:
- induction (one of the most common);
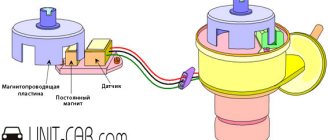
- sensor using the Hall effect;
- Optic.
We won’t talk about the design and operation features of each of them for now; let’s move straight to the malfunctions.
Symptoms of a problem
A malfunction of this device will immediately appear. Symptoms of a faulty DCPV are:
- Inability to start the power plant;
- Decrease in car dynamics while driving;
- Floating speed in different driving modes;
- Interruptions in operation, instability of idle speed;
- Under load, detonation may occur.
It is worth noting that since this sensor is very important for the functioning of the power plant, if it malfunctions, the electronic unit will signal this by lighting up the “ Check Engine”
».
Of course, the reason for the appearance of this inscription or icon on the dashboard may also be a malfunction in some other system, however, in combination with the indicated symptoms, we can immediately assume that the DCPV is to blame for all the troubles with the car.
Verification methods
Before going to a car store for a new sensor, it is still recommended to first check the one installed on the car.
This will make it much faster to determine why the car is not working well, because it is possible that the sensor is not to blame for everything, especially since some testing methods are not so complicated.
The most common are:
- checking the resistance of the sensor coil;
- comprehensive check (coil and insulation resistance, winding inductance);
- checking with an oscilloscope.
The first two checks are quite simple; you can perform them yourself if you have the necessary equipment.
The third method is the most accurate, but it can only be checked at specialized stations.
Bottom line
No matter what kind of car you own, if it has an injection engine installed, then problems with the engine’s operation due to DPKV are quite possible.
Experienced car enthusiasts always keep a spare sensor in their car so as not to be taken by surprise.
After all, it is much easier to install a new element and drive on, and then check the removed one for functionality, than at the most unexpected moment to encounter the fact that the car refuses to work normally due to such a small but very important element as the engine crankshaft position sensor.
Check for VAZ 2110
Ohmmeter (multimeter).
To make it more clear, let’s look at each method of checking the crankshaft sensor using the example of several cars.
The first will be the VAZ-2110, which uses an induction type of device.
So, the engine on the “Ten” malfunctioned and there is every assumption that this happened due to the crankshaft sensor. There is a multimeter at hand that can work in ohmmeter mode.
This is quite enough to check the winding resistance.
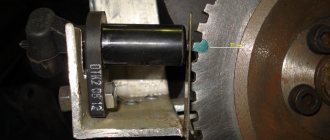
The first thing to do is to inspect the device while it is installed on the car, or rather, check for a gap between it and the synchronization disk.
It is quite possible that there is no gap there due to the fact that dirt has adhered to the sensor or disk, which led to malfunction.
If everything is in order with the gap, we will remove the device from the car.
On the VAZ 2110 it is located on the oil pump cover.
Before doing this, it is better to mark the position of the DPKV.
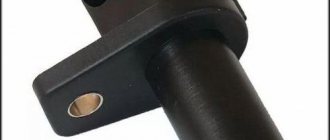
The next stage is assessing the external state. The sensor body must be intact, without signs of damage, the core must be clean, the contact terminals must be free of traces of oxidation, and the wires must not be damaged.
If external contamination is visible on the DPKV, you can wash it before checking (to do this, use only pure gasoline or alcohol), and also clean the contacts with a file.
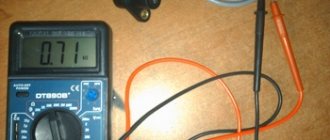
After cleaning, rinsing and drying, you can start taking measurements. To do this, switch the multimeter to ohmmeter mode and connect the probes to the sensor contacts.
When measuring, a working DPKV should show a resistance in the range of 550-570 Ohms.
For other cars, this indicator may be different, so it is better to inquire about the rated voltage of the sensor in the technical documentation of the car before taking measurements.
If the resistance value is lower or higher than the specified range, the sensor is faulty and must be replaced.
This is the easiest way to check DPKV, but it is also the most inaccurate. It can only give a partial idea of the state of the device, although this is sometimes quite sufficient.
An oscilloscope.
The most accurate method for checking is using an oscilloscope. Therefore, let’s look at how to check the sensor on a VAZ-2110 using this device.
During such a check, there is no need to remove the DCP, and all measurements are taken directly on the car.
Before carrying out the test, you need to correctly connect the oscilloscope to the machine. Typically this device has one clamp and two probes.
The clamp must be connected to the engine ground, that is, to any metal component of the motor.
One probe is installed parallel to the sensor signal output terminal. The second probe is connected to pin 5 on the scanner connector.
After connection, you should switch the device to the “Inductive Crankshaft” mode.
After this, start the engine. If it does not start, then you will need to rotate the crankshaft with the starter so that the oscilloscope takes readings.
After this, the performance of the sensor can be assessed from the resulting oscillogram. Any disturbances in its operation will affect the oscillogram image, and this will be clearly visible.
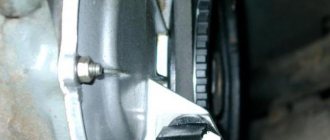
Replacing the crankshaft sensor
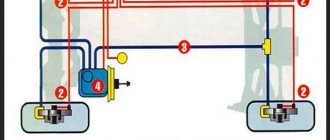
Where is the crankshaft sensor located? On all LADA cars, the DPKV is attached to the engine crankcase (to its lower part) using one bolt. On the diagram it is number 2.
To change the crankshaft sensor, disconnect the block with wires from it and unscrew the mounting bolt (10mm wrench). On Renault-Nissan engines (for example, H4M), you will first have to remove (move aside) the protective casing.
Installation of the DPKV is carried out in the reverse order. Using a set of feeler gauges, we check the gap between the end of the sensor and the teeth of the crankshaft pulley. The gap should be 1±0.41 mm; it is specified by the design of the sensor and is not adjustable.
Comprehensive check for Opel Vectra B
Now let's take another car and use it to consider the last of the verification methods - comprehensive.
This test is much better than with a conventional multimeter, but in terms of accuracy it is not as accurate as an oscilloscope.
The problem car will now be the Opel Vectra B. We leave the symptoms the same.
The initial work is also no different from the VAZ-2110: the sensor is removed, inspected, thoroughly washed, and only after that you can start checking the condition.
But for a comprehensive check you will need more equipment:
- Multimeter;
- Megaohmmeter;
- Device for measuring inductance.
It is better to take all measurements in a heated room so that the readings are correct.
First, the coil resistance is measured, as described above. Resistance readings must be within the range specified in the technical documentation.
The next check is to measure the winding inductance, for which a device is used to measure it. A working DPKV inductance should be in the range of 200-400 mH.
The devices are pictured below.
The insulation resistance is also checked with a megohmmeter. When a voltage of 500 V is applied, the resistance value of the sensor should be no more than 20 MΩ.
Based on these measurements, it is determined whether the DPKV is working or requires replacement.
Photos of the devices are below.
Features of testing on other cars
As for other cars, for example, VAZ-2109 with an injection engine, VAZ-2112 and VAZ-2114, their check is carried out identically to the VAZ-2110 car.
It is noteworthy that for VAZs, when checking the resistance of the crankshaft sensor coil, an additional check can be carried out.
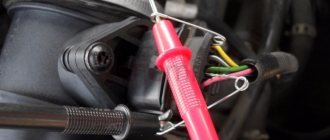
But to do this, the multimeter must be switched to voltmeter mode with a measurement limit of 200 mV.
Then connect the probes to the DPKV terminals and pass them with any metal object, for example, a screwdriver, at a short distance from the core.
If the sensor is working properly, it will react to metal, the multimeter will show voltage surges on the display. The absence of these bursts will indicate a faulty element.
As for a car like the Reno Logan, the difference from the VAZ in this car comes down to slightly different readings of the resistance of the sensor coil when measured with an ohmmeter.
A working Logan DPKV has a normal resistance of 200-270 Ohms.
For Daewoo Lanos, the coil resistance should be in the range of 500-600 Ohms.
But on the ZMZ-406 engine, installed on Volga and Gazelle cars, the normal coil resistance is in the range of 850-900 Ohms.
Idle speed control
Where is the oil pressure sensor on a Kamaz
? As in engines with a carburetor, an injection engine keeps idle speed with the throttle valve fully closed. This is possible only under one condition - if the design of the throttle provides for a bypass channel, and it must have a variable throughput. To do this, a conical valve was installed in the bypass air channel of the throttle body, regulating the air supply when the throttle valve is closed, and called it IAC, idle air regulator. It consists of a conical valve, a stem and a stepper motor. Depending on which winding the impulse is applied to, the motor rotates in one direction or the other, thereby changing the throughput of the bypass air channel. The idle either rises or falls as a result of the movement of the cone valve. The idle speed sensor on the VAZ 2115 has catalog number 1148300 02.
How to check
The most common failure of the IAC is a break in the windings of the stepper motor. To check the windings, you need a multimeter turned on in resistance measurement mode. The resistance value between contacts A-B and C-D is within 45-80 Ohms. Otherwise, the regulator requires replacement. There should be infinite resistance between pins AD and B-C. This means that the windings do not short circuit each other. If there is resistance at these contacts, the sensor is replaced. Rated supply voltage is from 7.4 to 14.1 V.